Access point from a Windows 10 laptop. Controlling WiFi distribution from a laptop. Programs for building an Internet access point
Development mobile internet It has reached such a level that many users stop connecting their home network using USB modems. However, their disadvantage is obvious - the inability to connect to standard router for Internet distribution. Few people know, but almost any computer or laptop that has a Wi-Fi adapter can act as a kind of router. In this article, we will look at how to distribute Wi-Fi from a laptop on Windows 10, but this method is also suitable for a desktop computer.
How to determine whether a laptop or computer can distribute Wi-Fi
 It was noted above that the method of distributing the Internet through a laptop is most often used in situations where a USB modem is connected to the computer. At the same time, it also works when distributing regular wired internet. In some cases (depending on the settings of the router and the Wi-Fi adapter in the laptop), a Windows 10 computer can act as a router, expanding the coverage area Wi-Fi networks, that is, having distributed wireless Internet to which it is connected.
To determine whether a laptop or computer running Windows 10 can distribute the Internet via Wi-Fi, you need to conduct a test. To do this, run and write the command in it:
Netsh wlan show drivers
After this, information about the Wi-Fi adapter that works on your computer or laptop will appear in the command line. In this information, you need to find the line “Support for a hosted network” and look at the displayed result. If it says “Yes”, it means with of this computer you can distribute Wi-Fi, but if it says “No”, then this option is not provided. 
Attention: In some cases, when the command line indicates that it is impossible to distribute the Internet from a laptop via Wi-Fi, it is possible to correct the situation. To do this, you need to update the drivers for the Wi-Fi adapter on your computer by installing them from the manufacturer’s official website.
Make a laptop or computer as a point Wi-Fi access for other devices the easiest way is through the command line. There is a lot third party programs, but their installation is unjustified, given that the process of enabling and disabling Wi-Fi distribution via the command line can be reduced to a couple of mouse clicks, which will be discussed below.
To turn on Wi-Fi distribution Through a device on Windows 10 you need to do the following:
- Launch the command line as administrator, and enter the command in it:
Note:
Ssid– setting the name generated Wi-Fi networks. In the example, the name of our site is “Okeygeek”, but when creating it you can specify any other network name.
Key– setting a password for the created Wi-Fi network. In the example, the password is the numbers “1234567890”. Please note that the password must be at least 8 characters. 
When the command is written, press Enter.
- Next, you need to enter another command into the command line:
This command will activate the Wi-Fi network, and after it it will appear in the list of devices available for connection by other devices.

As you can see, distributing Wi-Fi from a laptop on Windows 10 is not so difficult if you remember the commands that are responsible for it, but even this is not necessary. If you want to simplify the process of distributing the Internet via the command line, you need to do the following:
- Launch Notepad on your computer and enter two lines:

As you can see, the process of turning on the Internet is reduced to a minimum, and there is no point in installing third party applications, the functionality of which is arranged in a similar way.
How to disable Wi-Fi distribution from a laptop on Windows 10
If you need to disable Wi-Fi distribution from your computer, you can do this in the command line running as an administrator using the command:
Netsh wlan stop hostednetwork
This process can also be automated, similar to turning on Wi-Fi distribution by creating a corresponding file with the .bat extension.
Problems activating a laptop on Windows 10 as an access point
 Setting up Wi-Fi distribution on a laptop or computer under Windows control 10, the user may encounter a number of problems. Here are some options for solving them.
All tech-savvy users around the world probably know everything there is to know about hot spots WiFi access And Ethernet connection, and this article is for those who need help figuring out how to create and access a dedicated WiFi hotspot, as well as how to turn it off when you're done with your work. First of all, Ethernet refers to a series system, or rather a group computer systems, connected to a local area network, and sometimes to a metropolitan area network, along with protocols for monitoring the transmission and exchange of information, in an attempt to avoid crosstalk between the transmission of two or more systems. Both the Internet and World Wide Web, and local networks, basically allow you to easily transfer files over a distance.
An Ethernet connection is very useful for creating and using a dedicated WiFi hotspot. There are two main types WiFi connections- permanent and temporary. While most wireless networks are permanent, that is, they operate in infrastructure mode, some connections are better created as ad hoc, that is, temporary, because peer-to-peer networks do not need a central access point, and this can be very convenient when you are not at home or when a centralized access point is not available.
How to create a dedicated WiFi hotspot in Windows 10
The key requirement to run a dedicated WiFi hotspot is that the user's device must be running Windows 10. Also, of course, an Ethernet connection is not required. In addition, some drivers may be required, without which the special object will not be provided to the user. This can be checked through the exchange network center and you will see if the adhoc network is written along with “setting up broadband, dial-up...” under the heading “setting up a new connection or network”. If adhoc is not there, then that's it necessary drivers Should be installed.
The created special wireless Internet point will work on PCs, tablets, laptops, as well as phones on Windows based. Here's a breakdown of the process of creating a dedicated WiFi hotspot in Windows 10:
Step-by-step process for creating a dedicated WiFi hotspot
First, the user needs to search for the execute string to enter cmd command, to do this, find run on the taskbar and in the search field, enter cmd and click right click mouse and run it as administrator.
This is the command that the user must enter to create a dedicated Wi-Fi network to connect to the Internet:
netsh wlan set hostednetwork mode=allow ssid=adhocname key=password
Please note that you must replace adhocname with a name of your choice, this will be the name that other devices will work with and connect to the Wi-Fi connection to access the Internet. This password must be replaced with the password that will be used to connect to the special network Wi-Fi connection.

Replace adhocname with a name of the user's choice, and a password, whatever password the user wants to set. (Of course, the quotation marks used here are to indicate the extent of the team, and they will not be part of the team).
The next and last command will be: “netsh wlan start hostednetwork”.
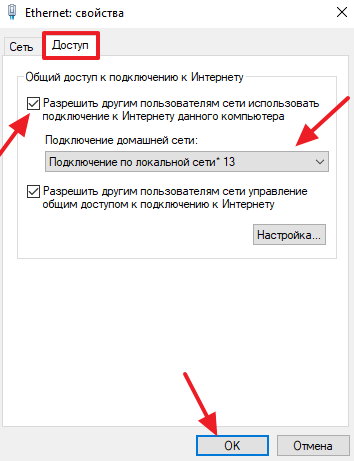
Now we move on to networks and sharing, and then the user must right-click on the Ethernet connection and select Properties.

Here, the user can open a tab general access, within which two checkboxes will be displayed: “Allow other network users to use this computer’s Internet connection” and “Allow other network users to manage or disable Internet connection sharing.”

Also, under the heading connection via home network, there will be a drop-down list. Here you need to check the checkboxes (even more important than the first one), the user can select the created connection from the drop-down menu and press the OK button, which will allow them to work under control special communication WiFi.
Now you can go and connect from your phone or any other Wi-Fi enabled device for your newly created ad hoc connection.
How to disable ad hoc Wi-Fi network in Windows 10
Disabling the connection is even easier. The user can simply open a command prompt (as administrator) and enter this command:
netsh wlan stop hostednetwork
The same methods for enabling and disabling special WiFi networks, can be used for Windows versions 8 and 8.1, so users of Windows 8 and 8.1 devices can relax and follow the above steps. But the drivers required for normal operation WiFi networks can different versions OS is different.
Cautions for Users - Setting up a special wireless point access, if the user shares it or his Internet connection after creating the network, any other user who logs into this device will use fast switching users, so network access is set by default, so it would be wise to disconnect from the network after using it to satisfy clients.
How to fix the error “The hosted network could not be started”
If you are trying to connect using the netsh command for wireless network WLAN hostednetwork to launch it, sometimes an error message may appear, which will be displayed in Windows as shown below.
The group or resource is not in in the right condition to perform the requested operation.
To fix this error, simply click Windows button and R keys together and enter the command devmgmt.msc into it and press the Enter key.

Once Device Manager is open, simply click on View and check the options that will show hidden devices.

Now click on network adapters from the list and then search for Microsoft virtual adapter hosted network.
Right-click and select Enable.

Now relax because you have already solved the problem. Just open cmd by typing it in the run field and enter the same command code netsh wlan start hostednetwork. The network will start working without any problems.

How to check whether your computer supports AD-hoc connection mode or not
First of all, open a command prompt and enter the line below.
netsh wlan show drivers
Now, in the results you get, look for the line that says hosted network supported. If it says Yes, then your computer supports AD-hoc connection mode.

Wi-Fi networks are currently supported a huge amount various devices, from wristwatch to TVs. Typically for such devices they use Wi-Fi router. But, if there is no such router, then you can get by a regular laptop or a computer with Wi-Fi adapter. In this article you will learn how to create a Wi-Fi access point on a computer or laptop running Windows 7 or Windows 10.
Creating a Wi-Fi hotspot on Windows 7
First let's look at more the hard way create a Wi-Fi access point. This method is based on the command line, so it works fine on both Windows 7 and Windows 10. Although in Windows case 10 it is better to use the second method, which is described at the end of the article.
So, in order to create a Wi-Fi access point on a Windows 7 computer, you need to open a command prompt with administrator rights. To do this, open the “Start” menu, enter the phrase “Command Prompt” into the search, right-click on the found program and select “Run as administrator.” This is the simplest option though.
Once the command line is launched, you can begin creating a Wi-Fi access point. To do this you need to do next command:
Netsh wlan set hostednetwork mode=allow ssid="wifi_name" key="wifi_password" keyUsage=persistent
Please note that this command contains the parameters “wifi_name” and “wifi_password”. This is the title created point Wi-Fi access and password to connect to it. In order to create a secure access point, it is better to change these parameters.
After execution the specified command A message should appear at the command prompt to enable hosted network mode and to change the SSID and passphrase.

Now you need to run a command that will launch only the previously created Wi-Fi access point:
Netsh wlan start hostednetwork
After running this command, you should receive the message “The hosted network is running.” If you receive the message “The hosted network could not start,” then you have problems with your Wi-Fi adapter. It may be disabled or not working due to driver issues. Solve the problem with the Wi-Fi adapter and run the command “netsh wlan start hostednetwork” again.

At this stage, the Wi-Fi access point has already been created and is working. You can even connect to it, but there will be no Internet access. In order to enable Internet distribution, you need to open the “ Network connections" To do this, you can press Windows-R and run the command “ncpa.cpl”.

In the “Network Connections” window, you need to find the connection through which you connect to your Internet provider. Right-click on this connection and go to “Properties”.

Next, you need to go to the “Access” tab and enable the “Allow other network users to use this computer’s Internet connection” function there. Also here you need to open the drop-down list and select the Wi-Fi connection that was created earlier by executing the commands. In the screenshot below this connection is called “Connection via local network 13", but in your case the name will be different.
This completes the creation of a Wi-Fi access point on Windows 7. Close the window using the “Ok” button and check how Wi-Fi works. To connect to the created access point, use the password you specified earlier.
It should be noted that the command “netsh wlan start hostednetwork” must be executed after each Windows startup 7. To stop the access point, use the “netsh wlan stop hostednetwork” command.
Creating a Wi-Fi hotspot on Windows 10
If you have Windows 10, then you are in luck; in this operating system, the process of creating a Wi-Fi access point is greatly simplified. Here you do not need to execute any commands, everything is done in a couple of mouse clicks.
So, in order to create a Wi-Fi hotspot on a Windows 10 computer, you need to open the Settings window. To do this, you can open the Start menu and click on the gear icon. You can also right-click on the “Start” button and select “Options” from the menu that appears.

In the “Settings” window, go immediately to the “Network and Internet” section.

And then open the subsection “ Mobile hotspot" Here at the very top of the window there will be available function"Mobile hot spot" Turn on this function and a Wi-Fi hotspot will be created automatically.

Just below you can select the connection that will be shared through the Wi-Fi access point, as well as view or change the access point name and password.
To set up a wireless network between two computers running Windows 10, you don’t even need wireless router. Often such connections are created for periodic file exchange between laptops in order to play network game or share network printer. But most often their goal is to open access to global network other devices with a Wi-Fi module, in the absence of a router. If in “Seven” any schoolchild can create such a connection on a laptop, then in Windows 10 this function has been slightly changed, which can cause problems in forming a “computer-to-computer” connection.
Creating an access point using Windows tools
The creation and subsequent configuration of a wireless network is carried out in the command Windows line 10.
- We launch it with administrator privileges, for example, using the context menu of the Start icon or the combination “Win + X”.
- Enter the command:
![]()

We look at the value next to the line “Support for a hosted network”. If it is “Yes”, proceed to the next step, otherwise we go to the manufacturer/support site of your Wi-Fi module, download the latest drivers from there, install them and restart Windows 10.
- Enter the command:
You can specify any name and password for data encryption, but the length of the key must be at least 8 characters, and it cannot contain Cyrillic characters.
The command will create a password-protected network (or rather, an access point), which will notify you with a message containing the content that the network has been created, its name has been changed along with passphrase. All that remains is to launch the formed network.
- Run the following command in the command interpreter window:

Our access point is broadcasting and you can connect to it. Now you need to configure the network so that it allows you to connect to the Internet.
- To do this, go to “Network Connections” located in the “Control Panel”.
- Then go to the “Properties” of the new wireless network and on the “Access” tab, check the “Allow other users...” option.

Attention! After reboot Windows computer 10, the network setting is not saved, so you will have to create it again, using or bat nickname: enter the above commands in Text Document and save it with the *.bat extension. Any user can do this in a standard notepad.
To stop the network, use the command:
Creating an access point using third-party software
Create a connection between Windows 10 laptops using wireless channel One of the specialized utilities will help with communication. Let's look at Wi-Fi example Creator. It can turn a computer equipped Wi-Fi module, into the wireless router. To do this, you just need to download, install and properly configure the application in Windows 10.
- Download the online installer and install the application.

- Let's launch the utility.
- Set the following parameters, as shown in the screenshot:
- WiFi Name – network name (any);
- Password – password without Cyrillic characters, length from 8 characters;
- Network Card – select the value “None”;
- Max Guests – the maximum number of connected people. If you do not intend to connect from more than one device, set the value to “1”.

- Click “Start” to start the network.
If successful, the following message will be displayed notifying you that an Internet connection has been created.

Wi-Fi Creator can also stop a functioning network after pressing the “Stop” button.
Alas, by analogy with the previous method, no information about the connection is saved after rebooting the laptop: to configure the network again, all parameters will have to be entered again.
(Visited 8,084 times, 1 visits today)
You may ask, why create a Wi-Fi access point on a laptop manually when you already have one? ready-made solutions in the form of modems and routers, as well as ready-made programs, distributing the Internet via Wi-Fi.
And then, to create a full-fledged Wi-Fi access point, nothing but an operating system Windows systems 10 is not needed! And so, in order to successfully create and manage a Wi-Fi access point, you must perform the following steps:
Check Windows 10 states
1. Check the condition wireless WiFi adapter -
2. Check the Internet status -
3. Check the status of the services - “WLAN AutoConfig Service”, “Routing” and “Internet Connection Sharing (ICS)”
Create, configure and launch an access point
Open " Command line(administrator)", right key mouse on the Start button.
Enter commands 1 and 2, then connect the tablet or smartphone and repeat command 3, if the connection is successful, the number of clients will be 1. To disconnect, enter command 4.
If you don’t want to type commands manually, then simply use the command line.
1. Command to create an access point
netsh wlan set hostednetwork mode=allow ssid=achs key=180419721804 keyusage=persistent
2. Command to start the access point
netsh wlan start hostednetwork
3. Command to show access point status
netsh wlan show hostednetwork
4. Access point stop command
netsh wlan stop hostednetwork
5. Command to delete access point
netsh wlan set hostednetwork mode=disallow

Setting up an Internet connected device: smartphone, tablet
1. Open “Control Panel” - “Network and Sharing Center” - “Change adapter settings”
2. Select the adapter that connects to the Internet, then right-click on it.
3. Select “Properties” - “Access” tab
4. Check the box “Allow other network users to use...”
5. Select the created access point. (In the picture I renamed it to achs).
6. Check the box “Allow other network users to manage...”
7. Click the “OK” button.
 After connecting the shared access, all devices connected to the WI-FI access point will be able to access the Internet.
Creating shortcuts for managing a Wi-Fi access point
WIFI folder, unzip and copy it to Program Files. Select files wifi-run.cmd And wifi-stop.cmd and click copy, then go to desktop and paste them as shortcuts.
You can change icons and run the command as an administrator.
Solving problems and errors
The first thing you should do if you have connection problems is: Disable your antivirus and firewall. Second, try connecting another device to the access point and check whether the Internet works on the laptop or desktop PC itself. Third, try updating the driver of your Wi-Fi adapter.
Problem: Error: The hosted network could not be started. The group or resource is not in the required state..."
Solution: Launch “Device Manager” by right-clicking on the “Start” button. Then, " Network adapters" - "Microsoft Hosted Network Virtual Adapter", right-click and select "Enable".
 Problem: The device is connected to a Wi-Fi hotspot, but the Internet is not working.
Solution: On the “Access” tab, where we open public access, you need to click on the “Settings” button, and in the new window, check the box next to “DNS server”.
 Solution: Restart the Connection Sharing Service (ICS), or disable and then re-enable Internet Connection Sharing for the adapter that connects to the Internet.
P.S As an alternative to creating an access point in manual mode, I suggest small program My Public WiFi.


