Set up a new wifi router. The procedure for turning on the Wi-Fi adapter. Possible problems when setting up a Wi-Fi router yourself
Modern people are faced with the need to connect to Wi-Fi everywhere: wireless networks are much more practical and convenient than their cable “brothers”.
It’s just that similar WiFi privileges are mainly used by all kinds of mobile gadgets: phones, tablets, smartphones and most modern laptops. Accordingly, the question arises: why is a “classical” personal computer worse? After all, working on a desktop computer is much more convenient, but connecting to cable Internet often causes a lot of trouble.
And in this article we will look at how to connect a desktop computer to wifi, and what needs to be done for the computer to “catch” invisible Wi-Fi.
By the way, the age of the device is not directly related to the creation of a wireless network, and you can connect WiFi even to a relatively old computer.
Can a regular computer be connected to wifi?
Some difficulties with connecting Wi-Fi on a personal computer are not at all related to the “prejudice” of the developers or the unfortunate fate of this device, full of hardships.
The fact is that mobile devices and modern laptops are initially equipped with a built-in Wi-Fi adapter for connecting to a wireless network (which is not available on a desktop computer). However, such devices are mostly designed for short-term access to the network, and have a rather meager set of functionality.
While a desktop computer is designed for long-term work with both serious offline software and any resources of the global information network. Accordingly, the connection to all peripheral devices and external networks (Internet, power supply, etc.) is carried out here in a more reliable cable way.
A cable Internet connection for a desktop computer is more stable than a wireless Wi-Fi connection. Thus, with a WiFi connection, the reliability and speed of the network directly depend on the number of active connections, channel congestion, room architecture and many other third-party factors.
Therefore, it’s still not worth deciding to connect your home computer to wifi solely for aesthetic reasons. “Standard” cable connection is more reliable, more efficient ( Not), and causes much less damage to the health of the Internet user.
However, if a hard connection to the Internet source is unavailable for some reason, then you can connect Wi-Fi on your home computer in a matter of minutes.
How to connect your home computer to wifi?
To connect wifi to a desktop PC, first of all, you need to purchase a special removable Wi-Fi adapter - a miniature antenna that will “catch” the Internet signal transmitted by the router and return the data processed by the user to the router.
The most popular and inexpensive solution here would be to choose a removable USB adapter for your computer.

In order not to get a “pig in a poke”, it is better to buy a device from well-known and time-tested manufacturers: TP-Link, D-Link, etc.
If you purchased the adapter from an official distributor, the device comes with a disk with a special program for installing drivers.
How to install Wi-Fi on a computer running Windows 7?
1. Connect your adapter to any USB port on your computer.
2. Insert the disk into the drive, run the auto-configuration utility and, when prompted by the program, click the “Next” button.
3. After installing the driver, in the “Network Center” folder for Windows 7 (or “Network Connections” for Windows XP), you will see a new shortcut (in addition to the usual “Local Area Connection”). The name of the label will contain the brand name of the manufacturer of your adapter.

4. Now you can connect your desktop computer to wifi. To do this, right-click on the shortcut once -> “Connection” -> Select the name of your Wi-Fi network and enter the password.
How to set up Wi-Fi if there is no installation disk?
In addition to the “classic” purchase of a brand new licensed adapter, there are cases when the user needed Wi-Fi on the computer “here and now”, and he borrowed/purchased an old used WiFi adapter from friends.
Naturally, the disk with the driver for such an adapter has long been lost.
In such a situation, you need to download the archive with the driver from the Internet.
“But there is no Internet!” - you say - “What to do?”
Here To connect your desktop computer to wifi you should:
1.
Connect the computer you are setting up to the router using a cable (if possible).
Go to the official website of the manufacturer of this adapter (or the specialized resource ddriver.ru), find the driver you need by the name of the USB-Wi-Fi adapter and download the software to your computer.
If a cable connection to the router is not possible, download the driver you need onto any computer connected to the Internet, and using removable media (flash drive) copy the archive to your wired computer.
2. Next, right-click once on the “My Computer” shortcut, then “Manage” and select “Device Manager” here. In the “Network Adapters” section, find the name of our USB adapter, right-click on it and select the “Update Driver” menu item. Next, specify the folder into which the archive with the necessary drivers was copied and click “OK”.
3. Once the installation is complete, you will be able to connect your desktop computer to wifi. To do this, in “Network Connections”:
Select a new shortcut;
Right-click on it;
Select the menu item “Connection”;
Select the name of your Wi-Fi network (which you specified in the SSID when setting up the router);
Enter your password and you can use the Internet.
Hello! I’ll probably start with the fact that I’ve already written a lot of articles on setting up Wi-Fi routers, and about the problems that may arise during the setup and operation of wireless access points. All articles are on this site, mainly in the “Internet” section. In this article I will provide links to the most necessary materials that may be useful to you when setting up a Wi-Fi router.
What is this article about? I want to talk in general terms about installing and configuring a Wi-Fi router yourself. Perhaps you want to buy a router and create a wireless network at home. Now is the time that we can’t live without it. One computer connected to the Internet via cable is a thing of the past. These are constant fights in the family for the opportunity to surf the Internet and a long line in the back :).
Moreover, now almost all devices have the ability to connect to the Internet via Wi-Fi. Phones, smartphones, tablets, laptops, netbooks, etc. And if there is no Wi-Fi at home, then you are simply limiting their capabilities.
Before I forget, I would like to separately write a few words about the harmfulness of Wi-Fi, or rather the waves that a Wi-Fi router emits. I wrote about this in a separate article. If you are interested in this question, then read the article. I will only say that there is no point in hiding from these “harmful waves”.Start searching for networks in your home. And you will see how many routers your neighbors have already installed (provided that you do not live in a village, there most likely will not be Wi-Fi networks). Moreover, the radiation from Wi-Fi is several times less than from a regular mobile phone, which we also hold near our heads. So they are afraid of a Wi-Fi router, this is not entirely normal and stupid.
Another plus of a wireless access point (aka Wi-Fi router) the fact that you can completely get rid of wires in your home. For some reason I am sure that your computer is not installed near the front door :). This means that the network cable needs to be pulled through the entire house. What if you just made a good renovation? A Wi-Fi router solves all problems. You can put it or hang it near the entrance doors, and some manage to place it in the common corridor (well, when there is a corridor for two apartments).
You probably ask: “But what about an ordinary desktop computer that does not have the ability to connect via Wi-Fi and needs to connect via a network cable?” everything is very simple, there are Wi-Fi receivers for such cases. I wrote about how to connect a desktop computer to Wi-Fi in an article.
Is it possible to connect and configure a Wi-Fi router yourself?
Maybe! And put aside any doubts and excuses, like I don’t know how, it’s difficult, etc. Well, for example, I set everything up myself, and I also wrote instructions for the site. If you are planning to call a specialist who will install and configure Wi-Fi, then my advice to you is to try it yourself first. It won't work out- Call the master. It will work out- Great! Will you be able to, for example, change the provider and what, call the technician again? And then you can set everything up yourself. Moreover, everything is relatively simple. You just need to want it!

Here is my detailed information to help you. Everything is there in detail and point by point, there shouldn’t be any problems. Using these instructions, you can configure other routers, because the process is practically no different. A lot of useful information is also in the comments, you can read them too.
Now I just remembered that I didn’t write about choosing a Wi-Fi router, because you are probably very interested in this question. I won’t recommend anything specific. Choose a router based on the amount of money you are willing to spend on it and the advice of the store salesperson (well, if the sales consultant is smart). All routers are good in their own way and all have their drawbacks. A year ago I bought a cheap one for my home (250 UAH/1000 rubles) router TP-Link TL-WR841N, the store recommended it to me. Excellent device, after a year of operation, no problems at all.
Possible problems when setting up a Wi-Fi router yourself
Judging by the comments to the articles on this site, there are problems. But this shouldn't scare you. Someone got a defective router, someone simply didn’t want to understand the nuances of the setup and immediately wrote: “Serega help, for some reason it’s not working!” :).
Setting up a router - main points:
- Connect the router to the computer via a network cable
- Connecting the Internet to the router
- Go to the router settings
- Setting up a tab WAN. Settings from the provider, if you don’t know what settings to specify, then you can safely call and ask the provider.
- Setting up a wireless Wi-Fi network. Set password, encryption type, security type, etc.
These are the main points; read the article for more details on setting up. As for various kinds of problems and errors, they most often arise when specifying settings from the provider and when setting up a wireless network.
But if there is a problem, then there is a solution. I tried to collect all the main problems when setting up a router and connecting to Wi-Fi. Of course, not just problems, but their solutions.
For convenience, I'll probably make a list of links to pages where I wrote about solving certain errors:
- Well, the most common problem when setting up a router is probably... Not only is this article the most popular on this site, so at the moment (04/09/2013) it is left for 739 comments.
- And others... :)
I tried to collect all the articles with the main errors. If you don’t find something, use the site search, maybe I missed something. Well, or ask in the comments, we’ll try to figure it out.
Good day!
Many users are intimidated by setting up a Wi-Fi router on their own, and when purchasing it, they also order a service to connect and configure it.
In my opinion, the price for this service in many stores is too high (sometimes up to half the cost of the router) - especially since many can cope with this operation on their own (you just need to figure it out a little).
I also want to immediately add that if in the future you need to change your password, settings for Internet access (or anything else), you will still have to go into the settings of the router and figure it out yourself...
That is why I wrote this small instruction article, with pictures and explanations of each step. I hope the step-by-step presentation of the material will help you figure out how and what to do.
And so, let's go in order ☺...
Addition! You can also read my other article on how to connect and configure the Tenda FH456 (N301, F3) router from scratch -
Step-by-step instructions: connecting and setting up a Wi-Fi router
Selecting a location and placing the router
Many users make one mistake - namely, they place the router next to the computer (for example, on the system unit). No, for testing and initial setup this is acceptable, but for continuous operation of the device this is not good in all cases.
The fact is that depending on where your Wi-Fi router is placed, the level of network reception in different parts of your home will greatly depend. Significantly reduce the Wi-Fi signal: load-bearing thick walls, mirrors, metal doors, etc.
Therefore, you need to position the router so that it is approximately equidistant from all devices that will connect to its network (and also so that there are minimal obstacles to the network signal). An example of unsuccessful and successful placement of a router in a 2-room apartment is shown in the layout below.

On the issue of choosing and placing a router in an apartment
An article about how you can strengthen your Wi-Fi signal -
In general, I think the message is clear: depending on the location of the router, the quality of the network signal, speed, errors, etc. will depend.
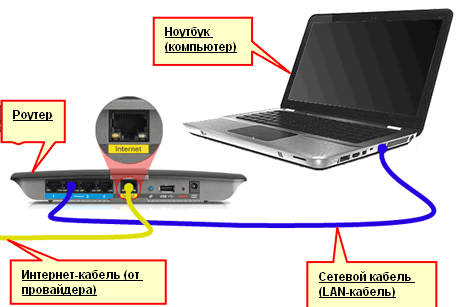
Connecting the router to the computer
A typical router delivery consists of (example in the picture below):
- the router itself;
- power supply;
- network cable (usually 1-2 m long). Used to connect the router to a PC (laptop) and configure it;
- operating instructions;
- antenna (there may not be an antenna - in some routers it is built into the device body).
Those. there is everything you need to start connecting and setting up the device.

The connection itself comes down to the following:
- Connect the router with a network cable (which comes with the router) to a computer or laptop. By the way, please note that the router, as a rule, has 4 LAN ports for this (most often marked in yellow). On some routers, the marking may be Ethernet instead of LAN;
- disconnect the Internet cable (coming from the provider) from the computer system unit and connect it to the router: to the WAN or Internet port (usually marked in blue);
- connect power to the router and turn on the device;
- If everything is done correctly, various LEDs on the device will begin to blink...

If shown schematically, the Wi-Fi router becomes like an intermediary between your computer and the Internet cable from the provider (see picture below).
Important! Connecting the router to a PC (laptop) using a network cable is necessary for the initial setup of the device. Subsequently, the cable can be disconnected and the router placed in a more convenient place.

Configuring network card settings
Before you go into the Wi-Fi router settings, you need to correctly configure the network card (especially if you previously had different default settings).
First you need to open a tab in the control panel - Control Panel\Network and Internet\Network Connections . The easiest way to do this is to press the Win+R button combination, enter the command ncpa.cpl and click OK.

How to open network connections || ncpa.cpl

Then you need to open select "Internet Protocol Version 4 (TCP/IPv4)" and open its properties.

In the "General" tab, set to obtain an IP address and DNS server automatically. Save settings.

Obtain IP address and DNS server automatically
Such settings are suitable in 99.9% of cases, because... your Wi-Fi router has an active DHCP server looking at the local network - which will give a free IP address to your computer/laptop.
Entering the router settings (device IP address)
To go into the settings of a Wi-Fi router, you need to know its IP address (which you just need to enter into the address bar of your browser and go to it).
Each router has its own IP address for settings. In most cases he 192.168.1.1 , but there are exceptions:
- address for D-Link and NetGear routers: 192.168.0.1 ;
- address for TrendNet routers: 192.168.10.1
Important! Also pay attention to the stickers on the body of your Wi-Fi router - almost always the IP address is indicated on these stickers. By the way, on the same stickers you can find the login password for accessing the web interface.

After you enter correct IP address to enter the router settings and press Enter - you will see a window asking you to enter your login and password (example in the figure below).

As a rule, in most cases both the login and password will be admin. If you can't log in, try leaving the password field blank.
I discussed in more detail how to enter the router settings, what passwords and logins, IP addresses, and what to do if you can’t log in in this article:
Setting up a router (router)
If the password and login were entered correctly, then you should be taken to the web interface (with a bunch of different settings, links, etc.). Each manufacturer and different router models have a different interface.
But there is one thing in common: the menu is usually located on the side or on top. The basic settings in the menu are also identical and are set in a similar way. So, having looked at how one router is configured, you can configure another by analogy...
As an example, I’ll take such a popular brand of routers as TP-LINK (with "green" firmware in Russian).
Cloning the MAC address of an old network card
The fact is that many providers charge extra. protection that checks the MAC address. And if the MAC address does not match (or has been changed), access to the network is blocked.
To clone a MAC address, in TP-LINK routers you need to open the “MAC Address Clone” link (in the “Network” section). If you have an English version of the firmware, then look for a link like "MAC Clone".
Addition! Not long ago, I published separate instructions on cloning a MAC address on my blog. -

MAC address cloning
Setting up Internet access
Setting up Internet access mainly depends on the network design of your Internet service provider. The necessary parameters for accessing the network must be specified in the contract for the provision of Internet connection services. Most often, PPPoE is used in Russia (note: a dynamic IP address is issued upon connection. To access you must enter your login and password).
It is impossible to open the WAN (Internet) tab in the router and first specify the connection type (for example, PPPoE, see “2” in the figure below). It is also necessary to indicate username and password (see “3” in the figure below, data can be taken from the agreement with the Internet provider).

All that remains is to save the settings. In most cases, you do not need to enter anything else. Now the router can access the Internet - and the Internet should now appear on the computer that is connected to it with a network cable.
All that remains is to configure the wireless network...
Setting up a Wi-Fi network
To set up a Wi-Fi network, you first need to open the "Wireless Settings" tab (or in English "Wireless Settings"). In this tab you need to specify the network name - i.e. the name of the network that you will look for to connect on your gadgets: tablets, phones, etc. (in some cases, if there is a bad signal, it makes sense to select a channel.).

Then you need to open the “Wireless Network Protection” tab (or in English "Wireless Security") and select the type of protection. Today, one of the best types of encryption is WPA2-PSK, which is the first in the list (we select it).
The PSK password is the password that you will need to enter when connecting to a Wi-Fi network.

Actually, after saving the settings, the router will reboot, and then you can connect to the Wi-Fi network and use the Internet.
That's all the setup...
I understand that in this article I did not consider many subtleties that in particular cases can have a great impact on the operation of the network. But, probably, all of them cannot be provided for in one article.
As I work on the site, I will touch on this issue more than once...
The Internet has become an integral part of life, and every computer should have access to the network. At home, a connection via a Wi-Fi router is suitable for this, which provides the ability to use both a wireless connection (for laptops, mobile phones, tablets) and a cable connection (for desktop computers).
Where is the best place to install a Wi-Fi router?
For those who are considering options for how to install a router, you should start by choosing a location to place the device. This is influenced by several factors:
- location of the provider's modem or cables, if used;
- apartment layout;
- location of the desktop computer (if any).
There are different models of wireless devices from Asus, TP Link, D-Link, etc. They may have different data transfer rates and coverage areas. This should be taken into account when you choose a location for the device, so that access is available anywhere in your apartment. In this case, the best solution would be a central point, if the cable, location of the modem and desktop PC allow it. If you have to install the device closer to the computer in order to run a cable to it, then you need to focus on this factor.
How to connect a router to a computer or laptop
It’s easy to figure out how to connect a Wi-Fi router to a computer. The process itself is quick, but problems may arise with setting up the device. Separately below, we will consider the option of connecting a desktop PC via a wireless network and using a network cable. The option of how to connect a router to a laptop is practically no different. Before purchasing a receiver, you should keep in mind that there are models on the market that do not support Wi-Fi distribution and act as an adapter (for connecting several devices).
At the first stage, to gain access to the Internet, you need to correctly connect the wires to the device. There are several major router manufacturers, but the connection diagram always remains the same. Here are step-by-step instructions on how to connect a wifi router to a computer:
- Unpack and install the device, plug it into a power outlet. On the back panel, as a rule, there is a button to turn on the device: press it. If a signal is received, the lights on the router will light up.
- There are several sockets on the rear panel. One of them is always located on the edge and is painted in a different color (blue, yellow) with the signature WAN. Connect the wire from the modem or the Internet cable into it. You should hear the latch click, indicating that the cord is securely secured.
- If you need to connect a cable to the PC, then insert it into any of the empty sockets nearby and stretch it to the connector on the network card. When connected, the light should light up, which means there is a signal.
- When connecting wirelessly, you need to go to the network settings on the PC itself.

Wireless router connection
Most users are interested in the option of how to connect to a router wirelessly. In the case of a laptop, everything is much simpler, because it has a built-in module for receiving a Wi-Fi signal. When it comes to regular PCs, the situation is somewhat more complicated, because you will additionally need to purchase an adapter for a Wi-Fi network. They are easy to find in any hardware store and are often sold together with modems.
There are two options for Wi-Fi adapters for PCs on the market – external and internal. The first ones are connected via a USB cable and stand on the table; they look like a docking station for an Apple player. The latter are mounted on the motherboard via a PCI connector. They work equally well, but the external version can be disconnected and connected to another device, and the built-in one does not take up space on the table. A disk with drivers and software should come with the device.
After connecting to the computer, setup occurs in exactly the same way as on a laptop. In most cases, to enable Wi-Fi on your computer, you just need to find your connection in the list of networks and enter the password. If you are connecting for the first time, you may need to specify the settings that were given to you when concluding a contract with the provider.
Wired connection using twisted pair
Previously, there was only one way to connect a wifi router to a desktop computer - a cord. At first, a cable from a telephone line was used (sometimes still used), then others appeared that provided not only the computer with Internet access, but also the TV with cable channels. This connection method is still used today, as a rule, for stationary PCs. How to connect a computer to a router via cable:
- connect the provider’s wire to the wi-fi router into the socket labeled WAN or Internet;
- The power cord should be inserted into one of the LAN connectors;
- the second end of the cord must be connected to the Ethernet port of the computer, after connection the light should light up (blink).
What to do if the router does not connect to the Internet

Even if you know how to connect a wifi router to a computer and have done all the necessary manipulations, a situation may arise that a connection to the Internet is not established. At the same time, everything works correctly through the cable, and the wireless network does not transmit data, but is visible in the list of connections. If you call the provider’s support service, the first thing the specialist will do is to unplug the Wi-Fi device from the socket, wait 3-10 minutes and turn it on again. In many cases this really helps.
If this method does not help, then there is a high probability that the computer cannot automatically obtain the IP or DNS address of the network. To check the settings, you need to right-click on your connection, select “Network Center”, click on the image of the network connection and go to the “Details” tab. If the DNS or IP item is empty, then this is the problem. You need to call support and find out what values need to be entered in the properties. After receiving them:
- Click on the connections and click on the “Properties” button.
- Find the item that ends with TCP/Ipv4. Click on it and click "Properties".
- Activate the “Use the following IP address” items, enter the data provided to you by your provider.
- Repeat the same for DNS gateways.
- Click "Ok" and close the other tabs.
Video instruction: how to connect a router to a computer


