How to make an installation disk. Burn ISO with Astroburn Lite. DVD burning utilities
Let's figure out how to record Windows image to disk different ways, for subsequent installation of the operating system on the computer. Many computers have special device: floppy drive - a drive for opening optical CDs on a PC/ DVD discs.
First the user writes ISO image system onto a DVD, and then boots the computer from the laser disc containing the system to install Windows. For modern versions Windows (Windows 10, Windows 8.1, Windows 8, Windows 7, Windows Vista) because of big size An ISO image will require a DVD disc, but for a Windows XP image, the capacity of a CD disc is sufficient.
To record a Windows image, DVD or CD discs are usually used in the following formats: DVD-RW, DVD-R, or CD-R, CD-RW. There may be different symbols between abbreviations: “+” (“plus”) or “–” (“minus”). You can use different types of discs to record your system.
Formats DVD-R discs or CD-R cannot be modified after recording, data can only be written to such a disc once. The “DVD-RW” and “CD-RW” formats are rewritable, so you can write new data to such a disc by first deleting old information from disk if it has become irrelevant. It is more practical to use the DVD-RW format, because such a disc can be used many times.
If you need to burn a Windows bootable disk to optical media, adhere to the following recommendations:
- It is advisable to record a system image at the lowest speed supported by the drive to prevent errors during recording;
- during recording it is necessary to provide uninterruptible power supply computer;
- if possible, use the option to check the disc for errors immediately after burning to a DVD disc;
- use discs from famous manufacturers, because in this case, the chances that the boot disk will last a long time, if properly stored, will increase.
First, you will need to obtain a Windows image in “.ISO” format, and then burn the system image to a DVD. Read the article about this from the official Microsoft website. To record to DVD, select the desired system bit depth: 32 bit or 64 bit, which should be installed on your computer. A multi-bit Windows 10 image, including both bit sizes (x86 and x64), is not suitable for recording on a regular optical disk, due to the large size of the image file, exceeding the size of a standard DVD disc(4.7 GB).
File in ISO format contains all the contents of a DVD or CD disc, saved in one image file. When recording an ISO image of Windows, you must make the media (DVD disk) bootable so that you can install the operating system on your PC. Record simple disk will not work with data, because such a disk will not be bootable.
Write down installation disk Windows can be done using built-in system tools, or using third party software. In the article you will find instructions on how to record Windows ISO to disk in different ways: first we will try to burn the disk through Windows, and then we will burn the system image using third-party programs.
How to Burn Windows to a Disk Using Disc Image Burner
Using the Windows Disc Image Burner, you can burn Windows 10, Windows 8.1, Windows 8, Windows 7 to disk. The recorder works the same on these operating systems.
To burn a Windows ISO image to a DVD, follow these steps:
- Right-click the disk image on your computer.
- IN context menu select "Burn disc image".
- The Windows Disc Image Burner window will display the name of the disk image file and information about the disk writer. To start the recording process, click on the “Record” button.
I recommend activating the “Check disc after burning” settings item. In this case, you will be convinced that the disc was recorded without errors. The recorded data will be compared with the original image. If errors were found during the recording process, the DVD disc can be re-recorded. Checking the disk will take some time, but you will know that the system was burned successfully. Otherwise, you will not learn anything about errors; at the crucial moment of installing Windows, the boot disk will fail you, and you will not know the real cause of the problem.

- A warning window informs you that before recording, all data on the disk will be deleted. Click on the "Yes" button.
- Next, the process of burning the Windows image to disk will begin.
- After burning the disc is complete, the disc will be checked for recording errors.
- Finally, click on the “Close” button.
Download Windows in the Media Creation Tool and burn the system image in the disk image burner
Using the Media app Creation Tool You can download the original Windows image from the official Microsoft website.
Burning a Windows ISO Image with BurnAware Free
Free program BurnAware Free used for recording optical discs.
In the main BurnAware Free window, in the “Images” section, click on the “Burn ISO” button (in the menu view “View” - “Icons”).

In the “Burn Image” window, select the path to the disk image to add the Windows image to the program. Check the writing speed and drive selection. Go to the “Options” tab, check the “Scan files after recording” checkbox.
Click on the "Record" button.

The Windows image is burned to disk and is ready for use.
Read detailed review BurnAware programs Free.
Burning a Windows Image in Ashampoo Burning Studio Free
Using free Ashampoo programs Burning Studio Free, you can burn an installation disc with the operating system.
In the main window of Ashampoo Burning Studio FREE, in side menu select “Disk image”, and in the menu that opens “Burn image”.

In the “Burn Disk Image” window, click on the “Advanced Options” button to enable the option to check the disk for errors after burning.
After applying the settings, click on the “Burn DVD” button.

Burn Windows to disk in CDBurnerXP
In the free program CDBurnerXP you can easily burn to a DVD disc boot image Windows.
Run CDBurnerXP program. In the main application window, highlight “Burn ISO Image” and then click on the “OK” button.

In the “Burn ISO Image” window, in the “Burn Options” tab, make the necessary settings:
- Using the “Browse” button, specify the path to the Windows ISO image on your computer;
- select recording speed;
- Check the box next to “Check data after recording.”
Click on the "Burn disc" button.

With default settings, the program will eject the disc from the drive after recording has completed and the media has been verified.
Conclusions of the article
If the user has a question about how to burn Windows 10, Windows 8.1, Windows 8, Windows 7 to disk, you can use the built-in system tool, or third party applications. Image recording tool Media application Creation Tool, UltraISO, ImgBurn, BurmAware Free, Ashampoo Burning Studio Free, CDBurnerXP programs will burn an operating system image to a DVD disc Windows systems, from which you can install the operating system on your computer.
Its main purpose is to install or reinstall the Windows 7 operating system (OS). It can also help to reset a forgotten or lost administrator password. This media can also be used to enter the OS preinstallation environment (Windows PE), which is minimum set operating system functions used when preparing a computer for OS installation, starting its installation, and rolling back to a previously created restore point.
First and foremost important condition- this is the presence of a file so-called installation image Windows 7. This is a file containing all the necessary data to install the OS. It has a file name extension of .iso and is about 4 GB in size. It can be downloaded from various Internet sources, for example, torrent trackers. Typically such sources provide so-called hashes ( checksums) images, which after downloading must be checked to ensure the authenticity of the image and the absence of errors during downloading.
We will need a DVD blank (namely a DVD, not a CD, which is explained by the size of the file - the system image), and one of the programs for transferring (not copying - a bootloader is also written to the DVD) of this image to the DVD. This disc can be either one-time recording (DVD-R) or rewritable (DVD-RW), and its recording speed is of great importance does not, since it is produced at very low speeds. The following article discusses several in various ways perform the required task.
Ways to create a boot disk
Now let's move on directly to describing the methods for creating an installation disk using the following third party utilities, How:
- Ultra ISO
- CDBurnerXP
- ImgBurn
- Windows 7 USB/DVD Download Tool
All of them can be easily downloaded from the Internet and have a simple and intuitive clear interface, which does not require any user input complex actions. In addition, the installation disk can be made using the tools built into the seven.
Burn a bootable disc using UltraISO
After launching this program, its main menu is displayed, in which you need to select the “File” element, and in the submenu that opens, select “Open”.
A window opens to select the boot image of the seven, in which you need to point to the required iso file and click the “Open” button. Then this window closes and you return to the main menu of the utility. After that, click on the “Tools” item in the main menu and in the drop-down list click “Burn CD image...”. 
In response to this, a window with recording parameters appears: 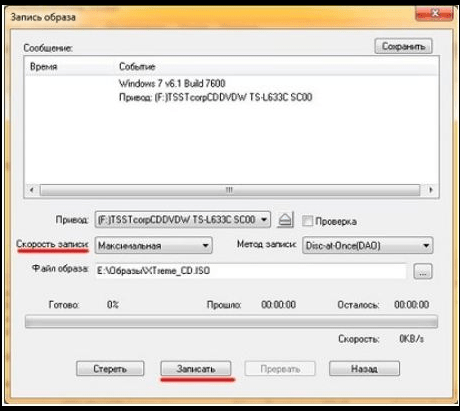
It needs to be set:
- The “Drive” parameter is a DVD device with the future boot disk installed.
- Recording speed is “Minimum”.
- Disc-at-Once recording method.
After this, you need to click the “Record” button. The burning process starts, usually taking several minutes. At the end of the process, the DVD device tray opens, which signals the completion of the process.
Creating a boot disk with ImgBurn
Before you run this utility, you need to install a DVD blank into the DVD device. In the Russified version of the program, its main window looks like this:  In this window, you need to click on the “Burn image to disk” picture, after which a window appears to set the parameters for the image burning process:
Here you need to set the following parameters:
- In the “Source” parameter select (yellow button) required file image.
- In the “Destination” parameter, set the DVD device.
- We check the “Check” checkbox so that upon completion of the recording process, the recorded image is compared with its original file.
- In the “Recording speed” parameter, set the lowest speed.
- Click on the picture with the arrow in the lower left part of the window to start the recording process.
The process of burning the image begins, which also takes several minutes. Having finished recording, the program pulls out the DVD device tray, then pushes it back in and begins the process of checking the recorded image. If the check is successfully completed, the utility plays a melody as a signal that the recording process has completed.
How to burn an installation disc using the CDBurnerXP utility
Despite the presence of “XP” in the name, starting with XP, this utility is functional in all versions of the OS. As for its interface, it is not much different from the ImgBurn interface. This is what the main CDBurnerXP window looks like: 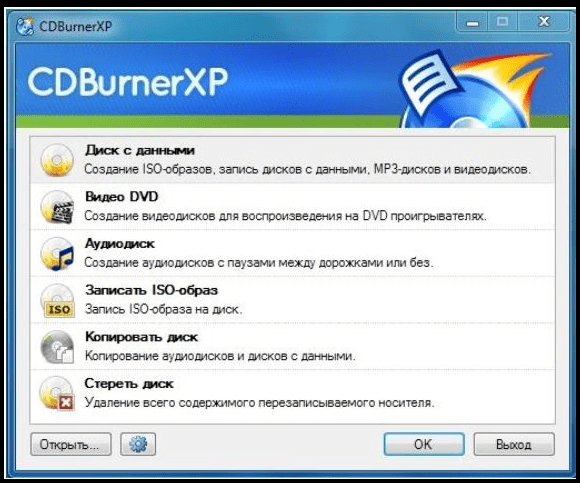
Of course, to do installation media, in this window, click “Burn ISO image”, and then click the “OK” button. In response to this, a window appears for setting recording parameters: 
What to do now:
- Using the Browse button, specify a file with an iso image of the seven.
- In the “Recording device” parameter, specify the DVD drive, and to the right of it – the minimum speed.
- In the “Recording method” parameter, set Disc at Once.
- Check the “Check data after recording” box.
Other parameters are set by the user at his discretion. The image burning process begins by clicking the “Burn disc” button. Upon completion, a check is performed - comparing the recorded image with its source in the file.
USB/DVD Download Tool
This utility was developed by Microsoft. It can be downloaded from the Internet and installed. The recording process in this utility is divided into several steps, each of which has its own window.
Step 1 of 4. In this window you need to specify the file with the iso image. To do this, click the Browse button, select the required file and click “Next”. In some cases the program is not liked specified files, about which the user receives a message. If he is sure that the image file was downloaded correctly and is not corrupted, then the only thing that can be done is to use another utility;
Step 2 of 4: This step selects the type of media that will be used as boot media. It can be a USB drive (for example, a flash drive) or a CD. For creating installation DVD press the DVD button;
Step 3 of 4. At this step, the utility asks you to install a blank DVD disc. You should not try to install a DWD-RW disc that has already been burned - it must be erased in advance. Insert a blank DVD-R or DVD-RW disc and press the “Try again” button. The utility will make sure that the disk is clean and display the “Begin burning” button. We press it, the next step begins;
Step 4 of 4. This is the process of burning the image itself. We are waiting for the message “Bootable DVD created successfully” to appear, indicating the completion of the process of creating the installation disk of the seven.
Recording an image using built-in OS tools
It should be noted right away that this method, although it does not require the installation of third-party programs, is not reliable and sometimes requires repeated repetition due to errors that arise.
To make the installation disk built into the OS, you must complete the following steps:
- Insert DVD-R disc(or DVD-RW - whichever is better) into the drive.
- At using DVD-R W erase all data recorded on it. To do this, in the “Computer” window, right-click on the DVD drive and select “Erase this disk” from the list that appears. A message will appear indicating that all information on the disk will be deleted. Click “Next” and wait for a window to appear indicating that the erasure was completed successfully, then click “Finish.”
- Double-click on the iso image with the left button. If no program is associated with this file, a window opens to select the program to record. In it, select “Windows Disc Image Burner” and click “OK”.
- The Disc Image Burner window appears. In it you need to set the “Disc recording device” parameter, check the “Check the disk after burning” checkbox and click the “Burn” button. The disc burning process will begin.
Sometimes all of the above steps have to be repeated due to errors that occur.
- The need to set a minimum write speed is explained by the fact that DVD discs do not always support the write speed declared by the manufacturer. It follows from this that errors may occur during recording, which can only be detected after the recording is completed - at the verification stage. If using a DVD-R, this will result in the CD having to be thrown away.
- The recording process must not be interrupted under any circumstances - this usually leads to the same thing as described in paragraph 1.
In contact with
If you are not confident in your abilities, then using the materials in this article, you can learn how to correctly burn an ISO image Windows 7 or Windows 10(the process is the same for both versions of Windows) to a DVD using the program Ultra ISO, Nero or free software BurnWare Free.
Introduction
Disk image- this is a file special format, which contains all contents of a CD or DVD disc.
An analogy can be drawn with rar archive or zip.
IN in this case we are considering ISO image. ISO (.iso) is a generally accepted format that most programs created for recording information on CDs and DVDs can work with.
UltraISO can also burn an ISO image of Windows 7 or Windows 10.You must choose the right bit depth Windows distribution, which you are going to burn to disk for later installation of Windows.
How to burn an image to UltraISO
If you do not yet have UltraISO installed, you can download it from the link above. Then you will need to install it. Installation is very simple and takes place in literally 3 mouse clicks. You can leave all settings (checkboxes) as default.
- The program is paid, but you can use trial period. In the "Welcome!" window just select the appropriate item - Trial period...(picture 1).
 Picture 1. Trial version UltraISO is enough to burn an ISO image of windows 7 or windows 10 to disk
 - After starting the program you need to select the menu item “Tools” → “Burn CD image...”(Figure 2). Wrong just drag and drop the image into the list of files, because... you write down the image file, and we need to burn it content to the disk so that it becomes bootable.
 Figure 2. Select the menu "Tools" → "Burn CD Image..." to burn an ISO image
 - In the recording window that opens, use the button «...» as shown in Figure 3 and select the ISO image on your hard drive.
- It is important to choose the correct disc writing speed. If you are using a rewritable disc (DVD-RW), then you can leave the maximum speed. Otherwise, it is better to set the speed to x4 or x8 (for older DVD drives possibly less) to minimize the risk of damaging the disc during recording.
 Figure 3. Use the "..." button to select an image file on your computer.
 - Click on the button "Record"(it is circled in Figure 3).
When recording to a rewritable disc, formatting will be required, which will take an additional few minutes.
Wait until the disc is burned - the corresponding information will appear in the program (see Figure 4) Figure 4. Results of burning a disc using UltraISO.
 - The disk with the Windows 7 or Windows 10 image is ready for installation.
- First of all, install this program to your computer and run it. (Figure 5).
- You will see an item called “ Burn ISO image", click on it. After this, the following window will open:
 Figure 6. Selecting a Windows 7 image to burn
 - Specify your image file. To do this, click “Select”.
 Figure 7. Windows 7 image selection window
 - If you have several CD/DVD drives installed on your computer, you need to indicate in the line "Drive-assignment"- the one in which an empty disk is inserted. Settings in item "Options" It is advisable to leave it unchanged.
- To start recording the image, click "Record" in the right top corner window and wait for the operation to complete.
- If an error appears "Disk not inserted", make sure you have chosen the right burner and remember to insert a blank disc.
 Figure 8. Message indicating that there is no disk in the drive.
 - Once recording is complete, the disc is ready to be Windows installation 7 or Windows 10
- First of all, install this program on your computer and run it (Figure 5):
 Figure 9. Starting to burn a disc with Windows 7 or Windows 10.
 - And first of all, click “Cancel”, then go to main screen programs.

 Figure 12. Setting disc burning settings
The first tab "Info" gives only brief information about the project being recorded. The second tab “Recording” has a number of settings. Let's take a closer look at those that are necessary to record our image:- Recording.
- Disc burning (enabled by default).
- Finalize CD - For this mode This function is not active, the disc is finalized automatically.
- Write speed - select the disk recording speed.
The recording speed is automatically adjusted to the maximum speed supported by the blank CD. The value of this parameter depends on the type of CD being written.
Right choice speed is needed to minimize the risk of errors when burning a disc, so it is better to wait longer, but burn the disc without errors.
We already wrote above that if you are using a rewritable disc (DVD-RW), then you can leave the maximum speed. Otherwise, it is better to set the speed to x4 or x8 (for old DVDs
drives, possibly fewer) to minimize the risk of disc damage during recording. Also look carefully at what maximum speedentries are indicated on the disk itself (for example: x2, x4, x8, x16). It is better to divide this speed by 2 or 4. - Number of copies
- - the number of discs you want to burn at the same time.
- After selecting all the settings, click “Burn” to burn our image.
Burning a Windows 7 image to BurnAware Free
BurnAware Free is a free and quality program for burning data to CD or DVD discs. Let's look at how to burn a Windows image using it.

Burning a Windows 7 Image to Nero Burning
Nero Burning Rum - a very well-known and proven program for burning discs. If this is exactly what you have on your computer, then below you can familiarize yourself with the steps you need to perform to record an image of Windows 7 or Windows 10 for later installation.The Windows installation disk is ready!
Why is it better to use third-party programs to record an image rather than the built-in mechanism of Windows 7
Starting with Windows 7, Winodws has built-in mechanisms for burning CD or DVD discs. But their quality leaves much to be desired: recording with standard Windows mechanisms often leads to damage to a CD or DVD disc, so it is better to use famous programs
, tested by time and millions of users (although even they sometimes fail).
The OS installer media is useful. You never know at what point the system will refuse to work or a friend will urgently need to reinstall Windows, let alone a recovery disk that can bring a dying operating system back to life. Let's look at how to create and burn bootable (installation) media for different cases.
How to create a boot disk for Windows 7
- To create a disk or flash drive to boot the system, you need to have with you what you will need directly during the work process:
- the media itself (disk or flash drive);
- utility for working with disk images;
Nothing else is required from the user. To begin with, let's get acquainted with the first, preliminary part of creating a boot disk - building an ISO image for its subsequent recording to media.
Creating and Burning an ISO Disc Image
Creating a boot disk assumes that the user has an ISO image that will be burned to the media. A disk image is a file that is a complete copy of the entire contents of a disk with software and is widely used in creating bootable disks and flash drives. If the image is not available, you can create it yourself without experiencing any problems: only for this... you will need an existing installation disk with Windows 7 or copied to separate folder system installer files. If you have any of this, you can safely start creating an image for a new boot disk.
ISO is the most popular format image, and it is with this that most utilities for creating and recording images work. You can also create a recording file using standard OS tools, but there is no data on the quality of such recording on systems younger than Windows 7. That's why third party programs recommended to use in any case.
Ashampoo Burning Studio Free
This is a free, lightweight utility for working with disks, characterized by ease of use and a laconic interface, as well as the absence of advertising and built-in malware programs. In it you can not only write files to a disk or flash drive, but also create an image in two ways to choose from: with physical media(CD or DVD that was previously inserted into the drive) and from a folder with files located on the computer.
Working with this utility is very simple: an ISO image is created in just a few clicks.
You can download Ashampoo Burning Studio Free on the official website.
CDBurner XP
This program is also free, very easy to use and is considered one of the best utilities of its kind. It is adapted for older versions of Windows, but it also works great in new ones (unless the antediluvian interface confuses you). Just like the previous one, the program can create disk images from CDs, DVDs and user files, and also write them down.

The utility is available for download on the manufacturer's website.
Ultra ISO
The most famous and widespread program that is usually used to create and burn discs is UltraISO. A wide range of functions makes this program a universal tool for creating and recording images, so it is recommended to use it. We'll come back to this program when we move on to burning a disc, but for now we'll look at creating an image in it.

UltraISO is not a free program, but on the official website you can download its trial version, which you can use for free for some time.
Video: creating an image in UltraISO
Creating an image manually
If you don't want to bother with programs (please note that when registering for installation flash drive you still have to), then Windows has something for you good news: you can create a disk image via the console, regular means Windows. To do this, however, you still have to download utilities: this time official tools from Microsoft that work from the console.
However, there is nothing particularly difficult about this.
- First you need to place the files to be written to disk in a separate folder and save it in a convenient location, for example, C:\Win7ISO. Why convenient? Because the shorter the path to the file, the easier it is to register it in the console.
- Then you need to download from the Microsoft website a set of utilities that will be needed when creating the image. The utilities need to be unpacked and installed.
- After installing the utilities, you need to open the command line as an administrator (press the combination Win keys+ X and in the menu that opens, select “Command Prompt (Administrator)”) and enter the following code in it:
oscdimg -n -m -b»C:\Win7ISO\boot\ etfsboot.com» C:\Win7ISO C:\Win7ISO\Win7.iso
Dmitriy
remontka.pro
The console will begin creating the ISO image, and all you have to do is wait for the build to finish. After this, the newly created image will be available in the path you specified.
Burning an image to a disk or flash drive
When the boot image is created, all that remains is to move on to the most important thing - writing it to disk. This can be done using Windows tools, and through special programs, some of which have already been discussed above. Programs are a simpler and more popular option, but we will look at both methods.
Burning an image to UltraISO
We will show the software recording method using UltraISO as an example, since this program is the most convenient and popular among users. However, you can use any other utility for this: general principle their work is similar.

Video: how to burn an image to UltraISO
Manual recording
This option is suitable for people who use new Windows versions(7, 8, 8.1, 10): they have the best implementation of disc recording. In the case of a flash drive, everything is a little more complicated: the instructions will only work for computers with UEFI. If you don't have UEFI, you will have to use programs.
If the system being installed is Windows 7 x32, then this method will also not work.
Let's start by burning the disc. Everything here is extremely simple: you just need to right-click on the image and select the “Burn disk image” option. Of course, you first need to check that the disk is inserted into the drive and there is enough space on it to record the image.
 To manually burn a disk image, just right-click on it and select the appropriate item
 But with a flash drive everything is a little different. To record it, you will need a command line opened as administrator (how to do this is indicated above).
IN command line The following commands should be entered in order:
- diskpart
- list disk
- select disk N (here N is the disk number under which your flash drive is displayed)
- clean
- create partition primary
- format fs=fat32 quick
- active
- assign
- list volume
Ready! The flash drive is formatted as bootable, then you need to copy files to it. This is how it is done.

Creating a multiboot disk
To create a multiboot disk (that is, a disk on which not one OS is installed, but several, and in addition more programs), you will need slightly different software.
The best choice for today - free program Sardu, which in addition also provides a choice of many images that it downloads itself.
The program interface is quite complex, so some explanations would be helpful.
 In the main menu of the Sardu program, you can select images and write them either to a flash drive or to a disk
 - antiviruses;
- utilities;
- Linux distributions;
- different versions of the Windows system;
- other (allows you to upload your own images, but is only available in paid version Pro).
On the right are the buttons used to record.

Creating a system repair installation disc
To create a system repair disk (this is the one with which Windows 7 can be restored if it fails), you need the disk itself - that's all.

Creating a recovery flash drive is somewhat more complicated.
- In this case, you should create a system image (in the same window where the recovery disk is, there is the “Create a system image” item.
- When the system collects and writes the image, you will need to write it to a flash drive using one of the methods discussed above. A little longer, but more convenient: a flash drive is more reliable than a disk. The only negative: the system image for recovery weighs quite a lot, so it is recommended to use a large flash drive or a removable hard drive.
Reliable media is a very important point in the “treatment” or installation of any system. Make sure to burn properly and don't neglect recovery discs: you never know when you'll need to reinstall or roll back Windows. And specialized software they will help you with this.
Download windows disk 7 boot image - installation torrent on your computer for free and without registration is possible from our website. Here everyone will find a Windows 7 SP1 installation disk in Russian for any purpose and configuration of your computer or laptop. A Windows 7 disk image is usually in ISO format, so you can create a bootable Windows 7 disk for further installation Windows 7, any program that works with images, we recommend the Rufus program or the UltraISO program.
Before you download a windows7 system disk from microsoft, you need to decide on your goals and capabilities. This directly affects the choice when downloading a distribution kit for Windows 7.
If your goal is to play games, access websites and social network, listen to music and watch movies, to work at home in for entertainment purposes and in order to get acquainted with this OS, you don’t really want to delve into how to then activate Windows 7 for free, and how to install it correctly necessary drivers to your Windows 7. In addition, you want there to be nothing superfluous and full functionality, we recommend downloading the original Windows 7 maximum disk image with a built-in desktop activator and driver installer from the link below. For optimal performance systems on your PC, if you have 4 GB or more random access memory, download the 64bit Windows 7 disk, if you have 1GB - 3GB, download the 32bit version of the Windows 7 disk.
Download disk windows 7 x64 maximum ISO image torrent
Download disk windows 7 32bit maximum ISO image torrent
If you still need to install win7, for home and entertainment purposes with free activation, and you want to have full set versions windows rulers 7 on one disk or one flash drive with the ability to install already from installed package Office 2016, programs, updates, with installed games system utilities. We recommend downloading this assembly windows disks 7 sp1 x86 x64 13in1. It already has security updates 07/17/2017, in addition, it has the ability to select two interface languages, Russian and English.
In case you need operating system win 7, for working in an enterprise, keeping records of a legal business, for working with money and increased security or other commercial purposes, we recommend purchasing license key for windows 7 on the official website of Microsoft developers and download only a clean, official, original image of windows7 to avoid fines and sanctions from Microsoft.
For security reasons, we recommend installing drivers only downloaded from the official website of the manufacturers of the motherboard, video card, etc. of your laptop or computer. We also recommend downloading all programs only from the official developer sites. If you have something to risk, information, files, accounts, etc., then there is no such thing as too much vigilance.


