How to use FileZilla - step-by-step instructions. FTP client FileZilla - setting up and using FTP manager FileZilla
The abbreviation FTP is heard not only by webmasters, but, perhaps, by more or less everyone active user Internet. Such popularity of this protocol has led to the emergence of a colossal number of client programs for working with it. This article describes FileZilla - one of the best free programs for working with FTP.
What is FTP?
The abbreviation FTP stands for File Transfer Protocolya, which means “file transfer protocol” in Russian. Thanks to FTP, it is possible to connect to servers and download/upload various files and folders.
The user program for interacting with the protocol is called an FTP client. At first glance, FTP clients seem to be similar, but they still differ both functionally and visually. To join the server you need to set the attributes:
- Address FTP servers, aka “Host”;
- User login;
- Password;
- Connection port. Usually - 21. In rare cases, for non-standard connections, a different port value is specified.
It would seem that FTP is overkill, since browsers can also download/upload files. This statement is incorrect. Thus, the protocol supports real-time connections, easily downloads information and is generally more stable than browsers.
Setting up FileZilla
Let's remember that FileZilla is free. The latest, stable and “clean” version is available on filezilla.ru - the company’s website. You just need to select the distribution for your OS and download. After installing FileZilla, you need to configure it.
Click File -> Site Manager:

The Add Site window will appear. Select the “My Sites” directory and click “New Site”.

As a rule, the connection is usually called the same as Domain name. But this is optional. The main thing is to correctly set the connection and authorization attributes. To do this, click the “General” tab and set the attributes:
- “Host” - enter the domain name or IP of the site;
- “Port” - set the value to 21;
- “Input type” - select “normal”;
- “User” - indicate the login for connection;
- “Password” - enter the authorization password.
The above parameters are specified in the letter that arrives when creating a new host account.

Sometimes the server requests content in what is called “passive” mode. To do this, click “Transfer Settings” and specify the “Passive” transfer method.

When the attributes are specified, click “Connect”. A connection via FTP to the server using FileZilla has begun. At the top there is a log area. All actions that take place are recorded there. On the left are the files of your PC, on the right are the servers. At the bottom there are indications of what is happening in this moment operations.

If the connection is successful, you can start uploading files to the server.
Features of uploading files via FTP
FileZilla has two equally effective ways uploading files to the FPT server. The first is standard drag and drop. The second is through the navigation window on the left. It is enough to highlight necessary files or directories, right-click your mouse and click “Upload to server”.

The download progress bar for all files in the list is displayed at the bottom. What was successfully uploaded to the server can be viewed in the “Successful Transfers” tab. Reverse download process (from server to local disk) works similarly. During booting, the red dot flashes and the green dot indicates an active connection.
The entire download process will be displayed at the bottom of the window. Files that download normally will be displayed in the “Successful Transfers” tab. The process of downloading data directly from FTP servers. When loading indicator - red. If the client is in standby mode - green.
If an attempt is initiated to load files of the same name into the same directory, regardless of whether where is he going uploading to a server or computer, FileZilla will signal this using a dialog box. It will give you the opportunity to rename, overwrite, skip, download or replace the “problem” file.

Working with FileZilla, as well as setting it up, is not particularly difficult. The program is easy to use and very easy to use. In addition, you can customize how it is rendered. In addition, FileZilla has a number of other more subtle options, special magazine actions and many different different instruments. This FTP client is suitable not only for experienced users, but also for beginners who have not yet mastered working with FTP. Use it!
Good afternoon, gentlemen! Today we will deal with the FileZilla program: we will talk about setting up this FTP client and talk about in which cases using FileZilla can significantly reduce your time and nerves. So, let's go!
This protocol is used purely for file transfer. Typically, when transferring files via FTP, you do not risk damaging them in any way. The process will either complete successfully or fail and you will be prompted to try again.
In modern realities, FTP is most often used when working with remote virtual servers(by the same webmasters or freelancers). You can learn more in the article about what an FTP connection is and what connection options exist.
In this article, as I said at the beginning, we will talk about one of the most popular FTP clients - FileZilla.
FileZilla – Free FTP Client
FileZilla is free FTP client for transferring files using the same protocol. The program is distributed free of charge and is available for download from the official website. It occupies one of the leading places among all FTP clients.
And this is not just like that: the application is very convenient and multifunctional. FileZilla is a pleasure to use. Intuitively clear interface, the variety of different tools and functions are not all the advantages of Filezilla.
Program installation
You can download Filezilla absolutely free. To do this, just go to the official website, where the desired button will be immediately available in the main menu.

Documentation for beginners is also available here, which will tell you how to work with this application.
After we click on “Download FileZilla”, we will be immediately taken to the download page, where versions for different operating systems will be available.

Choose the required version(most likely Windows x64), after which we download installation file on computer.
Important! If you use Linux, you don’t have to download the application image from the official website; you can install the program from the repositories.
Immediately after downloading and running the installation package (in exe format for Windows), you will see a standard installer.

Problems with installing FileZilla on Windows there should not be, just click “I Agree”, then “Next” - “Next” - “Continue”. After installation, the application shortcut will appear on the desktop and in the program list.
Setting up an FTP client
After launching Filezilla, you will see a window like this. This standard option settings that you will have immediately after installation. If you wish, you can change the display of specific windows using the icons that appear second row after the main menu (shown by an arrow).

The interface here matches system language(mine is in Russian), but if you wish, you can change it in the settings (Editing - Settings - Language).

Here, just above, you can change the icon theme, date and time format, and much more. IN standard setting FileZilla is quite usable: you can easily connect to the host to transfer files. This does not require any special setup, everything is intuitive and simple.
Application Appearance
Let's take a closer look at the FileZilla interface. Although it is extremely simple, it can be a little difficult for beginners. Filezilla itself (its main window) is divided into 6 components. Each of them is important and is responsible for a specific action. This is what it looks like.

Here you can see:
- Main menu: access to the settings and functionality of the application.
- Block of tool icons: with their help you can control interface elements, as well as reproduce any actions to manage file transfer.
- Authorization fields: here you enter information in order to log into the server (the host server itself, username and password, and port, if necessary).
- File manager on the remote server (when you connect to the host).
- File manager on your PC.
- Status of operations (files in job, transfers in error, etc.)
These are the components you will work with. Here (in the screenshot) I did not mark the command log. It is located immediately under the authorization fields - there you can observe all the actions that will be played when working with the program.

With the help of those same icons you can turn off everything extra elements interface, leaving only file managers for transferring files from the computer to the server and back. Their appearance, by the way, can be changed in the settings: Editing – Settings – Interface – Themes.
Site manager function
To avoid entering connection information each time, you can use the site manager. A fairly convenient function for automating connections to servers via FTP. Here you can not only “fill in” all the data for automatic connection in one click, but also group them into folders, creating individual settings for each site or group of sites.

Convenient, isn't it? Pay attention to “Protocol” in the “General” tab. Here you can choose which protocol to connect to a particular site. Besides standard FTP you can use SFTP and Storj. Each of them has its own advantages.
You can also configure encryption and even choose the background color for each site (so as not to get confused).
How to use an FTP client
Connecting to server/host
Now it’s time to move on to the main topic of this material - how to use FTP FileZilla client, and most importantly, how to create an FTP connection to the server.
First, we need to understand how exactly you can find out the site host for FileZilla. Here Beget hosting will be used as an example. We go to the official website of the hoster and register an account there, immediately after that all the necessary data for access via FTP will be sent to us by email.

If we want to create separate accesses for each site (if there are several on one account), then, as can be seen from the information in the screenshot, we just need to go to the appropriate section.
In this case, when connecting to an FTP server, we will only see the files of the site for which we created separate access. I will have access to all sites on my account, because I log in through default access.
To access we need the following data:
- host (server),
- Username (login),
- password.
I have them all (screenshot above), you will have yours. Enter the data in the appropriate fields in Filezilla and click “ Fast connection”.

If you also disabled unnecessary interface elements (using icons), this is exactly the window you will see after a successful connection. As you may have noticed, in the “Remote site” field there appeared files that are currently on my remote host. I can download, change and edit them at any time using FileZilla.
When connected to a remote server, we can transfer files back and forth. The easiest way to do this is to drag it while holding left button mice.

However, if you so desire, you can use context menu, which can be called up by right-clicking the mouse.

If you enable the activity window, you will be able to see when and which files were transferred.

A list of files that could not be transferred will be available in the next tab.
You can transfer files in batches. It’s enough just to highlight required quantity files and/or folders using the mouse, then drag them into the adjacent window.
To edit a file, for example, PHP code or any other, you do not have to manually download it to your machine. Just click on the required file right-click and then select “View/Edit”.

It will immediately open in your usual program automatically. Immediately after editing and saving the file, you will be prompted to update it on the remote host.

In this case, the document being edited will not be saved on the computer. It has a temporary status and is deleted after a restart.
You can edit most files this way.
Search files
Sometimes there are countless files on a remote host. In this case, the built-in search tool with an advanced type of settings can help us. As you can see in the screenshot, there are truly a lot of possibilities here.

Files can be searched by keys in the name and by content. Through this tool you can also search on your local PC if standard tools yours operating system do not cope with the assigned tasks.
Other
With the help of file managers, you can reproduce any actions with files and folders: renaming, creating directories and much more.
Conclusion
FileZilla great app, which is perfectly suited for the goals set. With it you can download and upload various files from remote servers. The versatility of Filezilla will allow you to forget about the inconvenience. Many things in this FTP client are simply automated, so you should definitely give it a try.
By the way, if you want to make money on sites, then you are welcome to ours.
Almost any webmaster is faced with the need to find the optimal and even probably the most the best tool to work with your website. Working on a website means copying files to and from the server, deleting and editing, setting access rights to certain files and folders, as well as setting access rights for separate files and folders. And in this article I will tell you how to use the best (in my personal opinion) FTP client Filezilla. The whole need to use this program appears when you create a website and place it on a remote server of a hosting provider.
So the first thing you need to do is download the FileZilla installation file. You can download it here: filezilla.ru/get. Download the file to your computer from the link. You can choose to download standard version which needs to be installed and portable version. The installation is carried out like any other installation. In case of portable version, installation will consist of easy creation folders with files without changing or creating registry entries.
After successful installation, launch the client and proceed to FTP setup connections.
Setting up an FTP connection
To connect to a remote server, you need to configure this very connection. To do this, you must know the IP address of the server (for example, it looks like: 192.168.123.343) or its URL (for example: www.fileserver.com). Typically, the hosting provider sends the necessary data in a letter after purchase or after registration. Data for connecting to a remote server also includes: login, password, and sometimes the port through which the connection is made (the port is indicated after the colon in the IP address, for example: 192.168.123.343: 8080 ).
Connecting using FileZilla is done in 2 ways. The first is a direct indication in the field quick connection all data and the second is to create a record with data in the connection manager. In the first case, after closing the program, the connection data is not saved, in the second, everything will be saved (IP, login and password). Please also note that all saved data for connecting to your server will be available to anyone who gains access to your computer under your account. Therefore, if you don’t even have a password to log into Windows, it is better to use the first connection method, and store the access data in a place inaccessible to others. I highly recommend using this to store all your passwords and login information. KeePass program. You can read about how to use it to store FTP access data and at the same time make a connection by pressing one button in the article:.
We launch the program and in the top line (where it is marked with arrows) indicate the connection data: Host, Login, Password, Port (if necessary) and click the “Quick connection” button.
If the connection went through without errors, you will see in the right window a list of folders and files that are located on your server to which you connected via FTP client. Also in the history of actions the status will indicate that “Connection has been established” and “The list of directories has been retrieved.” After your first connection to the server, FileZilla will save the connection history, which can be opened by clicking on the triangle to the right of the “Quick connection” button. All connection information is saved except the password. You will need to enter it every time (unlike the connection manager, where the password is also stored).

Now you can quickly create FTP connection with your server. The second method involves creating records with access data to your sites in the site manager. To do this, click the “Open site manager” button. And create a new entry by clicking on the “New Site” button. To identify it, we immediately come up with a name for it (I called it, for example, My Blog 01) and to set the login and password in the login parameters, we change the login type from “Anonymous” to “Normal” (after the change, fields for entering login and password will appear).

After that, fill in all the necessary fields (Host, User (Login) and Password) and click the “Ok” button if you just want to save the entry, or click “Connect” to save the entry and connect to the server.

By default, saving passwords is enabled in the settings, but if suddenly, when saving a record, a notification pops up that the password saving function is disabled, you will need to go to the “Edit” >> “Settings” menu and in the “Interface” tab uncheck the “Do not save passwords” option "


After you create records with data for connecting via FTP to a remote server, in order to connect to the specified host when you open the program, simply click on the triangle to the right of the “Site Manager” button and select the required site from the drop-down list.

File Operations
For file operations, FileZilla uses the same methods as in Windows itself. You can take the file from your desktop or from open folder with files and drag it to that part open window An FTP client that hosts content on your remote server. Similarly, you can use the drag and drop function in reverse direction. Those. "grab" a file or folder from your window remote server drag it to your desktop or folder. This copies the object that is being dragged.
You can upload to the server and download from the server in another way. Select the file you want to upload/download and right-click on it. In the drop-down menu, select “Download” or “Upload to server” depending on the transfer direction.

To delete a file located on remote computer, you need to select a file and after right-clicking on it (you can also select several files or folders I use when selecting additional keys Ctrl or Shift) select “Delete” from the drop-down menu. To rename a file, right-click on the file or folder and select “Rename”

To create a new folder on the server, right-click anywhere in the window where the files and folders of the remote computer are located and select the “Create Directory” menu. After that, enter a name for the folder. That, in principle, is all the basic operations with files on a remote computer using a file FTP manager FileZilla. By by and large the same as in the operating system.

Filezilla how to use synchronized browsing
In the settings when creating a connection in the "Site Manager" there are very convenient feature, which allows you to move from one folder to another on a remote computer to move to the same folders on your computer. This function will also synchronize your files between a folder on the hosting and a folder on your computer.
You can enable synchronized file viewing when creating an entry for an FTP connection or change an existing one. For this:
- Click on the “Site Manager” button
- In the manager window, select the site, when viewing which you need synchronized viewing or when creating new entry connections.
- Open the “Advanced” tab
- We indicate the pack on your local computer(existing or creating a new one)
- Specify the remote directory on your hosting server (if you don’t know the default directory, you need to ask support and they will provide it to you)
- Check the box next to “Use synchronized browsing” and finally click on “Ok” or “Connect”.
After all these steps, when connecting to the server, FileZilla will synchronize all files and folders and after that you will be able to view and navigate through folders on one server, and FileZilla will automatically navigate through folders on another.

Setting up access rights to files and folders
Almost all hosting providers in the vast majority of cases use on their servers Unix-like operating systems in which these same access rights to files and folders are used. Access rights are rules that allow or prohibit certain actions with files and folders. These rights include:
- reading files and folders
- record
- file execution
Rights to objects file system can apply to both a specific user and a group to which you can add several users. The group is created for more convenient control rights (there is no need to specify for each, but are changed for the entire group included in it and the system will automatically set access rights for everyone). The owner's rights are listed separately (this is the one who created the file or folder). Be careful with the owner's rights if you have only one and it's you.
In order to change access rights, you need to do the following:
- Right-click on a file or folder on the remote server.
- In the drop-down menu, select “File permissions...”
- A window with permission settings will appear. In block 3, rights for the owner are configured of this file or folders. By checking the boxes you allow execution with the object specific action, and by unchecking it, you prohibit it.
- Block 4 specifies the rights for the group.
- Block 5 specifies the rights for the user.
- If you have selected a folder as the object for changing rights, then additional block, which allows you to specify permissions for all files and folders inside the selected folder. By checking the box, 3 options for the task will appear: apply to all objects (folders and files), apply only to files and apply only to folders.
Select the options you need and click “Ok”.

Editing files directly from the FTP client
FileZilla has a very convenient and useful feature which I use constantly and highly recommend that you master it too. This is a function for editing files directly from the program window without having to download the file to your computer and then upload it back to the server. Plus, you can save changes without leaving the editor and see what this led to on the site itself and in case of problems, return the changes back to the file editor and correct the situation. For the most complete convenience when working with files, download and install the best editing program, in my opinion, Notepad++.

So we assume that you already have Notepad++ installed and you are in general outline got acquainted with the work. To configure file editing:
- Click “Edit”
- Select “Settings...”
- In the settings window that opens, select “Edit files”
- Set the switch to the “Use the following editor:” position.
- Specify the location executable file Click the “Browse...” button. Usually it is located in the default folder as indicated in my image.
- In this block you can specify that the editor specified in the settings above is always used to edit files. However, if you need to edit files with any extension in another program, then select the “Use file associations to open” switch. File associations can be configured as shown in the image below. Specify the file extension and, separated by a space in quotes, the path to the executable file.
- Check the box so that Filezilla tracks changes and offers to save the changed file to the server.

After reading this article, you will learn:
- connect to FTP server
- download and upload files
- use the site manager.
We will assume that you have already installed and launched the FileZilla client (installation guide).
Connection to the server
We will use this data for login. Replace them with your own to follow the working example in this tutorial.
Hostname: example.org Username: john Password: 7PjU#.J3
In this case, we fill out the Quick Connect panel:
Field Port: can be left blank if you are not using a specific port for connection.
Note: if you want to specify the exact port, for example, SFTP or FTPS, enter the hostname like this: sftp://hostname or ftps://hostname respectively.
Now FileZilla can be connected to the server. If the connection occurred without errors, the right "column" of the client will show a list of files and directories instead of a notification "Not connected to the server".
Navigation and window layout

Legend: 1. toolbar, 2. quick connection panel, 3. message log, 4. local panel, 5. remote (server) panel, 6. queue transferred files(full size version of the image)
In this step, we will become familiar with the layout of windows in FileZilla.
Under toolbar(1) and quick connection panel(2) in message log(3) messages related to file transfer and connection are displayed. Below you will see a list of files. In the left column ( local panel, 4) are displayed local files and directories, i.e. contents of the computer running the FileZilla client. In the right column ( server panel, 5) files and directories of the server to which you are connected are displayed. In both columns, the directory tree is displayed at the top, and the contents of the current directory at the bottom. Navigation is carried out simple choice items in a tree or list, just like in any other file manager. At the bottom of the window there is file queue(6) with a list of files that have already been downloaded or will be downloaded.
Transferring files
Now we will load following files(or the ones you chose):
Website/ +- index.html +- images/ +- image01.jpg +- image02.jpg
Uploading files
To start with local panel go to the directory that contains the data you need (for example, index.html and images/). Now, navigate to the desired target directory on the server (using the list in server panel). To download data, select the appropriate files/directories and drag them from local V remote panel. After this you will notice that the files will be added to queue at the bottom of the window and, after some time, are deleted from there after uploading to the server (of course, if everything happened without errors). The uploaded files and directories will be displayed in the server list in the right column.

List of local and server files after loading
Note: If you don't like dragging and dropping files, just right-click on the selected files/directories and click "Download"
Note (for advanced): If you have enabled filtering and uploaded the entire directory, only unfiltered files from this directory will be uploaded to the server.
Downloading files
Downloading files or entire directories essentially works the same way as uploading, you simply drag files/directories the other way around: from the remote panel to the local one.
Note: If you (accidentally) try to overwrite a file while downloading or uploading it, FileZilla will by default display a dialog box with different options actions (overwrite, rename, skip, ...).
Using the Site Manager
Once you're confident that you can transfer files (if not, practice it), you may want to add server information to your site manager to make future connections easier. Select an item Copy connection to Site Manager on the menu File, after which the site manager will be opened, and in it a new item filled with relevant information. Note that the name of the item is selected and highlighted - this means you can enter a corresponding name to make it easier to find this item later (for example, enter domain.com FTP server- you can rename it later). Now close the dialog box by clicking on OK.
Next time, to connect to the server, just select it in the site manager and click Connect.
conclusions
We assume that you are now able to use the basic features of FileZilla.
One last note: most problems can be solved different ways. This guide describes the most obvious solutions - after spending some time working with the program and reading the rest of the documentation, you will probably find the most quick solutions for your tasks (for example, the toolbar contains buttons for frequently used commands; some of them respond to right-click).
If you are confident enough in your abilities, you may want to move on to the more advanced user guide to explore the remaining features not covered in the example above.
Successful data transfer via FTP requires very precise and meticulous setup. True, in the latest client programs, to a large extent this process automated. However, the need to make basic settings for the connection still remains. Let's get on detailed example Let's learn how the setup is done FileZilla programs– the most popular FTP client today.
In most cases, if your connection is not made through the router’s firewall, and the communication provider or server administrator does not put forward any special conditions for connecting via the FTP protocol, then it is enough to make the appropriate entries in the Site Manager to transfer content.
For these purposes, go to the section top menu“File”, and select “Site Manager”.

You can also go to Site Manager by opening the corresponding icon in the toolbar.

The Site Manager opens before us. To add a connection to the server, click on the “New Site” button.

As you can see, on the right side of the window the fields have become available for editing, and on the left side the name of the new connection appears - “New Site”. However, you can rename it whatever you want and how this connection it will be more convenient for you to perceive. On connection settings this parameter will not have any effect.

Next, go to the right side of the Site Manager and begin filling out the settings for the “New Site” account (or whatever you call it differently). In the “Host” column we write down the address in letter form or the IP address of the server with which we are going to connect. This value must be obtained on the server itself from the administration.

We select the file transfer protocol supported by the server to which we are connecting. But, in most cases, we leave given value The default is “FTP – file transfer protocol”.

In the encryption column, if possible, we also leave the default data - “Use explicit FTP over TLS if available.” This will maximize the protection of your connection from intruders. Only if you have problems connecting via a secure TLS connection, does it make sense to select the “Use regular FTP” option.

The default login type in the program is anonymous, but most hosting and servers do not support anonymous connections. Therefore, select either the “Normal” or “Request password” item. It should be noted that if you select the normal login type, you will connect to the server via account automatically without entering additional data. When you select “Request Password,” you will have to enter the password manually each time. But this method, although less convenient, is more attractive from a security point of view. So it's up to you.

IN the following fields“User” and “Password” you enter the login and password issued to you on the server to which you are going to connect. In some cases, you can then change them if you wish by filling out the appropriate form directly on the hosting.

In the remaining tabs of the Site Manager “Advanced”, “Transfer Settings” and “Encoding”, no changes need to be made. All values should remain default, and only in case of any problems in the connection, in accordance with their specific reasons, changes can be made in these tabs.

After we have entered all the settings, to save them, click on the “OK” button.

You can now connect to the appropriate server by going through the site manager to the desired account.
General settings
In addition to the settings for connecting to a specific server, there are general settings in the FileZilla program. By default, they display the most optimal parameters, so often users in this section they never come in. But there are individual cases when certain manipulations are still required in the general settings.
In order to get into the general settings manager, go to the “Editing” section of the top menu and select the “Settings...” item.

In the first tab that opens, “Connection,” you enter connection parameters such as the wait time, the maximum number of connection attempts, and the pause between waits.

The “FTP” tab indicates the type of FTP connection: passive or active. Set by default passive type. It is more reliable because active connection in the presence of firewalls and non-standard settings There may be connection defects on the provider's side.

In the “Transmissions” section, you can configure the number of simultaneous transmissions. In this column you can select a value from 1 to 10, but the default value is 2 connections. Also, if you wish, you can specify a speed limit in this section, although by default it is not limited.

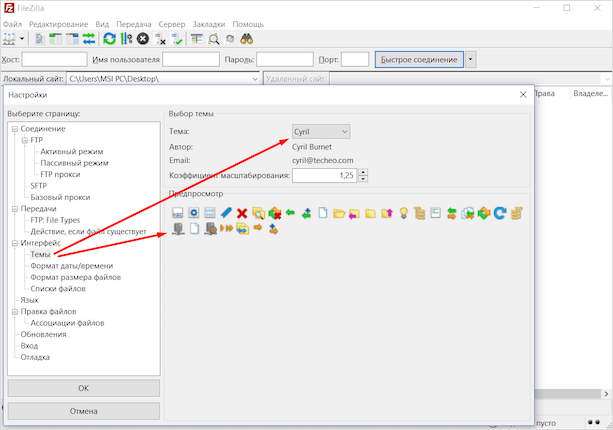
In the “Interface” section you can edit the appearance of the program. This is probably the only section of general settings for which it is permissible to change the default settings, even if the connection occurs correctly. Here you can select one of the four available types of panel layouts, specify the position of the message log, set the program to minimize to tray, and make other changes in appearance applications.

The name of the “Language” tab speaks for itself. Here you can select the program interface language. But, since FileZilla automatically detects the language installed in the operating system and selects it by default, in most cases, and in this section, no additional actions no need to produce.

In the “Edit Files” section, it is possible to assign a program with which you can remotely edit files directly on the server without downloading them.

In the “Updates” tab, you can set the frequency of checking for updates. The default is one week. You can set the “every day” parameter, but given the actual timing of updates, this will be an unnecessarily frequent setting.

In the “Login” tab you can enable log file recording and set its maximum size.

The last section, “Debug,” allows you to enable the debug menu. But this feature is only available to very advanced users, so for people who are just getting acquainted with the capabilities of the FileZilla program, it is definitely of no use.

As we see, in most cases, for correct operation The FileZilla program only needs to make settings in the Site Manager. General settings By default, the most optimal programs have already been selected, and it makes sense to intervene in them only if there are any problems with the operation of the application. But even in this case, these settings must be set strictly individually, taking into account the features of the operating system, the requirements of the provider and server, as well as installed antiviruses and firewalls.


