How long will the verification process take? How much can you earn from mining?
For beginning musicians on how to use a noise gate. In the material Vanakoro focused on basic principles using this tool, showing how to use a noise gate to remove background noise. website provides an adapted translation of the note.
Proper use of a gate helps with recording and makes mixing and mastering easier. The possibilities of a noise gate are very great, and its use is not limited to eliminating interference in the signal. A properly configured noise gate can be used for purely musical purposes: for example, to more clearly separate the drums from each other or add power to the bass.
Loading the noise gate
All DAWs (see ) come with a noise gate, which is usually found in the "Dynamics" or "Noise" (or similar) categories. Sometimes, instead of an independent plugin, developers implement a noise gate into some kind of compressor.
Download the attached. For the purposes of this tutorial I've done it sloppily - you can hear a slight background noise, caused by the operation of a small fan moving air near the microphone.
Operation threshold

The main tool in setting up a noise gate is the threshold. The trigger threshold allows you to configure the gate so that it eliminates any signal up to a certain point. In our case, we need to remove the background noise from the fan and leave only the human voice.
Let's loop a small section of audio and find the part where the background noise is heard best. It is advisable that there are no other signal sources in this part of the audio. Having found a suitable segment, we will adjust the Threshold parameter so that the noise disappears during playback. Based on the search results, it turns out that a threshold value in the region of -38 dB will be acceptable.
Fine tuning

Most noise gates are equipped with additional parameters— level of attack and decay. The attack is responsible for the gate's firing rate (how quickly it reacts to noise), and the decay is responsible for how quickly the gate returns to standard state. Adjusting these parameters can help in cases where the gate is cutting off the tails of notes or cutting off quieter words at the ends of phrases.
After we set the noise gate threshold to -38 dB, the gate began to operate too harshly. Phrases sound dry - the gate kills the natural reverberation of the room. You can tweak the noise gate a little more precisely, or add a subtle reverb effect to the track, which will recreate the tails and correct any cases where the gate has cut noise too aggressively.
Use in other situations
The more often you use the gate, the better you get at it. Try using a gate for different tasks. For example, remove crosstalk before recording a guitar to get more clear sound in the mix. Or adjust the penetration levels of different drums when working with drums.
Hi all! In this article we will tell you why and how to use noise gate. At correct use This processing makes mixing and mastering easier. Noise gate used, for example, to more clearly separate drums from each other or add density to the bass sound.
All DAWs have a noise gate. As a rule, it is located in the categories “Noise” or “Dynamics”. Below is a voice recording that was recorded with light background noise. This noise is added deliberately using a small fan located near the microphone.
Operation threshold

The main thing in a noise gate is Threshold - the threshold of operation. He eliminates sound signal before certain value. IN in this example Only the background noise needs to be removed and the voice left.
We are looking for the part of the track where the noise is best heard. We adjust Threshold so that the noise disappears during playback. An acceptable threshold value in our case was around -38 dB.
Fine tuning

Also in the settings of most gates there are parameters for the level of decay and attack. Decay is the return of the gate to its standard state, and attack is the speed at which the gate operates. If the gate is cutting off the tails of notes or quiet words at the ends of phrases, adjusting the decay and attack will help eliminate such problems.
By setting the gate threshold to -38 dB, its operation became too harsh. Noise gate kills the natural reverberation of the room, causing phrases to sound dry. There is an option to adjust the gate a little more precisely, or add a slight reverberation effect.
Express Gate(EG) is a specialized utility from ASUS. It is built into motherboards created by this organization. The program is a kind of analogue of an operating system in which there is access only to network functions. With it, you can go online or launch a chat client even before loading the “main” OS.
More about the program
The full name of the system is “ASUS Express Gate Cloud”. What kind of program is this? How does it work? Is it necessary? Will it interfere with working with a PC? We will try to answer all these questions.
The specified application is located directly in internal memory motherboard. It will function even if you have problems with the main operating system. It does not require flash drives, SD cards or any pre-installed software. The Express Gate utility is completely self-contained. With this application you will always have access to the World Wide Web. If you have memory cards, disks or drives, the program will be able to interact with them.
The system activates very quickly. It will appear immediately after turning on the computer. You don't have to wait full load OS to check mail, find out last news or view the weather report.

With EG you can connect to the Internet without starting your OS.
ASUS Express Gate is based on the Linux operating system and, in fact, is its distribution. But it works on computers with any operating system. The program can reserve a certain amount of memory on the hard drive for its needs. She has GUI. It is easy to understand - all functions are displayed clearly in the form of widgets. Here is a list of what is in EG:
- Browser (Web). Based on Mozilla Firefox0 or Google Chrome(depending on version). There is support for Adobe Flash Player. But JavaScript is not available.
- Various instant messengers: Skype, MSN, QQ.
- Video and audio player: MPlayer and EG Music Player.
- Own chat client running on the IM protocol.
- Supports voice calls.
- Online Games.
- You can view your photos, make albums from them, and create slideshows.
This utility will not replace a “full-fledged” OS. But it will be useful if you need to quickly access the Internet. It is also often used when the main system does not start. It does not affect the operation of electronic computer, but takes up space on your hard drive.
Both the advantage and disadvantage of Express Gate is that it cannot be modified (equivalent to the Read-Only attribute). Thanks to this, it will not be harmed by viruses or other malware. But you won’t be able to modify the program to suit your needs.

How to turn it on or off?
In laptops in which the specified application was initially installed, there are two buttons: one to launch the “main” operating system, the other for EG. Express Gate has a running man logo. This is indicated on the button.
The utility is not available in all motherboards ASUS. But you can download it from the official website of this company or find the installer in a search engine. To do this, write in it the name of the program along with the word “download”.
Some models do not support it. The motherboard should say that it is EG compatible. When downloading the utility from third party resources it can be installed on HDD or flash drive.
If you do not have a suitable button to launch EG, but when you turn on the computer, the message “Loading ASUS Express Gate” appears automatically, what does this mean? How to remove it?
In most cases this program does not interfere with “standard” work with a PC. It is very easy to exit from it - just click on the shutdown button on the menu bar. But sometimes the utility produces errors or does not load at all. In this case, it is better to turn it off. You can activate or deactivate it through the BIOS - this is internal system motherboard, which contains settings for devices and controllers. Here's how to work with EG through the specified program:
- In Express Gate itself, click on the BIOS Setup button.
- You can also launch the BIOS immediately after turning on the computer. You need to press a certain key. It depends on the model of the smart car. For ASUS boards this is “Delete”. Which button to open the BIOS is usually written on home screen system boot. At the bottom there should be a line like “Press DEL to enter Setup.”
- The interface will be on English language. You need to navigate through sections and items using the arrows on the keyboard. And to enter the menu or select an option, press Enter.
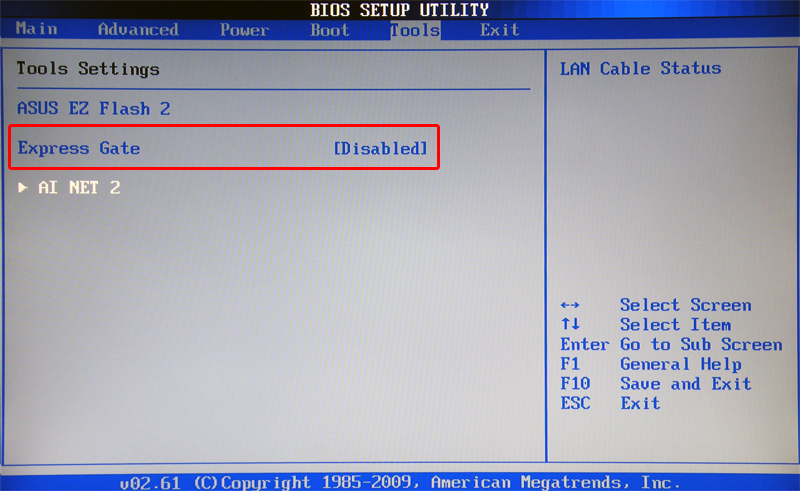
- Go to the "Tools" tab.
- Find the "Express Gate" line.
- There you can set a timer - the time that is given to the OS to choose from.
- To enable the program, set the parameter to “Enabled”; to disable it, set it to “Disabled”.
- To apply the changes, press the "F" key or go to the "Exit" tab. Before exiting, the utility will ask whether to save the settings. To confirm, select “Save”.
How to use?
Express Gate Cloud displays all options clearly. They are a “cloud” of widgets. Essentially, this is a set of buttons with inscriptions and images. If you click on “Chat”, the chat client will open; if you click on the player, the player will turn on.
The interface appearance may vary depending on the program version and motherboard model. In some utilities, all objects are static, in others you need to scroll through them, like pages or desktops on touch displays. In the configuration settings, you can change the date and time, select the application language, and connection type (Wi-Fi, LAN or DSL).
Express Gate is a fast-booting (5-7 seconds) operating system with minimum set functions, mainly network ones. It is designed to work in world wide web. The program is built into many modern devices from ASUS. This utility does not affect the “main” operating system.
The latest steps by the Ukrainian government aimed at blocking popular social networks“Vkontakte” and “Odnoklassniki”, resources “Mail.ru”, “Yandex” and others contributed to a surge of interest in software tools allowing . One such tool is the “Frigate” browser extension, which uses proxy servers to bypass unwanted blocks for the user. In this material I will tell you what a frigate is, how to use friGate, and what are the features of its functionality.
"friGate" is an extension for Chrome browsers, Firefox, as well as Chromium-based navigators (Yandex.Browser, Opera, Amigo, etc.), designed to gain access to blocked sites. In his work "Frigate" (this is the literal translation of the English “frigate”) uses foreign proxy servers (usually from the USA, France, Great Britain, Spain, Germany and the Netherlands), allowing you to receive content from a site blocked by censors.

The principle of working with proxies is standard: you make a request to a proxy in order to access a blocked site, the proxy server contacts this site, downloads content from it, which then forwards it to you. Nominally, some Spanish server contacted the blocked site, but in fact it was you from Russia or Ukraine.
- The friGate extension I'm reviewing is downloaded and installed on your browser, after which the corresponding icon will appear in the toolbar (top right).
- After clicking on it with the left or right key mouse (depending on browser) this extension you can activate/deactivate, change its settings, select your preferred proxy server country, and so on.
The “friGate” option provides the ability to use turbo compression (transmitted data is compressed, which allows saving traffic and data transfer speed). As well as activating the “anonymity” mode, which does not allow various software tools to track your online activities.
In addition, you can disable advertising(at the expense of which the extension developers live). To do this in Mozilla, you need to go to Browser Settings – “Add-ons” – “Extensions”, find “friGate” in the list of extensions and click on the “Settings” button on the right. In the settings that open, check the “Disable advertising” checkbox.
In Chrome, this is done by going to the application settings (right mouse button on the “Frigate” icon - “Options”), and checking the box next to “Do not show ads”.
How to add a site to your friGate list
An important feature of “frigate” is the ability to activate this application not for all sites (as you know, working with a proxy somewhat slows down the operation of Internet resources), but only for those selected by the user. Below I will describe how to use friGate in this context in Firefox and Chrome.
Firefox browser
- Install "Frigate" by going to the Firefox extension store and clicking on "Add to Firefox".
- After installing the extension, restart your browser, the “friGate” icon will appear in the browser panel on the top right.
- Now go to the problematic site and wait until the browser gives you a message that this site is unavailable (in address bar browser must contain the address of the blocked site).
- Now click on the “friGate” icon with the left mouse button, in the menu that appears, check the box next to the “enable proxy for sites from the list” option.
- Then hover over the most top panel(“site is not from the list”), and in the panel that opens, select “add site to list”.

Chrome browser
- Install the Chrome browser extension from the Chrome store.
- After installing the extension, hover your mouse over the “frigate” icon, right-click and select “options”.
- There is already a list of sites that can be bypassed using a proxy, but you can add your own list by entering a name for it and clicking on the “Add list” button.

Click on “Add to List” to create your list of sites
After you add your list, click on it and enter the address of the blocked domain into it (for example, *.vk.com - an asterisk and a dot before the name allows you to add a domain with subdomains), and click on the “Add site” button. You can also activate the “proxy is always enabled” option for a given site, or use an analytical algorithm that allows the extension to choose when to activate the proxy for a specified resource.
Setting up a list of Frigate sites
Unfortunately, on this moment"freeGate" extension for Firefox browser does not support customizing a list of sites. This setting available for browsers based on the Chromium core (for example, the same Google Chrome).
- To configure the list, hover the cursor over the “Frigate” icon in the browser and right-click.
- In the menu that appears, select “Options” and in the window that opens you will see a list of over 200 blocked sites called “friGate”.
- By clicking on it you can view this list, as well as deactivate the blocking of any of these sites by clicking on the corresponding button on the right.
- You can also create your own list and add the resources you need to it. The specifics of creating and editing such a list were described by me in the previous section.

Conclusion
In this material I described how to start using the friGate extension and how to configure the list of sites in this plugin. The tool I reviewed will be useful to those users who want to restore full access to resources blocked in their country (Vkontakte, Odnoklassniki, Yandex, various torrent trackers and other resources). Download and install Fregat, find the country whose proxies work the fastest and most stable - and you can forget about censorship in your country.
In contact with
A few days ago, while trying to find information on the Internet about a cryptocurrency unknown to me (Bytecoin), I came across one interesting service. It's called MinerGate and belong to the number of pools for mining cryptocurrencies. Although I spent quite a lot of time on various pools, I did not immediately classify this project as one of those.
The site has many features that set it apart from similar projects. It has its pros, cons, and what not...
In general, let me introduce you to the service more closely, show you how to make money on the MinerGate project, and you can decide for yourself whether to get involved with this project.
Features of MinerGate
- Probably the most main feature this pool - the use of the CryptoNight algorithm, based on the CryptoNote technology or protocol (read how ).
- Based on the mentioned technology, a completely new cryptocurrency- Bytecoin. Then came whole line other digital CryptoNote currencies: Monero, MonetaVerde, Aeon and others. You can mine almost all of these cryptocurrencies on the MinerGate website.
- Next feature The service consists of using your computer’s processor to mine cryptocurrency.
- The degree of anonymity in the algorithm used is higher than in the Bitcoin network.
In short, these are perhaps the main non-standard features of the pool. But I can’t ignore one more little thing - the graphical interface of the miner. I’ll dwell on this a little later, but for now let’s figure out the registration, learn how to work on MinerGate and how to withdraw money from this pool.
Registration on the MinerGate website
So, to register, go to the MinerGate website and click green button"Sign up" We fill out the most simple form, and click the button below (p. 1).

Now open your email and activate your account by following the link.
If you have not received the email, then after registering, go to your profile and click “Verify e-mail”. After receiving the email and clicking on the link, be sure to click “Save Changes.”
Earnings from the MinerGate pool
The MinerGate system offers its users several options for earning money:
- , without downloading software;
- Production virtual money using a program (miner) on the computer processor.
Going deeper into each of the points, I would like to start from the end of the list, since most of all new users are worried about the question “how to mine on MinerGate on a video card?” It all depends on your “video”. There will be 2 gigs free random access memory- the buttons in the GPU section will be active, but will not be, you will see the inscription “Not available” (p. 2).

There are also other, not entirely explainable reasons why it is impossible to start mining. This mainly applies to laptops. For example, my laptop, with ATI card The Mobility Radeon HD 5650 does not want to mine any of the cryptocurrencies, although there are plenty of gigabytes for work.
CPU mining
The main earnings on the MinerGate project are based on (CPU). By going to the “Downloads” section you can download mining software, depending on the number of bits of your operating system Windows systems(p. 3).

To find out how many bits there are in Windows 7, click “Start”, then “Computer”. Right-click on the free area below and click “Properties”. In the window that opens, you can see the bit depth of your operating system(p. 4).


The main interface of the miners is represented by a convenient graphical control. But, there are also classic miners (Console Miners tab, p. 5).

How to use the MinerGate program
Installing the program is terribly simple, so I won’t dwell on it. After you have installed the software, click on the MinerGate shortcut. A window will open in front of you where you must enter your registration data from the pool (p. 6).

Next you will be taken to the MinerGate program control panel. By default you will find yourself in the “SMART MINER” section, by pressing the green button, the program will automatically determine the most profitable cryptocurrency for mining and will start mining it.
If you want to mine a specific “cryptocurrency”, then go to the “MINER” section. Here you can mine one of the proposed cryptocurrencies:
- Bytecoin (BCN);
- DashCoin (DSH);
- FantomCoin (FCN);
- Monero (XMR);
- MoneteVerde (MCN);
- DarkNote (XDN) and others.
Note . Full list all available toCryptocurrency mining CPU, you can see by clicking the “View” (p. 7). Here you can add or remove digital currencies from the main menu.

To , just click “Start mining” next to the currency you will mine (p. 8). A little to the right you can see collapsed “menus” with numbers. It is with the help of these numbers that you can increase the speed of cryptocurrency mining on the MinerGate pool.

In fact, these are not numbers taken from the air; from them you can determine the number of cores on your computer. It is important not to use the entire processor for mining, but to leave 1 - 2 cores free in order to avoid overload and save normal functioning computer. For example, I have 8 cores on my laptop, but I never use more than 6 for mining.
In this way you can mine up to 3 currencies at the same time. The mined cryptocurrency will be simultaneously displayed in the program window and on the pool website.
Please note that virtual money is not credited to your main account immediately. Initially, they accumulate on an unconfirmed balance ( Unconfirmed) and only then are transferred to the main account. The crediting of coins to your main account depends on the type of reward you choose (PPS or PPLNS). When using PPLNS, the balance will be confirmed only after the round is resolved and the found block is confirmed. PPS payment involves accumulation a certain amount on Unconfirmed balance.
Minimum verification requirements vary depending on the cryptocurrency. So, to transfer from an unconfirmed balance to the main one, you need to mine:
- Bytecoin - 20;
- Fantomcoin - 1;
- Monero - 0.005;
- DigitalNote - 1;
- Aeon - 0, 01, etc.
Mining on the site
This is the lowest income earning on the MinerGate website. Go to the website and click the “Web Mining” button at the top. Then select the cryptocurrency you like and click “Start” (p. 9). Here, none of the power of your hardware is used, but the income, as I already wrote, is very low. Comparing to:
- Web Mining. Hashrate - 1.2 H/s.
- . Hashrate: 22 - 25 H/s.

CPU mining and cloud mining (webmining), you can use at the same time.
How to withdraw money from the MinerGate pool
I think that every second user of the MinerGate project has difficulties with withdrawing funds. I remember at one time, me too more than an hour I spent some time trying to figure out how everything works here.
In general, the first thing you should understand is that you can withdraw from MinerGate only through Changelly exchanger . It's very easy to find. Click the Withdraw button on the site and at the very bottom of the window that opens you will see a link (p. 10).


2). On next page Click “Next” (p. 12). Indicate the wallet number to which you will withdraw money. For example, I indicated a BTC wallet (Blockchain).

3). We confirm the payment (p. 13).

4). Copy the address generated by the exchanger (p. 14).

5). Return to the MinerGate website, click “Withdraw” again, paste the copied address into the appropriate field, indicate the withdrawal amount and click the blue button below (p. 15).

6). Wait about 20 minutes and the money will arrive in your wallet!


