FileZilla - what kind of program is it? What are the advantages and capabilities of FileZilla?
Greetings to all readers and guests of the site. Anton Kalmykov is with you.
First of all, let's figure out what FTP is and why it is needed.
FTP is a file transfer protocol that allows you to upload various objects to your server, delete them, edit them, and of course, make a backup copy of your blog. Without these manipulations this moment It is impossible to imagine a single successful blogger.
When I started working on our project, at the beginning I tried to tinker with the code in WordPress panels, but it was inconvenient and unsafe. You ask me why? Yes, because when I saved any changes and they did not lead to the desired result, I had to make a backup.
Now, I have created two directories on my computer. In the first one, using Filezil, I copy original files from the hosting, and in the second I download files with which I conduct all my experiments.
What is Filezilla and where to start?
So, let's take a closer look at my favorite, and not only mine, ftp FileZilla client. This is one of the most common and convenient free FTP clients in the blogosphere.
Downloading and installing the program
First, you need to download and install the program on your computer. You can do this by following this link http://filezilla.ru/get/ to the official website of the developer and select the appropriate version.
After installation, you need to connect to your hosting by clicking on the File tab→ Site Manager.

In the window that opens, click the “New site” button (1) and enter the name of your site (2).

Afterwards, in the “Host” field (3) insert the IP address of your server. It is given to you when you purchase your hosting, most often by email. It will also indicate “User” and “Password” (5)

By the way, to activate the login and password fields in the “Login Type” field (4) in the drop-down menu, select “Normal”. Well, to connect, don’t forget to click the “Connect” button (6).
If you did everything correctly, then in the first window you will see that “Connection has been established.”

Filezilla interface and features
Now let's take a closer look at the interface of our program. Visually it is divided into two parts.
The first part is the Local site (2, 3). In it you see the contents of your computer (disks, folders, files). The second part is the Remote site (section 4, 5). In them we see your hosting objects.
For a beginner, before getting started, I would recommend creating a backup copy of all blog content on your computer.
How to create a backup
To do this, on any disk, except the one where your operating system is installed, create a directory and copy all the files from the remote server into it.
Let's look at how to do this in more detail, and at the same time learn how to work with the program.

Click the cursor on any file or folder in window No. 5. Afterwards, using the Ctrl+C key combinations, select the entire contents of window 5. Next, press the right mouse button and a drop-down menu appears, using the functionality of which you can copy, create, delete everything that you think is not necessary, add to task, etc.
I want to warn you right away inexperienced users that after deleting a file from the server, it will no longer be possible to restore it, because FileZilla doesn't have a recycle bin feature like Windows does.
So, somehow I digressed from our educational program; in the drop-down menu, select “Download”. At the same time, do not forget to check that the directory you created in advance is open in window No. 3.
In my case, this is “Test” on drive D (this can be seen in window No. 2 and No. 3). Well, now we have created backup copy our site, and at the same time we learned how to download files from our hosting to our work disk.
Example of working with files
I would like to note that the transfer of the required object to the server must be done in the same order, the only difference is that the selection occurs on the left side (Local Site area).
Many will ask, what is all this for, why download it to a computer, what will it give me?
Let's look at a small example: you need to fix the index.php code. We find it on the server and download it to our folder on the computer.
Note: Please note that you should not use to edit files. standard program Notepad in Windows, because When saving, the encoding may change and the content may not display correctly. To edit the code, I recommend using Notepad++.
You can read a more detailed description of it on our blog in one of next articles. And so as not to miss -
If the opening occurred in another program, then we find our file on our disk, in my case, I click on the Start menu → Computer, select Local disk D and go to our “Test” folder. Next I click right click mouse on index.php and select “Open with” from the drop-down menu.

In the window that appears, find Notepad, select it, also don’t forget to check the box “Use the selected program for all files of this type” and click “OK”.

Now you can safely work with this object.
I will tell you in more detail how to work with Notepad in the following articles.
Once you have edited your file, save it and simply drag it into zone 5.

Since the file already exists on the server, the program will clarify your actions. Don’t be alarmed, in the window that appears, simply select “Overwrite” and click OK.

Well, here we are and we figured out what it is FTP client and how you can apply it when working with your blog.
I hope I succeeded accessible language tell about all this. Please do not judge me harshly, because this is my first article :). If you have any comments or suggestions, write them in the comments.
Here are a couple more useful programs:
Anton Kalmykov
Today I will share useful program, which will allow you to transfer files and folders to the hosting and download from it, without using a browser. It's called FileZilla.
FileZilla is great tool for webmasters, in addition fast transfer files, it has many useful functions. But I want to show you how to set up this beast for hosting.
Many people who run their blogs use a browser to transfer and edit files to work with hosting, but this is damn inconvenient, in my opinion.
Previously, I used total, but after a while, problems began and I switched to FileZilla, and I stayed with it, I really liked it.
So, first we need this program, you can download it from here. Download the latest version and start installation.
Installing filezilla.
1. Run the downloaded file and confirm license agreement by clicking on the " I agree».

a) For all computer users
b) Only for me, that is, for the user under whom this program is installed.

3. For full-fledged work, mark all the birds like I did. Click " Next»

4. Specify the directory where FileZilla will be installed. Personally, I left it as is, that is, it will be installed at: C:\Program Files\FileZilla FTP Client.
You can specify a different installation folder using the " Browse…» « Review", but I recommend leaving it as default, click " Next».

5. Specify whether to create a folder in the " Start" I recommend creating. If you don’t want to, check the box “ Do not create shortcut" and press " Install»

6. Within a few seconds, you will watch the installation process.
7. After completion, run the program, check the box next to “ Start FileZilla now" and press " Finish" That's all, the program is installed, and its launch will be reproduced.

The program window looks like this:


You can also implement it through the item “ File» - « site manager"or even more conveniently, a keyboard shortcut CTRL + S.
Here you need to do the following:

1. Press the button shown on the screen under number (1) (or a combination CTRL keys+ S, point above)
2. Click on the button numbered (2) “add a new site”.
3. Give the connection a name, you can use any name you like.
4. Open the letter from the provider (it is sent to you at Mailbox when registering hosting) and look for the item “ FTP access", there is the following line: Address (host): ftp.your_site (before transferring or registering a domain, you can use s24.h.mchost.ru) - enter in the frame under number (4) - this parameter is for McHost, you The main thing is to find the host address. It can simply be in the form of the IP address 125.22.11.22.
5. Enter the username - it was also given in the letter from the hoster
6. Enter the password, similarly, you can find it in the letter, click “connect”.
If you entered everything correctly, you will successfully connect to the hosting. These are the basic settings that need to be set in order to connect to hosting via ftp access.
Let me briefly tell you how to use it. So, here is a window in front of you, I have divided it into blocks and will explain what each is intended for.

1. All settings can be accessed using this block.
2. The second block shows the connection status. For example, if the login or password or the host is entered incorrectly, you will see an error in this window, the same thing happens after a long period of inactivity automatic shutdown from the hosting, the information will also be displayed in this window.
3. The block displays files and folders on local computer, more folded.
4. And this window displays a more detailed location. Over time, after working with this program, you will understand why these two windows are needed (points 3,4).
5. This window is the same as under point 3, only it displays files and folders already on the hosting, in a minimized form.
6. An alternative to point 4, only on the hosting, starting from the main directory.
7. In this window you can observe the status of transfers, whether files were transferred successfully or with errors.
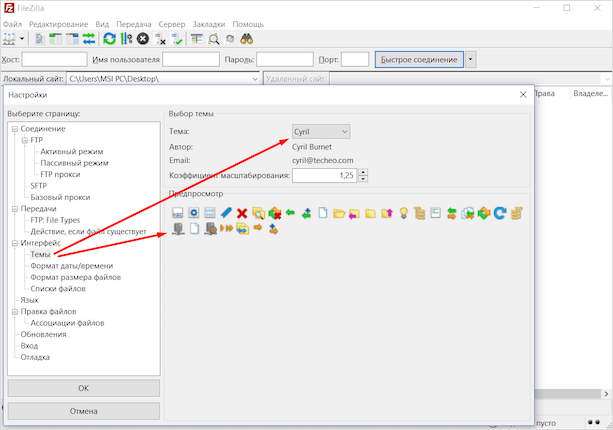
Go to the section " Editing", can be found in the first paragraph from the description, and select " Settings».
In the window that appears, on the left select “ Editing files" and set the path where your text editor is located using the " button review“. This is what it looks like for me:

What to do next? And then just enjoy filezilla program: easily navigate through folders, open the necessary files, to download a file from the hosting, you need to the required file or folder, right-click (right mouse button) and select download.
The second option is to simply grab with the left mouse button, hold and drag to the desired location.
After editing, also grab LMB and drag it back to the hosting in the desired folder.
Today, no one can be surprised by a personal website, since the Internet has deeply penetrated all areas of our daily activities. Unfortunately, not all users to this day have even the slightest idea of the principles of working with FTP servers, and without this it will be difficult to organize a normal website! The content alone is worth it, let alone the proper management of it.
Take, for example, the FileZilla program: almost only a few people know how to use it, but it is one of the most common and best apps for working with FTP servers. Since you may encounter difficulties when you first start, we have prepared small instructions for you.
What is it for?
First, let's give a small practical example, which can show you the importance of this utility. Do you know how to use FileZilla for Myarena? But this may be required by any user who creates own server for playing Minecraft with friends.
First, on the official Myarena website you will need to enable access to your account via FTP. We confirm all our actions, after which you are provided with a login and password to access your game server.
Then everything is simple: enter the received information in the appropriate fields, and then click on the button “ Quick connection" If everything went well, then right side In the dialog box, a field will appear that will display data about all the files available on your game server.
Here's how to use FileZilla. Ucoz and others free hosting also provide the opportunity to use this program. Read more about the principles of setting up the application below.

Establishing a connection
First you need to open the program, and then enter the data in the fields described below.
- The host is the domain on which your website is hosted. Of course, you must have your own account on it.
- In the “Username” we indicate your nickname.
- Accordingly, enter your identification data in the “Password” field.
- Port. The default is “21”, and if there is no need, this data can not be changed.
As soon as you click on the " Fast connection", the program will automatically connect to your hosting, check your identification data, after which you can start working with it. An indicator of this will be a list of files and folders that will immediately appear in the main application window.
How to manage files?
If you created your site on your local computer, you will probably want to upload it to a server on the Internet. To do this, you need to know that the public_html directory is the root directory. This means that it will contain all the files on your site. Take the folder from the “Local Site”, and then drag it to the public_html directory located in the “Remote Site”. If everything went well, all files will become available on your website.

Of course, from time to time you will need to change or even completely delete content on the remote server. To do this, select the document you need with the left mouse button, and then right-click on it. From the menu that appears, select the “View/Edit” option.
A little about editing
Please note that the file opens in normal text editor. If the system has default settings for another program (NotePad++, for example), then the document will be sent to it. Once you finish editing and save the document, the program will ask about your further actions: is it possible to delete local copy file, or finally send it to the site.
What operations can be performed on files?

We have already said that one of the most functional FTP clients is FileZilla. How to use it if you need to do something more complicated than loading or deleting a couple of pictures? In the "File" menu you will find great amount all kinds of options. Let's describe the most important features.
- The “Download” function will allow you to receive files from a remote server by copying them to your computer.
- The “Add files to queue” option will help to delay this operation.
- The "create directory" command, when used in root directory, will allow you to create new folder to post content there.
- Accordingly, the “Delete” option is used to erase already unnecessary files and catalogues.
- With the “Rename” command you can easily change the name of any file or directory.
- If you need special permissions to access a particular folder, use "Access Rights". You can easily edit access rights to any documents, including permission to change, read or delete them.
And these are not all the skills that distinguish the FileZilla program. How to use its other functions, which are designed for creating and editing web pages?

Site Manager
In the "File" menu there is an option "Site Manager". This is a kind of password storage in which all the identification data necessary to access one or another of your sites is stored. This way you will spend much less time when you need to create new content or edit the old content of your personal page.
For this option to work properly, it is extremely important to enter the correct host name as well as the FTP port. However, the value of the latter is already set by default (21), and therefore there is no need to change it unless there is a real need.
It is also important to choose your preferred connection method. If your hosting supports direct connection, use the protocol. However, SFTP is used much more often - SSH supports reliable encryption of transmitted and received data. All other connection versions supported by the program also support various secure access protocols.
Account login methods
We recommend setting the “Input Type” field to “Normal”. In this case, you enter your username and password in the required fields, which will subsequently be used for identification on the site. Here's how to use it FileZilla server. The application interface also allows its use in other modes.

If your server allows it, you can set the connection type to anonymous. In this case, you will be able to log into the site without providing the server with any of your personal data. Attention! If you are working on a computer that other users have access to, we strongly recommend using the “Require password at login” option. This option does not allow the program to save identification data, which significantly increases the security of working with the site. Of course, you will need to enter your username and password each time.
Similar login methods also include “Interactive”, but its difference is that the password will be requested each time you connect to the server. Simply put, when you batch upload files to a site, you will be forced to enter identification data to transfer each of them. Since you have to use FileZilla server a lot and often, this method cannot be called convenient.
Other features
To make it easier to manage multiple projects, the app's creators have included the ability to have a universal account that will store all your account information, including host information and all your passwords. This function is extremely convenient if the computer is used by several users. In addition, it is so convenient to sort your projects by their focus (data for sports and construction sites, for example).

As soon as all the necessary information, you can click on the “Connect” button. All saved settings can be changed or deleted at any time. Important! Before you use FileZilla client, we advise you to check the correctness of the logins and passwords you enter, since if they do not match, you can spend a lot of time and effort looking for the reason for the inability to establish a connection.
Extra options
There is also an “Advanced” tab in the “Site Manager”, the contents of which we would advise you to pay attention to Special attention. For example, you can easily even set your preferred type of server to use (Unix, DOS or VMS). However, if you don’t quite understand the results of your actions, then it would be much more justified to leave all the settings in the Default position.
If you need to change the quantity at a time active applications, then you need to go to “Transfer Settings”. In addition, you may need the “Encodings” section, which contains all the tools for changing the parameter of the same name. Unfortunately, they are not always determined in automatic mode, and therefore instead normal fonts in this case, you will see obscure symbols.
That's what FileZilla is for. We have already told you how to use it.
If you want to create your own website or server for home group users or office workers, and at the same time trying to configure the ability to manage the file system of a remote PC, then you will need the FTP protocol. But no the best program to manage such a protocol than FileZilla. What is it and what is it for? specified program, we will consider in this article.
Why do you need FTP and FileZilla?
FTP is a protocol, that is, it is a rule that the system follows when connecting to a specific port. There are many other protocols, but FTP is one of the oldest. Even HTTP is younger than FTP, although it is a protocol for connecting to sites on the Internet.
FTP is used to connect the client and server. Ultimately, this connection allows you to share files and folders.
That is, the client can upload the necessary data to the server, or download something from the host. In addition, the client has an internal manager to manage the server's file system. This interaction is necessary for remote control computer, as well as for managing website content on a hosting provider, which is why the FileZilla program is very popular among webmasters.
FileZilla is what it is software tool, which allows you to both manage the server and use the manager in the client. And all because there are two FileZilla versions: client and server. Using the first one, you can open a file manager on the server, and using server versions you'll create a session so the client can connect. Sometimes users use two versions of FileZilla on the same computer, that is, they create a server and use a client. This is necessary if you decide to preload the site on local server and want to add an engine to it.
What are the advantages and capabilities of FileZilla?
In addition to the fact that this program is distributed completely free of charge and you can both create a server and connect to it, you can also do all this in Russian. It is better to download the application from the official website, where you will also find a user manual that will make it easier to use FileZilla.
Some prefer Total Commander, but the manager in question has an obvious advantage - it is designed to work with FTP, therefore its level of protection is higher. Your server will be safe if you use FileZilla, as this manager encrypts saved sessions, unlike Total Commander, which leaves data about recent sessions public. Otherwise, these two programs are very similar, especially in terms of managing the server file system. Now let's look at the main opportunities that the manager gives you.
After you install the client on your computer and enter your server login information, a file manager will appear in front of you. Your computer's file manager will be located on one side of the control panel, and the server on the other. This way, you can quickly find files and folders on your PC and transfer them to the host, which will significantly save your time. Windows supports drag & drop, so moving files to the host via FileZilla will be even easier.
You can use the FileZilla manager to perform all basic functions FTP protocol: delete, move, copy, rename, change access level and download various folders and files from a PC and to a computer. And all this is done as simply as if you were performing these actions inside your computer. This is exactly why they love FileZilla - the manager is very easy to use. But it has many functions that few people know about.
Not everyone uses the login feature, although it is quite useful, especially for those who use an FTP manager to manage their site. If you enable “Login to file” and select the file where the logs will be saved, then it will be easier for you to understand latest changes on server. You will be able to find out which changes were the last, which will significantly reduce the solution time various problems related to innovations and uploading any files to the host.
Another one useful feature, which will make the manager easier to use is file filtering. With this feature, you can create unique filters that will filter out unsuitable files and show you those that are suitable. specified parameters. This way you can easily find pictures on the site, or configuration files and so on.
In addition, an indispensable function for managing a website server through the FileZilla manager is the comparison of directories and files. It happens that you do not remember whether you have downloaded everything to the host. In this case, you will need a directory comparison, after which you will know exactly which files are missing on your PC or server. In addition, this way you can calculate the virus in file system, or extra files, which accidentally ended up in a certain directory.
If you share a server with someone, then it is recommended to configure access rights for everyone separate file and folders. To do this, go to the folder options and click on “File/Folder Permissions” and define the actions that are allowed for certain users.
Good afternoon, gentlemen! Today we will deal with the FileZilla program: we will talk about setting up this FTP client and talk about in which cases using FileZilla can significantly reduce your time and nerves. So, let's go!
This protocol is used purely for file transfer. Typically, when transferring files via FTP, you do not risk damaging them in any way. The process will either complete successfully or fail and you will be prompted to try again.
In modern realities, FTP is most often used when working with remote virtual servers(by the same webmasters or freelancers). You can learn more in the article about what an FTP connection is and what connection options exist.
In this article, as I said at the beginning, we will talk about one of the most popular FTP clients - FileZilla.
FileZilla – Free FTP Client
FileZilla is free FTP client for transferring files using the same protocol. The program is distributed free of charge and is available for download from the official website. It occupies one of the leading places among all FTP clients.
And this is not just like that: the application is very convenient and multifunctional. FileZilla is a pleasure to use. Intuitively clear interface, diversity different instruments and functions - these are not all the advantages of Filezilla.
Program installation
You can download Filezilla absolutely free. To do this, just go to the official website, where the desired button will be immediately available in the main menu.

Documentation for beginners is also available here, which will tell you how to work with this application.
After we click on “Download FileZilla”, we will be immediately taken to the download page, where versions for different operating systems will be available.

Choose the required version(most likely Windows x64), after which we download installation file on computer.
Important! If you use Linux, you don’t have to download the application image from the official website; you can install the program from the repositories.
Immediately after downloading and running the installation package (in exe format for Windows), you will see a standard installer.

Problems with installing FileZilla on Windows there should not be, just click “I Agree”, then “Next” - “Next” - “Continue”. After installation, the application shortcut will appear on the desktop and in the program list.
Setting up an FTP client
After launching Filezilla, you will see a window like this. This standard option settings that you will have immediately after installation. If you wish, you can change the display of specific windows using the icons that appear second row after the main menu (shown by an arrow).

The interface here matches system language(mine is in Russian), but if you wish, you can change it in the settings (Editing - Settings - Language).

Here, just above, you can change the icon theme, date and time format, and much more. IN standard setting FileZilla is quite usable: you can easily connect to the host to transfer files. This does not require any special setup, everything is intuitive and simple.
Application Appearance
Let's take a closer look at the FileZilla interface. Although it is extremely simple, it can be a little difficult for beginners. Filezilla itself (its main window) is divided into 6 components. Each of them is important and is responsible for a specific action. This is what it looks like.

Here you can see:
- Main menu: access to the settings and functionality of the application.
- Block of tool icons: with their help you can control interface elements, as well as reproduce any actions to manage file transfer.
- Authorization fields: here you enter information in order to log into the server (the host server itself, username and password, and port, if necessary).
- File manager on the remote server (when you connect to the host).
- File manager on your PC.
- Status of operations (files in job, transfers in error, etc.)
These are the components you will work with. Here (in the screenshot) I did not mark the command log. It is located immediately under the authorization fields - there you can observe all the actions that will be played when working with the program.

With the help of those same icons you can turn off everything extra elements interface, leaving only file managers for transferring files from the computer to the server and back. Their appearance, by the way, can be changed in the settings: Editing – Settings – Interface – Themes.
Site manager function
To avoid entering connection information each time, you can use the site manager. Enough convenient function automation of connection to servers via FTP. Here you can not only “fill in” all the data for automatic connection in one click, but also group them into folders, creating individual settings for each site or group of sites.

Convenient, isn't it? Pay attention to “Protocol” in the “General” tab. Here you can choose which protocol to connect to a particular site. Besides standard FTP you can use SFTP and Storj. Each of them has its own advantages.
You can also configure encryption and even choose the background color for each site (so as not to get confused).
How to use an FTP client
Connecting to server/host
Now it’s time to move on to the main topic of this material - how to use the FileZilla FTP client, and most importantly, how to create an FTP connection to the server.
First, we need to understand how exactly you can find out the site host for FileZilla. Here Beget hosting will be used as an example. We go to the official website of the hoster and register an account there, immediately after that all the necessary data for access via FTP will be sent to us by email.

If we want to create separate accesses for each site (if there are several on one account), then, as can be seen from the information in the screenshot, we just need to go to the appropriate section.
In this case, when connecting to an FTP server, we will only see the files of the site for which we created separate access. I will have access to all sites on my account, because I log in through default access.
To access we need the following data:
- host (server),
- Username (login),
- password.
I have them all (screenshot above), you will have yours. Enter the data in the appropriate fields in Filezilla and click “Quick Connect”.

If you also disabled unnecessary interface elements (using icons), this is exactly the window you will see after a successful connection. As you may have noticed, in the “Remote site” field there appeared files that are currently on my remote host. I can download, change and edit them at any time using FileZilla.
When connected to a remote server, we can transfer files back and forth. The easiest way to do this is to drag it while holding left button mice.

However, if you so desire, you can use the context menu, which can be accessed by right-clicking the mouse.

If you enable the activity window, you will be able to see when and which files were transferred.

A list of files that could not be transferred will be available in the next tab.
You can transfer files in batches. It’s enough just to highlight required quantity files and/or folders using the mouse, then drag them into the adjacent window.
To edit a file, for example, PHP code or any other, you do not have to manually download it to your machine. Simply right-click on the desired file and then select “View/Edit”.

It will immediately open in your usual program automatically. Immediately after editing and saving the file, you will be prompted to update it on the remote host.

In this case, the document being edited will not be saved on the computer. It has a temporary status and is deleted after a restart.
You can edit most files this way.
Search files
Sometimes there are countless files on a remote host. In this case, the built-in search tool with an advanced type of settings can help us. As you can see in the screenshot, there are truly a lot of possibilities here.

Files can be searched by keys in the name and by content. Through this tool you can also search on your local PC if standard tools yours operating system do not cope with the assigned tasks.
Other
By using file managers you can reproduce any actions with files and folders: renaming, creating directories and much more.
Conclusion
FileZilla great app, which is perfectly suited for the goals set. With it you can download and upload various files With remote servers. The versatility of Filezilla will allow you to forget about the inconvenience. Many things in this FTP client are simply automated, so you should definitely give it a try.
By the way, if you want to make money on sites, then you are welcome to ours.


