Backup user data what is it on Android? (and translation into Russian)
As you know, the operating room Android system provides the user with enormous functionality, using which he can realize the full potential of his smartphone: starting from advanced settings using engineering menu and ending with a complete factory reset using special regime– Android System Recovery 3e. You will learn what to do in this menu with a smartphone in this article.
This settings mode was designed to work with system files and system parameters. With it, you can activate or block almost all functions of the device under Android control. Here you can perform such complex manipulations as complete cleaning or restore the system in just a couple of clicks. Due to the important role this menu plays, getting into it is not so easy, but more on that below. In order not to harm your device, you need to know the mode items, their meaning in Android System Recovery 3e and what to do to carry out certain actions.
Launch Android System Recovery 3e
As mentioned above, launching this menu is not that easy. To get here:
- Turn off the gadget;
- Simultaneously hold down the volume rocker, the Home button and the power key.
After a few seconds the screen will appear Android logo, and then it will start Android menu System Recovery 3e. What to do in it and what meanings the menu items have – we’ll talk about this further.
Assigning items in mode
The very first and most important point is Reboot. It allows the user to restart the device.
To use the device's memory card as external storage connected via USB, select Toggle USB strage.
Here you can also work with the CWM package. It is used to install your own Recovery on the device.
Selecting “Instal from sdcard” ( installing CWM from the memory card), you will find yourself in a subsection with the following items:
- Installation CWM Recovery, which is pre-loaded onto the memory card - Choose zip from sdcard;
- Check the amount md5sum – Check md5sum a file;
- Find out the signature of the CWM package – Toggle Signature Verification;
- Check CWM for compatibility with the device - this can be done by clicking on Toggle Sclipt Assert.
How to use Android mode System Recovery 3e for flashing, what to do on Lenovo or other gadgets? Use only proven functions that you understand!
- Reset all smartphone data – Wipe data/factory reset;
- Wipe Cache allows you to completely clear the cache;
- Wipe dalvik cache used to clear Dalvik Cache;
- To clear your battery usage history, use Wipe battery stat;
- Format System completely removes all system files;
- Format Date formats the data section;
- Format cache deletes cache data, but the files themselves remain in it;
- Clearing kernel cache data – Format boot;
- To completely format the device, use Wipe all partitions.

All the meanings of the menu items that we are talking about are completely identical for all gadgets running Android.
Backup/Restore is one of the most important sections, which is responsible for backing up and restoring data. It contains the following points:
- Backup – creates a backup copy of data;
- Restore – used to restore factory firmware;
- Advance Restore – used to restore individual data sections;
- Advanced Backup – can be used to copy partitions.
The next item is responsible for converting formats to Android System Recovery 3e. What to do in this menu? Here you can choose different kinds converting to EXT4 and EXT3. Here's what this section allows you to do:
- Convert/change a backup converts the device system;
- Use Convert Data to convert data;
- Change one of you backup is used to translate backup sections;
- Convert Cache converts cache;
- Wipe data/factory reset is used to convert all partitions;
- Formatting the system – format system, data – format data, cache – format cache.
Extra menu

IN Advanced section You can perform such actions using the following commands:
- File System Check checks the validation of system files;
- Print Partition Info displays log information on the display;
- Copy recovery.log to sdcard is used to save copies of the recovery log;
- Opening ext and ext2 formats on an SD memory card – Partition SD Card;
- No - save my fat32 partition! stops partitions;
- Use Fix Permission to fix permissions in /data/data.
And finally, the last item – Power Menu. It is used for power management:
- Reboot Recovery performs a reboot;
- In Bootloader mode, use Reboot into Bootloader;
- A simple reboot is carried out using Reboot;
- Power Off – normal shutdown.
Thus, using this menu you can great amount functions that are not available in visual settings. If you have any questions, you can always ask them in the comments!
 Hello everyone. We are studying strange things in Android, this time we will think about what Backup is. user data. So guys, as I understand it, Backup user data is an item in the menu Android Recovery. But why is this point needed? Yes, everything is simple here, this item is needed to save all your settings, including personal information, contact list, SMS/MMS messages, installed applications.. In principle, Backup User Data is translated into Russian: backup of user data.
I read on the Internet that not all phones support this backup, but if the Backup user data item is in the menu, then the phone should support it. And one more thing, why is this thing needed at all? This means that using a backup, you can save all your personal data as a backup copy. It looks like you can save it to a memory card.
And here is the Android Recovery menu itself:

As you can see, there are many items here, including Backup user data. And there is also a Restore user data item, as I understand it, this is the reverse process, that is, restoring data from a backup. In general, if it all works without jambs, then I advise you not to ignore the opportunity to make a backup. And you also see in the picture something like Use volume up/down and power, what is that? Yes, it’s not entirely clear here, it seems to say that to navigate the menu, use the volume buttons and the phone’s power button, something like this..
When the backup is complete, it will say something like Backup user data complete, and the backup itself should be on the memory card. The name of the backup will be something like userdata_20140823_022749.backup, as you can see, the name indicates the date the backup was created, which is convenient. Everything is restored easily too, select Restore user data in the menu and then select the backup file and the restoration will begin.
Friends! Today there is so much talk about the OS, recovery, all sorts of words with the root -boot-, that if you don’t know something, you feel stupid (I’m not humiliating anyone, no). Therefore, I decided to tell you about this.
Attention! No one is responsible for all your actions except you!
And it’s not for nothing that this topic has such a name, because I’ll talk about Recovery and Factory mode
. I think many have heard about recocery, but what is it? This is a set of programs for operating with the OS, such as backup and data recovery, and so on. But few people have heard of factory mode. This is a mode that allows you to check the phone's functionality. You can check everything at once or separately. But more on that later. Important: before operating in recovery and factory mode, charge the device to at least 50%, since all activities in these modes consume a lot of battery.
1. How to go: If you have volume rockers, then turn off the device. If you don’t have them, then hold down the “home” button. Then, holding them and the power button, wait for this window (it may not appear, it’s okay):
2.Mode selection: Now we choose what we need. For recovery - sound+, for factory mode - sound-, respectively.
3. Let’s understand what, why and how:
This is what recovery looks like: 
Let's figure out what's what:
reboot system now = system reboot;
apply update from sdcard = unpacking archives and installing firmware and other contents of archives (in most cases, root rights are required);
wipe data/factory reset = full reset settings;
wipe cache partition = clear cache;
backup user data = backup of all data. Need ~200 MB on memory card);
restore user data = restore data from the backup made in the previous step.
Now factory mode (not available everywhere): 
1.Tpupgrade = improvement touchpad at the bottom of the device;
2.Full Test = full test telephone;
3.Item Test = selection test;
4.Test Report = test notification;
5.Signaling Test = SIM card signal test;
6.GPS Test = everything is clear here, GPS test;
7.Reboot = reboot.
4.Precautions: Follow the written rules and you will reduce the risk that something will happen to your phone.
1. Charge the device to at least 50% if you want to make a backup or reflash, etc. ;
2. Let the device cool down: while performing the above steps, the device becomes very hot. If it gets too hot, you better remove the battery.
In principle, that's all. Good luck with flashing, etc.!
Hello, please explain how to use the Android System Recovery 3e mode, there is such a huge menu that half of the items are not clear.
Answers (2)
This comment is edited.
Recovery (also known as the recovery menu) is a separate small operating system that has a minimum of functions and works independently of the main one. There are stock and custom recovery. The first is “native”, the second is modified and improved, it must be installed independently.
The most common custom ones are CWM and TWRP; they are supported by most devices.
To enter recovery on Android you need:
- be sure to charge the battery 80-90%;
- turn off the device;
- simultaneously hold down the “on/off” button, volume control button “louder”, sometimes also the “home” button (depending on the model);
- wait until the manufacturer icon appears;
- release, the recovery menu will appear.
To move around it, use the volume control carriage - “louder” up, “quieter” down. To enter the sub-item you need to press the “on/off” or “home” button.
Returning to the previous menu is carried out using the “go back” item. After selecting any command, a list appears with sub-items “no” and one “yes”, which must be clicked to run.
The number of points depends on android system recovery. Instructions for use are as follows:
- “reboot system now” - reboot, through it you can exit android system recovery, depending on the device, the menu may contain this item in the “power menu” section;
- “wipe data/factory reset” - reset to factory settings, deleting all information from the device, after which the smartphone will be the same as after purchase;
- “wipe cache partition” - this item is responsible for deleting the system and application cache, that is, cleaning unnecessary files;
- “install from sdcard” - installation of archived files from a flash drive.

Some points have additional sub-points, so I’ll tell you about each of them. Chapter " backup and restore":- "backup" - created backup copy operating system, which is saved on a flash drive;
- “restore” - installing a backup; by opening the item, a list of firmware will appear;
- “advanced restore” - restores part of the operating system, the command works with the same partitions as the next function.

You need to be very careful with the “mounts and storage” item, as it can damage the device. It is used for formatting - permanent deletion all information and mounting, that is, connection to the system. This item works with the following sections:- “mount/system” - system;
- “unmount /data” - to store user information;
- “mount /sd-ext” - mounts part of the operating system onto a flash drive to expand capabilities;
- “unmount /cache” - cache, temporary files;
“mount /sdcard” - SD card.
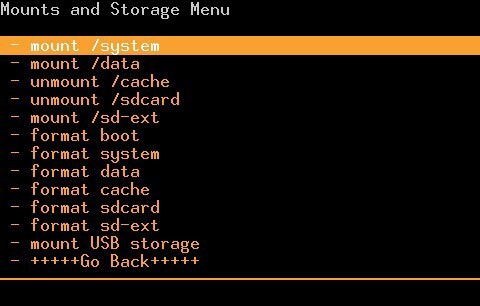
The "format" command works with the same sections, but only clears all the contents. Applying this item to “system” or “data” will kill the smartphone.
In recovery there is an “advanced” submenu, which includes additional features. Here is their list:
- “wipe dalvik cache” - cleaning unnecessary files from the dalvik machine in which programs are launched on the phone;
- “wipe battery stat” - clearing information about battery usage;
- “restart adb” - loading into adb mode, which is needed to control the device via command line from PC;
- “fix permissions” - the command returns file permissions to their original state.
This comment is edited.
Rarely, but a situation arises when android system recovery 3e does not respond. What to do about this problem and how to solve it depend on the reasons:
- not unlocked bootloader;
- installation experiments custom recovery, as a result of which the native one failed;
- Broken volume or power buttons.
The most common reason Due to which android system recovery 3e may not respond - this is a locked bootloader. Its unlocking occurs in different ways and depends on specific model devices.
An unsuccessfully installed recovery must be “rolled back” to its original one. First you need to find stock recovery For the desired model- It’s best to search on our and American forums.
The recovery is flashed through ADB program, which is installed on the computer as follows:
- download the zip archive;
- open it, find the ADB.exe file;
- in the menu that appears after right-clicking on it, select “run as administrator”;
- then a blue window will appear;
- write “y” and press “inter”, repeat this 3 times, so we agree to install the program and drivers;
- go to the ADB folder, it should be in the root of drive C;
- copy the downloaded recovery here and rename it to recovery.img;
- press “shift” and right button mice;
- select “open command line”;
- enter “fastboot flash recovery recovery.img" is the command that will install the downloaded recovery;
- by pressing “inter” we launch it;
- write “reboot”.
After this, you can enter the updated recovery.
If the buttons malfunction, you need to connect the device to the computer as described above, enter “reboot recovery” and press “enter”.


