The best programs for quickly deleting files. Files Terminator Free - permanently delete data from your computer
Permanently deleting files from a computer is necessary to ensure user privacy. The free CCleaner program has a built-in tool for securely erasing information from your PC.
I may be asked, what does confidentiality have to do with it if the file is already deleted from the computer? It would seem that the file is no longer on the computer, what then should you worry about? It's not that simple here.
When you delete data from your computer, the Windows operating system changes the file attribute, marking the file as deleted. In this case, the contents of the file are physically located in the same place on the hard drive. Therefore, this file can be recovered using a specialized program, for example, R-Studio, EasyRecovery, etc.
If, after a certain time during computer operation, other information was written to the location where the deleted file was located, then it will no longer be possible to restore such a file, since the file was overwritten by other data. In the best case, individual fragments of the file located in another location on the disk will be saved if the file has been fragmented.
It’s just that deleted files that have not yet been overwritten are quite possible to recover. There is one problem: in some situations, a complete stranger can recover deleted data.
Permanent deletion of data is necessary when selling a computer, so that the new owner does not receive any confidential information relating to the previous owner of the PC. In other cases, when unauthorized persons have access to the computer, there is also the possibility of leakage of seemingly deleted confidential data.
To securely permanently delete files, a special shredder program is used to erase information from the hard drive. This program overwrites areas of the disk where deleted files were located. After this, it will be impossible to recover deleted data programmatically.
The process of erasing disks in CCleaner takes place in 4 stages:
- Selecting the erasing method.
- Selecting a rewrite method.
- Selecting a disk to erase.
- The process of erasing data on a disk.
To start the overwriting process, you first need to select what you want to erase on this computer. There are two options available in the program: “Only free space” and “Entire disk (all data will be destroyed).”
If you choose to overwrite only free space, the area on the disk not occupied by files will be overwritten. After this, the areas of the hard drive on which previously deleted files were located will lose all information that was previously theoretically possible to recover.
Overwriting the entire disk will permanently delete files from the hard drive (selected disk partition, external hard drive, removable USB drive).
- Easy rewrite (1 pass)
- DOD22-M (3 passes)
- NSA (7 passes)
- Guttman (35 passes)
In most cases, simply overwriting the data will be sufficient. If necessary, you can choose a more advanced method of destroying information.
Keep in mind that the data erasing process will take a certain period of time, which depends on the size of the erased space and the overwriting method (more passes will take more time). In any case, this is a rather lengthy process.
Select the desired disk, and then click on the “Erase” button. In this example, I chose the following settings: erase only free space, simple overwrite (1 pass), disk - USB drive (flash drive).

After this, the process of clearing free space will begin.

After the overwriting process is completed, a program window will open with the message: “Disk erasing completed successfully.”

Conclusions of the article
The free CCleaner program can be used to permanently delete files from your computer. The program reliably erases free space on the disk, or erases the entire disk, making it impossible to recover deleted files using software.
While working with a computer, users often encounter a situation where one of the files simply does not want to be deleted. When you try to delete a file, the operating system reports an error and the deleted file remains in place. In such a situation, you need a program to delete non-deletable files. In this article we will look at three such programs, and also look at other ways to solve this problem.
Unlocker is the most popular program for removing files that cannot be deleted. The Unlocker program is distributed completely free of charge, there is a regular and portable version of the program. You can download the program on the official website.
With Unlocker, you can rename, move, and delete files and folders that are not normally deleted.
The Unlocker program works from the context menu. After installing the program, the “Unlocker” item appears in the context menu. If you encounter a file that cannot be deleted, then you need to right-click on it (to bring up the context menu) and select “Unlocker”.
After this, the Unlocker program will launch, in which you will see a list of programs that block the uninstall function. Below the list of programs there will be a drop-down menu and a row of buttons.

From the drop-down menu you can select the action you want to apply to the file. You can rename, move, copy, or delete the file. You can also unlock the file and delete it later in the usual way. To do this, use one of the buttons:
- Delete process – Unlocker will terminate the program that is blocking file deletion.
- Unlock – the program will unlock the file by the selected process.
- Unlock all – the program will unlock the file by all processes.
As a rule, after deleting a process or unlocking it, you can perform any actions with the file without restrictions.
IObit Unlocker is another program for removing files that cannot be deleted. Unlike Unlocker, this program is not so well known, but, nevertheless, it copes with its task no worse. The IObit Unlocker program is also distributed absolutely free of charge, you can download it from the official website.
The IObit Unlocker program can be used either from the context menu or simply by launching the program. After launching the program, you will see a window into which you need to drag files that you cannot delete.

After adding a blocked file, the “Unblock” button and a drop-down menu next to it will appear in the program. By clicking on the “Unlock” button you will remove the lock from the file, this will allow you to perform any actions with the file.
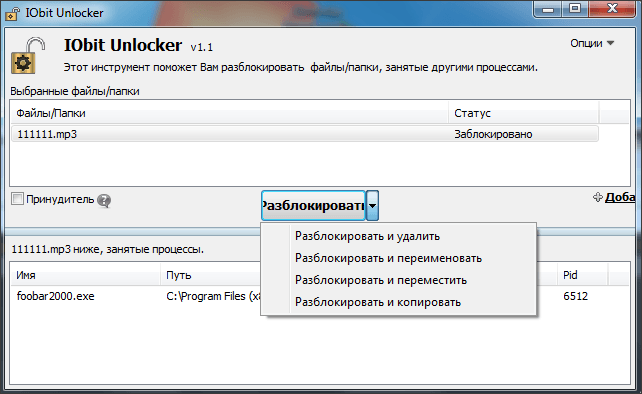
If you want to immediately delete a file or perform another action on it, then you need to open the drop-down menu. From the drop-down menu you can perform the following operations on the file: Unlock and delete, Unlock and rename, Unlock and move, Unlock and copy.
LockHunter is the last program to remove files that cannot be deleted that we will look at. This program, like the previous two, is distributed free of charge and can be downloaded from the official website.

As you can see in the screenshot, this program has a rather confusing interface and does not support simple drag and drop of files. Therefore, it is better to launch it from the context menu.
After opening a locked file, LockHunter displays a list of programs that are blocking the file.
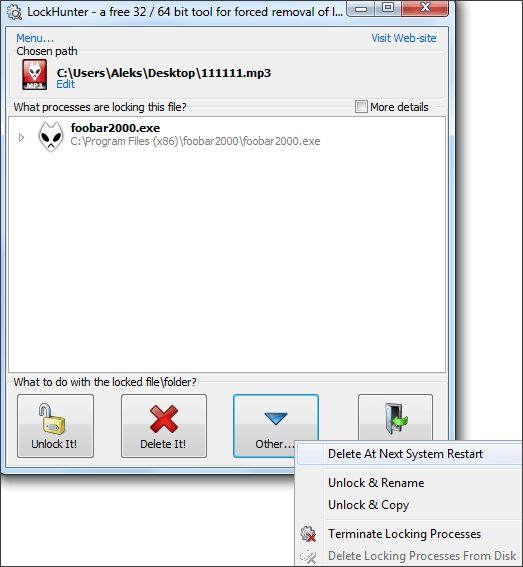
Below the list of programs there is a row of buttons:
- Unlock It – The program will unlock the file. After this, you can perform any actions with the file without restrictions.
- Delete It – The program will delete the locked file.
- Other – drop-down menu with additional functions.
If you want to immediately delete a file, then click on the “Delete It” button and the program will quickly solve all your problems.
Other ways to delete files that cannot be deleted. Before you resort to using programs to remove files that cannot be deleted, you can try to delete the file yourself. Below we will list some tricks that will allow you to delete almost any file without using third-party programs. So, if you are faced with the fact that you cannot delete a file, then you need to try the following:
- Close all running programs and try again. If the file is used by any program, then most likely it will not be possible to delete it.
- Stop your antivirus and close it completely. If a file is suspected by an antivirus, the antivirus can block any operations with it.
- Log in to your administrator account and try to delete the file again. In some cases, a file can only be deleted with administrator rights.
- Restart your computer and try again. It’s not uncommon that after a simple reboot, the file’s lock is removed and it can be deleted without any problems.
- Disconnect your computer from the local network and try to delete the file. If the file is being used by other users on the local network, then it is quite possible that you will not be able to delete it.
- Boot your computer into Safe Mode. Safe mode loads only the most basic components of the operating system. Therefore, the likelihood of your file being blocked is much lower.
Instructions
The first way to delete files and folders without possibilities subsequent recovery is as follows:
- select the file or folder to be deleted by left-clicking on it once;
- press the “Shift + Delete” key combination on your keyboard (on some keyboards, the “Delete” button may also be called “Del”);
- a dialog box will appear asking you to confirm the final deletion of the file;
- in this window, click the "Yes" button to confirm deleting the file or the "No" button to cancel this process.
The second method is to disable the Recycle Bin mode when deleting files. Do the following:
- select the system Trash folder by right-clicking on it once (the Trash folder is located on the Desktop as a shortcut);
- in the action selection menu that appears, click on the “Properties” line. The Trash properties window will pop up in front of you.
- in this window, select the "Global" tab. There are general settings for the operating system Recycle Bin;
- in the selected tab, check the box next to "Destroy" files immediately after deleting them, without placing them in the Recycle Bin." After that, all deleted files and the folders will be destroyed completely, that is, without possibilities their subsequent recovery.
If deleted files and the folders are already in the Trash, then to completely destroy them you need to empty the Trash. To do this, right-click on the Trash icon once and select “Empty Trash” from the menu that appears. Then simply confirm to empty the trash.
Video on the topic
Sometimes users need to delete a file or folder from their hard drive or removable media. Usually, to do this, just mark the file and press the Delete key or right-click on the file name and select “Delete” from the context menu. However, standard means do not always work.
Instructions
The file may be occupied by a process that is currently running on the computer. In this case, the system displays a message like: “The file (folder) cannot be deleted.” No access". Try closing all open folders and programs and try again.
If the message repeats, right-click on the taskbar (blue bar at the bottom line of the screen) and launch “Task Manager” from the context menu. Open the "Processes" tab and look closely to see if the process with the name of the file you are trying to delete is running. Check this process and click End Process. After the system warns, confirm the completion of the process and then try deleting the file again. If the attempt is unsuccessful, restart your computer (this will close all running programs) and try again to delete the file using standard means.
An executable file that cannot be deleted may be a virus program. Log in in Safe Mode. To do this, after turning on the computer, press the F8 key until the boot mode selection menu appears. Select the top item “Safe Mode” and after loading Windows, try to delete the file using standard methods.
You can use the free Unlocker program to delete files. Download it from the manufacturer's website and run it. During the installation process, carefully read what exactly you are offered to install. On the first screen, uncheck the box next to “I accept the terms of the license agreement with Hamster Free Zip Archiver” if you do not need an archiver from this developer, and click Next. The next screen will ask you to install SpeedUpMyPC. Uncheck the box if you don't think you need to do this and click Decline.
In the language installation window, select Russian. When installing the Unlocker program, if you consider yourself an advanced user, select the Advanced method, but uncheck the boxes next to Install Delta Toolbar - later it will be very difficult for you to get rid of this program.
Now, to delete a file, right-click on it and select Unlocker. The program will prompt you to select an action from the list: “No action; Delete; Rename; Move." Use "Delete".
note
If a deleted file or folder appears again every time the system boots, it makes sense to scan your computer for viruses.
Tip 3: How to permanently delete data from HDD
Situations regularly arise when it is necessary to restore personal and service files that were accidentally deleted or located on storage media. The opposite situation, when you need to delete data from the HDD so that no one will ever see it, is less common. However, if you decide to give someone else a hard drive on which confidential data was stored, it can be permanently deleted.

Instructions
Regular deletion and even formatting does not destroy data, it only changes information about which files were written where. Data is easy to retrieve. Therefore, the old HDD can be subjected to so-called low-level formatting, which will actually erase all data. When restarting the computer, you need to hold down the Delete or F1 key, enter the BIOS menu and find the 50h command there, which will format the hard drive.
New hard drives are formatted at a low level only at the factory before being put into operation, because their design is much more complex. Since low-level formatting is not applicable to modern HDDs, and the 50h command will only write zeros over your data, you need to use software with a data erasure function. Repeated rewriting will make reading deleted information problematic. To do this, you need to install a utility like Victoria (Erase item), HDDScan, Eraser HDD or MHDD. Auslogics BoostSpeed also has a feature that allows you to overwrite disk sectors multiple times.
There are special utilities that replace low-level formatting. It is better to download such programs from the official website of the manufacturer of a particular hard drive. There are also universal utilities, for example, HDD Low Level Format Tool and SeaTools for DOS.
Video on the topic
Removing hidden folders and files from your computer is the same as deleting regular ones, except that you need to enable their display in Windows settings before doing so.

Instructions
Open Control Panel and select the Folder Options menu item. In the window that appears, go to the second settings tab, which is called “View”. Scroll to the end of the list and in one of the last positions, check the box for “Show hidden folders and files.”
Here, check the “Show hidden system folders” checkbox. This will allow you to enter system directories that are hidden from users in order to protect the data contained in them. If you do not have sufficient skills to work with them, do not enable their display in the system.
Apply and save the changes. Here you can also change other settings for folders in your operating system, for example, adjust the visibility of file extensions, change folder thumbnail settings, and many others. The adjacent tab is responsible for associating files of different extensions with applications, after which any registered file type can be opened with a program specifically defined for this purpose at the user’s request. Also here you can configure other parameters regarding the appearance of folders and files in the operating system. Please note that changes will only be available to the current Windows user.
Go to the directory that contains hidden folders and files that you need to delete. Select them with the mouse button and delete them in the usual manner, for example, by pressing the Delete key, or Shift+Delete if you want to delete them permanently without the possibility of recovery. If some of the hidden elements cannot be removed, uncheck the “Read Only” attribute in its properties.
Tip 5: VKontakte: how to delete from a social network without the possibility of recovery
The desire to permanently delete your account from the VKontakte social network arises among users for various reasons. Some are running from addiction, which they suddenly realized, others are running from broken feelings or virtual love.

You will need
- Internet
Instructions
On any free server, for example, yandex.ru or mail.ru, create a new mailbox. This can be done without even closing the inbox folder in the browser.
On the VKontakte social network, go to the “Settings” menu. Opposite the value “Who can view”, select the item “Only me”. Other users who visit your page will see a message indicating that the page has been deleted. This way you will notify your friends that you deleted your account intentionally.
Go to the Settings menu and the General submenu. Select "Change Password". Enter your old password in the top field and, without closing the page, proceed to the next step.
Open the Notepad text editor, switch the layout to English and randomly press any keyboard keys. Select fifteen characters from this unique password and copy them to the clipboard using the right mouse button or using the Ctrl + C combination. Close Notepad without saving the file.
Return to "Basic" settings. Paste what was copied into the "New Password" line and the "Confirm New Password" line. Click on “Change Password”.
If everything is done correctly, the page will refresh and the message “Password changed” will appear. If this does not happen, repeat the operation until it succeeds. Proceed to the next step only after completing this.
Go to the “Change e-mail” field. Enter in the “New e-mail” line the address of the mailbox that you created in the first steps of the account deletion operation. Click "Change email".
A letter will be sent to your new and old mailbox. First, open the letter from the old mailbox, follow the link to confirm. Then do the same with the letter from the new mailbox. The VKontakte page should close. A window for entering your login/password will appear in front of you.
To eliminate the possibility of using the “Recover Password” button, delete the new mailbox, according to the instructions of the server where it was created.
Video on the topic
Today Google Chrome is one of the most popular browsers. The program has earned its popularity due to the speed and stability of its work. However, in some cases, you may need to reinstall your browser to update, troubleshoot, or reset settings.

Google Chrome on computer
If you want to remove Google Chrome from your computer without being able to restore all your bookmarks, downloads, and saved pages, you can use the Windows Add or Remove Programs tool. By uninstalling the program, you will erase all the settings that were stored on your computer. To go to the Google Chrome uninstaller, click on the “Start” button - “Control Panel” - “Uninstall a program”. In Windows 8 operating systems, you can go to the “Control Panel” by using the Metro interface and clicking on the corresponding shortcut in the menu that appears.
Saving bookmarks and settings
If you only want to reinstall Google Chrome, but keep all the recorded bookmarks and data, you will need to save the browser configuration files located in the program folder.
To save program bookmarks, open Google Chrome and go to the “Bookmarks” - “Bookmarks Manager” menu. You can also go to the management menu using the Ctrl, Shift and O key combination. After that, click “Arrange” - “Export bookmarks to HTML”. In the window that appears, select the folder where you want to save your saved pages.
If you want to save both your settings and your Chrome bookmarks, you can download all the necessary data to your Google account. To do this, click on the program menu button and go to the “Settings” section. Click on the “Sign in to Chrome” button and enter your Google account information (Gmail, Blogger, etc.). You can also specify the account you are using on your Android and iOS gadget.
After logging in, click on the “Yes, sync everything” button. You can specify parameters for synchronization in the “Advanced” section. After the operation, you can remove the browser from your computer through the “Uninstall Programs” menu “Control Panel”.
After the browser is reinstalled, you can restore your bookmarks through the menu “Bookmark Manager” - “Arrange” - “Import Bookmarks from HTML File”. If you want to restore your settings using the specified Google account, go to “Settings” and sign in to the previously specified account again.
To be sure that no one will use your confidential data after you have erased it, advice from specialists and special programs selected by them will help.
User information is becoming increasingly valuable, which means reliable protection against theft is required. Important confidential documents, account and credit card information can all become easy prey for inquisitive attackers. By deleting documents and other important secret data from the Recycle Bin or immediately bypassing it, many users think that they have destroyed them irrevocably and nothing threatens their security.
However, in reality this is not always the case. Any person well versed in computers, if desired, can easily restore information deleted in this way. In addition, a lot of service data is stored in the operating system and on the hard drive in various forms, including about the user’s actions, such as visiting sites, copying and transferring files, what programs he worked with and even when and what flash drives he connected .
If special devices known as shredders can be used to destroy paper documents and optical discs, and fingerprints can be erased, then with traces left in a PC, everything is not so simple and obvious. For example, even when creating an encrypted file, a temporary, unprotected copy of it can be generated, which an attacker could theoretically later restore. In addition, many programs, such as Microsoft Office or Adobe Photoshop, leave service information in files, including information about previous versions, where confidential data that the user later erased can be stored.
We will tell you about the main ways to delete personal information from the system and when working in different programs and then clear free disk space to eliminate the chance of recovering deleted files. In addition, you will learn about the features of cleaning solid-state drives.
Destroying temporary files
Temporary files that are created by various applications, such as MS Office, and, of course, browsers can tell quite a lot about the user. To destroy temporary files, it is best to use special utilities that do their job automatically.
CCleaner. Free Windows cleaning utility. Among other functions, it allows you to clear free space on the HDD from previously deleted files and safely erase information. To do this, go to the “Service | Erasing disks." Specify what exactly you want to remove, as well as the method (for example, “NSA (7 passes)”), and select the drive. To destroy data, CCleaner provides the user with a choice of algorithm: single overwrite, 3, 7, or 35 cycles.

Mars WinCleaner- this is no longer a new, but very reliable utility for deleting temporary files - the result of the work of many programs. Unfortunately, this program does not have a function for completely erasing information, but it can be configured to automatically clean the system of temporary files on a schedule, as well as when the computer is turned on or off.

Kaspersky Internet Security Thanks to its “Remove Activity Traces” function, it allows you to remove most of the temporary files that can tell about your work with your PC. You can find this option in the “Tools” section.

Clearing data in programs and documents
A document that you have edited many times often contains part of its history, and using standard or special tools, its previous versions can be partially restored.
For example, files with the PSD extension of the Photoshop photo editor contain a history of changes that can be used both for good - to edit the image, and to identify some details that the user would like to hide. To avoid this, you should copy the completed version of the document into a new, clean file and send it to the recipient. This way you will get rid of the change history. You can check this by comparing the sizes of the new file and the old one that was edited.
In addition, when using older versions of Microsoft Office, it may be useful to install a plugin from the manufacturer - Remove Hidden Data, which allows you to remove various service information from Microsoft Office 2003/XP documents. In the 2007 version, to do this, click on the round button with the program logo and select “Prepare | Document Inspector”, then in the window that appears, mark the necessary menu items with checkboxes and click on the “Check” button. After scanning, the wizard will prompt you to delete the found data. In Office 2010, this feature can be found in the File | Details | Troubleshooting | Document Inspector."

Browser cleaning
To automatically or manually remove personal information from Internet browsers one-time, you must change their settings.
Mozilla Firefox. To remove traces in this application, you need to go to “Tools | Settings" and on the "Privacy" tab, check the "Clear history when closing Firefox" checkbox or configure the program in a way convenient for you, for example, so that the browser does not initially save information.
Internet Explorer. You can use the keyboard shortcut “Ctrl+Shift+Del” or the menu item “Tools | Delete browsing history."
Opera. Click on the "Opera" button and go to "Settings | Delete personal data." In this window, you can use the drop-down list to specify in detail what data should be deleted.
Apple Safari. Click on the gear button and select “Reset Safari” from the menu that opens.
Google Chrome. Go to settings by clicking the button with three bars in the upper right corner, or simply enter chrome://chrome/settings in the address bar and on the settings page that opens, click on “Show advanced settings”, and then click the “Clear history” button.
Automatic and manual system cleaning
If you do not want to install additional programs, you can use the Windows registry, browser settings and local OS security policies.
Swap file. Elements of processed confidential information may remain in this storage. To automatically clean it, you must do the following: Press the key combination “Win+R” and in the line that appears, enter the command “secpol.msc” (without quotes). Click OK. In the window that opens, go to “Local Policies | Security Settings" and on the right side of the window select "Shut down: Clear virtual memory page file". Double click on it. In the settings window, set the mode to “Enable” and click the “Apply” button. Now when you turn off your PC, the page file will be automatically cleared.

Information stored on the Internet
Not only can your computer contain user data - on social networks, even after you delete previously uploaded photos or your pages, they remain in storage and can be restored at the request of intelligence services. All records about the IP addresses you use when connecting, passwords, correspondence, etc. are also stored for a long time.
Therefore, try not to transfer important and unencrypted information to cloud storage: they can be hacked or be under constant surveillance by various intelligence services and security services of a competing company. Even when deleting data from the cloud, you have no guarantee that copies of it will not remain in storage and will not be transferred to outsiders or captured by attackers.

Clearing free disk space
With standard deletion, the file is not completely destroyed - the operating system only erases the address of its location. The data itself can be stored on the HDD for quite a long time until it is overwritten by other information. And even after rewriting, such information can be partially restored. To ensure the destruction of data, we recommend that you use publicly available programs that ensure irreversible deletion of information.
eraser. This is the most popular free utility that allows you to truly reliably destroy documents, including the Guttmann method, in which the file is overwritten 35 times with random data. Eraser also offers the function of clearing free space on the HDD to completely destroy erased information.

Kremlin. This is a real data harvester, and file destruction is only part of its functionality. Also, with its help, you can encrypt information and remove traces of computer work. Among other things, Kremlin offers a useful function for cleaning RAM, where important information may be stored.

Acronis True Image Home 2013. In addition to the basic functions of backing up data, the application will help you irreversibly delete specific files and folders, as well as clean up already empty disk space. In this case, you can choose a data destruction algorithm.

Flash drive tracking
The operating system can even remember information about previously connected flash drives. Using the USBDview program, you can see when and which flash drive was connected, and also erase this information. You can also delete such information in the Registry Editor in the following branches:
"HKLM\SYSTEM\ControlSet001\Enum\USBST OR"
"HKLM\SYSTEM\CurrentControlSet\Enum\U SBSTOR."
Wiping SSD
The technique of repeatedly rewriting data to delete it without a trace is destructive for solid-state drives due to their limited resource. In addition, studies have shown that not a single software method of deleting information guarantees its complete destruction - from 4 to 91% of “safely” erased files can be restored. Therefore, the only reliable way to permanently delete data from an SSD is to physically destroy the media.
Hardware erasers
If your HDD or flash drive contains important information that needs to be destroyed quickly and irreversibly, one way is to use hardware.
For internal hard drives
Now there are devices on the market that allow you to reliably and in a short time destroy all information stored on a “protected” hard drive. There is even a function for extreme cases - physical damage to the HDD. One of such devices is the domestic development 2S-994 “Priboy”. The cost of such a device is almost equal to the average PC performance and is about 16,000 rubles.
For portable disks and flash drives
In the age of mobility, transporting confidential information on portable drives can be safe if you take special care in advance. For example, there are special media with the ability to remotely monitor their position, block recorded and encrypted information upon command, and even physically destroy the drive. The Security Guardian flash drive, developed by ExactTrak Ltd., has similar functions. It can also automatically self-destruct, block or delete information if the drive is removed from the specified perimeter. Servicing such a flash drive will cost approximately 1,300 rubles per month, while the cost of the 32 GB drive itself is 20,000 rubles, including the first year of security service.

Today, under my “software microscope” I had the temerity to come across a free program for permanently deleting files and folders called Alternate File Shredder.
Is it as good and reliable at dispersing various computer files into atoms, without the possibility of their recovery by any means, methods and special programs, as the manufacturers claim? Let's check.
How to completely and securely delete a file or folder
Several times on the pages of this site I have described to you special recovery programs accidentally deleted files. With their help it was possible to return data even after formatting the disk.
But what if the task is to completely delete a file or folder, without a single chance of recovery (by bad uncles and evil aunts)... so that no Recuva, Hetman Partition Recovery or PhotoDOCTOR can resurrect them? Are there really no such programs?
We launch the program and specify files or folders for secure deletion...
The "number of iterations" is the number of passes. On SSD drives, I do not recommend abusing this figure (one pass is enough).
Click on the “Destroy files” button and confirm complete deletion...

(Oops, screenshot with deleting another file)
...let's go submit documents to any spy organization in the world...

We check the reliability of data deletion...

...the Recuva program didn’t find anything even similar to my deleted file, but it did find a huge pile of files that were deleted a couple of years ago.
I didn’t check the data with other resuscitators - I’m sure the result will be the same.
Download Alternate File Shredder
Alternate File Shredder, a program for permanently deleting files and folders, lives at this address - http://www.alternate-tools.com/
Its size is 909 kb. There are no viruses or installation difficulties. Has a multilingual interface (English, Spanish, French, Italian, Russian, German, Korean, Czech...). Works in absolutely any version of the Windows operating system.
And lastly, do not confuse Alternate File Shredder with uninstalling programs. These are different things. The hero of this article deletes individual files and folders, and does not uninstall programs previously installed on the computer.
P.S. I also ask you not to make a holivar in the comments about the fact that there are other programs with a similar function of reliable permanent deletion - of course there are, but this article was about Alternate File Shredder.
Until new useful computer programs and do not forget to delete files behind you.


