DIY table with a built-in computer. Gaming computer tables
IN Lately worked on the creation of a serial table-case called Cross. Recently it became known that this table became available for pre-order on the official website of the Red Harbinger company.
Background of this product you may also have already seen on the pages of our website. So, after modder L3p presented to the public his desk-computer L3p D3sk, and then , people turned to him a large number of those who want to buy the same table for installing a computer. For this reason, modder L3p (together with his comrades) decided to make serial version table for installing a computer, making it accessible to everyone. At the same time, the prototype of this product was assembled, tested and finalized in front of the entire modding community as a modding project, which took place in May of this year.

Basis of serial cross table made of aluminum and steel, coated with powder paint, while the table top is made of scratch-resistant tempered glass. What to touch functional characteristics, then the table-case allows you to place two separate high-performance gaming PCs (at the same time, the mounts for the second motherboard expected soon), and the most powerful system water cooling for them. In addition, the table provides space for hidden cables, four 5.25-inch drives, a couple of dozen 3.5/2.5-inch drives, a sufficient number of places for fans, etc. In addition, the specification of the table-case also provides additional options, such as decorative panels, drawers for various small items and fasteners for a headset, and the design itself is modular, that is, it is quite amenable to upgrade and modification. The table dimensions are 1502 x 726 x 765 mm, with up to 300 mm of space allocated for video cards (480 mm with the carriage removed), and for CPU cooler- 153 mm.

Also important characteristic The table-case is its price, which in the USA was $1,699. However, shipping to Europe costs an additional $390. On this moment Cross can be pre-ordered with delivery to the USA, Canada, Europe and Australia. For computer case such a price can easily be called high, but for high-quality furniture such a price is quite ordinary, so most likely there will be buyers for the new item. You can find out more about the new product by visiting
Good afternoon, Khabrovsk residents. Thank you very much for the invite! And although starting with translating other people’s posts is not the best good idea, perhaps this homemade project will seem mega-cool to someone else.
This is a translation of a post from the Overclock.net forum. User Show4Pro decided to take out all the insides of his super computer and hang everything on the wall. Great idea perfectly executed. For those who are interested in how it was assembled and how it works - welcome to the cat.
The last time I updated my home machine was 1.5 years ago. Well, I thought about upgrading the car to i7 (before that there was Bloomfield), although in fact, more powerful processor I didn't need it. I wanted to buy new building- Corsair 900D, to change the 8 year old Super Armor. But I wanted something special, unique. In Battlestations on Reddit I came across a very simple, but elegant solution- wall computer And that's where the whole project began.
Accessories:
CPU: Intel Core i7 950
Motherboard: Asus Rampage III Extreme
Video cards: 2 x AMD HD7970
RAM: 6 x 2GB Corsair Dominator
SSD drives: 4 x 120GB Corsair Force GT SSD
HDD drives: 2 x 1TB WD Caviar Black
2TB WD Caviar Green
1.5TB WD Caviar Green
Power supply: Corsair AX1200i
Sound: Creative Sound Blaster Zx
Cooling:
Cooling for CPU:
CPU Water Cooling Radiator EK Supreme HF Full Copper
Pump Swiftech MCP655 /w Speed Control
The cooler itself FrozenQ Liquid Fusion V Series 400 ml Reservoir - Blood Red
XSPC RX360 Performance Triple 120mm Radiator
GPU Cooling
Heatsink for video card EK FC7970 - Acetal+EN
The pump and cooler are the same as for the processor.
Swiftech MCP655/w Speed Control
FrozenQ Liquid Fusion V Series 400 ml Reservoir - Blood Red
Water cooling radiator Watercool MO-RA3 9x120 LT Radiator
Other:
Cooling system pipes
Koolance QD4 Quick Discounnect No-Spill Coupling
Bitspower G1/4 Silver Triple Rotary 90deg Compression Fittings
Monsoon Free Center Compression Fittings
Phobya Angled Clip 90° Tubing Guide
Phobya Terminal Strip Tubing Clip/Holder
The cooling tubes themselves (red) PrimoChill Advanced LRT Tubing Bloodshed Red
Phosphorizing refrigerant, of blue color EK UV Blue Non-Conductive Fluid
Cables:
Bitfenix Alchemy Premium Sleeved Extensions
Corsair Individually Sleeved Modular Cables
Creation.
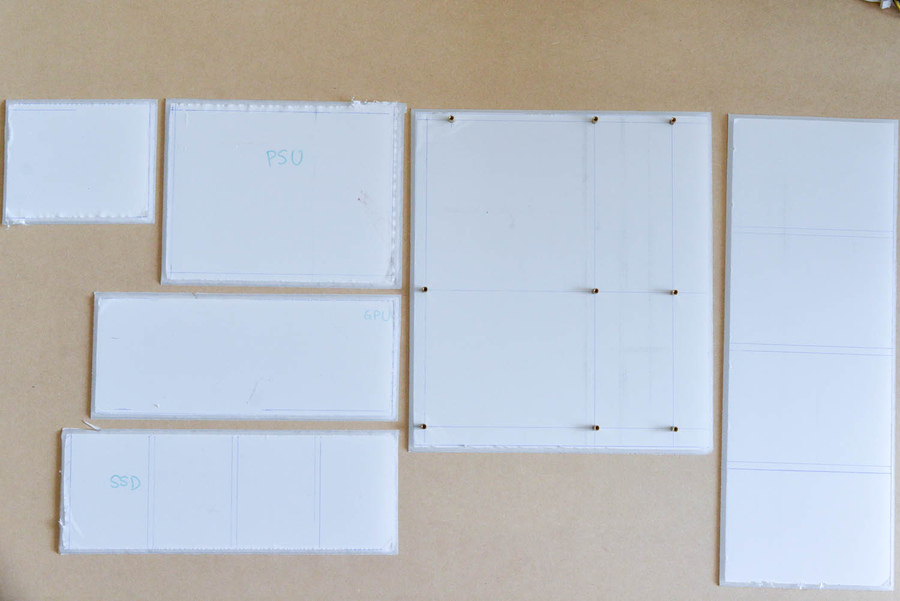
To begin with, I took photographs of all the components in their actual sizes and put it all together in Photoshop. This way I was able to move them around the work surface and decide what it would look like. Well, this is necessary for routing the cooling pipes. Here are a couple of layouts:
I refused this because empty space in the lower right corner. And the motherboard ended up on the left, although it should be in the very center and attract attention to the entire panel. 
There is also a lot of space on the right, although the power supply and motherboard are closer to the center. IN final version cooling tubes stretch along the entire right edge, plus two thermometers appeared there.

I transfer the drawing of the motherboard onto an acrylic sheet.

Since the video adapters will be far from the motherboard, I ordered PCIe slot extenders for each card on eBay. This is me testing how they work. However, later I had huge problems with the cross-function of the cards due to cheap unshielded wires. They ended up on top of each other and created serious interference. The system was stuck loading the BIOS. It was possible to launch it with only one card. In the end, I had to shell out for very expensive cables with good protection. But more on that later.

The goods have arrived!

Most of the water cooling is from Performance-PC. They even gave me a T-shirt and two mouse pads!

Acrylic backing for motherboard.

All acrylic panels are cut at 45° to achieve a glowing edge effect.

The holes are drilled and the fasteners are installed.
TA-dah!!! It turns out that the mother of Rampage III Extreme is eATX format. And this is for the ATX form factor.
I made the correct eATX substrate later.

Time to gut my old dusty case.


In the old computer, the disks are inserted into Vantec HDCS boxes, which make 3 HDD boxes out of 2 5.25" ones.


Video cards.
Supports for all components.

Custom acrylic pump mounts.

Close-up of a rough finish done with a table saw. They will need to be sanded later.

There is a triangular cut in the center of each plate. It will reflect light that is projected perpendicularly inside the plate at the edges. Without a cut, the edges barely glow.


Test with the light on on the sound panel.

All panels are sanded with 120 grit wet sandpaper.

Close-up of sanding.
All back panels are pre-drilled.

Under the table is acrylic snow.

Preparing to paint red.
Surprisingly, Corsair included thermal pads on the blades, although they don't get hot at all.

Marking all components on the main board to mark various slots and holes. Board - 1/4" 48 x 30 fiberboard.

All cracks and holes are marked in their places.

I'm getting ready to cut out the slots with a jigsaw.


I glue the frame.


I paint the inner edges black - to match the color of the carbon film.


Soldering LED strips.

Workplace.


LED strips. Temporary fastening.

Glue a giant one vinyl film. This was the cruelest part. I almost had a heart attack. How to stick a film on a phone screen, only x1000 more.

No bubbles!


I use aluminum tape to hide the LED on the front side of the panel for hard drives, between them.

My assistant is Tommy.

All substrates are installed in their places on the common board using #10 screws. I screwed them into pre-prepared holes.


Checking the light.

Coolant and cables have arrived. I used Bitfenix for the components and Corsair for the power supply.


On the left is Bitfenix, on the right is Corsair. Bitfenix doesn't have black heat shrink on the ends, so the Corsair looks cooler.

Red zip ties to tie up hanging wires.

Backside. All cables are connected.

We test for leaks while the entire system is lying on the floor - this makes it easier to troubleshoot problems.
First start.
Not loaded. I connected via iROG USB to the laptop to view the download log. It turned out that the system was stuck on the VGA BIOS. I disabled one of the video cards - everything worked. I tried to connect another one - it also works. Both cards are not. Did some research and found that unshielded PCIe extenders with ribbon cables are very susceptible to EMI. I tried to shield them by wrapping them in several layers of aluminum foil. 

After 4 layers of foil I was able to get both cards running. But the machine immediately froze as soon as I launched any game or any 3D editor. Moreover, my Soundblaster is also cascaded with a cable to the 3 x1 PCIe slot, and this also greatly interfered with the operation of the video and hung up the system.
As a result, with pain in my heart, I had to order expensive protected extenders for PCIe slots from 3M (approx. $100 each)

Shielded 3M extension cords in place. They turned out to be longer than the previous ones and now both video cards have reached PCIe x16.


Changed the previous sound to SoundBlaster Zx. This one looks amazing!

And finally
At the moment everything is working smoothly. The installation has only 2 fans. On the PSU it barely moves, and I installed another one on the chipset - it’s very quiet. The pump runs at the lowest power, so the computer came out quite quiet. The only annoying thing is that it turns out that you can hear the operation of some components outside the case. In my case, this is the buzzing of the video and 1TV hard drive.EK UV refrigerant is very sensitive to ultraviolet radiation. I know you shouldn't mix coolants to preserve their properties, but damn if I used it undiluted, I wouldn't be able to see the coils in the reservoir. For both circuits I used about 1/8 of the jar, the rest was distilled water.
From the translator
I in no way claim any authorship of this incredible project. It’s just that I’m a journalist with a degree in electronics engineering, and doing such things is my dream. And to be honest, I would make a table, not a wall. So I decided, suddenly not all Khabrovsk residents are sitting onI had regular computer in a regular case with a water cooling system, but I wanted something new and beautiful! And having seen enough of all sorts of modding projects, I decided to do everything on the table, so that all sorts of schoolchildren would envy, and in general, so that it would please the eye! I myself, without hands or tools, had only one idea and decided to turn to a carpenter I knew.
I started looking for an office that could do everything for me, and then problems arose. Nobody wants to work with such non-standard things, and, usually, the modder himself is directly involved in the manufacture of such parts and assembly. But, as I already said that I have no hands, I looked further. the main problem in a solid front panel, curved in 4 places. And I didn’t know what better way to make it out of. In the end, I finally found a man and decided to make everything from wood.
I uploaded drawings from the program and the process began.
Of course, I couldn’t explain everything in words and there were a lot of mistakes with sizes and I had to improvise to fit everything in! It was also necessary to simultaneously solve many problems associated with the non-standard arrangement of cooling components and table dimensions:
How to place SVO components
- how to organize power supply to the coolers on the right side of the table, there are no such long extension cords
- how to secure the controller in the groove
- how to place lighting
- how to hide all the wires or disguise colored ones as plain ones
- how to minimize pump vibrations, hard drive etc.
- what holes to make for radiators for sufficient air flow
- how to clean the board from spilled liquid (yes, I’m a handyman)
And finally, after 2 weeks the table is ready
Let's call this project: I can't do anything myself, here's an idea, a project in a program you don't work in, please make me a table!
For amateurs and professionals computer games We have great news!
Finally, a whole series of truly modern computer desks has appeared on sale, in the design of which the developers took into account all the wishes and requirements of gamers. In addition to the gaming chairs that are now widely distributed everywhere, requests from customers have led to the long-awaited appearance of the right gaming tables for gamers, which allow them to spend time comfortably long hours for your favorite game. It is no coincidence that this new product has become the most popular in the sales ranking among amateurs and professionals of virtual games.
If you ask an experienced gamer about what buying a computer desk means to him, he will probably complain that this is not an easy matter, citing many nuances that are known only to him. Sitting at the table should not only be comfortable from the point of view of human anatomy, but should also be physically correct, that is, so as not to provoke back problems.
The range of modern computer tables presented on websites and in furniture stores is somewhat monotonous. This is approximately the same shape, a set of familiar and sometimes standard additional options and details, such as the ubiquitous pull-out keyboard tray.
If for work and school the standard computer tables cope with their mission quite successfully, then for games and many hours professional work Such tables are definitely not suitable for a computer. Thank God it's special correct tables For active participants computer games have now appeared on store windows, but unfortunately there are not so many of them. New generation computer furniture takes into account all requirements active users from this category of buyers.
So. Let's note the main advantages of tables for gamers:
1. unique design, unusual execution and special style are now given one of the first places when choosing any item. New tables are an ultra-modern, creative thing that will characterize its owner as an advanced person who understands the trends of our time;
2. Such tables stand out from the crowd due to their shape, which makes it possible to expand the options for its location in the apartment. For example, additional USB connectors in the table can solve the problem with wires;
3. premium materials from which the furniture is made allow the table to be used for a long time, disassembled and rearranged without harm to the structure.
There is nothing superfluous in the gaming table that could interfere gameplay. Drawers, shelves, and stands are deliberately removed from these tables. Nothing should distract from the virtual world.
It is impossible to place office equipment on the table and there is no place to store papers. Manufacturers thought about a certain category of buyers, only about their convenience and wishes. Here everything is subordinated to only one goal - the game and no more distractions.
When purchasing a gaming table, focus on your feelings and requirements for convenience. When choosing a stylish gaming desk, think about where it will be placed and how it will fit into the overall design of your room.
It will not be possible to use such a table as an office table. There is no place to store papers or an organizer; you cannot place a printer or copier.
Every gamer will be able to choose a table according to their preferences. When choosing, you should focus not only on the attractive design, but also the size of your room where it will be located. interesting purchase, think about the location of the table in advance.


