New housing for speakers from a music center. Improvement of sound quality of multimedia acoustics. General concepts for upholstery, strengthening the case, replacing wires and installing speakers on spikes. Strengthen the overall structure
Do-it-yourself acoustics modification.
You have a pair of speakers on your hands, or maybe not a pair. Active or passive. Floor or shelf. It might even be a subwoofer and not speakers.

This article will help you learn about ways to improve the sound quality of your acoustics without extra costs. The most effective methods for improving acoustics will be described, which are easy to implement with your own hands. This can be called polishing what the manufacturer could not implement, due to the feasibility of production and its payback.
All instructions and tips from this article are suitable for any acoustics with a bass reflex, including subwoofers and floor-standing speakers. Many tips will also apply to other types of speaker systems.
So, let's begin.
Upholstery of the body with sound-absorbing material and strengthening of the structure.
First, let's find out for what purposes this procedure is being performed.
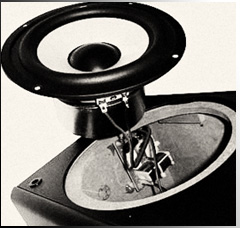
Opening the columns.
Disassembling the column is very simple.
If this is an active speaker, then on the active speaker you need to unscrew the amplification unit from the back, which is screwed on with screws.
You need to remove the block very carefully, without sudden movements. If there are plugs that come unfastened, disconnect them and place the amplifier unit nearby without over-tightening the wires. On passive speakers, you just need to unscrew the screws on the midrange speaker and carefully remove it without damaging the wires.
*All these operations must be carried out carefully and without sudden movements, in order to avoid damage to wires and circuits.
Strengthening the body.
This modification is worth carrying out if you doubt the structural strength of your acoustics and there are no additional rigidity structures inside the case (reinforcing strips, “plugs” on the walls, screeds between the walls). Almost always, speakers need additional strengthening.
For this procedure you will need small 1x1 - 1x2cm bars and rubber glue. We will glue the bars along the corners, on which there are no bars, which will strengthen the fit of the side walls to each other. We measure and cut, apply and estimate, spread plenty of glue on the beam and the place to which it will stick. We glue all the corners where the manufacturer saved wood. Naturally, we use the beams as spacers, and not just glue.

It is also worth laying beams along long walls columns, if missing. As shown in the picture, or diagonally. The beams should fit snugly at the edges.
It is also advisable to make horizontal struts between the walls, this will significantly strengthen the structure. This is especially true for large speakers with long walls (for example Microlab Solo 7).
After this procedure, we get a stronger structure that creates less resonance of the walls, as well as less vibrations when micro-friction and walls touch each other.
To carry out this procedure, we will need double sided tape And sound-absorbing material.
For which goals it's being done.
All this action is carried out with the purpose reduce reflection of sound waves from an acoustic body with a bass reflex. If this is not done, then often, instead of bass, incomprehensible buzzing and whistling sounds will come out of it. Upholstery gives more smooth And balanced bass which is becoming more soft and better audible. It removes the buzzing, resonating sounds that arise in the acoustic body due to the collision of sound waves. This also allows you to slightly expand the lower range of reproduced frequencies.
As sound absorbers, the best materials are: padding polyester(can be found at any clothing market, or can be found in an old jacket :) felt, rolled wool or the most interesting material - cotton wool, sound-absorbing – type “ URSA”, besides, it is non-flammable. Just not insulating glass wool made from quartz sand, but homemade wool for installing partitions. If obtaining these materials is problematic, as a last resort you can use rolled foam, which you can get at any HozMage. But its use is still highly undesirable. Do not forget that padding polyester, felt, cotton wool must be fluffed before gluing.
To begin with, we take out the sound-absorbing material that the manufacturer put inside, if any.

What are we doing.
1) We glue with double-sided tape as much of the area inside the column as possible. Immediately peel off the protective paper.
2) We cut or stretch the sound-absorbing material so that the bare walls are completely covered, including (especially) the corners.
3) We line all the cavities with material so that the wooden walls are completely sealed. The thickness of the layer should be no more than 2 cm, otherwise it can significantly reduce the volume inside the case, which will not have the best effect on the depth of the bass component.
Warning.
In areas that get hot, it's best not to overdo it. This applies to places near the transformer and amplifier unit. It is better to leave an empty space of 1-2 cm between them and the sound-absorbing material. Therefore, the best material is non-flammable sound-absorbing wool like “URSA", which, for example, may remain after repairs. It can be used without restrictions.
You need to try to fix the material as thoroughly as possible. After all, you don’t want cotton wool or synthetic padding to jump around inside or, even worse, fly out of the bass reflex during large movements of air masses inside the housing :)
Modification of the bass reflex.
To reduce rattling and possible whistling from the bass reflex, it is worth doing 2 things.
1. Wrap the bass reflex with sound-absorbing material, like a “fur coat,” in one layer. Leave 1 cm of bare space at the end of the bass reflex. Secure the “fur coat” tightly with thin elastic bands, wrapping them around the bass reflex, as shown in the figure above.
2. Using wire cutters, cut off any protective grilles inside the bass reflex pipe evenly. There is no benefit from them, but there are a lot of unnecessary sounds and whistles. If there is a mesh glued to the end, then it is also better to remove it. This will allow air to flow more easily, which will increase the overall responsiveness of the speaker.
Installation of acoustics on spikes.
Try pressing the speaker for a while while playing music. You will hear that it will be out of tune and swallow a good half of the frequencies. This happens because the finger absorbs vibrations, preventing the speaker from releasing them into the air.
Speaker housing is a continuation of the speaker. When it comes into contact with the floor, table, shelf or other things, the speaker body gives off some of its vibrations to these objects, as in the example with a finger.
In order for the acoustics to efficiently transmit sound waves into the air without physically scattering them on the floor and objects with which it comes into contact creating distortions, spikes are used.
The spikes are attached as legs. To do this, 4 small holes (not through) are drilled on the bottom wall into which they are screwed. You can buy them in many consumer electronics stores that sell acoustics and accessories, or order them online. Under acoustics with spikes, there must be hard material– ceramic tiles, parquet or other. The main thing is that the legs have as little contact with it as possible and were not recessed.
The principle of operation of the thorns is that they strongly reduce the contact area columns with the surface on which it stands. Thanks to this, the sound waves that are supplied to the body begin to sound, and not fade away on the floor, parquet or shelf. Distortion is reduced to a minimum, the bass component becomes more audible and much more detailed.
Important note.
Spikes make sense to use for acoustics with decent weight and decent size. Spikes should be used primarily for floor-standing acoustics weighing more than 12 kg. Or for subwoofers weighing 5 kg or more. In smaller acoustics the effect will be there, but not as noticeable.
Replacing wires on the amplifier part of the acoustics. For active acoustics.
Often, the manufacturer saves on such things as the quality of wires from the crossover to the speaker and from the board to the crossover. The thickness, as well as the quality of the wire, directly affects the sound quality. The thicker the wire, the deeper the bass and the clearer the mids. This modification should primarily be carried out on subwoofers, due to the greater energy that flows through these same wires.
1.
We select a suitable replacement wire, naturally the highest quality copper that is available. Preferably not VVG (solid), since the signal changes when passing through such a wire. It is better to take a PVA (braided) core made of oxygen-free copper. Thicker is not always better, you need something in between, depending on the power of the acoustics.
2 . Unsolder and cut off the old wires. If there is a bracket at the other end, then, if possible, solder the wires to the terminals themselves on the board. If this is not possible, cut off the bracket at the root, remove the terminals, solder the wires to them and insert them back into the bracket. We also wrap the speaker and crossover terminals and solder them liberally. Soldering is a MUST!
3. We make sure the quality of the soldering.
It is also worth paying attention to connecting wire between the columns.

The manufacturer rarely slips in something sensible. The best option among the most affordable ones is braided wire with transparent insulation, which is supplied with, for example, SVEN Royal or Microlab SOLO 6 and higher.
A similar wire can also be purchased at electrical stores. This is an inexpensive option for replacing the flimsy wires that come with the speakers. For floor-standing options, speaker wires with a thicker cross-section and higher quality, oxygen-free copper are best suited. These can be bought at any store that sells home theaters, or at the electronics market.
A few words about the wires from the sound source to the acoustics.
The wires that go from the sound source to the speakers (usually tulips) or receiver must be of good quality.
It is highly desirable that they be shielded from interference from power lines, cellular networks and radio. To do this, wire manufacturers wrap them in a layer of foil, or braid them with aluminum or copper thread. It is not difficult to distinguish them - they are much thicker than non-shielded ones. Also, high-quality wires should have gold-plated plugs for lower resistance and less signal loss on the plugs. You can buy such wires on the radio market or in stores that sell home theaters.
Note.
In order to have a noticeable effect from changing the wires, we recommend replacing them on acoustics with a price level 100$ and higher (for 2.0). Or, if the wire used by the manufacturer is of really poor quality.
Use surge protectors.
Good surge protectors that are equipped high frequency suppressors, they are quite good at cleaning up the so-called White noise and other interference caused by poor power supply and network interference.

Often, in built-in amplifier circuits, there is no high-quality noise suppression circuit, which leads to distortions, noise from speakers and different sounds when the refrigerator starts working or the neighbor’s electric stove starts igniting :)
Remember that cheap filters will not save you from interference. These are capable of protecting equipment from pulse currents that arise, for example, when lightning strikes the wiring, and nothing more.
The filters that we need must contain a suppressor (filter) of high-frequency interference. They are also useful for receivers and amplifiers, both for protection and for better noise immunity.
Companies make good filters ZiS Pilot(starting from series G.L.), APC.
If the speakers hum or there is extraneous sound coming from them.
There are usually two reasons:
- Poor quality signal source or cable.
- Poor quality input capacitors in the built-in amplifier part (if the speakers are active).
IN first case, you need to check the cable, look inserted Are there connectors? fully into the plug and check integrity cables Also need take away wires from others, especially cables supply network And radio, since they create magnetic fields around themselves.
In second case, you need to open the column with the amplifier part. It is usually heavier and has a heatsink.

Next you need to find the capacitors of the power supply filtering circuit. Usually there are two of them and they are the largest. They should be removed and replaced with new, high-quality ones with a higher maximum voltage and capacity. It is also worth looking to see if others are swollen or leaking (brown or yellow dried liquid nearby). If yes, then replace it without hesitation.
You can also replace other large capacitors, since they do not stand out in terms of quality in multimedia acoustics.
Other useful tips for improving the sound quality of your acoustics, without any modifications.
Correct placement of acoustics.
To achieve the highest possible sound quality, the acoustic system needs arrange correctly around the room.
30% of success in achieving the correct sound picture depends on the correct placement of acoustics.
_________________________
1. Tweeters ( HF) - must be flush with the ear listener for better positioning in space.
2. Port the bass reflex should not be anything closed. The distance from a wall or other obstacle should be more than 15 cm so that low frequencies are not lost at the output and nothing prevents them from spreading throughout the room.
3. The front speakers should be positioned at 30 degrees, from the listener’s point of view and directed strictly at him.


Rear, on 30 degrees from the listener's side point (from 90 degrees) Only in this case the best depth of the sound picture is ensured.
4. Optimal distance, on which the speakers should stand from the listener - 2 meters For floor speakers and 1 meter For shelf.
5. Eliminate extraneous sound sources. This could be an open window, a quiet system unit, and so on. All these sounds interfere with the perception of sound and can even make a great sound illegible and poorly detailed.
Conclusion.
Let's repeat the steps again:
1. Strengthen the overall structure.
2. Upholster the body with sound-absorbing material inside.
3. Modify the bass reflex.
4. Install the acoustics on the spikes.
5. Replace the wires inside and outside with better ones. Connect through a good surge protector.
6. Correctly arrange the acoustics, eliminate noise sources.
7. Listen.
Most of these tips are suitable for both active and passive acoustics.
Get creative and be surprised how the sound changes for the better.
Happy modification!
Currently, home appliances, consisting of music centers, are not widely used and are safely gathering dust on the cabinets of the premises. In this regard, one gets the impression that it seems to have already served its useful life. Is it so? Equipment for playing music is of high quality and quite expensive, so it’s a pity to send such equipment to the trash heap. In our article, we will look at alternative uses of the device for playing music, for example, how to connect speakers from a music center without a center to a computer.
How to connect speakers from a working music center to a computer?
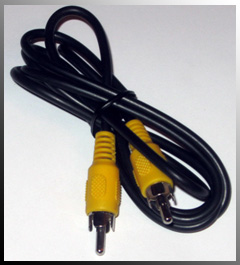
Let's ask ourselves how realistic it is to connect speakers from a stereo system to a PC. It turns out that this is quite possible. And for a functioning acoustic device, such a connection process is not difficult at all. For this procedure, you only need to use one cable, the appearance of which looks something like this:
- one side of the cable is topped with the usual black 3.5 mm minijack;
- on the other side hang two tulips, white and red.
Important! There is nothing complicated about this cable; you can make it yourself, but to do this you must at least be able to hold a soldering iron correctly. To do this, you need to find the cable itself; if it is missing, you can use a cord from stereo headphones. The necessary plugs can be purchased in any radio parts department in a modern hypermarket or market. As they say, both cheap and cheerful.

How to properly connect a speaker from a music center to a computer:
- We connect the purchased cable to the AUX connector, which is located on the rear side of the stereo system panel. These are two identical holes that are red and white.
- We connect the second end of the cable to the output hole for the acoustic speakers on the personal computer. This is a large hole that has a green rim. And that's almost all.
- After this, turn on the audio system and select the AUX mode on it.
Important! Each individual music center has its own setting, which differs from others, so to connect you need to choose individual instructions or you can try using the “scientific poking” method. Maybe you can guess and correctly determine the desired mode.
Now you can easily take our advice and simply connect stereo speakers from your audio system to a desktop PC or laptop, if you have a functioning music center. But there are times when music playback equipment is not working, how to solve the problem in such a situation?
How to connect speakers from a non-working music center
This situation is much more complicated and its solution requires certain costs. The problem is that the stereo system contains an amplifier that powers the speakers. The power of the sound card located in the computer device is not enough to drive the acoustic speakers. Therefore, connecting speakers from a music center to a desktop computer or laptop without the center itself is not so easy to implement. But probably.
To do this, first of all, you need to find an amplifier or make it yourself. For this, both a separate device and the use of a board from old speakers will be useful. The main requirement is that the power of the selected amplifier should not be greater than the power of the stereo speakers.
Important! If necessary, you can solder the amplifier yourself - this is not such a difficult task. There are a lot of ready-made schemes of any complexity and various options on the Internet. The required parts can be easily purchased in any amateur radio department of a hardware store.
Sometimes there are computer speakers in the house, which may not have the functionality of several speakers. In this case, it is necessary to clarify this power and operating voltage, and conduct a comparative analysis with the acoustic speakers of a home stereo system.
Important! The required specifications can be found in the instructions or on the rear panel of the audio system. If the parameters are suitable, then the problem is solved, and we can connect our device.
Video material
From the above article it is clear that an out-of-fashion music center can easily be turned into computer acoustics. To do this, you need to use your ingenuity and some tips given in our article. You can connect the aux to the music. center and enjoy the music.
First of all, I must warn you that here we will talk about what can be changed without changing the design of the device itself. Usually, in all music centers, the developers have already adjusted all its components to each other. But, as always, with additional financial (and other) investments you can achieve quite good results, bringing your center closer to the standards of HI-FI equipment, or at least making it more functional and pleasant to hear for yourself.
So, what can still be improved in a music center and how much can it cost?
Step 1. Let's start with costs that are unlikely to be directly related to the financial side (although depending on how you look at it :)). Typically, most owners have speakers next to the central unit. Yes, it looks impressive, but it sounds... And often at high volumes the CD player in the center gets confused. The optimal location is as follows: in width - as wide as possible, in height - just below the level of the ears of the person sitting at the listening position. Ideally, of course, put the speakers on stands, but firstly, this costs money, and secondly, you need to look for a place to put them. To support the bass, you can place the speakers in the corners of the room (it especially helps for those speakers that have a bass reflex hole at the back, but they need a distance of at least 10 cm, otherwise there will be no bass). It is advisable to avoid installing speakers in niches, because At the same time, the reproduction of mid frequencies (in particular, the voice and the leading instrument) suffers. You can easily place the speakers on pieces of furniture, such as cabinets, tables, etc., not forgetting to stick the legs on the speakers. Sometimes they come complete with the center, sometimes they are already glued to the speakers, but most often they are simply not there. In this case, you can make them yourself. A total of at least 8 ordinary plumbing gaskets are required (4 for each column). They are glued to the bottom of each column using any glue for gluing rubber and chipboard, for example, “Moment”, closer to the corners. By the way, due to the fact that design has recently occupied far from the last place in any industry, it is worth taking this into account when arranging acoustics, or more precisely, when placing them. It often happens that a departure from the classic speaker layout (strictly on the same line and in the same plane) sharply narrows the possibility of placing speakers. For example, in many music centers it is not advisable to place speakers on their sides (which is often done when placing them on mezzanines). In the case of an asymmetrical arrangement of speakers, keep in mind that it is more correct to position the speakers so that the tweeter (small, sometimes dome) is on the outside of the central unit, which will allow you to expand the stereo base, at least a little.
Now let's move on to the costs that free economic resources begin to require :). There are several options here. Let's go in order.
Step 2a. The simplest and least financially dangerous is changing cables. It should be warned that this will only happen painlessly for owners of those centers that have clamps both on the device itself and on the speakers. The rest will have to disassemble the speakers, which I clearly do not recommend doing during the warranty period - you will immediately lose the warranty. What cables should I buy? In a word - inexpensive. To be more precise, inexpensive cables (up to $5/meter) with a cross-section of up to 2.0 sq. mm. (more is more expensive, and it won’t fit into the spring clamps that most centers are equipped with) and well-known companies. You should not buy unknown cables from the same construction market that, according to the seller, are acoustic. Usually it's just who knows what. A special word to the owners of block mini-microsystems. In this case, it is possible to replace the interconnect cables. You shouldn't buy expensive ones here either. It will be enough to take a meter cable up to $20-30 (with a shorter length the price is lower). When connecting additional devices (we will discuss them later), again use inexpensive cables. The fact is that stereo systems are almost the lowest class of audio equipment, in which expensive cables will, first of all, be economically unfeasible, in addition, you will not get a CARDINAL change in sound for the big money that will be paid for an expensive cable. There will be a difference, but not so much as to take a $50-80 cable instead of a $10 cable. More likely, even so: the difference between a standard cord and a ten-dollar one will be more noticeable than between a thirty-dollar and eighty-dollar one (this only applies to stereo systems). In addition, a more expensive cable can expose all the shortcomings of the center and you will no longer want to listen to it :(.
Step 2b. Buying a subwoofer. It's no secret that many owners of music centers like to listen louder and have bass! It's usually rare that speakers can produce deep bass without distortion. Therefore, there is a special speaker for low and sub-low frequencies, called a subwoofer. It is intended not only for “thumping”, but above all for high-quality bass transmission. Subwoofers are either passive (just a box with a speaker) or active (with its own amplifier). Active subwoofers now make up the lion's share of the market. Usually, you can painlessly connect a second type of subwoofer to the centers, however, provided that the center has a special output for it (SUB OUT). Active subwoofers are better than passive ones not only because they have their own amplifier (which allows you not to strain the amplifier of the music center), but also are quite flexible in adjustments. An active subwoofer can be placed anywhere on the floor, excluding niches and corners (otherwise the bass will be very boomy). If there is no special subwoofer output, then you will have to look for a passive subwoofer or an active subwoofer with high-level inputs and outputs. Passive is cheaper, but it also has many disadvantages: it is critical to the installation location, the impossibility of adjustments, it uses the resources of the music center. It is connected into the gap between the central unit and the speakers: the wires for the speakers first go to the subwoofer, and from it to the speakers. Which subwoofer should I buy? It is necessary to consider the way the subwoofer is connected to your center and, above all, proceed from this. Again, don't buy expensive subwoofers. The upper limit for a subwoofer for a music center is $500. There are many good models for music centers in the region of $100-200
Step 2c. Replacing acoustics. This is probably the most interesting upgrade of the center, allowing you to radically change the sound of the device. What kind of acoustics are there? Acoustics can be floor-standing or bookshelf. Which one should you prefer? Based on the area of the room:
|
Room area, m2 |
AC |
|
less than 10 |
shelf keeper, large shelf keeper |
|
from 10 to 18 |
large shelf worker |
|
from 18 to 22 |
large shelf holder, small floor holder |
|
from 22 to 25 |
small, medium floor standing |
|
over 25 |
medium, large floor standing |
A bookshelf speaker is usually a two-way speaker with a height of about 30-40 cm.
A large bookshelf speaker is a two- or three-way speaker with a height of about 50-60 cm.
Small floorstanding – two-way speaker with a height of about 70-80 cm.
The middle floor standing speaker is a two- or three-way speaker with a height of about 80-100 cm.
Large floor-standing speaker - three- or four-way speakers with a height of about 100 cm and higher
But the choice of acoustics is not limited to the choice of room area. Important (or rather, even decisive) factors will be resistance (impedance) and power. Typically, music centers are designed for a resistance of 4-6 ohms, but there are those that are designed for 8 ohms. If it is written that you can connect 8-ohm and higher acoustics, then you cannot connect 6-ohm and especially 4-ohm acoustics. This threatens the failure of the amplifier's output stages (expensive non-warranty repairs). In the best case, the current protection will work, but you must admit, it is very unpleasant to listen to music accompanied by temporary mutes. The maximum input power must be no less than the maximum output power of the center. The rated power is usually 1.5-2 times lower than the maximum. This is the power at which the speaker will operate normally without distortion or damage. Remember: not every expensive acoustic system will give you what you want from it. Acoustics for music centers have a noticeable rise in bass (100 Hz) and high (10 kHz), but beyond these frequencies there is a rather strong decline. In inexpensive acoustics, the rise in these frequencies is less, but it is there. In addition, a wider frequency range. Expensive acoustics do not have this rise and at first it seems that there are no bass or highs (a common misconception of people accustomed to listening to a stereo system). Therefore, you should not spend more than $250-400 on acoustics. It is also worth paying attention to such a parameter as sensitivity. This is essentially the volume of the speakers. For most music center speakers, this figure varies from 76 to 88 dB. Inexpensive acoustics up to $350 have sensitivity from 82 dB to 91-93. High sensitivity directly contributes to the fact that even a low-power SAMSUNG with 5 Watts per channel will scream like a $1000 center.
Step 2d. Purchasing additional devices. Very often, manufacturers recommend additional devices to expand the capabilities of the center: MD and CD recorders, record players, DVD players, etc., suitable, first of all, in size and design to the existing device (for which, by the way, they often pay a lot money with limited functionality). I can assure you: any device (with the possible exception of a record player) can be easily connected to the center for playback (if there is an AUX IN), and often for recording (AUX OUT). And it is not necessary to strictly observe the name of the input (again, with the exception of the input for the record player): it can be called anything: LINE IN, AUX IN, MD IN, VIDEO IN, GAME IN, but they are the same thing. So you can safely connect almost any device. The whole question is, do you need it?
In conclusion, I want to say: a music center, unlike block equipment, is a complete system, subject to limited modernization (and sometimes even limited modernization cannot be carried out), therefore any intervention must be strictly understood and clearly formulated for itself. And if all this is done, the result will please you.
Good luck with your upgrade!
Good luck!
Sincerely, Evgeniy (aka Eu-Jinn)
ICQ #161381058
Answers:
DiMoN-:
Not directly, but through an amplifier, you can use the center itself as an amplifier (there is usually an AUX input there - you need to send a signal there from the green connector on the sound system) or buy/assemble an amplifier.
Booster:
Only through an additional amplifier (and through the same center).
Niko:
Only if they have the same resistance. But this is unlikely. But even if this is so, the sound will not be as powerful. It is better to connect the output to the speakers from the computer directly to the music center (use it as an amplifier), and then listen to the sound through a normal music center.
Leo:
It’s better to connect the center itself to the computer.
TU-154:
Through an amplifier - it is possible and necessary. Directly - it is possible, but it is pointless, since the output power of the sound card is not enough for their operation.
Andrey Fedorovich:
It is possible, but it is better to connect through an amplifier.
DarkArt:
It’s not possible, but it’s necessary! Especially if the center has a subwoofer :).
Lekha-yandex:
Depends? carried the center itself or the amplifier will not handle the sound. Personally, I have 2 50W speakers from a Yugoslavian-made turntable, but they are active.
Shamann:
Directly - under no circumstances! You'll burn the soundbox! And through the center - please, in some even USB sweat is designed for this.
Alekssh76:
It is possible, but without an amplifier it is unlikely that anything good will happen.
Shurovik:
Directly - no. Only through an amplifier.
Mike:
If you are a radio engineer, then at least go to the kettle.
Ssifl:
Directly - no. Each center has a linear entrance. This is where you can connect your computer.
Zvyagintsev Pavel:
It’s possible, but you’ll burn out the sound system, it’s not for nothing that computer speakers are still connected to the network, and there’s also an amplifier there.
Andrey:
Speakers cannot be connected separately from the “center”. You need to connect a music center and speakers to your computer.
Krugovoy, Alex:
Possibly through an amplifier.
Ilyukha:
Solder a mini jack to them.
Neos81:
You can, but through an amplifier, otherwise you'll burn the sound card. Buy a cord with a tulip on one side and plug it into the other like on headphones and that’s it.
Agro:
Can. Take (make, buy) a cord: at one end there is a minijack, at the other there are two tulips (or whatever you have at the center entrance). Plug the minijack into the Line Out of the sound boxes, tulips into the Line In of the center and that’s it. IMHO: if the center is normal, not cheap for 100 rubles, and the sound package is appropriate, then the sound will be of high quality (in general, computer speakers cannot be compared with good ones from the center). This is how I did it myself.
Konstantin Mikhailovich:
How are center speakers different from computer speakers, huh? Especially if you have a good sound system...
Mik:
Necessary if you do not have Solo2 or Mercury50. To Audigy2 Value Hi-Fi set.
VGreen:
It depends on the sound. On almost all modern ones you can only connect active speakers, but on old ones. In short, to stop useless disputes, I have Soviet AC25s hanging on my ESS Solo-1 (it seems so), for the third year. Obviously, there are no super-duper bells and whistles on the old sound card, but it works without an amplifier, although it’s hot :) And you probably have an integrated one, since such a problem arose, so it will only have to be done through the center.
This is a question from the archives. Adding replies is disabled.
Music centers released ten or more years ago are outdated both morally and technically, but any of them can be modernized. After modification, such a device will be able to play music from memory cards and streaming services.
For assembly we will need:
Old music center.
- Any smartphone (can be cheap and even without a battery).
- Memory card adapter (adapter from microSD to SD).
- A piece of plastic.
- Printed circuit board, heatsink, LM317 transistor and two resistors (240 and 510 ohms).
- 3.5 mm jack and toggle switch (optional).
- Wires, soldering iron.
- Bolts and nuts.
Remove the cassette mechanism and optical disc drive from the music center. Leave only the amplifier, radio, AUX input, control buttons and display.

Cut a cover out of plastic that will cover the hole left after you broke out the cassette deck and CD drive.
Make several holes in the cut-out cover: for a smartphone, a power button and a memory card adapter.
Remove the back cover of the smartphone and solder the wires:
- Two wires for power supply.
- Two wires from the speaker.
- Eight wires from the contacts of the memory card slot.

Solder the wires that come from the memory card slot to the SD adapter according to this diagram (it is not necessary to install a capacitor):

Insert the adapter into the slot and secure it with glue. It will be possible to insert a microSD card with music into it.
Solder the wires coming from the speaker to the AUX input or amplifier. You can also provide AUX switching between the smartphone and an external audio source. To do this, you need to insert the jack into the audio output of your smartphone and solder the cable coming from it to the toggle switch.
Supply power to your smartphone through a voltage stabilizer.

The power button must have two groups of contacts. One group switches on turning on the phone, the second switches on the radio. If a radio is not required, you can get by with a button with one group of contacts.

Glue the smartphone with hot glue and additionally secure it with plastic cambrics. Such a music center can do everything that a smartphone can do, that is, it can play music from a memory card and online services.


