Connecting an SSD drive to the motherboard. Interface for connecting SSD and HDD drives - several important characteristics
They are rapidly gaining popularity. More and more users are deciding to try an SSD drive and install an operating system on it. But most people do not have experience working with this type of drive. Therefore, on thematic forums they are often interested in how to connect an SSD drive to a computer. In this material we will look at the process of connecting SSD drives to a desktop computer.
Firstly, the process of connecting an SSD drive to a computer is not fundamentally different from. Therefore, if you know how to connect hard drives, then you will not have any difficulties connecting an SSD. The only difficulty is how to fix the SSD drive inside the case, but more on that a little later.
Step No. 1. Prepare your computer for connecting an SSD drive.
Before you start connecting the SSD drive, you must completely turn off the power to the computer. To do this, disconnect the cable that leads to the power outlet. Then disconnect the remaining cables and remove the side covers of the system unit. As a rule, they are fixed with four screws at the back of the system unit.
Step No. 2. Installing an SSD drive.
An SSD drive is a completely electronic device. Unlike hard drives, it has no moving parts and therefore does not create vibration or noise. Therefore, the SSD drive can be installed anywhere in the system unit.
Your task is to choose a place where the SSD drive can be conveniently fixed so that it does not dangle inside the computer. Otherwise, when you move your computer or the next time you service your computer, the SSD drive may hit other computer components and damage them.
The simplest and at the same time reliable option is in the hard drive bay. But, since the hard drive bay is designed for 3.5-inch devices, and the SSD drive is made in a 2.5-inch form factor, we will need a special sled (mount). Quite often, these sleds come complete with the drive itself. If they are not available, you can purchase them separately.
The SSD drive is attached to the carrier using 4 screws that are screwed into the bottom of the carrier. After this, the slides themselves are inserted into the system unit into the bay for 3.5-inch hard drives and secured with 4 screws.
As a result

Step No. 3. Connect the SSD drive to the computer.
After securing the slide inside the system unit, you can begin connecting cables to the SSD drive. Solid state drives are connected in the same way as modern hard drives, that is, using two.

A wide SATA cable is power supply; it connects to the computer's power supply. A narrow SATA cable is a data cable; it connects to the motherboard.
If it supports SATA 3.0, then the SSD drive is best connected to SATA 3.0 ports. SATA 3.0 ports provide significantly higher data transfer speeds, allowing you to get the most out of your SSD drive.
On the motherboard, the SATA 3.0 ports are marked in a different color. Read the instructions for your motherboard so as not to confuse anything.
Connecting various devices to a computer is difficult for many users, especially if the device must be installed inside the system unit. In such cases, the multitude of wires and various connectors is especially intimidating. Today we will talk about how to properly connect an SSD to a computer.
So, you purchased a solid-state drive and now the task is to connect it to your computer or laptop. First, we'll talk about how to connect the drive to a computer, since there are more different nuances here, and then we'll move on to the laptop.
Connecting the SSD to the computer
Before connecting the drive to the computer, you should make sure that there is still room for it and the necessary cables. Otherwise, you will have to disconnect some of the installed devices - hard drives or disk drives (which work with the SATA interface).
Connecting the disk will take place in several stages:
- Opening the system unit;
- Consolidation;
- Connection.
At the first stage, no difficulties should arise. You just need to unscrew the bolts and remove the side cover. Depending on the housing design, it is sometimes necessary to remove both covers.

There is a special compartment for mounting hard drives in the system unit. In most cases, it is located closer to the front panel; it is almost impossible not to notice it. SSDs are usually smaller in size than magnetic disks. That is why they sometimes come with special slides that allow you to secure the SSD. If you don’t have such a sled, you can install it in the card reader compartment or come up with a more clever solution to fix the drive in the case.

Now comes the most difficult stage - directly connecting the disk to the computer. It takes some care to do it right. The fact is that modern motherboards have several SATA interfaces, which differ in data transfer speed. And if you connect your drive to the wrong SATA, it will not work at full capacity.

In order to use the full potential of solid-state drives, they must be connected to the SATA III interface, which is capable of providing data transfer rates of 600 Mbps. As a rule, such connectors (interfaces) are highlighted in color. We find such a connector and connect our drive to it.

Next, all that remains is to connect the power and that’s it, the SSD will be ready for use. If you are connecting the device for the first time, then do not be afraid to connect it incorrectly. All connectors have a special key that will not allow you to insert it incorrectly.

Connecting an SSD to a laptop
Installing a solid state drive in a laptop is somewhat easier than in a computer. The difficulty here is usually to open the laptop lid.

In most models, the hard drive bays have their own cover, so there is no need to completely disassemble the laptop.
We find the required compartment, unscrew the bolts and carefully disconnect the hard drive and insert the SSD in its place. As a rule, all the connectors here are rigidly fixed, so to disconnect the drive, you need to move it a little to the side. To connect, on the contrary, slightly move it towards the connectors. If you feel that the disc is not inserted, then you should not use excessive force; perhaps you are simply inserting it incorrectly.

Ultimately, having installed the drive, all that remains is to securely fix it, and then tighten the laptop case.
Conclusion
Now, guided by these short instructions, you can easily figure out how to connect drives not only to a computer, but also to a laptop. As you can see, this is done quite simply, which means that almost anyone can install a solid-state drive.
rmozov. All this is very annoying, as it does not allow you to work in normal mode. You can fix such problems by installing an SSD drive. It can be used as a backup or main storage location for information. However, most users are interested in using it as a system disk, as this makes it possible to significantly speed up the system.
Purchasing an SSD drive for a laptop is an important procedure for increasing system performance. On such drives, accessing various files is much faster.
Moreover, replacing an outdated HDD with a more advanced model will allow you to get a significantly greater increase in power compared to installing a new processor model or expanding the memory capacity. That's why, V which laptops can install ssd An extremely pressing question for many users.
The main advantages of an SSD drive for a laptop:
- All programs launch and operate much faster,
- the modest dimensions of such units allow them to be easily selected for any laptop model,
- light weight, this nuance is especially relevant when used on a portable device,
- Energy consumption is significantly reduced - this will have a positive effect on the overall operating time of the device.
- high level of reliability and long service life.
All these advantages fully justify the curiosity, how to install ssd drive in laptop and its further operation.

Features of choosing the optimal SSD drive model
When choosing a solid-state drive, you need to rely on its size and capacity.
In terms of laptop sizes, choose 2.5-inch or 1.8-inch models. There are even smaller options, but the final choice depends on the model of your device.
Volume is a little more complicated. The most affordable models are from 60 to 120 GB. They are quite enough to accommodate the system and store documents. More spacious models cost a pretty penny, and not everyone can afford them.
In terms of form factor, the most popular options are mSATA and M2, but most often how to install ssd msata in laptop users want to know.

How to install an ssd drive in a laptop
If you have already chosen the appropriate SSD drive model and purchased it, then all that remains is to carry out the entire set of steps to install it. Depending on the laptop model, several options for installing the drive may be used.
How to install ssd instead of hdd in laptop
To replace the hard drive with a more advanced model, you will need to partially disassemble the laptop. To do this, you need to use the appropriate screwdriver. In almost all laptops the hdd is located immediately behind the lid. That's why how to install ssd instead of hdd in laptop Usually the owner of the device sorts it out on his own. Having removed the back cover, carefully remove the HDD; to do this, pull it in the direction indicated by the arrow. We install the SSD in the 2.5 slot for the hard drive and fix the laptop lid. In this case, the installed drive acts as the main storage.
Current technologies and the presence of special equipment make it possible to insert an SSD instead of a disk drive. How to install ssd in laptop instead of dvd Find out below. First of all, you will need to purchase a special adapter - SATA 2nd HDD Caddy for Laptop. Just when making a purchase, be sure to make sure that it is compatible with your laptop model.
To install the adapter, you will need to unscrew the back cover of the device. In some laptop models, access is very limited; a comprehensive disassembly of the device will be required. Having removed the drive, we connect an adapter that works with 2.5 form factor drives.
By the way, all actions aimed at how to install ssd in laptop correctly instead of a disk drive are fully justified by the advantages of this operation. It becomes possible to use information from an old HDD drive, and the space on the laptop is significantly increased.
Purchasing a special case
In this case, you will need to purchase a special case to make the SSD external. The device is connected via a USB connector, but this option has several nuances.
Firstly, this option is much more expensive, and there is no option to install the disk inside the device. Secondly, before you think about is it possible to install an ssd in a laptop external element, make sure you have USB 3.0 or 3.1. Outdated connectors will not allow you to get the desired result, but on the contrary, performance can only worsen.
Features of setting up an SSD drive
After the replacement has been completed, you will need to make the appropriate settings in the operating system. If the drive is used as a disk for the operating system, you need to make changes to the disk loading. To do this, launch the BIOS and go to the BOOT category, where we move the required disk to the main position. Now Sony laptop upgrade with ssd installation will be completed in full.
Disable some services in Windows
The Windows operating system is fully configured to work with HDDs, which have certain differences in the operating principle of SSDs. To improve the performance and service life of a modern drive, certain changes will need to be made:
- disable hard drive defragmentation,
- disabling the paging file,
- launching the TRIM function,
- disabling file indexing.
Therefore, after how to install ssd in asus laptop or in any other model, you will need to carry out all these manipulations. This way, you significantly optimize the operation of the installed hard drive.
How to install an ssd in a lenovo laptop and use it correctly
Once the installation of the ssd is completed, it must be divided into several partitions. The operating system will be stopped on one, and all the others will be used to store less important information.
There is another rather interesting option and it is the most profitable and convenient. How to install ssd in lenovo laptop you can use it to launch the operating system, and store all other files on the HDD disk. This optimization will significantly increase the lifespan of the ssd.
If the solid-state drive is small in volume, then it is advisable to periodically clear it of unused files. We avoid working at the limit of its volume - this has a serious impact on performance and service life. A number of utilities are now available that allow you to quickly remove all unnecessary junk from a disk.
It is necessary not only to know, but also how to properly care for it, configure it, and much more. Only correct settings will allow you to achieve the desired result in increasing performance, but will also significantly extend the life of the SSD drive.
GD Star Rating
a WordPress rating system
SSD drives are much faster than even TOP HDD models. But how to connect them correctly to the system so that they work at full capacity and do not lose performance? And how do you know if it’s even possible to connect a solid-state drive to your computer?
SSD connection process
Almost all computers and laptops with SATA connectors can connect solid-state drives. The higher the interface version, the greater the potential of the drive will be revealed.
It is worth considering some nuances when mounting the disk. Their number depends directly on where you install the drive - in the system unit or laptop case.
Installation in the computer system unit
First of all, make sure there are free SATA cables and connectors in the case. If there are none, then you will have to disconnect any of the devices that use them (it’s good if it turns out to be an old hard drive). You can also try connecting some SSD drives to outdated versions of interfaces, for example, IDE. But in this case, only an insignificant part of the carrier’s capacity will be available, and it will not work quite stably/correctly.
Also note that there are new SSD models that no longer support correct operation with SATA 1 and SATA 2 interfaces, but can only work with the latest version. In general, it is recommended, whenever possible, to connect SSDs to SATA 3 connectors, since in this case the performance of the media will definitely be 100% maximized.
In total, installation work can be divided into three stages:
- Disassembling the system unit;
- Mounting the disk into a special slot;
- Connection to the system.
The disassembly stage looks individual for each case. Typically, it is assumed to remove the side cover, which will be held on by screws and/or special latches. Some cases may require removal of two covers at once. You can find more information about disassembly in the instructions for your system unit, which should come with it. As a rule, there are no difficulties in disassembling.

If you have a case of a standard form factor, then it can be placed in a horizontal position for ease of working with its “internals”.
In the system unit, find special cells for installing media. They are often located near the front panel. The cells are quite voluminous and stand out from the overall design, so it’s difficult not to notice them. However, this creates another difficulty - if you do not have the most modern case, then it is unlikely to have special cells for an SSD inside, and the regular slots are too large.

Especially for such cases, special fasteners are sometimes included with the SSD. If these are not included in the kit, then you can buy them at any electronics store, or try to install the disk in the section for card readers. It is not recommended to try to fix the SSD using improvised means, or to leave it without fixing it at all, as otherwise you may damage the disk itself, or the cable may begin to come off while using the computer.
After the drive is fixed, you need to move on to the most difficult and important stage - connecting all the wires to the rest of the computer elements. The main difficulty here will be to avoid accidentally connecting the SSD to the wrong SATA connector. The fact is that modern motherboards can have several versions of SATA at the same time, and if you connect to the wrong SATA, the speed of the drive will decrease.

You can find the interface you need by paying attention to the notes. SATA 3 is marked with a color or a corresponding signature. If you don’t find any, you can always refer to the documentation that comes with the motherboard. There should be a detailed description of the location of each connector.

After connecting to the motherboard, all you have to do is power the SSD by connecting it to the power supply. To connect power, simply connect the appropriate cable (usually red) from the power supply to the SSD.

Turn on the computer and check how successfully the new device was detected by the system.
Connecting an SSD to a laptop
Everything here is much simpler than with a computer, since the number of actions is reduced to a minimum. First, you will need to find out if your laptop supports connecting an SSD drive. To do this, look in the laptop's specifications to see what type of interface is used to connect an already installed drive. If it is SATA, then everything is fine, but there is a risk that the SSD will still not work at full capacity (if SATA below version 3 is used as an interface).
Once you are sure that the technical characteristics of the laptop allow you to connect an SSD drive to it, you can begin the installation process. To begin with, it is recommended to disconnect the laptop from power and remove the battery. Then you can disassemble the case. Some models are equipped with separate covers that allow quick access to hard drives and/or RAM. If you have just such a model, then you do not need to disassemble the entire case.

When you gain access to the hard drives, remove the old HDD. If you have a slot for an additional disk, then it is not necessary to remove the old one. Install the SSD disk into the free cell so that it fits tightly into it and also connects to the SATA connector. If you are unable to install it tightly, you will have to use special slides that come with the SSD or are purchased separately. You cannot leave the drive loosely fastened, as during operation it can simply become disconnected from the SATA interface.

After connecting the media, assemble the laptop and start it. Check if the system has detected a new device. If not, then perhaps you made a mistake somewhere, or did not connect the drive tightly.

There is nothing complicated about installing a solid-state drive in computers and laptops, so even a less experienced user can figure it out.
There are several ways to install an SSD in a laptop, depending on the purpose of using solid-state storage. The device can be used as a primary or additional storage space for information. Many users use a solid-state storage device as a system drive, which can significantly speed up Windows.
Installing an SSD in a laptop
New models of solid-state storage devices have a large amount of memory for storing multimedia files and resource-intensive programs.
Choosing an SSD drive for a laptop
The standard solid-state drive has a 2.5″ form factor, which is compatible with the dimensions of a laptop HDD. When choosing a model, you should pay attention to this criterion. The drive must be connected to the SATA interface. Modern technologies provide the ability to use several file storages in a laptop, which expands the choice.
To install the operating system, purchase models with a memory capacity of up to 120 GB. This solution has an affordable price and speeds up system booting and operations related to system files by 5-6 times. Larger solid-state storage is designed for storing high-quality multimedia files and working with resource-intensive programs.
Replacing HDD with SSD
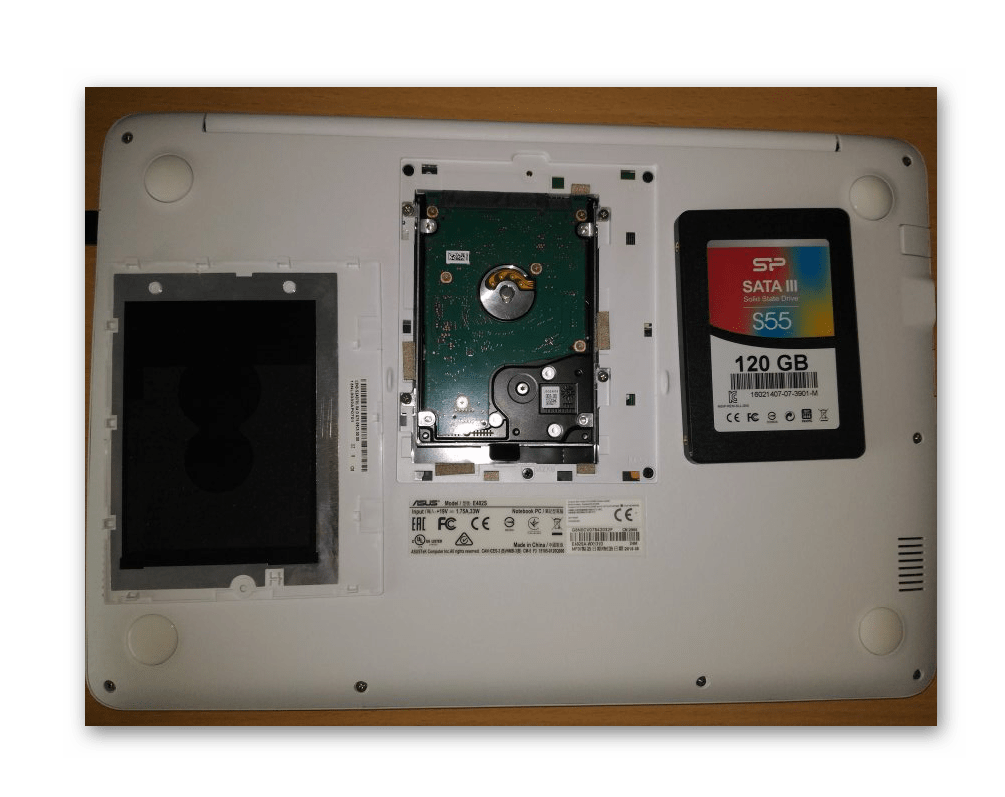
To replace the hard drive with a modern analogue, you need to disassemble the laptop. To do this you will need a Phillips screwdriver. In most laptop models, the HDD is located immediately under the back cover - unscrew the mounting bolts and carefully remove the cover.
Smoothly remove the HDD by pulling it in the desired direction marked with the guide arrow. An SSD, like a standard HDD, is connected to a SATA interface. Install the drive into the 2.5″ hard drive slot and secure the laptop cover with bolts.
This solution allows you to install a modern storage device as your main file storage. Install the operating system on the new device, and further configuration of the storage device will be described below.
Installing an SSD instead of a disk drive
Modern technologies and the availability of the necessary adapters allow you to install an SSD in a slot for an optical drive. This solution allows you to expand space on your laptop and save data from the old HDD drive. You can use several file storages at the same time.
To install a solid-state drive instead of a disk drive, you will need to purchase an additional adapter - SATA 2nd HDD Caddy for Laptop. When ordering an adapter, check compatibility with your laptop model. To install the adapter, you must remove the back cover of the laptop.
Some models limit access to the drive, which forces you to deeply disassemble the laptop. Follow the instructions to maintain the integrity of the case and ensure successful disassembly.

Remove the drive and connect the adapter. The adapter supports 2.5″ drives.

Reassemble the laptop case.
Setting up an SSD drive
After replacing the HDD with an SSD or installing an additional drive, you need to make subsequent settings in the operating system. If the solid-state drive is used as a disk for the operating system, you need to configure disk loading.
Enter the BIOS to the BOOT section and move the required disk to the first position. The operating system will automatically boot Windows from the required drive.
Configuring and disabling services in Windows
The Windows family of operating systems is designed to work primarily with HDD drives, which have some differences in the operating principle of SSDs. To improve the functioning and lifespan of the device, you need to make a number of changes in the Windows settings.
Disabling hard drive defragmentation
Defragmenting a hard drive allows you to speed up the operation of the HDD by optimizing its logical structure for faster data reading. This function is not needed for an SSD; on the contrary, it can harm the solid-state drive. You can disable defragmentation by executing the command in the “Start menu - run - dfrgui «
In early versions of Windows 10 and subsequent updates, this section was called “Disk Optimization,” where defragmentation was redesigned for modern systems. In Windows 10, there is no need to disable this process.
Disabling the page file
If you have enough RAM, it is recommended to disable the page file, which has a positive effect on the speed of the hard drive.

To perform this operation, you need to open the performance options. Select "No paging file".
Enabling the TRIM function
Starting from version 7, the Windows family began to actively support work with solid-state drives. The developers have added a TRIM function that interacts with the SSD drive. The system sends information about unused blocks to be deleted. This speeds up system performance and increases the service life of the device.
You can check the activity of the service in the following way:

- Open a command prompt
- Copy the command fsutil behavior query disabledeletenotify
- The received response must contain the value DisableDeleteNotify = 0 or DisableDeleteNotify = 1. If the received value is 0, the TRIM function is active, if the value is 1, TRIM is not functioning.
This feature is enabled by default in Windows 7 and newer versions.
Disabling hibernation - sleep mode
The system startup speed on an SSD drive is 5-6 times faster than on an HDD. The sleep mode function loses its relevance when using a solid state drive. Hibernate mode creates a system writable file. Disabling this feature simplifies system operation and optimizes device performance.
Disabling file indexing
File indexing occurs continuously and creates a writable file, which could theoretically shorten the life of the SSD drive.

Disabling indexing will not affect the speed of file search, since the SSD has a high speed of working with files. You can disable indexing as follows:
- Open the “My Computer” shortcut;
- Open the properties of the required disk;
- Uncheck the “Allow file contents to be indexed...” tab.
Installing a modern storage device not only speeds up the system, but also requires maintenance and detailed configuration.


