Add a background in Photoshop. How to change the background in Photoshop. Detailed lesson.
This lesson will tell you how how to remove the background from a photograph and insert a new one in Photoshop. I will describe a fairly simple, true and quick way replacing the image.
Often in a photo we are not satisfied with the background we are in and there is a temptation to insert something interesting. This can be done simply using Photoshop. Main background replacement needs to be done efficiently and carefully so that new background fit harmoniously into the photograph. Therefore, you need to carefully select the background that you want to insert so that it fits the composition as best as possible and is similar in color, so that you don’t have to do a lot of color correction later.
Lesson plan
- Open in Photoshop the photo on which the background will be replaced and open the photo of the new background
- Cut out the old background from the photo
- Copy new background and paste into photo
- Adjust colors, levels
Look at the result of the work after replacing the background. Before and after photo.
Preparation for execution
If you want to practice on these same photos, download them:
You can also use your own photos or find others on the Internet.
Step 1
Open the photos in Photoshop. Go to the photo on which we will replace the background.
Step 2
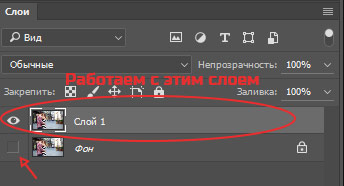
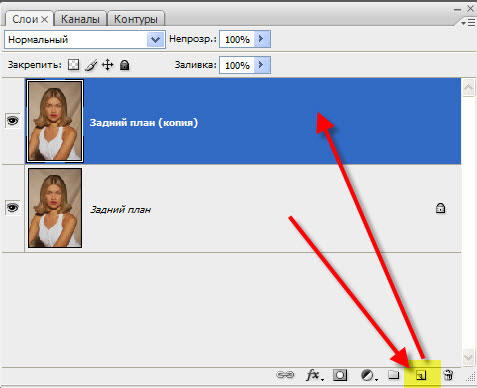
Create a copy of the layer.
Since the photo layer is locked from editing by default, you need to make a copy of it. Select the layer and click CTRL+J on the keyboard to make a copy. You can hide the old layer by clicking on the eye icon.
Let the old layer be a reserve just in case, so that in case of an error you can return to it.
Step 3
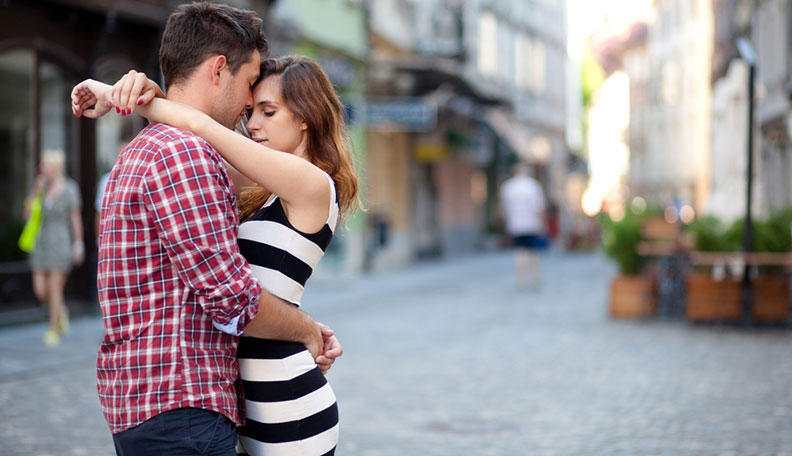
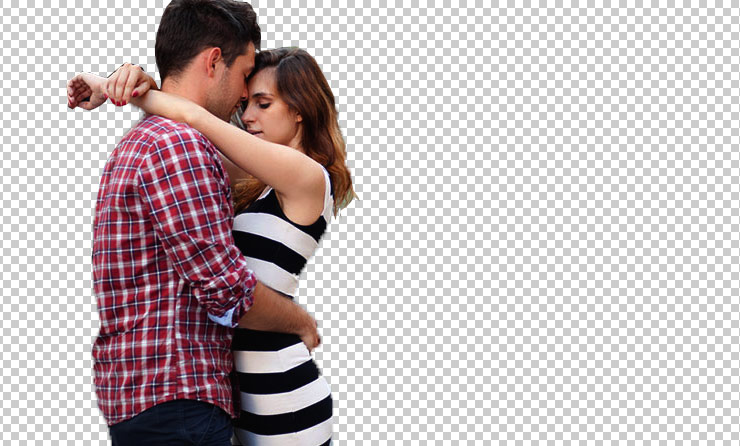
Now we need to select people, namely the loving couple in the photo.
We will use the tool Quick selection.
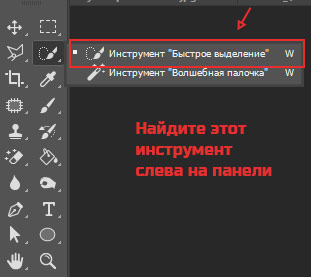
The principle of its operation is simple. You use a brush to show where to select and Photoshop creates the selection.
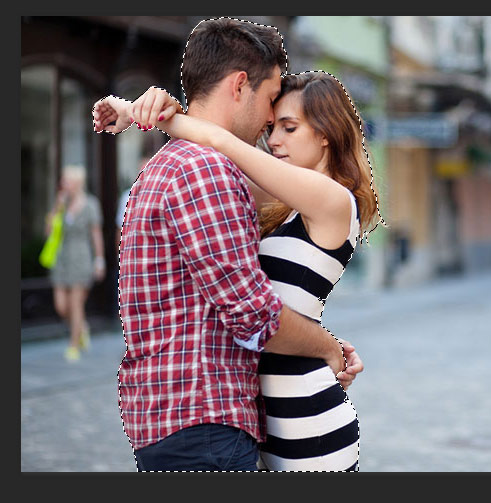
Start highlighting people. For convenience, you can zoom in (hold ALT on your keyboard and scroll with your mouse wheel).

If you have a more complex photo and cannot highlight it, then apply all the knowledge from.
Advice: To make the selection of objects more even, you need to change the brush size as you work.
In the end, you should completely highlight a couple.
Step 4
Now we get rid of the old background. To do this, invert the selection you made by clicking SHIFT+CTRL+I(or menu Selection - Inversion). After this, everything around people or the background will be selected. Click Del (Delete) on the keyboard to remove the background.
Now the people appear on a transparent background.
Step 5
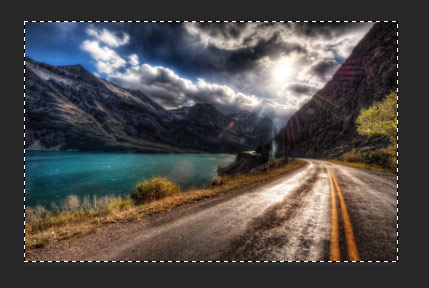
Insert a new background. Open an image with a new background. Select the entire area of the image, you can click CTRL+A and copy by clicking CTRL+C.
Go to the photo.
Create a new layer under the photo. SHIFT+CTRL+N or simply click on the create layer icon.
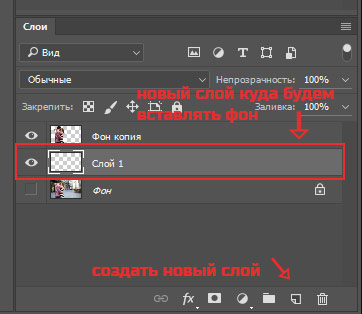
Now that the new layer is created, click CTRL+V to insert a new background image.
The background image is inserted, but it may be too large in relation to the photo.
So click CTRL+T to adjust the scale and reduce the image to the desired size.
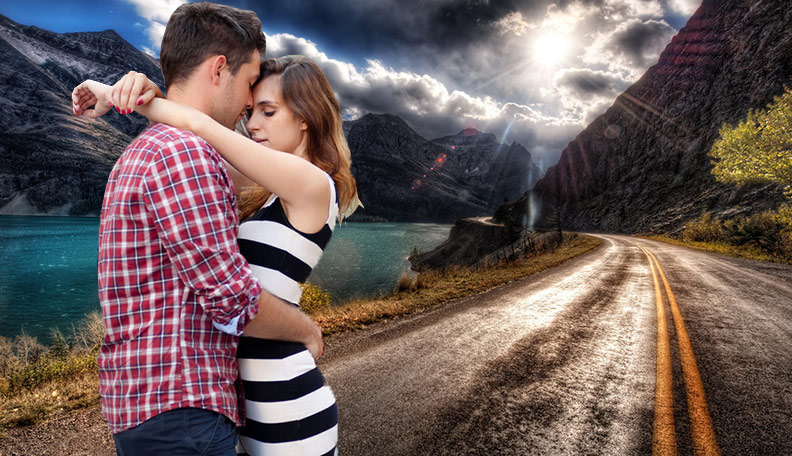
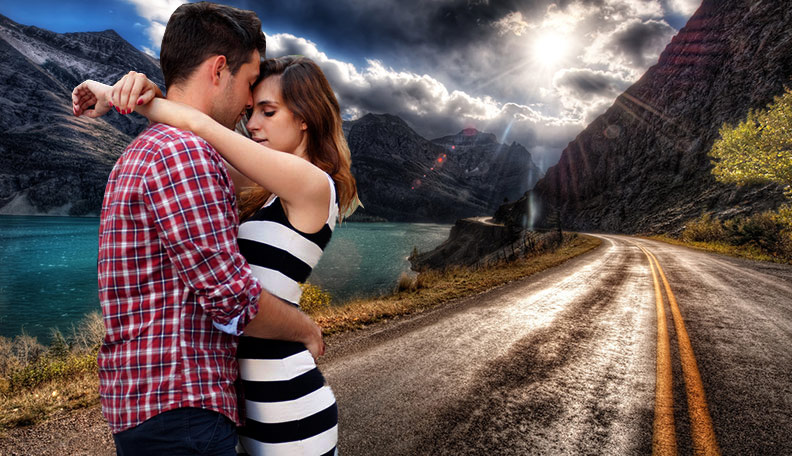
The end result will be something like this:
Step 6
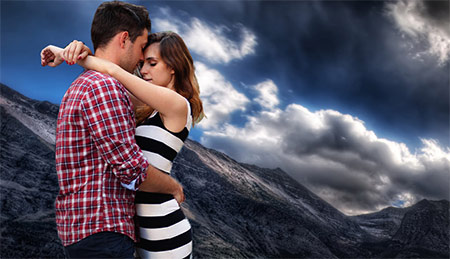
Everything is fine, but we need to slightly adjust the color depth of the people, so to speak, to adjust it a little to the new background.
To do this, select the layer with people and click CTRL+L to call the function Levels.
Darken the image a little.

Now the photo with the new background looks more realistic:
This completes our manipulations of inserting a new background. As you can see, there is nothing complicated about this and Photoshop will help you do it in 5-10 minutes with hard work.
If you have any problems, ask questions in the comments, we will help in each individual case.
In this lesson on working with photoshop we will learn to separate the object from the background. This method works well if the background has a more or less uniform background and has good contrast between the object and the background.
Similar publications:
- lesson "Cutting out a complex object from an almost uniform background"
- lesson "Correctly transfer an object to another background"
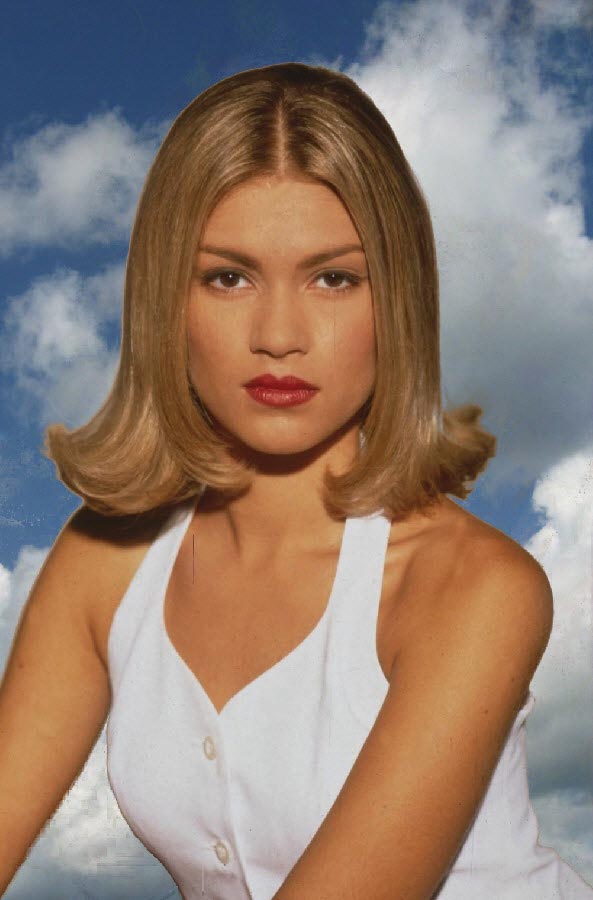
Let's open the original image. I want to separate the girl from the background and replace it with something more suitable. So how to change the background in photoshop?

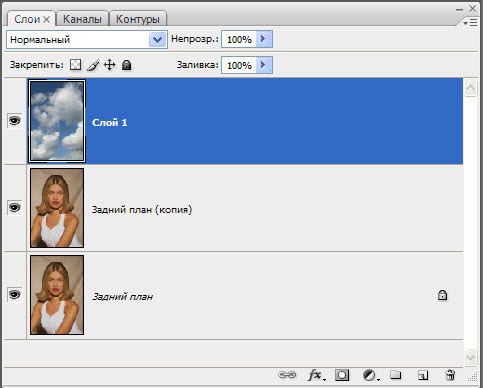
Let's create a duplicate of the main layer by dragging it to the second icon from the right in the "Layers" palette.
Let's open the image that will serve as the future background for the girl's photo. Select the Move Tool (V).
Let's click anywhere on the new background and, without releasing the mouse button, drag it onto the girl's photo. In the Layers palette we now have three layers.
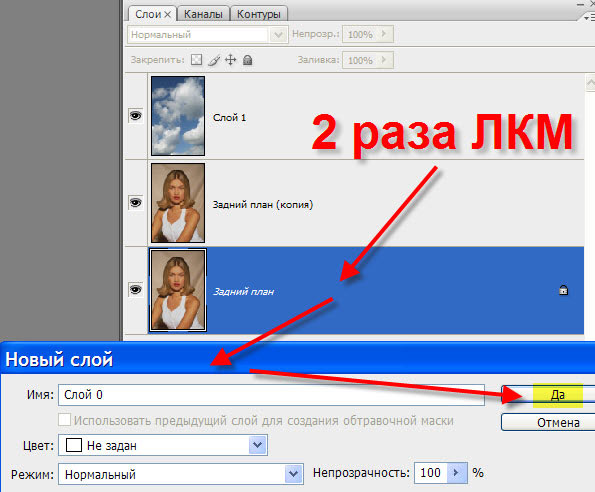
Double-click on the bottommost layer with the left mouse button. The window " New Layer", in which we do not change anything, but simply click "Yes". With this action we unlocked the main layer.
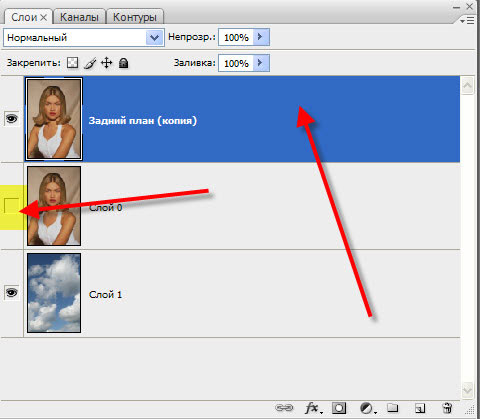
Place the sky layer at the very bottom, turn off the visibility of the middle layer and make the top layer active.
Background eraser "(E) with the following parameters: test: once, tolerance - 10-15%. The smaller the tolerance, the more accurately you can remove the old background.
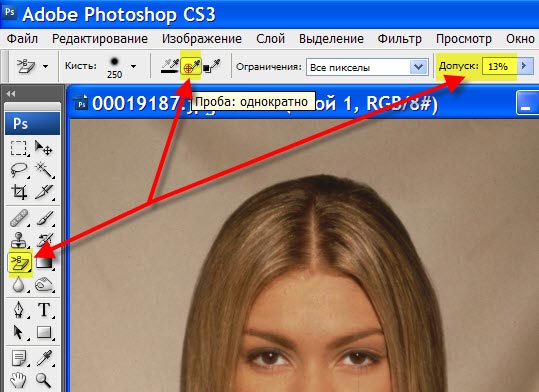
Now we “shak” the girl along her contour. Here's what I got.
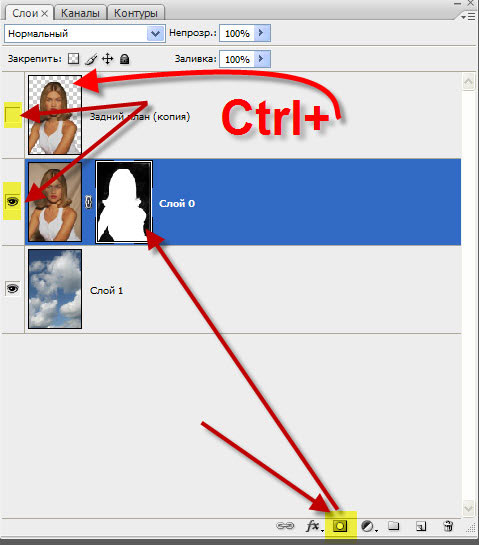
Holding Ctrl key, click on the icon of the top layer, the girl’s selection is loaded. Make the top layer invisible. Turn on the visibility of the middle layer and make it active. Click on the third icon from the left in the Layers palette. A layer mask will load onto the middle layer.
Holding Alt key, left-click on the mask icon.
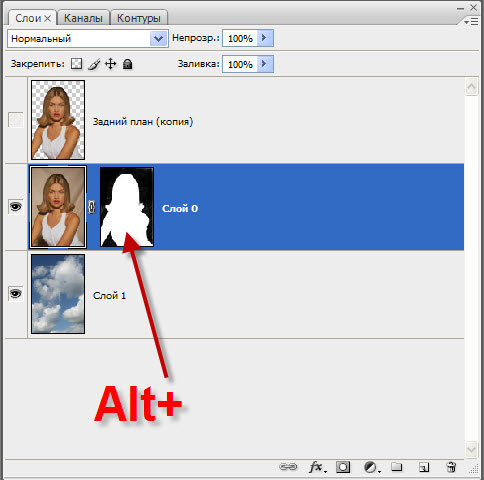
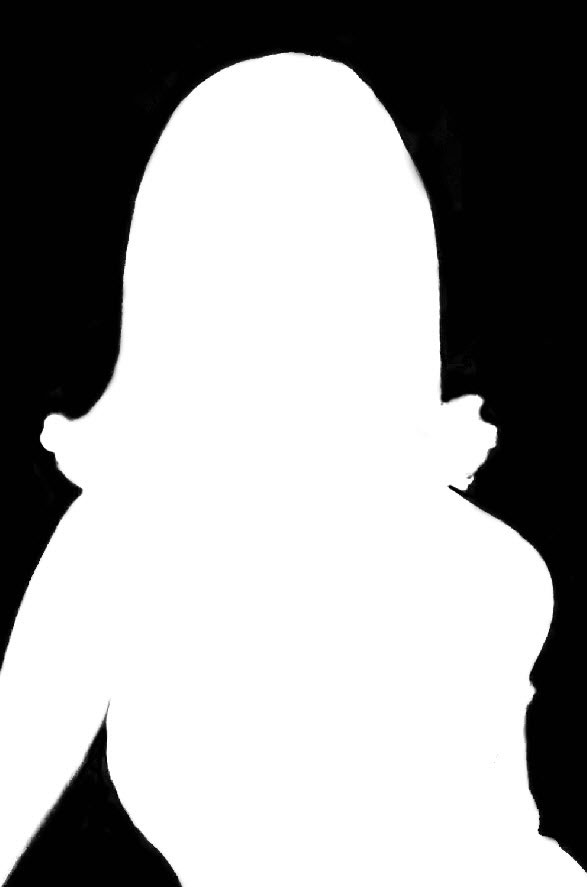
We will see the layer mask. You can immediately see how many flaws it has. On a black background there are white stains, and on a white background, on the contrary, there are black ones. Ideally, the mask should be completely black and white.

Brush " (B), the foreground color is white and paint all the dark parts inside the girl's figure. Then change the color to black and paint the background around the girl so that it becomes completely black.
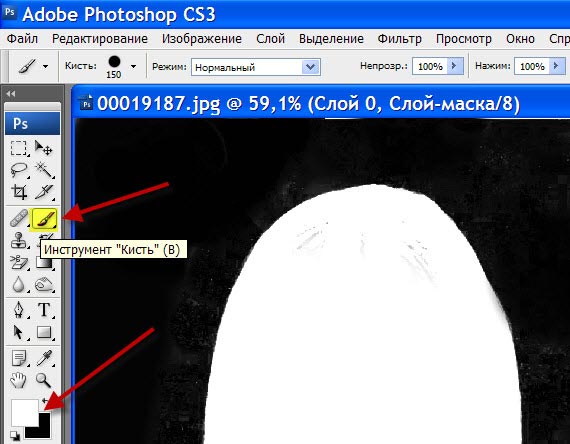
This is what the mask looks like after using a brush.
Hold down the Alt key and click on the layer mask again, and we see our image. It turned out quite realistic. Like this in a simple way We changed the background in photoshop.
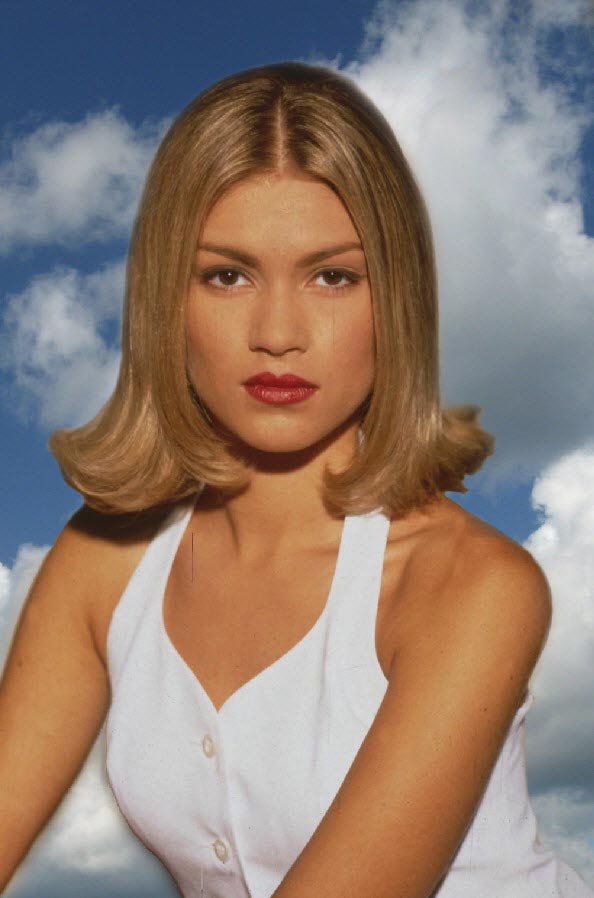
Compare the picture of the girl before and after photo processing in photoshop.
You can download the lesson (358 Kb) in PDF format
If you don’t want to miss interesting lessons on photo processing, subscribe to the newsletter.
The subscription form is below.
First of all, I would like to say a few words about this a small example. Friends! Everything shown here is just techniques, understand. =:) Some possibilities that you can use, or you don’t have to touch them in your processing. It's like... well... I don't know - like problems in a math textbook. =:)
Therefore, comments like “I would have stopped at such and such a step, everything else is not needed” or “I should have made the effect twice as weak” seem rather strange to me. It’s like writing in the same mathematics textbook: “a train from point A should not reach point B, it should stop before reaching it” or “let the train travel from point A to point B not 12 hours, but 8, because 12 is already too much.” =:) Well, you must agree - it looks wild. =:) Otherwise - thank you for your thoughts and considerations in the comments, I really appreciate it =:)
So, replacing the background. This shot was obtained as a result of shooting in the studio (60mm | ISO 50 | 1/100 | f/6.3):
1. Load the image into Photoshop and correct the “horizon is blocked”:
2. Using the Healing Brush and Clone Stamp tools, the background is cleaned and minor imperfections in the picture are eliminated:
4. Next you need to select the hair. I decided to use the method that was suggested to me by Andrey Zhuravlev, also a teacher at the “Photoproject” school, more savvy in all sorts of things like that than I am. =:) To do this, you first need to make a number of additional preparations. Namely, using Ctrl + J, make 2 copies of the original cleaned layer (from step 2) and using Clone Stamp, “paint over” the hair with the background on the first layer:
5. And then combine this layer with the original one using the Difference addition mode:
6. As a result, we get the following picture, which will serve as a preparation for creating a mask for the ends of the hair:
7. We switch to the Channels palette and go through all the channels in search of the most suitable one for the role of a hair mask. In our case, this is the Blue channel. Ctrl + click on it and we get a selection:
8. ...which we attach in the form of a mask to the layer from step 2. But now the mask is too gray and non-contrasting; if you use it in this form, your hair will be completely transparent. Therefore, the mask is “pressed” with curves:
9. By turning on two layers on a white background, we can look at the result of separating the hair from the background. Small parts very well designed, but the ends of the hair store information about the color of the background that was visible through them (they are gray, to put it simply =:)):
10. Therefore, we simply add on top empty layer and combine it with the other layers using the mode overlay Color. We attach the mask from step 8 to this layer (it is copied if you hold Alt while dragging the mask from layer to layer). Then Brush tool Tool (with a regular brush), against this background, sets the color of the ends of the hair (with the eyedropper that appears in this mode, when you hold down Ctrl, the hair color is taken and simply painted with a brush):
Voila! The hair is separated from the background, and only by masks, without any addition modes (except for painting the ends of the hair), which gives complete freedom when substituting another background. By the way, this technique also works well in more complex cases, for example, when the background from which the hair needs to be separated is non-uniform:
12. ...and for the upper torso:
13. Contrast is added by copying the Blue channel and combining it with the image using the Soft Light mode:
14. And highlights and shadows are drawn on two layers (shadows on the Multiply layer, and highlights on the Overlay layer). Additionally, toning is added to the skin orange using a Solid layer applied to Color mode based on the skin mask (it was drawn separately):
15. Then the background, previously blurred using Lens Blur, is turned on:
17. A beautiful sun glare and rays are “drawn”:
18. The rays are slightly blurred and arranged according to the image using the Screen overlay:
19. The overall saturation is slightly edited:
20. And the overall color balance shifts:
The finished picture (I want to say right away that I didn’t have the goal of making a shot “as if it had happened,” I was rather making a picture):
And as a bonus, a small slideshow based on the creation of this material =:)
How to change the background of a photo in Photoshop? How to edit a photo so that you can show it to your friends without embarrassment? When we see our photographs, which we would like to keep for a long memory, in the form in which the would-be photographer photographed us, we all often ask ourselves this question: how to replace the background?
For example: a wedding and a happy bride and groom find themselves against the background of a steam heating radiator or a photograph of unforgettable vacation at sea are spoiled by the fact that on the background Your happy faces have seen either a fat topless woman or, say, a boy without pants, or even a pooping dog. What to do?
But you can’t retake the photos - the train has left, and you don’t want to show them to your friends in this form either... How to process, how to edit a photo so that it sparkles with new colors? Today I will tell you how you can process a photo, if you just add brightness and contrast to it, for example, and change it a little Color tone. And if you just change the background in Photoshop, thereby improving the photo and not at all disturbing the overall impression at the time of shooting, then you and I will get a completely new, beautiful photo! You can always change the background in Photoshop and process the photo so that even the most picky viewer will not understand or notice anything. And you will forever have the most beautiful and unforgettable photographs of the wonderful moments of your life!
Today we will take more to process a simple photo than the one I edited at the beginning. I just want you to understand what you can do with your favorite photos. I want to teach you how to change the background in Photoshop on a bad photo complex objects, for example in photos with curly haired people or furry animals. I will show you what and how you can do in principle, and then let your imagination work.
1. So, open our photo in Photoshop, I took a photo of a kitten on an uninteresting, simple, but not uniform background.
2. Opened, click on the lock double click left button - transfer to layers. We must evaluate the background to understand how best to remove it using magic wand. We see that the background is not solid, not monochromatic, which means our magic wand will get stuck - it loves plain backgrounds and preferably contrasting to the image that needs to be extracted from there. What to do? For now we'll just try to blur the contrasting lines on the background a little, to do this we take the Finger tool with the following settings and begin to blur the contrasting lines on the background.
3. Now we need to find a beautiful, new background for our pussy. I think the background could be a beautiful still life. Open the picture.
Go to Selection - All. Then go to Editing - Copy. Go to the layer with the kitten - Edit - Paste. Place the layer with the still life under the layer with the kitten.
4. Now let's try to improve, make it brighter and clearer, the picture with the cat. To do this, go to Image – Correction – Brightness/Contrast. We move the markers something like this, in your picture these may be different values, just move them, look those that you think will be better.
5. Again go to Image - Correction - Hue / Saturation. We increase the color tone and saturation of the picture.
6. Let's take a closer look at our kitten. We see that on the head, on the chest, where the cat’s antennae are, there are very light hairs, almost white, and therefore, when selected with a magic wand, they will stand out along with the background, and we need the kitten to stand out clearly. Try checking this out. Take the wand with the settings as in the screenshot and click anywhere in the background. A section of the background was selected along with part of the kitten, i.e. this part will be deleted in the future, which means the kitten needs to be further modified to prevent this from happening. What will we do with you now?
7. Let’s add some more sharpness and clarity to the kitten. To do this, go to Filter - Sharpening - Smart Sharpening and leave the default settings.
8. You can also add contrast and sharpness using the Xero/Clarity filter, also with default settings.
You can download the filter for free from Yandex Disk.
Download Xero filter:
9. Now we will darken the lightest areas of the cat a little using the Burn tool with the following settings:
10. Now we finally take the magic wand tool and try to select our background so that we can then change it to another. We start with the same settings as in the previous screenshot from step 6. Start from any corner, select individual pieces, gradually expand the selection by clicking on the edges of the selected area until the entire background is completely selected. If you are doing a lesson with your own picture, you can try changing the magic wand’s tolerance in the settings to decrease it if it still grabs some parts from the picture that we are selecting.
11. So, we have selected the kitten completely, do not pay attention if somewhere it is not clearly distinguished by its fur, but with an indentation or somewhere in the background there are spots that are not highlighted. We will correct all this during the finalization process. Now we need to invert the image. To do this, press simultaneously Shift keys and Ctrl and press the I key. Our kitten without a background is highlighted.
Now on top horizontal panel We look for the Refine Edge button, press it and a window opens for further processing, while our background disappeared, and the kitten appeared on the new background that we selected. Perhaps your settings will show a kitten on a black or white background, that’s okay, we will work with them too.
12. In the Refine Edge window, click on the small triangle on the side of the View window and select On Black from the drop-down list. The background has changed to black, on which all the gray edges of the kitten's edging are clearly visible. We will remove them. To do this, play with the settings sliders: Radius, Feather, Contrast, watching how the image of the kitten changes. Then go to the View on White window and try to correct our image. I settled on the following settings:
13. To see how our kitten will look on the new background, go to the View tab on layers - the kitten with our still life will open and we will see that along the edges the remains of the old background are still visible, which also needs to be removed. To do this, find a rectangle with a brush in the window on the left, click on the small triangle on the left and select a brush to paint over these remains. This work will be better visible on a black background - go again to Black. The brush setting is 35, yours may be larger or smaller if the picture is different. And we begin to brush over the places where we need to remove the remnants of the old background. after that go to again White background, on layers and see how the kitten has changed. If there is still something in your picture that doesn’t suit you, try checking the box: Clear color and play with the slider. IN in this case, we won’t use this function with a kitten.
15. Now the top layer is the layer with the mask. Make one click on the mask, in the toolbar select a black brush with these settings and carefully, trying not to get on the kitten itself, wipe along the contour where there is still Gray background, specifically on the background, and not on the picture with the kitten, otherwise you risk erasing part of the image. If you still have pieces of the old background somewhere in the background, you can go in the same top layer from the mask icon to the icon with the kitten itself, select a soft eraser in the toolbar and delete these places.
16. In our picture, the kitten looks too large compared to the still life and too sharply defined. to reduce it, click on the kitten icon on the top layer, go to Edit-Free Transform and reduce the kitten to normal proportions, placing it in the lower right corner.
17. Now let’s add shadows to the kitten, because our objects in the still life cast a shadow, so the kitten should not seem glued, let’s make it more natural, as if it had always been here, as if it had been photographed against the background of this still life. In the Layers panel, go to the Blending Options (bottom) and select a shadow with settings as close as possible to the shadows in the still life:
18. Well, that's all. All that remains is to sign your work or write some text and frame it or simply leave it like a photograph without a frame. I think that you can already do this yourself or use one of the methods from my previous lessons. I wish you a pleasant creative process when processing your photos!
Download free lesson Replace the background from Yandex Disk.
Open the file you downloaded and follow the installation instructions.
2. Upload a photo to the program
Launch Photo Editor. Click the button Open file and select the image you are going to edit, or simply drag it from the folder into the Photo Editor window.
3. Replace the background
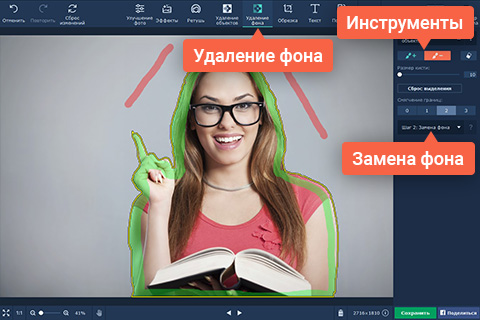
To replace the background of a photo, open the tab Removing the background. Apply a few strokes green brush inside the foreground object you want to keep in the photo. Then select red brush and select the background in the same way. To erase the selection, use eraser. The program will outline the object you selected with a yellow outline. If you are happy with how the object is selected, click the button Replacing the background.
You can now choose any background color or leave the image background transparent. You can also change the size of the cut image and adjust the Blurring edges. If you need to put a picture on the background, click the button Add an image. In the window that opens, select the desired photo from your collection by clicking Download, or choose a suitable background from our collection. To cancel all changes, use the button Reset. When you are satisfied with the final result, click Apply.


