The frames for Word are beautiful. Adding frames in different versions of the editor. How to make a beautiful frame
The Word text editor provides a lot of options for formatting text. In particular, text can be highlighted using frames and patterns. In this article, we'll show you how to create a patterned border around text in Word 2003, 2007, 2010, 2013, and 2016.
If you want to make a frame with a pattern around the entire page, then to do this you need to position the cursor on desired page and click on the “Page Borders” button. If you have Word 2007 or 2010, then this button will be on the “Page Layout” tab
And in text editors Word 2013 and 2016, the “Page Borders” button is located “Design”.

Well, if you have Word 2003, then you open the “Format” menu and select “Borders and Fill” there.

After the “Borders and Shading” window appears in front of you, you need to go to the “Page” tab. Here you can set up a patterned border around the text of the entire page. To do this, you need to select the “Frame” design type, the type of frame pattern, as well as its color and width. After this, you need to save the settings by clicking on the “Ok” button.

If necessary, you can choose one of the proposed ones as a frame pattern Word drawings. To do this, you need to select the “Frame” design type and the picture option. Then you need to save the settings.

If necessary, the frame can be applied to the entire document or to individual sections. To divide the document into sections, use the “Breaks” button on the “Page Layout” tab.
How to Make a Patterned Frame Around a Paragraph of Text
You can also have a pattern around a single paragraph of text. This is done almost the same as described above.
To do this, you need to place the cursor on the paragraph of text that you want to highlight with a frame with a pattern, and click on the “Page Borders” button on the “Page Layout” tab or on the “Design” tab if you have Word 2013/2016.

After this, you need to go to the “Border” tab, select the “Frame” design type, select a pattern for the frame and save the settings using the “Ok” button.

Please note that you cannot make a frame with a pattern around a paragraph. Only line patterns are available.
Do you need the most large collection frames in RuNet? Then you have come to the right place!
There are frames for text design. They are also used for framing paintings, photos, and what is especially interesting for us, electronic documents Word. Agree, dry text done in black and white is not very pleasing to the eye. Of course, if we're talking about about business documentation, you need to adhere to the appropriate style. There's not much to experiment with here. But even here you can create a stylish page frame.
note . At the end of the article, sets of frames available for download are presented to you -.
It's another matter if we create a letter, a children's book, or any other document of an entertaining nature. This is where we can safely use our imagination and create a beautiful and vibrant document design, thanks to the use of all kinds of frame variations available in Word.
. Don't forget that finished document must be designed to the highest possible quality. Don't forget to put numbers for each page (see).If you need to frame a piece of text in any document that is published on your site, you can use HTML tools(cm. ).
Adding frames in different versions of the editor
This section Suitable for those who want to understand how to make a frame in Word. The process is quite similar in all editor variants, but there are still slight differences. Let's start with the oldest version.
Frames in Word 2003
Open the document into which you want to insert a border. Next you need to do the following:
Frames in word 2007

Frames in Word 2010
Here the process is similar to that discussed above. So let's try to expand a little standard set editor.There is big set frames for Word: pictures, all kinds of lines and even frames in the form of GOST frames. We invite you to download three sets (see):
- Some interesting pictures for frames
The archives contain a pretty good set of frames. Launch, see which ones suit you, and use them.note. If you need to indicate below the frame in the document Additional Information, you can add it using footnotes (see)
A short instructional video:
Update. Added set patterned frames. Jun 5, 2015
Conclusion
Using frames will allow you to format the document, add the necessary technical fields, and make it more original and readable.
Can be used in any Word document. This way, you can set the desired orientation for the entire document or a separate sheet.
Allows you to create convenient navigation inside the document. Use them to add a table of contents.
Why look for information on other sites if everything is collected here?
Good day to everyone, my dear friends and guests of my blog. In my article today, I want to tell you how to insert a frame in Word to transform your document. In fact, this is a very good thing, and there is nothing complicated about it, but different versions office has its differences.
First we need to open our text editor, after which we go to the Design tab. In the feed, on the very right side, click on the item "Page Borders". And then select the tab that interests us.
For all pages
When you sewed up "Page Borders" go to the "Page" tab. There you will see individual settings, which will apply to all sheets of your document. That is, to begin with, let’s choose a type, for example volumetric. Now let's select any type of line, for example, like the one in my screenshot. And of course, don’t forget to choose the desired color and thickness. You can also choose a separate drawing, but I don’t like any of them).

Look what happened when I chose a volumetric frame type, a bold line type, Blue colour, 3 pt wide, and applied to the entire document.

For a specific part of text
But if you want to frame not the entire document, but only a certain part of the text, then you need to select this part, and then go to the above point, just go to the “Borders” tab. The essence here is exactly the same, but you only apply all this to only part of the document.

Look what I got when I selected a specific paragraph and applied the red border settings to it.

Well, as you already understood, to remove the frame, you will simply need to set the type to “No”. That's all).
Other versions of WORD
If you are the happy owner of more earlier versions office, then you will need to log in a little differently.
In Word 2007 and 2010, everything happens exactly the same, you just initially need to open a tab "Page layout", and not “Design”, as was the case in the previous example. Well, then you look for the item again "Page Borders" and do everything the same as before.
In Word 2003, the whole process is exactly the same, except that you will need to look for the “Format” menu item at the top of the editor, and select the item from the drop-down menu "Borders and Shading".
Ready frames
In addition to the built-in frame editor, you can already use ready-made solutions, which can be easily found on the Internet.
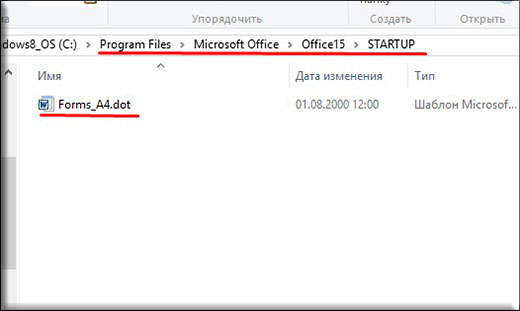
For example, if you need frames according to GOST, you can download them. When the archive is downloaded, unpack it. There you will see the file Forms_A4.dot. This will be the frame template. But don’t rush to open it just like that. Copy it to the folder where you have Office installed in the STARTUP folder. Now you have everything installed.
Go to Word. We noticed that when you created a new document, an item appeared: "Security Warning". It always does this when connecting external data. This is fine. Just click on "Enable Content".
Now go to the Add-ons menu. There you will see our downloaded data that we just copied to the office folder. By clicking on any of the templates provided, you will see how it will immediately fit into the document according to all the rules.

Just in case, I put a special font inside the folder for forms of this format. this font.
Patterned frames
In addition to the above, I suggest you use one more method to decorate a document, namely loading external patterned frames. Essentially these are just pictures in the format PNG With transparent background. You can download them.
Now go back to your text editor, look for the “Insert” menu, select “Drawing”, and then look for the files that you just downloaded.
Yes, and don't forget to click right button mouse on this frame and select “Picture Format”, then go to the “Layout” tab, and then set “Behind the text”. Well, now you can write whatever you want inside this frame, and also move it as you see fit.

Of course, they will not fit on the entire sheet, but you can always stretch them and move them as you need.

Well, that seems to be all I would like to tell you today about how to insert a frame in Word. I hope that many of you will find this information useful. So I look forward to seeing you again on my blog. Check back often. Bye bye!
Best regards, Dmitry Kostin.
The need for a framework arises among students of engineering and computer specialties when they need to complete a laboratory, coursework, or thesis. You can buy sheets with already printed frames, but it’s easier and more convenient to type up the text with frames yourself. Here you will find and download for free a template (*.dot) that allows you to easily and simply create texts on sheets with frames. If you configure the template correctly once, you can save a lot of time. By the way, one of our readers reported that using this template he established successful business- prints for classmates and everyone in the dorm on framed sheets.
Download the file (see link below), and open this file Word editor. When you open it, you will be warned that the file contains macros. This is normal (there are no viruses). Ease of use is achieved through these macros. Therefore, select the "don't disable macros" option. After launch it will appear additional panel, which you see in the figure (it can be customized). Then everything is very simple: create new page, place the cursor on it and press the button on the panel with the desired frame. This page can be edited, fonts can be changed, etc.
In addition to the frames above, you will also receive an additional top stamp (see left) and an address stamp (an example of an address stamp can be seen in the picture below). These templates are intended for the preparation of electronic documents in accordance with GOST 2.104-68*, for design documentation. The downloaded file is a document TEMPLATE and should not be edited directly. For proper operation Place the template in your templates folder (usually C:Pogram FilesMicrosoft OfficeTemplates). For correct operation The template requires font files GOST Type A and GOST Type B, which must be installed on the system. You can download these fonts, for example, . It is strongly recommended that before starting to work with a document, without changing anything in its text, open the menu File - Document Properties and in mandatory fill in the fields regarding the Name and Number of the document, Name of the enterprise. After confirmation changes made save the document, close and open it again. It is recommended to type the text of the document using the "Body Text" style.
It is strongly recommended to use specialized styles to format headings at the appropriate level - “Heading 1”, “Heading 2”, etc. You don’t have to do this, but then you will have to manually format each heading at the appropriate level and also manually create a table of contents. It is also recommended to write stand-alone formulas (not in the main text) and create tables using the appropriate Formula and Table styles. If you need to use any other objects, create your own styles for them.
Previously, in order not to bother ourselves with drawing small and large frames for term papers or diplomas, we ran to the store and bought them. Now, it’s much easier to download a template for the frame you need and print as many as you need on your printer. The same situation applies to the design of text in abstracts, certificates, diplomas, and similar frameworks. Download and print beautiful frame, all you have to do is type it right away or enter your content after printing.
- here are frames according to GOST: 15 and 40 mm;
- you can also download an empty frame, with margins of 5 and 20 mm;
- There is a small selection of decorative frames that are made in DOC format, for Word;
- for all this you will only need one, under which you can evenly fill sheets with A4 format frames.
15 mm frame (small)

A small A4 frame, which has standard borders on the right, bottom and top of 5 mm, and on the left 20 mm. You can download it in the format for Word of any older versions. This is in case you need to fill or edit this frame. If everything fits and you just need to print it, it’s better to use a format that can be printed even without having established office on the computer.
40mm frame (large)

This frame is usually used for drawings or at the beginning of sections. Its height is 40 mm, the margins are standard: 5, 5, 5 and 20 mm. This frame is also available for download in two formats: and , both in A4 format, respectively.
A4 frame with numbered sheets

Such A4 sheets with a frame with only space for the sheet number are needed for essays and term papers. By placing a zebra, you can write your text manually with the same indentations. You can download a frame with numbering for free in or format.
Blank A4 frame

This is the most basic type of frame - without a table or numbering. In other words, around the perimeter standard sheet(297 x 210 mm), a rectangle is drawn that respects standard fields according to GOST. Depending on the need, download the frame file or print immediately.
Decorative frames for text
Next are frames that will help you beautifully design your text. Any of them is available for download in DOC format for the Word program. Thus, having opened the file in the office, you can print your own text, and only then print the finished frame.
Frame with yellow flowers


