How to set new wallpaper on your desktop. How to put pictures on your desktop? Interesting ideas
Users see the computer desktop and the background image that is set on us more often than anything else on their computer. Therefore, it is not surprising that over time you want to change the boring background and put your own picture on your desktop. Fortunately, there is now simply a huge selection of background images and wallpapers for your desktop of excellent quality on a wide variety of topics. You can try something new every day without fear that you will soon get bored with it.
It won’t be difficult for you to find numerous sites with desktop wallpapers if you use any search engine and enter “desktop wallpapers” or something similar as a query. We will not dwell on this issue in detail. Instead, we’ll talk about how to put a picture on the desktop in various ways in the main versions of the Windows family of operating systems.
Simple method for Windows Vista and Windows 7 operating systems
Right-click on the image that you want to see set as your desktop background and select “Set as desktop background” from the context menu that appears.
Installation from Control Panel in Windows XP
- Click the Start button.
- In the menu that appears, select “Control Panel” and then “Screen”.
- In the window that opens, go to the “Desktop” tab.
- Select a new one from the list of available standard images.
- If you need to install your image saved on your computer’s hard drive, then in this window, click the “Browse” button and select the location where it was placed.

Installing a picture directly from the desktop in Windows Vista and Windows 7

For desktop pictures whose dimensions do not match the resolution of your computer screen, you can try adjusting the placement. There are three options for setting the placement: stretch the image, tile and center. If they do not help and the installed image looks ugly, then crop it exactly to the size of your screen using any suitable graphics editor. For example, Photoshop.
If you work a lot on the computer, then over time you may get tired of the monotonous background image and you will want to replace it with something more original. Plus, by changing your wallpaper, you'll show other employees that you happen to be computer savvy!
By clicking the right mouse button (the cursor should be on a clean desktop, and not on any tabs or shortcuts), call up the context menu.
In the menu that opens, select Personalization
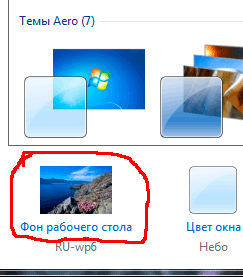
Fig.2
 Fig.3
Fig.3
In the window that opens, you can select a background from several dozen pictures that are available by default in the Windows 7 operating system. To view, click on the thumbnails of the pictures and they appear on the monitor screen before your eyes. When you select a picture, click the Save Changes button so that the picture you like becomes your desktop background.
If you check several images, then the field will become active Change image every and from the drop-down list you can select the time interval after which the images will replace each other.
But perhaps you want to make your drawing or photograph your desktop background. Then click the Browse A button and find the folder with your photos. Just keep in mind that if the photo or drawing does not fit the screen size, then you need to click the Fill B button and from the drop-down list select what you want to do with the drawing: stretch it, place it in the center, etc.
Changing your desktop background in Windows XP
By right-clicking on a blank screen, you open the context menu. In it, select the bottom line - Properties.
In the Properties: Display window that opens, click the tab Desktop:
 Fig.4
Fig.4
This is where you can set the color or background image of the screen.
If you want your monitor screen to be one color, then on the Color tab 1 From the drop-down list, select any color you like (black, yellow, red, etc.). And in the field Background 2 click on the top line ( No ) . In this case, the color you selected will appear on the monitor screen, which is visible in the middle of the tab. If you like this color, then click the apply button, and then OK. That's it - the monitor screen is painted in your favorite color.
But it will be more beautiful if the screen is not monochrome, but has a background image. The picture can be selected from the standard Windows set. To do this, in the Background picture 2 field, click the cursor on the names of the pictures and these pictures will appear on the screen of the sample monitor. Currently there is a standard Windows XP image called Serenity. Having selected a picture, you click the Apply button, and then OK and this picture will appear on your desktop - on the screen of your monitor.
But, after a while, you will get bored with all the standard drawings and will want to find something new.
Many drawings are available on CDs and on the Internet. You can choose several designs for yourself and then change them every week. To display such a picture, click the Browse button and use Windows Explorer to find the file with this picture on your computer. The selected file will appear in the list Wallpaper 2 Now click the Apply button, and then OK and your picture will appear on the screen.
I only draw attention to the fact that the drawing must be on the hard drive, and not on a CD. That is, the picture you like must first be copied from the CD, and then installed as the background picture.
But perhaps this will not seem enough to you. You will want to use your own photos as the background image. This is also possible.
It is only desirable that the drawing matches your screen resolution. If the screen resolution is 1024 x 768, then the photo size should be the same. Because if the photo is larger than the screen, then only part of the photo will fit on the screen and not necessarily the best part.
If the photo size is smaller than the screen, then you will need to select an option in the Location 4 field. The photo will either have to be placed in the center or stretched, or the screen will be covered with it, which, in any case, will not be very beautiful. This means that the photograph must be prepared in advance.
Background picture
and screen saver on your computer
Initially, on computers with installed Operating
Windows system already has a background image installed.
And, most often, this is a background image with the Windows logo.
The screen saver is not installed initially.
But it can be installed and then changed.
How to change your computer screen wallpaper
How to change
screen background
I’ll say right away that changing the background image to
today - not available for all versions of Windows.
In particular, for Windows 7 (starter) -
this option is not available.
So, the path to changing the background image begins
from the “Start” button → select “Control Panel” on the right.

In the “Design” section, select the function
"Changing the desktop background."
The following window will open.

This window contains desktop backgrounds. You need to click on the image you want to make the background. Then select the position of the image at the bottom - on the “Fill” button

In addition to choosing a ready-made Background, you can choose any other image. From those that are downloaded to your computer. To do this, in the “Image Location” section, click on the arrow. A context menu will open.

(Click on the picture to enlarge)
You can select "Image Library". And when yours open
folders with images - select the one you need. Or click the “Browse” button.

And also select the image in the desired folder.
And when the image appears in the window for setting the desktop background, do the same as for the finished Background. Click on the selected one. Select the position of the image at the bottom - on the “Fill” button, select the position of the image. And then click the “Save Changes” button at the bottom.
What is a screen saver and how to install it
What is a screen saver
and how to install it
A screen saver is just that: a screen saver. Depending on the one selected, it appears either against the background of the Wallpaper, or instead of it at a time when the computer is turned on and is in a pause state. That is, you do not use a mouse or keyboard. Or just walk away from the computer.
As soon as you touch the mouse with your hand or click
pressing the keyboard button – the screen saver disappears.
Installing a screen saver on Windows 7 (initial) is also available.
The path to installing a screen saver begins with the “Start” button → select “Control Panel” on the right → click on the “Appearance” button. The following window will open.

In the “Screen” section, select “Change screen saver”.
The Screen Saver Options tab opens.

Initially, the screen saver is not installed. Therefore, in the “Screen saver” parameter it is set to “No”. To see the selection of available screensavers, click on the arrow. A context menu will open.
When you turn on your computer, the very first thing that appears on the screen is the desktop, which plays an important role for many users. Some people put on their favorite nature image, while others enjoy a screensaver that displays an interesting photo. But some time passes and a desire arises to change it. Choosing an image for a desktop, as a rule, does not cause any difficulties, but not everyone knows how to install it. In our article we will look at how to put a photo on your desktop.
Windows XP
There are several ways to set a photo as a background in the Windows XP operating system. This action can be performed using the control panel or screen properties.
Installation via screen properties
How to put a photo on the desktop in the Windows XP operating system:
- Right-click your computer mouse on any free space in the main window.
- Select the “Properties” item, which is located in the context menu. It is here that it is possible to configure the main number of external parameters of the system.
- Go to the “Background” tab.
- Click on the “Browse” button to upload your file.
- Click on the window that appears indicating the location of the desired file.
- When all the parameters are configured, you need to click on the “Apply” button, after this procedure all new changes appear.
- If the file is too large or slightly smaller than the parameters of the main window, then the picture can be positioned in the center or stretched a little. To perform such actions, you need to use the “Location” tab.
- To change the color, you need to go to the “Color” tab. The required color will be visible behind the photo, and it can be seen in the names of shortcuts and icons located on the main screen.
Important! Live desktop wallpapers are at the peak of popularity among regular PC users today. If you also want to install them on your computer, read the information about.

In order to put a photo on the desktop through the control panel, you have to perform the following actions:
- Click on the “Start” button.
- In the window that opens, select the “Control Panel” tab and then “Display”.
- Next, go to the “Desktop” section.
- Select a new one from the list of available standard photos.
- When installing your picture, which is saved on your computer’s hard drive, you need to click the “Browse” button and select the location where it was placed.

Windows 7 and Vista
Windows 7 and Vista operating systems provide several options for setting the home screen background image. To do this, you can use the control panel or personalization.
Installation via personalization
Let's look at how to install a photo in Windows 7:
- Right-click on any free space in the main window.
- Select the “Personalization” item, which is located in the context menu.
Important! In the initial versions of the Windows 7 operating system, there is no “Personalization” tab, so there is no way to change the default image to another one.
- In the window that opens, you can configure the photo settings and thus install the picture on the main screen, while specifying the file for the screensaver.
- You need to go to the “Location” item and configure the screen saver settings.
- Select a value for the home screen background: a solid color or a colorful picture.
- Click on the “Browse” button and install the photo on the display.
- In the window that appears, you need to select the path to the corresponding file and click on it.
- To specify the filling option, go to the “Filling” item. Where the value for the picture is selected - you can place it in the center or stretch the photo.
Important! The Windows 7 operating system has many more features compared to the XP version.

Installation from the control panel
In order to put a photo on the desktop in Windows 7 and Vista using this method, you need to do the following:
- Click on the “Start” button.
- In the window that opens, select the “Control Panel” tab.
- In the Control Panel menu that appears, in the “Management and Personalization” section, open the “Change the desktop background” tab.
- Select a new photo from the standard background images, which are located in the C:\Windows\Web\Wallpaper directory.
Important! In case of installation from another directory, for example, your own photos or pictures for the display that were saved from the Internet, you need to click the “Browse” button and specify the path to the image.

Windows 8-10
Installing a photo on the desktop in Windows 8-10 is not such a big problem. Let's consider the order of sequential actions:
- Click on the “Start” button (Windows logo).
- Select the “Options” tab.
- Click on the “Personalization” tab. At this point, you can configure the photo settings, as well as change the color tone of all elements of the device.
Important! You can monitor your changes as you make them using the preview window.
- Go to the “Background” tab, specify a solid color or a colorful image for the background of the main display. There is also the ability to create a slide show from several photos.
- In the present “Colors” section, you can independently decide on the color scheme for a photograph on a computer or laptop, or you can use an automatically selected version of the operating system.
- After choosing the color scheme of the photo, you need to decide on the placement location.
- You also need to determine the background theme - dark or light.

Via the Windows Registry
In order to change the picture on the desktop using the Windows registry, you will have to do the following:
- Click on the “Start” button.
- In the search bar, create the query regedit and click on the Enter button.
- If the User Account Control (UAC) prompt appears, you need to click “Yes”.
- In the registry window that opens, you must perform the following steps: HKEY_CURRENT_USER\Control Panel\Desktop.
- Double-click the left mouse button on the right side of the window on the “Wallpaper” key.
- Specify the full path to the corresponding photo (with the extension .bmp or .jpg).
Important! The file name must not contain spaces. If they exist, then you need to rename the name of the photo. If you do not use this recommendation, the result will be only a black image.
- Click on the “OK” button.
- Close the Registry Editor window that opens.
Important! If you have important information stored on your computer that children and other users could unknowingly move or even delete, set up a transparent folder on your desktop. With its help, all the necessary information will be hidden for other users, but at the same time be at your fingertips. Ways to do this are given in the form of step-by-step instructions in the article.

Via context menu
Changing a photo on your desktop via the context menu of the image is not difficult. How to set the image:
- Find the corresponding picture.
- Right-click on the file.
- Select the “Set as desktop background” tab from the context menu and click on this item.
Done, your device has a new background for the main display!
Important! Using these steps, you can only install the picture. To fully configure all parameters, you need to go to the section called “Personalization”.

Creating a slideshow from photos
To keep photography from getting boring and always bring pleasure, you can design a slide show of several pictures. They will change automatically after a certain time interval. To create a slideshow on your desktop, you need to do the following:
- Right-click on any free space in the main window.
- Select the section called “Personalization” from the context menu.
- Go to “Location” to configure image parameters.
- Select the appropriate value for the photo.
- Click on the “Browse” button to set the desired set of photos as the main screen screensaver.
- In the window that appears, select the path to the required images.
- Select all photos for the screensaver of the main display window.
Important! A quick method for selecting an image:
- If you need to select all files in a specified folder, then just use the key combination Ctrl+A.
- If the files are not located next to each other, they can be selected while holding down the Ctrl key.
- When placing files one after another, you can select the first image, and then, while holding down the Shift key, click the last image from the list. With this procedure, all files that are located between the first and last image are selected.
- Click on the “OK” button.
- Set the time interval for changing background images in the “Change image every...” section.
- In order for the photos to change not in order, but in a chaotic mode, you need to check the “In random order” box.
- Click on the “Save changes” item.
Important! Windows XP does not have the ability to set a slide show for the main screen. This feature is present only in the Windows operating system, starting from version seven.

MacOS
Not only the Windows operating system is used to operate laptops and tablets; computer devices can also be equipped with other operating systems. For example, Apple Corporation uses the Mac OS operating system for its devices. Let's look at how to install a photo on the desktop in Mac OS:
- Double-tap and click on the touchpad.
Important! If the mouse is not a factory one, you must simultaneously hold down the Ctrl key and click on the touchpad, or right-click.
- Go to the context menu section and select the “Change desktop background” tab.
- In the “Desktop and screensaver” tab that opens, specify the image option.
Important! If you check “solid color” in the “Apple” item on the left side, the main screen will be filled with one color. When you specify the “Pictures” section, the system prompts you to select the appropriate photo.
- If the required photo is in the “Image” folder, then you just need to find it in the list. If it is missing, then you need to click on the “+” icon indicating the corresponding folder.
Important! When you specify the desired folder from external media - a USB flash drive, an external hard drive or an SD card, after the procedure of disconnecting them from the computer device, the photo of the main screen will be automatically replaced with the standard version. That is why it must be transferred to the internal hard drive of the device.
In this article we told you how to put a photo on your desktop. Now choose for yourself how to do this.
A picture on the desktop in the Windows Vista and Windows 7 operating systems. In other operating systems, such as MacOS and Linux, these actions are very similar.
Windows 7: The first thing to do is right-click on the desktop and select “Personalization” from the context menu. In the window that appears at the bottom you will see “Desktop background". Click on this inscription and in the new window that opens you will see “File location”. You can choose not only the default, but also photos downloaded from the Internet or your own photos. To do this, click the "Browse" button and find the file you need, then click OK in the dialog box and OK in the "Desktop Background" window. Wallpaper set.
Windows Vista: As in the instructions for Windows 7, you need to right-click on the desktop and select “Personalization” in the context menu. After that, select the “Desktop Background” option from the list. Next, find the “Browse” button on the screen and select the desired image, then click OK in the dialog box and OK in the “Desktop Background” window. Wallpaper set.
Video on the topic
Sources:
- how to change the desktop picture 7
The Windows GUI desktop background, installed by default with the operating system, can be changed in almost any version of this operating system. Even in those that, by the will of Microsoft, do not support such an option. Depending on the OS version, the methods for replacing the “wallpaper” will vary - in some it is enough to select an item in the context menu, in others you will have to install or use additional programs one-time.
Instructions
If the photo wallpaper you want to install is posted on the Internet, the easiest way to solve the problem is to use the appropriate browser option. To do this, load a full-size picture into its window - this is usually done by clicking on the thumbnail image of the desired wallpaper option. Then right-click the full image and select the desired item from the context menu that appears. In different browsers it is formulated slightly differently - in Opera this command is called “As desktop image”, in Internet Explorer - “Set as background”, in Mozilla Firefox - “Set as desktop background”.
Google Chrome and Apple Safari browsers do not provide such an item in the picture menu, so use a similar option in the operating system. To do this, first save the full image to your computer, then using “Explorer”, which is called up by pressing the Win + E keys, go to the image folder and right-click it. In the pop-up menu, the desired item is called “Set as desktop background image” - select it.
A photo wallpaper file stored on your computer can be made a background image through a special control panel applet - in the latest versions of Windows OS it is called “Personalization”. To launch it, right-click on the existing desktop picture and select “Personalization” from the menu. Under the table with theme icons in the window of the applet that opens there is also a picture with the caption “Desktop Background” - click on it and a page with a table of options for background images known to the system will be loaded into the same window. To add your own files to it, click the “Browse” button, in the dialog that opens, specify the folder in which they are stored, and click OK. Then select the icon of the desired image in the changed table, in the “Image Position” field, set the parameters for its placement on the desktop and click “Save Changes”.


