How to create a beautiful frame in Word. Frame for thesis
Hello my hardworking readers! In this “Crib Sheet” we will figure out how to make a frame with a stamp in Word. It's spring outside, and students and schoolchildren are suffering. The end of the school year means inevitable exams for them, and before them the delivery of all kinds of calculation and graphic work, coursework, and even diplomas. Therefore, I think this topic will be useful to many students. As always, in extreme detail, clearly, with screenshots using the 2016 version as an example... Let's go?
Creating sections in a document
Please, friends, do not confuse our sections (technical) with the semantic division of your document. In this case, we will talk about the ability to set different formatting for certain pages. As a rule, frames with stamps are not placed on the title page, table of contents and list of used literature. The main part is designed in two ways:
- the middle stamp is inserted on all pages;
- The middle stamp is placed only on the first page, and the small stamp is placed on the second and all subsequent sheets.
Accordingly, taking into account the requirements for the design of school and student work of your particular educational institution, the document will need to be divided into 4 or 5 sections. However, there may be more such sections if the main part of the document contains pages on which frames and stamps are not needed. That is, you should now understand the main thing that we are creating a section where the formatting needs to be changed. By default, WORD will give us frames and stamps in a row on all sheets.
I will not give an algorithm for creating partitions in this article. For those of you who have forgotten how to do this, I refer you to the article. There this process is described in detail.
Gost drawing frames for WORD
Then the requirements of the ESKD (Unified System for Design Documentation) for A4 format, the indentation from the sheet boundaries should be 20 x 5 x 5 x 5 mm. The same dimensions are repeated by GOSTs and all training manuals. So let's set them for the necessary sections.
For Word to understand which section it has to work with, simply place the cursor on the desired page. Next from tab "Layout" go to section "Page settings" and open the window of the same name by clicking on the arrow at the bottom right.
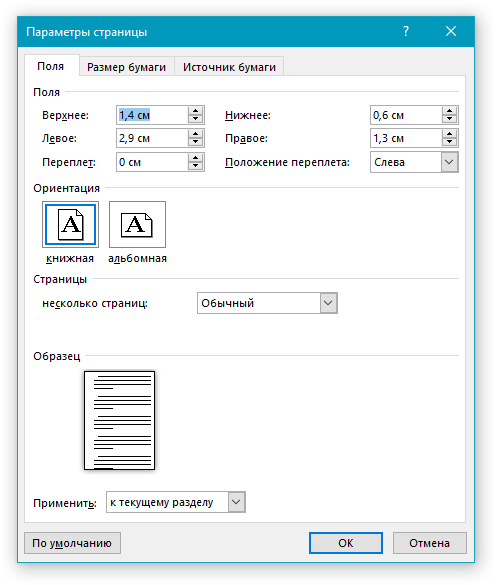
In the pop-up window in the tab "Fields" set the following values:
- upper margin - 1.4 cm;
- lower - 0.6 cm;
- left - 2.9 cm;
- right - 1.3 cm.
Don’t let the fact that these numbers bear much resemblance to the required 20*5*5*5 worry you at all. It’s just that the Word file is not familiar with Russian GOSTs, and in this case we are making allowances for its American “dumbness”.
This is, of course, a joke. I really respect this text editor. I assure you, after printing you will see your desired frame sizes in full accordance with our standards.
But let's finish the job in "Page Options". In line "binding" leave zero "binding position" - "left", orientation - "book", in line "pages" choose "regular". Per line "apply" We don’t pay attention at all. Click OK(Figure 1).

Next, go to the tab "Design", click the button "Borders pages." In the window that opens "Borders and Shading" choose "type" - "frame", "width" - 0,75 , line "apply" - "to this section", and open the window "Border and Fill Options".
Here we set the field values, that is, the indentation of the text from the frame in Word units pt (points). They should be like this:
- top - 25 pt;
- bottom - 3 pt;
- right - 20 pt;
- left - 21 pt.
In line "relatively" choose "text", V "parameters" put a mark next to "Always ahead", press OK. This window closes but remains open "Page Borders". Don't forget to click there too OK. After this, frames will appear on all pages of your section. The frame for A4 Word format is ready. For the remaining sections of the document that you have selected, for example, for a small stamp, the procedure for inserting frames will have to be repeated again (Fig. 2).

How to make a stamp in Word according to GOST
Friends, after reading the two previous parts of this post, have you ever wondered why we are only talking about medium and small corner stamps? What's big? Does this even happen? Of course, but the point is that it is not used for A4 format. Therefore, put doubts aside and let’s start creating the middle stamp - the so-called main inscription.
Middle corner stamp in WORD
Of course, we will insert the corner stamp into the footer. To open it first in a tab "Home" click on the button "show hidden formatting characters", then mark the spaces between the sheets (double-click on the dividing line). Using the same double click on the bottom of the page, select the header and footer. This opens a toolbar at the top "Constructor". In his section "Position" in two lines with numerical data we set zeros(Fig. 3).
Now you can start creating the stamp. Essentially this is a table with given dimensions. Therefore, I recommend that you remember the ways and (links will open in new windows, so you will not lose this article). Do you remember? Well now let's begin.
Place the cursor in the footer area and go to the tab "Insert" and press the button "table". Select a table from a template with 9 columns and 8 rows. All. Our sign still barely resembles a real corner stamp, but it is already in place. The only thing is that it should be pulled to the left flush with the text border using the move marker (a cross above the upper left corner).
to the tab "Layout", chapter "Cell Size" and increase their height to 0,5 cm (Figure 4).

The next step is to set the required sizes for the columns. Select them one by one and select their width using the button shown in Fig. 4 is highlighted in blue. Here's how wide the columns should be in the middle corner stamp (from left to right, in cm): 0,7
- 1,0
- 2,3
- 1,5
- 1,0
- 7,0
- 1,5
- 1,5
-2,0
. The table takes the following form (Fig. 5). 
Its dimensions 40 x 185. Adjacent cells filled with the same color need to be merged. We do this in the panel "Working with tables" tab "Layout" via button "merge cells"(Fig. 6).

The cell surrounded by a red frame, on the contrary, needs to be divided into three. We do this using a button "split cells"(Fig. 6). The middle corner stamp is ready and in place.
How to make a small stamp in Word
A small stamp in accordance with GOST 2. 104-2006 is placed on the second and subsequent pages of the main part of explanatory notes for term papers and dissertations. Its overall dimensions 15 x 185. The initial table template should consist of 3 rows and 7 columns. The height of the cells here is the same - 0,5 cm, and the column widths are as follows: 0,7 - 1,0 - 2,3 - 1,5 - 1,0 - 110 - 10 . For school work, the main inscription can be even smaller in size, but this will no longer be in accordance with GOST. However, friends, I hope that you now understand how to make a stamp in Word, regardless of the given conditions. Good luck to you in your battles with the granite of science. For your and our victory!
Your guide to WORD 2016 copywriter GALANT.
Did you remember to watch these “Cribs”? Go ahead, it's interesting.
Framing a paragraph allows you to highlight an important idea, and a frame around the page decorates or is sometimes necessary for the requirements for the design of certain types of documents. We'll tell you how to make a frame - for a fragment of text or for all sheets, including a frame with a stamp in accordance with GOST.
You can select a piece of text using a regular rectangular frame or a curly one.
Regular frame
How to make a frame around text in Word:
- Select the text you want to frame. This can be a single sentence or an entire paragraph.
- On the toolbar in the “Home” tab, click on the “Borders” icon in the “Paragraph” section.
- Choose which sides of the paragraph you want borders on.
To change the appearance of lines or frame text, open the last item in the Borders and Shading submenu. Change the type, color and width of borders. In the “Sample” window, configure which sides to place the lines on. If you want to draw frames for each selected line, in the “Apply to” item, select “Text” - the lines will be framed separately. In the Fill tab, set the background color and pattern.
Figure
You can make a beautiful frame using a variety of shapes. Go to the “Insert” tab, in the “Illustrations” section, click on “Shapes”. In the drop-down list, select an image from the list - rectangles, stars, arrows, callouts and much more. Click on the selected picture, place the cursor in the desired place on the sheet, hold down the left mouse button and move it sideways - a figure will appear on the page. To insert text into the frame, right-click on the image and select “Add Text” from the menu.

The frame-shape can be changed at any time - click on it, the “Format” tab will appear in the menu. Various styles and fill patterns are available on it, you can change the direction of the text, and add WordArt objects. This frame is easy to move around the document - just hold down the mouse button on it and move the pointer in any direction - or copy, the text content will also move.
Page Framing
Let's figure out how to insert a basic frame in Word. We will need the “Page Borders” tool; depending on the version of the program, it is located in the tab:
- 2016: “Constructor”;
- 2013: “Design”;
- 2010 and in Word 2007: “Page Layout”;
- To create a frame in Word 2003, select the item of the same name in the “Format” menu.
In the window, configure the frame - the type of borders, the format of the lines, their color and width, for patterned frames - the design. In the “Sample” section, set the locations of the borders.

You can apply the created drawing to all documents - in this case, the same frames will automatically appear on all sheets. Or to individual sections, for which you must first place the section break symbols in the right places.
Using Templates
To prepare documents in accordance with GOST, use special frame templates that can be downloaded for free on the Internet. The template is a “.dot” file. Once downloaded, open it like a regular document. A security message appears about running macros - allow the content to be enabled. A new Add-ons tab will appear in the toolbar.

How to insert a frame in Word: select the desired frame with a stamp and click on it. A frame will appear on the current sheet; all you have to do is enter the data in the fields.
Conclusion
We figured out how to make a frame in Word. The program provides interesting tools to create strict or insert beautiful frames. You can make the frames yourself or use ready-made templates to quickly get the finished result.
We have already repeatedly raised the topic of the extensive functionality of the Microsoft Office Word program. However, many users, even quite advanced ones, actually know nothing about the software and its functionality. That’s why today we want to tell you about how to make a frame around text in Word. Some people don’t bother too much and, when the need arises, they create a huge table around the text, which visually looks like a frame. Unfortunately, this method has one huge disadvantage - the inconvenience of editing. Especially if the text also contains tables. What to do then? Now you'll find out!
How to make a frame in MS Office Word around the entire page with text
We want to offer you a simpler, more effective, well-thought-out option in terms of the functionality of this text editor. You'll see, but the Page Borders tool is ten times more convenient to use. In addition, it does not interfere with subsequent editing of the page text and other information on it.So let's get straight to the point. First, we want to tell you how to set borders for the entire page - perhaps you want to “wrap” the entire page with text in borders. You need to do the following:
As you can see, there is absolutely nothing complicated here. Now you just need to configure this very frame. To do this, click on the “Page Borders” button again and experiment with the elements marked in the screenshot.

We figured out a frame for the entire page with text and other elements, but how to make a frame in Word around individual text?
How to Create a Border Around Single Text in Word
In fact, this instruction will not differ very much from what you see above. Because you will have to do almost the same steps. Well, let's begin:
To frame another paragraph, select it before following the instructions above.
Don't forget that you can change the width, appearance, color and design of the frame, as well as its location, depending on your own wishes.
Finally, we would like to remind you that these instructions are suitable for all versions of MS Word, but the arrangement of elements may differ. In any case, you shouldn't have any problems setting a frame around the text.
MS Office has become the most used, convenient editor for typing and processing text. In certain cases, a document requires additional external design, requiring the addition of stamps and frames. This procedure may differ for different versions of the office. Below is how to add a frame in Word 2010.
How to make a frame around a page in Word 2010
Microsoft's Word program has several editions; many changes have been made to the interface and menus. The software includes ready-made designs for framing greeting cards. There will be opportunities for preparing and writing dissertations and term papers (according to GOST), simply to improve the visual perception of the text. Creating markup on a document page can be done in several ways. Below are instructions on how to make a frame in Word 2010:
- Go to the "Home" tab.
- In the “Paragraph” section, find the icon of a dotted square with a filled bottom border, click on the arrow next to it.
- Click on the “Borders and Shading” line (located at the bottom).
- A window will open to create a frame; you can set the thickness, color (white will not be visible), and style.
- After assigning all the settings, click on “Ok”.
How to make a frame in Word for a diploma
The procedure - how to make a frame in Word 2010 - is of interest to all students who are defending coursework and diplomas. Boundaries must be set strictly in accordance with GOST, otherwise the work will not be accepted. At the first stage, you need to create sections for the document, for example, the main part, table of contents, title page. This is necessary so that the frame is displayed only for the necessary areas. To create sections, you need to go to the “Page Layout” item, click “Breaks/Next Page” at the necessary places. Instructions on how to properly make a frame in Word 2010:
- According to GOST standards, the design must have the following indentations: 20x5x5x5 mm. To make settings, go to the “Page Layout” section.
- Click on "Fields/Custom Fields".
- A window for entering parameters will appear. Set the following values: top - 1.4 cm, left - 2.9, bottom - 0.6, right - 1.3 cm. Binding - left, orientation - strictly portrait.
- From the menu, select Page Layout, click Page Borders.
- Select the “Frame” line, immediately confirm “Apply to this section”, then click “Options”.
- In the settings window, set the following parameters: top – 25 pt, bottom – 3 pt, left – 21 pt, right – 20 pt, in the parameters – “always ahead”.
- Click "OK" and a border will appear for the section you selected.
How to make a frame around text in Word
In certain cases, you should know how to insert text in a frame in Word, and not around the entire page. This is an additional design technique that can help improve the perception of information. The program provides the ability to frame only part of the text to emphasize its importance. You can do this as follows:
- Select the area to be decorated.
- Go to the “Paragraph” main menu tab and select the “Borders and Shading” item.
- Click “Border”, here you can enter all the necessary parameters for future framing.
- In the “Apply to” line you need to set “Text”. If desired, you can assign a “paragraph” here and create a frame for an entire piece of the document.

How to make a beautiful frame in Word
Framing can be applied not only to official documents, but also to greeting cards. If you come up with a beautiful toast or poem for the birthday person, you can design it as a card and give it as a gift. Instructions on how to insert a frame in Word 2010:
- Select the "Insert" section.
- In the Illustrations group, find the Shapes button. When clicked, options for possible frames will be displayed.
- Select the appropriate one and use the mouse to place it on the desired area of the document.
- You need to insert the design on a blank document; it is impossible to do this on already written text.
- Right-click on the shape, click on “Add Text”, enter the required content inside.
How to draw a frame in Word
In addition to standard tools, there are options on how to make a table frame in Word 2010. You yourself will draw the design boundaries as you see fit. The creation algorithm is as follows:
- On the main menu tab, from the “Paragraph” group, select “Draw Table” (the button with a dotted square).
- Set the required margins on the right and left.
- The cursor will change to a pencil. Place it in the desired location by holding down the left mouse button and stretch the rectangle to the required size.
- The result is a design that is essentially one large table cell.

Because this is a table, all Word commands will apply to the content. You can easily change the size of the frame or the thickness of the lines, or move its borders. You can move a cell horizontally or vertically. The contextual sections “Layout” and “Designer” will remain available to you, which provide the ability to adjust the position of the text and fill.
How to make a frame with a stamp in Word
For diploma or official documents, you not only need to insert a frame in Word 2010, but also design a place for a stamp. Creating a frame is described above; below are instructions for creating a typical title block:
- First you need to insert a footer. To do this, find the bottom of the page, double-click on it, and the editor will open.
- Go to the "Design" tab from the "Position" group. Change the value to 0.
- Create a table with 9 columns, 8 rows via “Insert” -> “Table”.
- Hold down the left mouse button and move the left border of the table to the edge.
- Select all the cells, go to the “Layout” tab, select “Cell Size”, set the height to 0.5 cm.
- Set the width of the columns one by one to: 0.7-1-2.3-1.5-1-6.77-1.5-1.5-2.
- Combine cells as needed to create space for a stamp, signature, etc.
Video: how to create a frame in Word
The academic year has just begun, but soon students will begin to complete calculations, graphics, coursework, and scientific work. These kinds of documents, of course, have extremely high requirements for their design. These include a title page, an explanatory note and, of course, frames with stamps created in accordance with GOST.
Each student has his own approach to document preparation, but in this article we will talk about how to correctly make stamps for an A4 page in MS Word.
The first thing you need to do is split the document into several sections. Why is this necessary? To separate the table of contents, title page and body. In addition, this is how you can place the frame (stamp) only where it is really needed (the main part of the document), without allowing it to “climb” and move to other parts of the document.
1. Open the document in which you want to make a stamp and go to the tab "Layout".

Note: If you use Word 2010 or earlier, you will find the necessary tools for creating breaks in the tab "Page layout".
2. Click the button “Page Breaks” and select the item from the drop-down menu "Next page".

3. Go to the next page and create another break.
Note: If your document has more than three sections, create as many breaks as necessary (in our example, it took two breaks to create three sections).
4. The required number of sections will be created in the document.

Unlinking Partitions
After we have divided the document into sections, it is necessary to prevent the future stamp from being repeated on those pages where it should not be.
1. Go to the tab "Insert" and expand the button menu "Footer"(group “Header and footer”).

2. Select an item “Change footer”.

3. In the second, as well as in all subsequent sections, click the button “Same as previous section”(group “Transitions”) - this will break the connection between sections. The headers and footers, in which our future stamp will be located, will not be repeated.

4. Close the header and footer mode by clicking the button “Close the header and footer window” on the control panel.

Creating a frame for a stamp
Now, in fact, you can proceed to creating a frame, the dimensions of which, of course, must comply with GOST. So, the indents from the edges of the page for the frame should have the following values:
20 x 5 x 5 x 5 mm
1. Open a tab "Layout" and press the button “Fields”.

2. From the drop-down menu, select “Custom Fields”.

3. In the window that appears in front of you, set the following values in centimeters:
4. Click "OK" to close the window.

Now you need to set the page boundaries.
1. In the tab "Design"(or "Page layout") click on the button with the corresponding name.

2. In the window “Borders and Shading” that will open in front of you, select the type "Frame", and in the section “Apply to” please indicate “this section”.

3. Click the button "Options", located under the section “Apply to”.
4. Set the following field values in “pt” in the window that appears:

5. After you press the button "OK" in two open windows, a frame of the specified size will appear in the desired section.

Creating a stamp
It's time to create a stamp or title block, for which we will need to insert a table into the footer of the page.
1. Double-click the bottom of the page you want to add a stamp to.
2. The footer editor will open, and along with it a tab will appear "Constructor".

3. In a group "Position" change the header and footer value in both lines from standard 1,25 on 0 .

4. Go to the tab "Insert" and insert a table with dimensions of 8 rows and 9 columns.

5. Left-click on the left side of the table and drag it to the left margin of the document. You can do the same for the right margin (although it will change in the future).

6. Select all cells of the added table and go to the tab "Layout", located in the main section “Working with tables”.
7. Change the cell height to 0,5 cm.

8. Now you need to change the width of each column one by one. To do this, select the columns from left to right and change their width in the control panel to the following values (in order):

9. Merge the cells as shown in the screenshot. To do this, use our instructions.
10. A stamp that meets the requirements of GOST has been created. All that remains is to fill it out. Of course, everything must be done in strict accordance with the requirements set by the teacher, the educational institution and generally accepted standards.

If necessary, use our articles to change the font and its alignment.
How to make fixed cell heights
To ensure that the height of table cells does not change as you enter text into it, use a small font size (for narrow cells), and also do the following:
1. Select all cells of the stamp table and right-click and select “Table Properties”.

Note: Since the stamp table is located in the header, selecting all its cells (especially after merging them) can be problematic. If you encounter such a problem, select them in parts and perform the described actions for each section of the selected cells separately.

2. In the window that opens, go to the tab "Line" and in the section "Size" in field "Mode" select “exactly”.

3. Click "OK" to close the window.
Here's a modest example of what you might end up with after partially filling the stamp and aligning the text in it:

That's all, now you know exactly how to make a stamp in Word correctly and will definitely earn respect from your teacher. All that remains is to earn a good grade by making the work meaningful and informative.


