Skype webcam won't load. Why doesn't the webcam on my computer work? Possible causes of the malfunction
When communicating on the Internet, especially with people you know well, correspondence alone is not enough; you also want to hear and see your interlocutor. This live communication can provide whole line messengers, among which is the most popular. This application can capture video from a built-in or external webcam and send it over the network, but in some cases Skype does not see the camera, even though the latter is in good working order.
As always, there can be several reasons causing this problem. Often, Skype does not detect the webcam if the corresponding hardware drivers are missing or damaged, the user disables the webcam, or third party programs, using an outdated version of the messenger. Also, the webcam may not work in Skype due to incorrect settings in the application itself. Hardware faults cannot be ruled out - camera breakdowns, damage to cables, ports or cables. Let's start in order.
Outdated version of Skype
If you encounter problems with video communication, the first thing we recommend is to make sure that the version of Skype you are using is up-to-date. To do this, select the “Check for updates” option from the “Help” menu.

If available a new version program, download it from the official website and install it.
Temporary failure
The problem may arise as a result of temporary problems with the computer or system. To eliminate this option, simply restart your PC. Perhaps the service responsible for the webcam simply failed in Windows. When you reboot, the service will automatically start and the camera will be detected by Skype.
Webcam is disabled
It may happen that you yourself accidentally or intentionally turned off the webcam and forgot about it. This is one of the reasons why the camera does not turn on in Skype. In some laptop models, the built-in camera is activated and deactivated by pressing the Fn + F (1-12) button combination. Look carefully to see if you have top row keyboard button with a picture of a video camera and press it. Buttons for controlling the webcam can also be located on the side of the laptop.
You can also check whether the webcam is enabled or disabled in Device Manager. Find the “Imaging Devices” item in the list, expand it and check the status of all components in it. Their properties should indicate “The device is working normally.”

If the camera is inactive, turn it on by clicking the corresponding button in the window or selecting the “Activate” option in the context menu.

Note: If the webcam is not displayed in Device Manager, update the hardware configuration through the Action menu.
Driver problems
In case of operational problems hardware Traditionally, the presence of drivers is checked. If your camera does not work in Skype on Windows 7/10, be sure to check whether the camera driver is installed and, if installed, whether there are any conflicts or problems with its operation. You can find out this again in the Device Manager. In the properties of image processing devices there must be a message about their normal operation, and the device icons themselves should not be marked with yellow or red icons.

The unknown device in the manager may well be a webcam. For the assumption to be confirmed, you need to find and install for it software. To search for drivers, it is best to use special programs like DriverPack Solution, for laptop cameras, the necessary drivers can be found on the included disk. The manufacturer often adds to it proprietary utility to configure the built-in webcam. In case of updating or reinstalling drivers current version must be removed, otherwise the new one may not install correctly.
The camera is being used by another application
One webcam can only work with one application. Check if there are other programs running on your computer that may have access to the camera. If in this moment the camera transmits the image to some program, it will not work in Skype, and the user will either receive a black window or a notification “Cannot start video broadcast.” Close all applications that are intercepting the video stream, and only then launch Skype.
The camera is not selected in Skype itself
If the webcam in Skype on a laptop does not work after connecting a second camera, TV tuner or other video device to it, you must also check the settings of the messenger itself and make sure that required device. Go to the program settings, switch to the “Video Settings” subsection and select the camera you need from the drop-down list at the top. At the same time, you can eliminate the “conflict” between Skype and the camera by checking whether it works with other applications.

To check the camera, you can use the service Webcam Toy. Go to the address in your browser webcamtoy.com/ru, click the “Use my camera” button and give permission to the service to use your webcam.

A similar check can be performed using any media player, for example, VLC. To do this, select the “Open capture device” option from the “Media” menu.

Now specify the webcam you are checking in the “Device name” drop-down list.

The player window should display what your camera sees.
If the video stream is broadcast in the player or other applications, but not in Skype, then the problem is in the messenger itself. Check all settings, reinstall the application, try portable version. If there is no video in other programs, check the camera and the drivers that support its operation.
Webcam failure
The worst thing that can happen is that the built-in or connected external webcam fails. A hardware failure will be indirectly indicated by the lack of interaction between the camera and different programs and directly – the absence of the camera itself in Device Manager. However, you should not rush to make such a diagnosis without checking the operation of the ports, cables and cables.
Perhaps the webcam in Skype does not work only because the contact in the port through which it is connected to the computer has been broken. Check all contacts and cable integrity. But with laptops everything is a little more difficult, to establish whether everything is in order with the connection between the camera and motherboard cable can only be used at a service center.
Other reasons
What else can cause problems with the webcam in Skype? Maybe you changed BIOS settings and mistakenly turned off the capture device? In this case, you need to go into BIOS, find the camera in Advanced section or Security and turn it on.
The Skype camera often does not work on older computers with Pentium processors III and below. Alternatively, users of such PCs can be recommended previous version Skype, preferably a portable one, otherwise the best solution, of course, there would be a purchase of a new one modern computer. The same goes for outdated versions operating system. For example, in Windows XP SP2 all the latest Skype versions do not support video broadcast mode, so the only the right decision in this case it will be Windows installation 7, 8.1 or 10 or upgrade to XP SP3.
We solve the problem - the camera does not work on Skype
Greetings, friends. In this article, we will look at the question of why the camera does not work on Skype and how to fix it. This is a very popular problem. We will try to help you solve it.
We also highly recommend an article about high-quality laptop cleaning in Minsk. Sooner or later, all laptops become dirty with dust, then begin to make noise and overheat. As a result, a breakdown occurs.
And so, let's go.
- Introduction
- The reason that skype does not see the camera
- Fixing the lack of a camera in Skype
- Conclusion
Introduction
I can't live without Skype now. Many have relatives in other cities and countries, so they desperately need the capabilities of this “Internet phone”; moreover, free feature this program, which allows you to talk at a distance via a webcam, that is, seeing your interlocutors, even if they are in another country.

The reason that Skype does not see the camera
Quite often the camera on Skype stops working after updating the program. Upon subsequent launch, we are informed that we cannot make a video call due to the lack of a camera. Although not only after the update, so still try the method described below.
It turns out that the developers of the program have made changes due to which it is not fully supported by some processors. But don't worry too much, there is a way to get around this problem.
To do this we just need to use more old version Skype. That is, you will have to remove the existing one and install another one, which we recommend, in order for Skype to find the camera.
Fixing the inability to make a video call on Skype
So, first, let's delete the existing version. To do this, we exit it, just do not forget that you must remember your login and password, since after reinstallation you will have to log in again.
After we leave, we delete it. This can also be done special utilities, or you can use the tools built into the system, for example, “install and remove programs.”
We find it along this path: start - control panel - programs (uninstall programs, programs and components), sometimes it can be signed as “add and remove programs”. Let's go there. We find Skype, double-click with the left mouse button and carry out the deletion process.

That's it, deleted. Also, to be on the safe side, you should restart your laptop or computer. Now we install the version we need.
To do this, follow this link www.skype.com/go/getskype-sse that is, select it, right-click “copy”, then paste it into address bar browser you are using and press enter. The download will start immediately or you will be offered a location where to save the file.

Now we need to run the installation file we downloaded. We follow the necessary instructions, that is, click “next, install... and so on.” As a result we get installed version Skype programs, which will most likely see your “web”.
A small digression. We advise you to read the note: The laptop has become hot. It is this anxious state that leads to the combustion of parts inside. By being more aware of why your laptop gets hot, you can avoid sudden breakdowns. And all the "beeches" without exception get very hot.
We also need to disable automatic updating of the program in the Skype settings, this way we will prevent it from updating itself and the camera stopping working again. Let's do it like this. At the top of the menu we find “Tools” - “Settings” - “Advanced” - “ Automatic update"—turn off automatic updates:

So we disabled the feature self-updating programs. Accordingly, if this method helped identify the camera, then it will continue to work until the developers stop supporting this version.
If this does not help, then it is quite possible that the webcam is broken. To do this you need to check it. The most reliable and the right way- this is to connect to another computer or laptop or several. If it doesn’t work anywhere there, then it’s quite likely that it no longer works and you’ll have to buy a new one.
Nowadays, various software products, which help to communicate with people via the Internet, including using a video camera. Among the many such programs, Skype is especially popular. The main way of communication is through this program- this is, of course, video chat. The camera allows you to see the image of your interlocutor, as if communicating live. Thus, you can “visit” anyone without leaving your home. Enough convenient thing, right?
It’s just that certain problems arise more and more often. This is what users often complain about: the camera shows a poor image or doesn’t show anything at all, the camera doesn’t work, I don’t see the interlocutor, or I see the interlocutor, but poorly, they don’t see or hear me, etc. Sometimes it even happens that when Skype is turned on, the camera does not work, although everything works fine on the computer. Many people immediately grab their laptop or system unit and quickly carry him to service center so that everything can be fixed and adjusted there. But it turns out that setting up a camera on Skype is not so difficult, and you don’t need any special knowledge and skills to do it.
Setting up a video camera on a computer
So, the first thing you need to do is find out whether the camera is working or not. Maybe the computer (laptop) doesn’t see it either? Or is the device not working on Skype? Before you start using Skype, you should pay attention to the following:
- is the video camera connected to the computer?
- are they installed? latest drivers for her.
A common cause of various problems with the camera is that the cord is simply not fully connected (or pulled out), and the user is not aware of this. You need to check if everything is installed securely.
You also need to test the performance of this device. First of all, you need to check the availability of drivers and their correct installation. It is because of the drivers that Skype often displays an inverted image. To do this, you need to go to the device manager. On the “My Computer” shortcut, right-click context menu
, in the list that appears, select “Properties” and then on the left select the line “Device Manager”. Here you can find out about the status of the webcam. If there are emergency icons nearby, it means that there are certain problems, possibly with the drivers. To reinstall the drivers, you need to determine the brand and model of the video camera and update the drivers yourself from the manufacturer’s official website. If this causes certain difficulties, you can use programs that will find and install themselves necessary drivers to all your devices (for example RadarSync). Typically such problems concern Windows users XP and Vista. Because new Windows
7 and 8 automatically download drivers for any devices, you just need to connect them to your computer.
If everything has been fixed and configured, or there were no problems at this stage initially, move on to the next step.
So, the camera on the computer was installed and tested for functionality. Next, you need to check whether your web camera is selected in the Skype settings. To do this, select “Tools” on the menu bar, then “Settings”. On the left, select the “Video Settings” tab. If the image shows, it means that everything is working and the webcam does not need to be configured. If, instead of the image, something like “Skype does not see your device” is written, then we move on.
By the way, it's good to know. If you do not want the webcam to turn on every time you make a video call, then in the same menu you need to find the line “Show me when calling” and select “No one”. In this case, the program by default will not immediately show you to the interlocutor, but will first ask if you want the camera to be turned on. Sometimes this can be very useful.
So we need to check:
- whether the video device is being used by other programs. Only one program can work with a webcam at a time, because of this Skype often does not see the camera;
- Availability of up-to-date drivers. Even if the drivers are fine, reinstall them. Sometimes it helps.
- presence of a checkbox in the “Enable Skype video" Go to the menu we are already familiar with (Tools-Settings) and check this box there. After this, the name of your device should appear in the “Select a webcam” list. Select it, and if the image shows, click “Save”.
Question from a user
Good afternoon.
Tell me how to get the webcam to work. It seems like I already downloaded the driver, reinstalled it 10 times - but it still doesn’t work (it only shows a black screen). What else could be wrong?
Good day!
Yes, today's Internet no longer surprises anyone with streaming videos, webcams, etc. In general, in general, there are not so many problems with webcams, and by following a simple series of steps you can eliminate the reason for its inoperability (unless, of course, it is related to the hardware component - after all, your webcam could simply break down).
Why the webcam may not work
1) The camera is simply not active...
By default, the webcam in a laptop is always on and power is supplied to it (it’s just not active in real time - after all, you don’t always need the camera, but only when talking on the Internet, or when recording video).
And for it to start taking images, you just need to launch some application that uses it.
For example, in Windows 10 there is such a program as “Camera”. It's in the START menu.

If you have Windows 7/8, then some problem may arise - because... not built into them basic program for working with a webcam. In this case, you can use Skype or Media Player Classic(which is present in every codec set).
Addition! About where to download normal Media Player Classic -
Using Media Player Classic as an example, I’ll show you how to open an image from a webcam in it (relevant for all versions of Windows).
After installing the program, go to its settings: "View/Settings" . In the “Capture” section, indicate your camera in the “Video” column, the microphone in the audio column, and “Russia” in the country (it should look something like what I have in the screenshot below).


If everything is fine with the camera, the image should appear in the player window.

2) Drivers are not installed
If the image from the webcam is not transmitted, then very often the reason for this is the drivers (or rather, their absence). To see if the driver is installed on the system, open device Manager (press the combination Win+Pause and in the menu on the left you will see a link to launch it).
In Device Manager, look at the tabs "Cameras" And "Other devices" .
If the driver is installed, then in the “Cameras” tab the model of your device should be displayed; if there is no driver, then in “Other devices” you will see a yellow mark exclamation mark on some "Integrated WebCam"(see visual screenshot below).
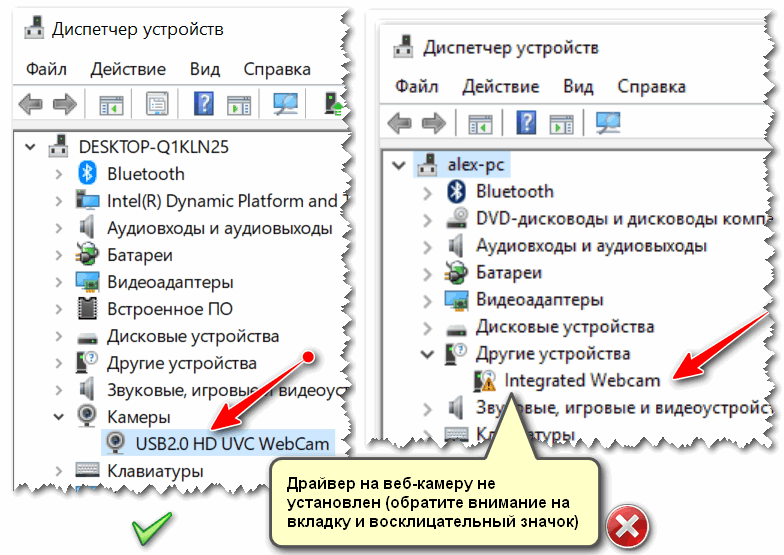
Device Manager - checking if there is a driver for the webcam
To update the driver, you can try using Windows function: Right-click on “Camera” and select from the menu that appears.

3) It is turned off in Device Manager or Windows Control Panel
It is also worth noting that in addition to the lack of a driver, the camera can simply be disabled in the device manager. Pay attention to the icon: is there an arrow on it?

If you have Windows 10, then open the START menu and go to the settings section.

In chapter "Confidentiality" open the tab "Camera" and allow applications to use the hardware.
By the way, please note that at the bottom of the window you can specify applications individually, which can use the camera and which cannot.

4) Check the spec. laptop control centers, antivirus.
And there is one more point that may affect the operation of the webcam...
Some laptops have control centers (included with the drivers). They allow you to configure the laptop’s power supply, adjust its monitor (brightness, contrast, etc.), and fine-tune the keyboard and touchpad.
Often in such centers there are privacy (security) settings that may limit the use of a microphone and camera. I recommend checking this moment.

By the way, some antiviruses can also block the transfer of images from the camera, fearing that an attacker’s application will be able to gain control over it (and therefore receive confidential information about you). Try disabling your antivirus for a while.

PS
Alternative not obvious reasons
1) Check Is the camera taped over? or some kind of sticker. I have noticed this “trick” with some laptop users more than once - people are afraid that hackers (or tracking software) will be able to take pictures of their personal life and, just in case, they cover the camera. Naturally, in this case, the camera will not show anything other than a black screen...
2) Is the webcam busy? another application? It’s just that if you run two applications at the same time that “want” to use the camera, then perhaps nothing will be shown in one of them. Try restarting your PC (after previewing and turning off everything unnecessary), and use only the only software to view video from the camera.
3) Between the time you launch the program to display video from the webcam and the time you see the picture on the computer screen, 10-15 seconds may pass. ! Those. there is a certain pause. It’s just that many users launch the program and do not see the image after 2-3 seconds. - they believe that it does not work and are looking for the “cause” of the problem (which is not there!).
4) If all of the above did not help, maybe your camera is just broken(hardware reason). I would recommend that you buy an inexpensive external webcam (connected to USB port) in some Chinese store(For example). If you catch a promotion (+ take advantage of cashback), you can spend mere trifles...
Additions on the topic are welcome...
That's all for now.
Problems with calls on Skype? Most likely, this is due to your or your interlocutor’s Internet connection. Low Internet, may result in connection to remote calls, delays and low quality sound and video. Additionally, if problems occur, you will see a call quality indicator. Use the following tips.
Make sure you have good wifi signal or if possible use wired connection .
If your Internet connection deteriorates during a call, Skype may turn off some video streams in group calls. When the connection returns to normal, Skype will automatically turn the video back on.
If you are having connection problems on Windows, you can perform troubleshooting as described in Solve network connection problems.
Close all applications that may negatively affect call quality. File sharing applications, streaming audio or video and even open browser- all this can take up bandwidth.
If you are using Skype on a laptop that is running energy saving mode, try connecting it to mains power or switching to maximum performance mode.
Check your computer and Internet connection.
Poor connection may cause disconnections, unclear or freezing video, and poor quality sound. If your connection quality is poor, you may receive the following notification: Poor network connection.
In addition, the following may affect call quality:
- Checking your system's privacy permissions. For Mac OSX Mojave (10.14 or later) later version) and Skype for Windows 10 (version 14) users, make sure to grant permission for Skype to use your microphone and cameras.
- Mac OSX Mojave (10.14 or higher):
-Switch to Mac partition System Preferences>security and privacy>tab Confidentiality > Microphone or camera and providing access to Skype. - Skype for Windows 10 (version 14):
-Go to Start and then select Options gears > privacy> select cameras or microphone. In the section, make sure that Skype is replaced on. Restart Skype and go to your Skype audio and video Options for check correct devices, selected in Skype.
- Mac OSX Mojave (10.14 or higher):
- Check your webcam. Make sure it is turned on, pointed towards you and not blocked by anything. In Skype for desktop, select your avatar > Audio and video settings and in the section Video check what the webcam shows in the window preview.
Note. Skype for Windows 10 requires your webcam to meet the minimum requirements for Microsoft applications Store. - on Skype. During such a call, you will be asked to record a message, which will then be played back. This is the easiest way to check your audio settings. In Skype on your desktop, select your avatar>Audio and video settings >Make a free trial call.
- Check the sound
- . The range of devices available is vast, and there may be a number of possible causes for poor functionality. Each trademark has its own quirks, so we always recommend visiting the manufacturer's website to view the user manual or get troubleshooting help
Below are some steps you can follow.
- Check your microphone, speakers, or headphones. Make sure they are connected and not muted. If this bluetooth device, make sure it is connected as well.
- Check your webcam. Make sure it is turned on, pointed towards you and not blocked by anything.
- Make a free test call on Skype. During such a call, you will be asked to record a message, which will then be played back. This is the easiest way to check your audio settings.
- Can you hear the echo of your voice? There may be a problem with your interlocutor's device. Ask him to turn down the audio volume.
- Check the sound. Try playing a song or using another audio app to check the volume. If you hear sound, the problem may be on the other person's side. Ask him to do the same.
- Refer to the manufacturer's website. The range of devices available is vast, and there may be a number of possible causes for poor functionality. Each brand has its own quirks, so we always recommend visiting the manufacturer's website to view the user manual or get troubleshooting help.


