How to create a group in contact with a pinned top menu for the new VK design. How to properly set up a VKontakte group - basic elements and useful tips
Hello everyone, dear readers of the blog site. I continue my topic about - in fact, not everything is as complicated as it seems, and there is nothing special to study here. Your professionalism depends entirely on practice. Well, okay, today we will talk about the beauty of your groups, the beauty of the menu in your groups and how to beautifully design the menu and the groups themselves, and with your own hands, i.e. for free!
Speaking of the simplicity of the SMM industry - even in there are more branches and tricks that you need to know in theory in order to achieve results. Well, okay, I also admit the fact that I may still be too weak in these areas, although I have clients in both.
Well then, Let's go create a menu for VKontakte groups?
How to design a menu in a VKontakte group yourself
Yes, exactly on your own, because after reading this article, you will not need the services of freelancers. Although this is not an expensive business, for 1500 you can make a menu on workzila (I wrote a detailed experience about working with this exchange).
So this is what we need to create a group on VK:
1. Layout (graphical arrangement of elements) - we must know where everything should be.
2. Basic knowledge of wiki markup. (we’ll talk about the most standard things below, but for a detailed study I recommend this group ).
3. Basic skills in working with Photoshop. You will need to cut out pieces of the layout to the required size.
Where can I get menu layouts?
Layouts for VKontakte menu design can be taken in different ways, for example:
1. Freelancing or also Workzilla.
2. You can create it yourself if you have Photoshop skills. If not, I recommend Evgeniy Popov’s courses, here is one of them, just for Photoshop - click.
3. You can google and download ready-made ones. Believe me, there are quite a few of them.
Well, on the other hand... Why Google? Just subscribe to my site updates. And click on the social media buttons below.
I have prepared an archive especially for you, in which more than 100 different designs for VKontakte groups!. When unpacked, the archive takes up about 2.5 gigabytes.
The main condition is to be a subscriber and follow the social buttons!
Thank you. Now you can download the archive from this link.
Don't forget to go through the rest of the social buttons.
Sizes of avatars and menus that are useful for designing VK groups
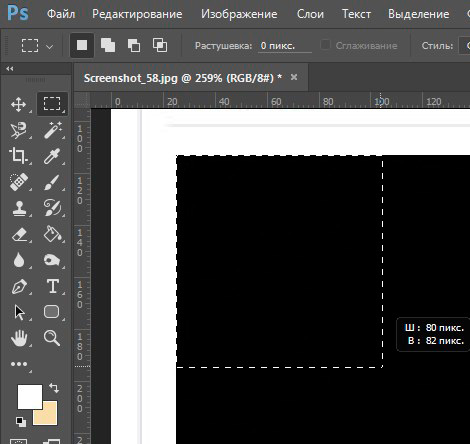
In order to properly design a group or public page, you need to know about the size of the pictures that need to be used. I ask you to pay attention to this picture.
As you can see, in the group the avatar needs a size of 200 in width and 500 pixels in height. And for the main menu image - 395 pixels wide and 289 pixels high.
That's basically all you need. There are layouts, there is an understanding of sizes.
The creative part is over - only a little work remains. We begin the technical part of the entire process of creating a menu for groups.
How to create a VKontakte group yourself, having layouts in hand
So we have the group design mockups. Now you need to cut out the necessary parts.
Of course, nothing is needed for the group avatar. We cut out the required part from the layout or picture and paste it into the group. I think you can insert it yourself? Well, I hope so. If not, write comments, I will add this section to the article.
Now the menu, it needs to be cut out. Not the menu itself, of course, but every part for the menu (buttons) definitely needs to be cut out.
First, a little education.
How is the group menu different from the public menu?
They differ in that the group menu is essentially a set of buttons. But this menu is always hidden! Always! And the public menu is always open and in fact is a pinned post link leading to a page with sections of the menu itself (buttons).
So, again: in a group - to see the menu, you need to click on the “Group Menu” button, by default this button is called “Latest News”.
 And in the public (in a group, by the way, you can also) the menu is always open.
 But this picture is one big and beautiful link that leads to a larger separate menu. Here:
 This picture-button on the menu is created through a pinned post. This is just a post in the group that we pin forever! This link post will take you to a separate page that we will gently pre-create.
How to create a separate page for the VKontakte menu
To create a page for the future menu (navigation) you need to send the following request to VK:
where XXX is the group number, YYY is the page name (here all question marks and dashes are required).
Moreover, I recommend making the name normal, attractive and meaningful, because it will shine and people will form a certain impression about you and your group based on this name. For example, “Navigation” or “Group Menu” are normal names, but they seem banal. Use your imagination.
I entered the following query
And I immediately opened a created page with the ability to edit it.
 This is where you will need to insert your code for the menu itself using wiki markup. But more on that later.
By the way, I’ll tell you a secret, if you have a group (and not a public one) - a standard menu that already exists by default - it is already a page in itself. So you can use it if you have problems creating additional pages.
How to make a pinned post in a group or public
Yes, and in any type of community, a pinned post is created the same way! Everything is done very simply.
 And in the window that appears, click the “Pin” button - it’s simple!
Many groups, by the way, use pinned posts as announcements. If the relevance of this ad has passed, you simply click again on the publication date and the “Unpin” button.
In fact, everyone now uses this particular menu method.
Guess why?
So, we already know how to create pages and pin posts. Cool. Let's return to our ram layouts.
Cutting a layout for group or public design
So, for the avatar everything is clear, we are not cutting anything here. We created a picture of the required size and uploaded it to VK. All. We're done with the group avatar!
Now the menu.
For example, I took the menu from this group. I made it myself, and I still have access to it, so I can even show the code of the pages.
So, you already know how to make the main image for the menu - it’s just a pinned post.
Click on the menu and see the picture.
 We need to highlight “clickable” zones.
those. select the buttons themselves. Let me highlight these areas for you with red lines.
 How much do we get? 5 pictures. And not every picture will be a button!! As you can see, the top large picture is not a button, but itself...
So, we cut out pictures along these lines. Now you need to “upload” it to VK.
If you created a separate page for the menu, then click on the “Fill with content” button on the newly created page.
 If you did not create this page, but used a ready-made page for the menu, then you will immediately see the page editor and you can immediately upload photos:
 Filled in and you should see the following:
 You may just have a code like the one in the picture below. If not, click the “Source Code” button, I highlighted this button in the top picture. And you will see the following:
 Here we need to line up all the pictures so as not to get confused (well, that's what I do).
And so that there is no padding between the pictures, enter the “nopadding” tag, it should look like this:
this is page-58190479_45419120 - this is the address of the VKontakte page itself, you will find this identifier in the address bar of your browser.
 That's all :) Isn't it difficult?
This is what I ended up with in my code. If you have something similar, then everything is in order.
 If you have any problems with any of the points, please contact us. I'll be glad to help.
Taking this opportunity, I would like to remind you that there are wonderful services for any promotion and cheating, these are:
prospero | associate | socialtools
I may not have told all the secrets that needed to be told. I admit that I missed something, after all, the article was not short - write to me if you notice any obvious omissions. Thanks in advance.
Successful design of a VKontakte group should not only be beautiful, but also functional and convenient. Make design solve your marketing problems so that the group attracts a paying and buying audience to the brand and stays with it forever.
5 steps on how to create a group on VKontakte
Cover
The community cover today is an important tool for designing a brand group in Contact and promoting it. You can download it in the “Community Management” section by going to the “Settings” tab. A high-quality horizontal image in the community header itself plays the role of the company’s main promotional banner on the social network. It sets the mood, informs, enhances the image, calls for targeted actions, and sells at the same time.
1. Use high quality illustrations
The VKontakte community cover should be 1590x400 pixels in size, but it is better to upload a photo 2-3 times larger in .png format. This way you can avoid poor quality display.
2. Adapt the image for different devices
Keep in mind that this image may appear differently on different devices - the edges will be cut off on mobile, so it's best to place all the most important information closer to the center.
3. Place a slogan and USP
Let the client see your philosophy and benefits from the first screen.
4. Display the product/service, process or result of its use
This way, the potential customer will immediately know what you specialize in and will be involved in the product.

5. Help customers contact you immediately
Write your telephone number, e-mail, and other company contacts on the banner. If geographical location is important for your business, for example, you are in the catering industry or horeca, the address will also be useful.
6. Announce events
Are you promoting concerts, expecting a new collection or product launch, or holding a festival/conference/client day? Tell everyone who comes to the community about this.
7. Present promotions and discounts
Where else on the main platform can you tell the audience that right now they can place an order from you at 2 times cheaper? Most importantly, do not forget to change the illustration after the offer expires.
8. Offer to take a targeted action

When loading the community cover, two buttons are placed horizontally in the lower right corner - Write a message and Join the group. Point an arrow at them to further attract the audience's attention. So, if a product is shown on a banner, you can offer to order it immediately in messages. And if it contains a digest of the latest news, subscribe to always receive the latest information.
Upload an avatar and select a thumbnail
Some brands still do not adopt the cover, preferring the old look of the first screen of the group, using a combination of an avatar and a pinned post as the so-called “header”. In this case, one picture is a continuation of the other. It looks most impressive when the photo ends on the same level as the avatar.
When using the maximum avatar size of 200x500 pixels, the size of the image in the pinned post must be made 510x308 pixels. An excellent engaging technique is to attach a video uploaded through a social network player, which stylistically continues the avatar.
If you use a cover as a header, the avatar will always be displayed as a thumbnail.
Rules for designing a VK community avatar thumbnail
A thumbnail is a small round image that is cropped from a large avatar, and is displayed in the search for groups, in the list of communities for each user and on the left under the cover, if there is one. Here are some design tips.
1. The thumbnail should be understandable to the audience

You shouldn't post a piece of weird illustration. Visualize something that the target audience will subsequently associate with the brand, for example, a logo, a product/service icon, or maybe the main marketing character of the brand.
2. Use only high-quality photographs
It’s better to upload the source 2-3 times larger than the required size, so you can forget about the terrible pixel “squares” that do not show you in the best light.
3. Design your own illustrations
Standard stock images will look cheap and unprofessional, and will become synonymous with users' distrust of the brand. Make unique designs in the same concept and colors as the rest of the design.
4. Pictures that contrast with the background of the page are what you need
When designing VK thumbnails so catchily, the “round piece” will stand out in the feed among other groups and will not merge with the background of the page.

5. Place contacts or USP of the company
Depending on the purpose set for the thumbnail, place on it a contact phone number or website address, information about free shipping, an indication of the lowest price in the segment or a promotion.
6. Make the text large and readable
It is better not to use serif or italic fonts - they are too noisy when viewed on PC screens, mobile devices and smartphones, littering the view. Make sure that the text does not extend beyond the borders of the cropped thumbnail. This will allow you to convey the message to the user correctly and effectively.
7. Use custom shapes
For example, in the desired round template, enter a polygon or other geometric shape on a white background. Create an unread notification effect or a graphic “online” icon.
Develop a menu

The menu is an important element of the design of a group in Contact, which makes it easier for users to navigate the group - it will be more convenient for people to find the information they need. Each element and page is created in a special programming language - Wiki markup. Using it, you can make images clickable and create convenient pages within the social network as if it were a website page.
You can use both open and closed menus. In the first case, the user immediately sees the sections that are included in it, in the second, they are preceded by a preview picture with the inscription “Menu”. The menu can also visually become a continuation of the avatar if you use the old community design option.
Develop a product showcase
When placing products in your community showcase, remember that users always see the first 3 items. Place the most popular and most ordered ones in them, uploading a presentation image in the same style. Publish here uniform icons or photos of the products themselves. Services can be placed in products. In the design, show the process of providing the service or its result. The size of such a picture will be square – 400x400 pixels.

Post design
1. Make full use of available image sizes
The maximum width of an image in a feed is 510 pixels. Square images of 510x510 pixels and rectangular images of 510x300 pixels look most impressive.
2. Develop a custom post style
To make your posts look individual, come up with a unified style, font and color scheme.

3. Place short text on the picture
For example, you can divide an image into 2 parts - text and graphic, or write text while darkening the background. To make the text visible without a darkened background, write it on a background (a contrasting graphic block of a uniform color) or add a shadow to the inscription. Photos with a frame look good.
4. Make several templates for different purposes
For example, for quotes use one template for the presentation of visual information, for the announcement of materials from the site - another, and for competitions a third.
Use these absolute techniques, and your company will be presented on VKontakte in the best possible way, and it will be convenient for customers to interact with it. But don’t forget that everything needs moderation! Look at even more fresh ideas for designing a VK community on the services page of the Tesla Target agency.
1 voteGood day, dear readers of my blog. In the previous article, we learned how to make something charming. Now let's move on to the second part. We will create a beautiful single picture for the avatar and think about an effective transition.

If this is your first time on my blog, then you don’t have to start with the first lesson. You can read this publication first and start designing, starting from this step. Now I’ll tell you how to make a beautiful VKontakte group, and you can decide later whether to use additional features.
By the end of this article, you will have an impressive and unified picture.

Method for the lazy
In order not to distract from important matters those who already know how to do everything, are in a hurry or simply don’t want to bother, I can offer a video tutorial. He will tell you how to do the same thing that I am going to talk about, only without Photoshop through the service www.vkprofi.ru .
I haven't used it and can't say whether it's paid or not. I would be grateful to those who check this information and leave a comment on this article with an answer to this burning question.
For those who want to learn
If you decide to stay and go the long way, then exciting work awaits you. It will be very useful if you are just starting your journey in online business.
You will learn many tricks, for which I will give useful recommendations for working with advertising, and you will also gain useful skills and experience.
You will need…
- Photoshop.
- Basic picture.
The photo must be large and of high quality; if you are searching in search engines, then pay attention to the desktop wallpaper. If you work for a cool community, especially related to business, then I recommend using the service https://ru.depositphotos.com . There you will find advertising images.

Choosing a picture that will promote a product is not so easy. If it is used for the business community, it must meet many requirements. Not everyone understands this. If you are promoting a hotel, inn, bar or club, it is not recommended to take photos of empty rooms.
First of all, we should not sell a place where a person can sit down, but show the emotions that he will receive from visiting the establishment. The beauty of interiors won’t surprise anyone these days. You need to create a unique atmosphere that the buyer will want to plunge into.
Nobody likes worn-out photos. If they are used all the time, then the chance of getting clients decreases. About quality, correctly set light, etc. I won't even talk. I hope you already understand this. Such options as in the photo below have not been rolling for about 5 years.

From personal experience... on one of the projects I worked with a very cool advertising manager. We took each picture apart piece by piece. The object must be at a certain distance from the center, at a specific angle, preferably in the correct optimistic range.
We had to change the color of the frame in which the painting hung in the farthest corner! At first I thought that all this was unnecessary trouble, but then they showed me the conversion after working with similar little things for comparison.
Making a template for a future beautiful group
So, when everything is ready, you need to decide on the dimensions and prepare a template for the future image. By the way, if you learn how to do this, then you can then use this technique for many other tasks and create incredible VKontakte pictures. You'll soon understand what I'm talking about.
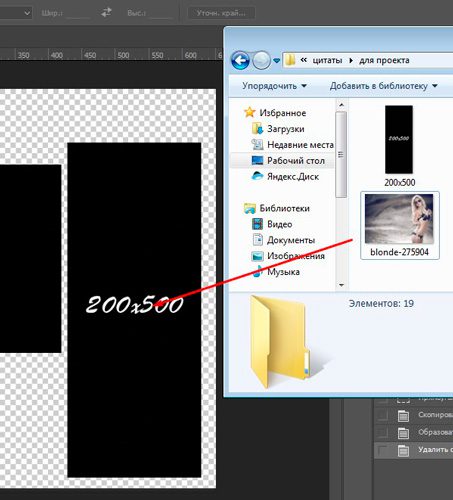
So, let's open contact. If you look for standard VKontakte post sizes, you will see 200x500 and 700x500. However, if you use a ruler, you can make sure that the thumbnails do not correspond to these indicators. The service compresses them when loading.

Everything is the same with the picture on Ava, it really is 200x500.

With fasting everything is different.

In any case you need or download the template I prepared, or take your own screenshot. I advise you to choose the second option. Why? This way you can make templates for different tasks yourself. For example, if you have a product gallery or “Latest News” displayed on your main page.
My option is only suitable for pinned posts. The simplest and most popular design method.
Open your group or any other group where a post with a photo is pinned at the top. Just like in my drawing. You can also take this photo by right-clicking on it and “Save as...”. True, I’m not sure that everything will turn out right for you in the end. Do you have time for an experiment? Share your results in the comments.

For others, the step-by-step instructions will be different. First of all, enlarge the image in the browser to 100% (press the Ctrl button and move the mouse wheel). Frankly speaking, I don’t particularly understand why this was done, but on my first attempt, it didn’t work out just because of the scale.
Now press the PrtSc button. It's located in the very top row on the keyboard, after the countless "F's". After you click on it, nothing will happen. Everything is fine, you don’t need to click 100 times, open Photoshop.
Click on Ctrl+V, thereby you will paste your screen into the working field of the program. Now take the Rectangular Marquee tool and work with the left block.

Guide straight along the edge of the image. You shouldn't get the picture below. It is not right.

Move strictly along the edge.
Grab the cursor at the upper left corner of the rectangle and move it to the lower right. In order not to fool your head with a magnifying glass, use the magnification using the Alt button and the mouse wheel.

Now press Ctrl+J. This will transfer the selected fragment to a new layer; it will appear above the background.

The same thing needs to be done with the avatar. Select and move to a new layer (Ctrl+J)

When you transfer to a new layer, the background should be active, and not the one you just created. Make sure it is highlighted.
Then you can get rid of the background. Click on the lock next to this layer, this will allow you to manipulate it.

Drag the layer to the trash can, just like a regular file from your desktop.

We're done with this. The template has been created.
Unique image for the group
I recently wrote an article about . Incorrect opening and further work with the size can significantly worsen the quality of the coolest picture, if you are interested, you can read an article about this on my blog.
Drag the photo that we will use as the main one.
It doesn't reflect correctly.

If you have the same nonsense, just make it the top one. Then, while holding down the Alt button, click on layer 1 and layer 2 so that both of them are highlighted.

They need to be combined using the right mouse button and the appropriate option. In this case, it will be more convenient for us to continue working. You don’t have to overlay and cut out the photo first for the avatar, and then for the post.

If you press Ctrl and then the thumbnail of the layer you just created. Ants run along the edges of objects from the new layer, which will tell you how to display the bottom picture. You can remove them by pressing Ctrl+D. What is now in the internal part will later be inserted into VK.

If you start moving the photo, then the running ants will “go” with it. I can advise you to set up guides. Don't know how to work with them? Watch this video here.
After you set everything as it should, you can move on to the next step. I'll show you two options to achieve the same effect. The first one is simple. On the top layer, right-click and select “Create Clipping Mask.”

But I love the second one. He's faster. Press Alt and move the cursor between the two layers, it will visually change. Then left click.

The result is this photo.

Each part can be cut out using the Frame tool and then saved as a jpeg. We add the right photo as an avatar. On the left you can simply add it as a regular post and then pin it.
It's not difficult, but if you have problems, I can recommend that you read the third publication in this series, in which I tell in detail how to make sure that when a reader clicks on your photo, he is sent to a website.

In this article, I would like to systematize all my knowledge on designing VKontakte groups based on my experience of interacting with clients and their preferences. Moreover, over the past six months, VKontakte has made many changes that many are not even aware of. I wanted to dwell on some of the innovations in more detail, because among them there are really worthwhile and useful things. We all seem to have recovered from some shock after the redesign of VKontakte, and behind the visible changes we discovered the multivariate functioning and content of the group. So now the design of groups involves a complex procedure that is not limited solely to the graphic component in the form of beautiful pictures. Now owners need to take into account many nuances of building a group structure, depending on the topic of the business and the convenience of users.
This mainly concerns choosing a graphic design from two mutually exclusive options, developing an internal menu, choosing an entry point to the internal menu, understanding the difference between a catalog and a product display, preparing promotional materials to promote the group, and using useful applications. But first things first. First, we will look at the basic design elements of the group, then we will move on to their interaction in the form of various combinations and then we will talk about some useful features and subtleties.
1. Horizontal cover (header)
Let's start with a horizontal cover or header. VKontakte developers assure us that the cover, due to its size, provides greater maneuverability in providing and visualizing information. Usually, in addition to a beautiful picture, the header contains a logo, accompanying information, contacts, a call to join the group, and a website address. I have a suspicion that someday covers will become the only possible design option for the group, so I would recommend switching to them immediately in order to avoid force majeure redesigns later.


How to upload a cover
To download the cover, you need to go to Community Management >> Basic Information block >> Community Cover >> Upload. Recommended cover size is 1590x400 pixels. There cannot be any working buttons in the header that can be clicked - essentially it’s a picture and that’s it. Today, the cover is visible on mobile devices, and seems to be already visible in applications and clients.

Wiki tab Latest news
In the top block under the header there can now be three tabs: pinned post, information about the community and wiki menu (only in groups, there is no such tab on public pages). The emphasis is still on the pinned post, but even with its presence, the user will now always have access to information about the community by switching between tabs. For the wiki menu tab to appear (it is initially called Latest News), you need to go to Community Management » Sections » Materials » Restricted (or Open) » Save.

2. Vertical avatar
Now let's turn our attention to the good old avatar for a group with a size of 200x500 pixels. For now, it is also a way to design a group. Typically, the avatar contains the following information: logo, accompanying text or slogan, contacts, call to join the group. On mobile devices, the entire avatar is not visible, only part of it is visible - the thumbnail. To design a group, you can use either a horizontal header (cover) or a vertical banner. If there is a header, the vertical avatar is not visible. There cannot be any working buttons on the avatar that can be pressed - essentially it’s a picture and that’s it.


3. Miniature
Currently, a vertical avatar is used to create a thumbnail, the minimum size of which is 200x200 pixels. The thumbnail is used in posts and entries in the form of a small circle near the title and in the form of a larger circle in some selections and community mentions. In connection with the transition to a round shape, the requirements for miniatures have become more stringent. In order for the text on the miniature to be fully readable, it must visually not extend beyond the boundaries of the circle.

How to upload a thumbnail
The miniature has become a completely independent element, and when using the cover (header) in the design of the group, you now have to make a separate miniature, keep in mind. If the group does not have a header (cover), then to upload a thumbnail you need to click “Upload photo” in the avatar block (top right). If the design contains a header (cover), then to upload the thumbnail you need to click on the circle immediately under the header and select “Upload photo” there.

4. Banner
Banner (English banner - flag, banner) is a graphic image of an informational, advertising or incentive nature. The banner is attached as a picture to the post and can only have one internal link. Many are still convinced that several links can be made from a banner on the main page. This is not true, just one link and that's it. I would highlight the following types of banners.
4.1 Information banner
A common type of banner containing general information about a company, group, service or event with a detailed list of benefits and other accompanying materials. Often used as a pinned post in a group. The size of this banner is 510x307 pixels. At this size, the bottom of the banner coincides with the avatar. If there is no connection with the avatar, then you can use any size. For example, I use the size 600x350 pixels. The square format of 510x510 pixels is also convenient and gaining popularity now - with this size, the banner occupies the largest possible area in the news feed.

4.2 Banner to enter the internal menu
If we add the catchy inscription “Open menu” to the banner from the previous paragraph, then we will get a banner whose main task is to serve as an entry point to the internal menu. Sometimes they create a decoy in the form of several buttons on a banner, but this is an illusion; when clicked, the user still gets to the internal page, and there each button has its own link. The size of this banner is 510x307 pixels. At this size, the banner at the bottom coincides with the avtar. If the entrance to the menu is not tied to the avatar, then you can make the banner any size, even a narrow button with the inscription “Open menu”. The main thing is that the banner width is at least 510 pixels.

4.3 Card for repost, promotions
Recently, cards for reposts or shares have become especially relevant. Its task is a call to specific action. Basically it’s “Join the group, repost or like and win a prize.” Such banners are used as part of advertising campaigns or promotions both in their own groups and for promotion in other groups. I usually use 600x350 pixels.

4.4 Banner with gif animation
After VK developers made larger sizes for gif images at the beginning of the year, gifs immediately stood on par with information banners. For example, on a GIF banner you can show images of several changing products or texts - movement immediately attracts attention. And when the function was added in June autorun gif animations in the news feed, GIFs have become the object of close attention of advertisers and marketers.

5. Avatar + pinned banner design
Until recently, this modular design, consisting of an avatar and a pinned banner, was the most popular way to design groups. More details on how to do this design are described in the lesson. With the advent of the header (cover), the popularity of this design may decrease slightly.
Plus, there is a possibility that VKontakte will again change some block parameters and then the entire design will fall off, as has happened twice in the last six months. So, dear group owners, when choosing a design for your group, take this fact into account. Yes, and one more thing, in mobile devices all the beauty of a single picture is not visible, since the avatar is not displayed, but only a thumbnail, and the pinned post is located just below.


6. Internal navigation menu
The menu in the form of active links is located on the internal VKontakte page and is written using wiki markup commands. How to create the inner page itself is described in the lesson. Using the menu, the user navigates through the group. Below you will look at the types of internal menus, but for now we will focus on several important points.
Entry points to the internal menu
I would like to point out one subtle point that is often not given importance. Sometimes clients order an internal menu from me, but have absolutely no idea how the user will get to this very internal menu. And you can get to it in two ways: either through a pinned banner (see paragraph 4.2), or through a text link in the top tab under the status line (see figure below). Sometimes a text link is also placed in the “Links” block in the right column of the interface.

Internal menu links
Typically, when ordering, customers indicate the following menu items: About us, Our products (catalog), Delivery methods, Payment, Guarantees, Reviews, Contacts, Promotions, Discounts, Schedule, How to order, Portfolio, Questions and answers, Info, Place an order. Links from menu items can go to the corresponding sections of the external site. Then the link automatically opens in a new window. Most of the points lead to internal VKontakte pages. In this case, the page opens in the same window and you have to make a link or a “Return to main menu” button.
Links to albums with photos and videos open in a new window. Links to topics with discussions (for example Reviews), to a dialog box for writing messages, to applications (see point 10), to selection by hashtags (see point 12) open in the same window and in this case you can get back to the menu only through the main page of the site, or through the “Back” button in the browser. This is perhaps the most inconvenient moment with such links.
Editing the menu
Clients often ask me if it is possible to edit the internal menu. My answer is, if you are a confident user and are familiar with wiki markup and editing modes, then you can edit. But if you are not familiar with all this, then absolutely not. In this case, you will simply ruin all the settings.
I will quote the words of the VKontakte developers themselves. “One simple piece of advice will save you a lot of effort and nerves: work in only one mode. Either it is visual mode or wiki markup mode. It is switching between these two modes while working on the markup that brings most of the problems: pictures may become smaller, various parameters may disappear. This is one of those things that will definitely be corrected in the future, but for now we need to keep this fact in mind.”
Mobile responsive
And one more thing about adaptability. To make the internal menu look the same on mobile devices, you need to layout it on tables. Then the image will be rigidly fixed. Otherwise, when the screen size is reduced, the pictures tend to move one under the other, violating the originally intended order.
Here, again, are the words of the developers about adaptability. “The wiki menu is displayed in mobile browsers, but does not adapt to screen size, which is why images may not look the same as on a computer. You can find guides online on how to adapt wiki markup for mobile devices, but even they do not guarantee 100% performance on all devices.”
7. Types of internal navigation menu
Below are the most common types of internal menus. There are simpler and cheaper solutions that have a high degree of reliability. And there are more complex and labor-intensive designs in terms of graphics and layout. But they look more impressive.

7.2 Large graphical menu
In this case, a vertical row of links is located on a large background image and has a rigidly fixed structure. Here's the lesson.

7.3 Menu in the form of icons, tiles
This design involves several rows and columns in the form of graphic icons and inscriptions for them, or graphic multi-colored or monochrome tiles.

7.4 Dynamic menu with navigation effect
A very impressive design that simulates site navigation with the effect of button clicks or other markings of visited links. Such a menu is quite difficult to manage and requires skills in communicating with wiki markup, since you will also have to edit information on pages in wiki markup. Here is a lesson on this topic.

This article will be a detailed manual and I will tell you how to make a menu for a VKontakte group. A beautifully designed menu of the VK group contributes to a real increase in visitors and sales growth on the site.
Hello my dear readers. Let me tell you today how to make a beautiful menu for a VKontakte group and completely free. By the way, having learned to create such topics, you can earn a little money from this -))). Not a single commercial website operates without creating its own community on social networks, especially VK, which is guaranteed to help bring in new clients, as well as promote your business.

But if your community is not attractive and like everyone else, who will want to stay there? I think no one!!! So let's decorate our groups with high-quality design and learn how to do it very quickly. Before you start creating graphics and our future menu, you need to install the Photoshop program on your computer for further cutting of pictures. Many will ask why you need to cut pictures at all. The point here is that for each menu link we will have to create a separate strip from the general banner.
Today there are several types of created menus:
- Open with active items;
- Closed as a pinned post;
- With individual pictures or a common adjacent picture of the banner and menu.
The essence of creating both options is the same. The only main difference is in the additional elements and record types, and this will be discussed in more detail in this article.
To work with the menu it will help us wiki markup, which is built into the VKontakte text editor today. It differs from the usual one in that it will use standard commands to display a particular image and insert links to the necessary elements. The wiki markup itself allows you to insert code to display images, videos and other elements.
VK group closed menu
In this case, we will see to the left of the main group avatar a hyperlink in the form of the inscription “group menu”, when clicked on, our menu with active items and images will open.
The menu will look like this:

Open group menu (pinned material)
The idea is to create already open menu items that will be displayed in the description of the group itself, where it is usually displayed for all conditions. Our picture will be attached to the description, which we will prepare in advance and link it to the page on which we will have active items. This menu has become very popular recently and is in demand among customers. They look like this:

How to make a beautiful menu for a VKontakte group: step-by-step instructions
So, first of all, we will need to create the main avatar of the group, which we will place on the right, and the stub for our menu in the form of a banner.
- For an avatar 200x332 pixels;
- For the main menu banner, 395x282 pixels.
As you may have noticed, the height of the images is different and this is done so that the images do not move down in height and are at the same level since the height of the community name and status takes up about 50 px and we will need to remove this value from the height of the menu.
To make it clear, if the height of the main avatar of a group is 332, then we subtract 50 from it and get the height of the main menu equal to 282. If the dimensions do not matter, then the height can be set arbitrarily.

The next step after creating a community will be setting up materials, and here we need to prohibit participants from creating additional pages and blocks, but only writing on the wall. To do this, you will need to go to the section under the group avatar called “community management” where we need to make our materials “restricted” as shown below.

Now let's start creating the overall composition. You can, of course, simply insert a picture instead of an avatar and into the description, but let’s not be amateurs and I’ll show you how to do it professionally, so that it is one full-fledged picture, turning into one another.
Let's create a new canvas in Photoshop with dimensions of 600x350 pixels, which we will use as a stencil by cutting out openings in it for our pictures. To work, we need to convert the sizes of all elements and rulers into pixels and this is done along the following path: “Edit-installation-main” and here we set the pixels.
The next step in creating an open menu is to make cutouts for the banner and avatar, which we will then receive for downloading. To do this, go to the section of the left vertical menu and select cutting.

Using the left mouse button, as if you were selecting an area, you need to select blocks of the sizes we need and after each selection, press the “Delete” button and select 50% gray. Such actions will lead to the blocks being of the required size and highlighted in a color different from the main background.
It should look like this:

Now we just select the eraser and use the “magic eraser” function to click on each gray block and get a stencil with cutouts. The next step is to select our main image and place it under the background and get ready-made pictures on which you can write text with the name of the menu or other advertising elements.

Great. After you have placed a picture of our design, we just have to select “save for Web” and as a result we get 2 of our pictures. Now we go back to our group and can fill in the main avatar (vertical). We will use the banner for the menu a little later when working with the wiki markup code.
Let's create the menu itself, with active items that will redirect the user to the necessary sections of a third-party site or to albums and catalogs in the group itself. We will use a new image for variety -))).
So, let's go back to Photoshop and create a new canvas with dimensions of 400x300 pixels. Then select in the section: file-place and select a picture for the menu background.
We place the buttons of our future menu on the picture and cut the picture as we did above by selecting the necessary blocks. After which we also select “save for web” and get a folder with our cuts. In my case, I got 4 pictures in a separate folder.

Now we need to upload the pictures downloaded from Photoshop into a separate album and hide them from prying eyes. After downloading, each picture will receive its new name and unique id.
Please note that you must have:
- Materials are opened in “restricted” mode;
- Discussions included;
- The folder with photos is open to everyone.
Now all that remains is to configure our page where the menu will be displayed. To do this, go to the main page of the community and select fresh materials and edit and call “OUR MENU”.
Next, we need to insert the pictures that we received when cutting in Photoshop. Some people use markup codes, but in order not to overthink it, I suggest that you simply select inserting a picture by clicking on the camera icon and upload one after another.

Working in a text editor, if after loading the pictures, we click on the icon in the form of brackets in the upper right corner, we should see this code:
Advice: An important point after loading images is to remove the padding. This can be solved by inserting “nopadding” before the image sizes.
For clarification, it is written below what comes from where, but considering that everything will be inserted automatically and there is no need to be clever, and open as some write each picture and take the id, then we simply download and save.
[]
where xxxxx is the id of your image
yyyyy - width in pixels (maximum 388)
It should end up looking like this:
Now our pictures are collected in a separate banner. And in order to add a link to each item, simply click on the image with markup disabled and in the link section paste the copied url.
And now we come to the most important and final point in creating our VKontakte menu. Now we need to save our page with pictures and copy its address. In my case it looks like this:
http://vk.com/page-116682062_51411604?act=edit&hid=183950676§ion=edit

Remember, at the beginning of the article we made a stub menu, which will be a continuation of our main avatar, and we made a stencil for it. This is exactly what we need now.
Go to the main page and do the following:
Step #1.
We paste the address of the page into the text field for a new post on the wall, after which it will be converted into a link.
Step #2.
We attach an image of our menu placeholder to the post and click send.

Step #3.
Now, after publishing the post, click on the creation time in the lower left part of the post and select “PIN”.


Great!!! Let's finish here. Now you know how to create cool menus and you can earn good money from it. I advise you to do everything in the following order:
- We come up with a structure and order the design of menu images;
- We resize and cut all images;
- Insert pictures into albums;
- We edit all the cuts in the editor and publish them on the main pages of the group.
As a result of our work, we will get this menu.

But the menu itself, when clicked, will pop up with active links. It’s worth playing with the sizes and adjusting them to fit your screen, but don’t forget about display on mobile devices.

IMPORTANT: After changing the VK design in 2016, new changes were made when creating images and requirements for pictures about which.
Download VK group menu template + all lesson sources
I hope the material was useful, and you now easily understand how to make a beautiful menu for a VKontakte group. Subscribe to blog updates and see you soon in new posts. If you have any questions, write them in the comments, and I will definitely help you.
I am attaching a video to reinforce what you read -))).


