Cards supporting physx. What is the nVidia PhysX engine and what is it for?
Every owner of an NVIDIA video card has opened its control panel at least once. And I probably got to the “Installing PhysX configuration” item. There is almost no useful information, but there is only one parameter “Select PhysX processor”, which provides the opportunity to choose who will process NVIDIA’s proprietary technology, PhysX, integrated into many games.
PhysX is a cross-platform, embedded physics engine for simulating a range of physical phenomena. Originally developed by Ageia for its PhysX physical processor. After Ageia was acquired by NVIDIA, the engine became the property of NVIDIA, which continues its further development. NVIDIA adapted the engine to accelerate physical calculations on its graphics chips with CUDA architecture. PhysX can also perform calculations using a conventional processor. PhysX is currently available on the following platforms: Windows, Linux, Mac OS X, Wii, PlayStation 3, Xbox 360, PlayStation 4, Xbox one. The engine is used in many games and is actively offered for sale (licensing) to everyone.(c) Wikipedia
When viewing this item, many people thought about the question: “Which parameter should I choose? Auto, CPU or GPU” – That’s what we’ll figure out today!
It’s worth noting right away that NVIDIA allows you to process some PhysX capabilities only on its video cards, while the rest should be content only with CPU processing.
Test Stand
Monitor: DELL U2414H 1920x1080 60 Hz
CPU: Intel Core [email protected] 1.025v;
GPU: EVGA NVIDIA GTX 1070;
Motherboard: ASUS X99-A/USB3.1;
SSD (systeam+games): Intel 530 Series 120GB;
Memory: Corsair ValueSelect DDR4 8GB@2400.
Testing methodology
For testing, we selected games that use PhysX technologies and have a built-in performance test, which was used for testing with different modes work “Select PhysX processor” AUTO/GPU/CPU.
Here is a list of selected games:
Rise of Tomb Rider
Batman: Arkham Knight
Metro: Last Light Redux
Mafia 2
Brief description of the main technologies used in selected games
Rise of Tomb Rider
The previous part of Tomb Rider used AMD TressFX technology, which made it possible to realistically simulate the fur and hair of characters in real time. The new part uses new technology, which is based on AMD TressFX, PureHair developed by Crystal Dynamics in collaboration with NVIDIA and based on PhysX. 
The second technology used here is the VXAO shading method, an analogue of HBAO+ and SSAO. VXAO is a higher quality option compared to its competitors. This Ambient Occlusion (AO) technique allows for even more precise shading, taking into account lighting and the influence of objects on each other. VXAO is part of the VXGI (Voxel Global Illumination) volumetric lighting technology, which correctly takes into account direct and reflected light. In VXGI, the scene is divided into a vexel grid, and then the scene is traced taking into account different parameters for each segment. In addition to correctly modeling the illumination of each area, this method produces more accurate Ambient Occlusion shading. A good example below. 
Batman: Arkham Knight
Probably the most bright representative For of this testing. It uses a lot of technologies from the NVIDIA PhysX Gameworks library, both available to everyone, and several that can only be used by owners of NVIDIA video cards.
Cloud FX is a realistic simulation of smoke and fog. Allows you to simulate the full behavior of particles and the influence on them external environment. Available only to owners of NVIDIA video cards. Another such technology is interactive scraps of paper. This is very difficult to describe, but it can be clearly seen in the technical preview of the game, which shows other technologies that are available to everyone.
Mafia 2
Old man, it used APEX technology. It made it possible to work with small elements into which objects were divided when destroyed. Break large objects into parts and leave parts of it on the stage.
Metro: Last Light Redux
A game that “Humiliated” the top video cards of that time, since it used all the most advanced technologies from NVIDIA. Destruction simulation, smoke calculation, tessellation.
Testing
Rise of Tomb Rider
It was decided to disable antialiasing because... does not unreasonably overload the system and does not affect the result of our testing. 


Test results: 

Batman: Arkham Knight
For GPU mode: 
For CPU/AUTO modes 
Test results: 

Mafia 2
Test results: 
Metro: Last Light Redux
Test results: 

Conclusion
The result, I would say, is unexpected. In almost all tests auto mode is ahead of, or within the margin of error with, its pursuers. Only Batman: Arkham Knight caused ambiguity. The test was rechecked 3 times, and all the time the result was the same, I don’t know what this might be connected with. As for our original question - “What is better than a CPU or GPU for processing PhysX?”, it is impossible to answer unequivocally, because In different games, the results can be turned upside down.
Afterword
The result is extremely natural. While still starting work in the field of video cards, NVIDIA was able to attract programmers who were able to create software. It helped them get ahead of their competitors. And, as we see now, the company has not lost its high-level programmers, which is good news.
Preface
I’ll immediately emphasize once again that this guide is not for everyone, but only for those who have weakness- the processor and at the same time it is completely not a panacea, not a magic pill that will turn cheap into expensive. That is, if in some specific processor dependent
game its loading reaches 100%, then these simple steps can
improve the situation.
However, how much they will improve it depends on how weak the processor is. There is no need to create illusions, and then be offended, give a low rating, write that the author is an asshole, which did not help, if now your processor is too weak and does nothing but choke, and think that after the guide it will fly like an airplane. There is a difference between “getting to 100%” and “staying at 100% all the time.”
In general, friends, let's adequately evaluate our hardware.
By the way, this guide was written from the very beginning as part of
, but I decided to make this part as general, because theoretically this should unload the CPU in others as well processor-dependent games to one degree or another, but haven't checked it personally. Let me know in the comments if you noticed a difference if you tried this with any other CPU-dependent game.
If the processor is the weak link on your system, and at peak load times you observe FPS microfreezes or other problems associated with a lack of computing power. CPU power, it may be possible to solve this problem together with other optimization methods by adjusting just a few parameters via Nvidia control panel.
Perhaps AMD has similar settings, but I don't know, so if anyone knows, please write about it in the comments, it might help someone.
Personally, this is the only way I managed to get rid of FPS stuttering in GTA V on my cheap Intel G4500, working with a Palit Super JetStream GTX 980 video card, 8 GB of RAM and an SSD with Windows 10. At the same time, I got more than playable FPS and picture quality. True, I also applied several tweaks and found one interesting setting in the game, but about all this in a separate article.
CPU-dependent games and weak processor
Using GTA V as an example, you can see that the higher the FPS, the higher the processor load. In my case Intel download The G4500 with an FPS of more than 50 does not just reach 100%, but often freezes at them, the processor simply “chokes.” In the game this is expressed by the appearance of micro-freezes, which makes the game unplayable. But if through an increase graphic settings I achieve that the video card produces no more than 47 FPS, the processor load only occasionally reaches 100% and there are no freezes observed.
That is, in the end it is impossible to play at minimum settings, but at maximum. settings 35-47 FPS with a beautiful picture. All due to a weak processor. Many people say that with such a processor it is generally impossible to play GTA V normally, but we now know that this is not true.
Of course, I could also get rid of micro-freezes with my processor by turning on 50% vert. synchronization, which will also lead to 30 FPS (60Hz monitor), but why, if you can play at 35-47 FPS with better mouse and keyboard response.
Theoretically, it would also be possible to downgrade the frequencies of the video card in order to get an FPS that does not load the processor beyond its capabilities, but why, if you can do this by improving the picture quality.
Here are the CPU load graphs at FPS >50 at low graphics settings and at 35-47 FPS at max. settings. You can clearly see how in the first case the processor often “chokes”, and in the second case it works almost at maximum, but not higher than that.
This graph shows the “choking” of the processor on the left a little more clearly:
NVIDIA Control Panel
- Open "NVIDIA Control Panel", go to section
3D Settings -> Manage 3D Settings -> Software settings
and select the game you are interested in from the drop-down list. - Set the following parameters to the specified values:
Parameter
Explanation
Shader caching
Reduces the likelihood of FPS microfreezes, since shaders are compiled once and saved to disk in this form so that in the future, instead of re-compiling, they can be loaded from it. It also speeds up the loading of levels and other things, if shaders are compiled during the process.
Maximum number of pre-prepared frames
The most important parameter. The higher the value, the more the processor is loaded with preparing frames for processing by the video card. Pre-prepared frames help ensure an even supply of data to the video card for processing, which helps smooth out small differences in rendering time. However, a high value may result in input lag. Important: if you set the value to "Use 3D application setting", then the game can use some of its own values other than 1, or the default value accepted in Windows, i.e. 3.
- Now go to the section
3D Settings -> Manage 3D Settings -> Setup Surround, PhysX
and in the region "PhysX Settings" just in case, explicitly indicate your video card.This is regarding the parameters, aimed specifically at unloading the CPU. The following values are also recommended in the software settings for games:
For all settings for which it is possible - "Application control/Use 3D application setting". And the settings are already made in the game itself, but if there are no settings, then through the control panel. Remember that if you set an explicit value for a parameter, i.e. On, Off. or, for example, x2, x4, etc., you force using exactly this value, ignoring the game settings. For example, only setting Vertical Sync to "Use 3D Application Setting" will take into account the setting of the game itself. Settings via the control panel have higher priority.It is also worth mentioning that it is not recommended to use this kind of settings in global parameters, since for some games it is sometimes worth setting other values. Specified settings It is worth using to unload the CPU if it cannot cope, i.e. if its load level often reaches 100% in the game.
Shutdown unnecessary services And NVIDIA programs
So that you can determine which service is needed and which is not for you personally, I will give short description each. Let me make a reservation right away: launching the program GeForce Experience does not depend on services, but the functionality it provides does.
Service name
Short description
NVIDIA Display Driver Service
If disabled, you will not be able to open the NVIDIA Control Panel and it will disappear from context menu desktop. However, everything will remain functioning in normal mode, as if the service remained running. You can set the startup type to Manual, then the service will start upon the first call to the control panel, but will remain running after that.
NVIDIA GeForce Experience Service
Regardless of the startup type of this service (including Disabled), GeForce Experience will start, so if you only use ShadowPlay among all GeForce Experience features, you can disable the service.
This is what concerns NVidia services. You can always find information on the Internet about other services, system ones and those that are installed along with programs, to understand whether you need them, whether it is possible and whether it is worth disabling them.
It is also worth paying attention to programs in startup. For example, which again concerns NVIDIA:
- Nvidia Backend (NvBackend.exe), responsible for game optimization functions according to the parameters for them from GeForce Experience. You can remove it from startup if you do not use this function.
- Nvidia Capture Server (nvspcaps64.exe) is needed for ShadowPlay.
Other programs and services
Naturally, setting these values in the NVidia control panel is not the only way to unload the processor in the game, so if this was not enough in your case, I recommend paying attention, using the task manager, to what other programs/services are using the processor in parallel with the game.
The American company nVidia Corporation has produced many innovations, both in the technical field and in the field of software, however, few new developments have been as important as the physics engine nVidia PhysX. Initially, PhysX was not developed by nVidia, but by a small Californian company, Ageia Technologies. At that time, PhysX did not have most of its capabilities, but the potential was visible to the naked eye.
In February 2008, Ageia Technologies was acquired by nVidia Corporation and became fully part of it. Of course, all the developments of Ageia Technologies also became the full property of nVidia. The management of the latter decided to rename PhysX to nVidia PhysX and focus on its active development. The engine has been optimized for accelerated physical calculations on graphics chips, which also have the CUDA architecture developed by nVidia. Among other things, nVidia PhysX can perform calculations and calculations not only on graphics chips, but also on the most common central processors. Today, this physics engine is available on all popular platforms, such as Windows, Mac OS, Linux, Xbox 360, PlayStation 3 and even Wii, however hardware acceleration Available on Windows platform only.
What is nVidia PhysX
What exactly is nVidia PhysX and why has it gained such wide popularity? PhysX is a cross-platform physics engine that relieves game developers from the need for long, expensive and labor-intensive independent development of their own software responsible for the physical interaction of various bodies.
An example of how the engine works is nVidia PhysX
A distinctive feature of nVidia PhysX is that it must be downloaded and installed separately, while other physics engines are installed along with the game itself. The engine itself consists of three parts:
- Rigid body, responsible for processing solid bodies;
- Cloth, responsible for processing fabrics;
- Fluid, responsible for processing various liquids.
Each of these components is implemented in top level. For example, Cloth provides the most realistic behavior of fabrics when interacting with other fabrics and other objects, as well as their ruptures and separation into several parts. A striking example is the game Mirror’s Edge, where, thanks to this technology, the realistic physical behavior of not only fabrics, but also tarpaulins, construction film and other similar materials was realized. To date, nVidia PhysX is widely used in more than 150 gaming projects. It's safe to say that nVidia PhysX is the most widely used physics engine in the world.
We bring to your attention Full description control panel drivers. Please note that some settings are only available with certain types of equipment used. IN this review We tried to reflect all possible settings.
Main panel window
The main window is shown in the illustration:
The navigation panel is located on the left and allows you to navigate through the necessary settings with one click. The View menu allows you to enable an advanced view, which gives you the most full access to all the driver settings options or configure a custom panel view, leaving only those items that you intend to use. Also, in the lower left part of the panel, access to help system control panel (link “System information”):

from which you can find out about the versions of files, installed drivers and other software NVIDIA software, as well as the characteristics of the video card.
Category "3D Settings"
Adjusting images with playback
Available following settings:
- Settings according to 3D application— this option allows you to control the quality and speed of display using 3D applications. However, the default trilinear filtering optimization and anisotropy sampling optimization enabled by default remain regardless of application settings.
- Advanced 3D image settings— advanced driver settings installed by the users themselves are used. The “Go” link opens access to the “Manage 3D Settings” tab. It is the management of additional driver options that allows you to achieve maximum image quality.
- Custom installations with a focus on…: - the most interesting option that allows simplified management of additional driver options for novice users:
Meaning Performance corresponds to the maximum operating speed and includes the following settings: vertical sync is disabled, all optimizations (trilinear filtering optimization, mip filter optimization for anisotropy, sampling optimization for anisotropy) are enabled, negative level details: negative level prohibition - enabled, texture filtering - "quality", anisotropic filtering and anti-aliasing are controlled by applications.
Meaning Balance has the following settings: anti-aliasing - 2x, anisotropic filtering - 4x, all optimizations (trilinear filtering optimization, mip filter optimization for anisotropy, sampling optimization for anisotropy) are enabled, negative level of detail - enabled, texture filtering - "quality", vertical sync - controlled by applications.
Meaning Quality has the following settings: trilinear filtering optimization - enabled, anti-aliasing - 4x, anisotropic filtering - 8x, negative level of detail - enabled, texture filtering - "quality", vertical synchronization - controlled by applications.
All modes are provided with detailed explanations of their use, and a rotating company logo demonstrates the use of certain settings.
For more detailed settings window is used Managing 3D Settings.
Managing 3D Settings
Global options

Possible bookmark settings Global options :
Anisotropic filtering. Possible values are “Off”, “Application control”, “2x-16x” (depending on the video adapter model). Anisotropic filtering is today the most advanced technique for compensating pixel distortion, and in combination with trilinear filtering it gives best quality filtration. Activating any value other than “Application Control” allows you to ignore application settings. But we should not forget that this is a very resource-intensive setting that significantly reduces performance.
Vertical sync pulse. Possible values are “On.” and Off, Use 3D Application Setting. Vertical synchronization (it is completely unclear why NVIDIA moved away from this term) refers to the synchronization of image output with the monitor’s refresh rate. Enabling vertical sync allows you to achieve maximum smooth image images on the screen, turning it off allows you to get the maximum number of frames per second, often leading to disruption (displacement) of the image due to the fact that the video adapter has begun drawing the next frame, while the output of the previous one has not yet been completed. Due to the use of double buffering, enabling Vsync may cause frames per second to drop below the monitor's refresh rate in some applications.
Enable scalable textures. Possible values are “None” and “Bilinear”, “Trilinear”. No - do not enable scalable textures in applications that do not support them. Bilinear - better performance at the expense of quality. Trilinear - good image quality with lower performance. It is highly not recommended to use this option in the forced bilinear filtering mode, since the image quality obtained when forcing the option is simply depressing.
Background lighting shading. Enabling technology for simulating global illumination (shading) Ambient Occlusion. The traditional lighting model in 3D graphics calculates the appearance of a surface solely based on its characteristics and the characteristics of the light sources. Objects in the light's path cast shadows, but they do not affect the illumination of other objects in the scene. The global illumination model increases the realism of an image by calculating the intensity of light reaching a surface, with the brightness value of each surface point depending on relative position other objects in the scene. Unfortunately, honest volumetric calculations of shading caused by objects in the path of light rays are still beyond the capabilities of modern hardware. Therefore, ambient occlusion technology was developed, which allows using shaders to calculate the mutual occlusion of objects in the plane of the “virtual camera” while maintaining acceptable performance, first used in the game Crysis. This option allows you to use this technology to display games that do not have built-in support for ambient occlusion. Each game requires a separate adaptation of the algorithm, so the option itself is enabled in the driver profiles, and the panel option only allows the use of the technology as a whole. The list of supported games can be found on the website NVIDIA. Supported on G80 (GeForce 8X00) and later GPUs starting with driver 185.81 in Windows Vista and Windows 7. May reduce performance by 20-50%. Possible values are “On.” and "Off."
Maximum number of pre-prepared frames— allows you to limit the control of the maximum number of frames prepared by the central processor when disabled. If you encounter problems with a slow response of the mouse or joystick, you need to reduce the default value (3). Increasing the value can help achieve smoother images at low frame rates.
Expansion limitation. Possible values are “Enabled” and “Disabled”. Used to solve compatibility problems with older OpenGL applications due to the overflow of the memory allocated for storing information about the capabilities of the video card. If applications crash, try enabling extension restriction.
Stream optimization— allows you to control the number of GPUs used by applications; in most cases, changing the default value (Auto) does not require. However, some older games may not work correctly in such configurations. Therefore, it is possible to manage this option.
Power management mode. Possible values are “Adaptive” (default) and “Maximum performance”. With GeForce 9X00 and newer video cards that have separate performance modes, for games and programs that place a small load on the GPU, the driver does not switch the video card to 3D performance mode. This behavior can be changed by selecting the “Maximum Performance” mode, then whenever the 3D graphics card is used, it will switch to 3D mode. These features are only available when using driver 190.38 or higher in Windows Vista and Windows 7.
Smoothing - gamma correction. Possible values: "On" and "Off." Allows you to perform gamma correction of pixels during anti-aliasing. Available on video adapters based on the G70 (GeForce 7X00) graphics processor and newer. Improves color scheme applications.
Anti-aliasing - transparency. Possible values are Off, Multisampling, Oversampling. Controls advanced anti-aliasing technology to reduce the laddering effect on the edges of transparent textures. We draw your attention to the fact that the phrase “Multiple Sampling” hides the more familiar term “Multisampling,” and “Oversampling” means “Supersampling.” The last method has the most serious impact on video adapter performance. The option works on video cards of the GeForce 6x00 family and newer, when using drivers version 91.45 and higher.
Antialiasing - parameters. The item is active only if the “Smoothing - Mode” item is set to “Increase application settings” or “Override application settings”. Possible values are “Application control” (which is equivalent to the “Application control” value in the “Anti-aliasing - mode” item), and from 2x to 16x, including “proprietary” Q/S modes (depending on the capabilities of the video card). This installation seriously affects performance. For weak cards, it is recommended to use minimal modes. It should be noted that for the “Increase Application Settings” mode, only the 8x, 16x and 16xQ options will have an effect.
Antialiasing - mode. Enable full screen image anti-aliasing (FSAA). Anti-aliasing is used to minimize the "jaggies" effect that occurs at the boundaries of 3D objects. Possible values:
- “Application control” (default value) - anti-aliasing works only if the application/game directly requests it;
- “No”—completely disable the use of full-screen anti-aliasing;
- “Application settings override” - force the anti-aliasing specified in the “Anti-aliasing - parameters” item to be applied to the image, regardless of the use or non-use of anti-aliasing by the application. "App Settings Override" will have no effect on games using the technology Deferred shading, and DirectX 10 and higher applications. It may also cause image distortion in some games;
- "Increase Application Settings" (available only for GeForce 8X00 and newer video cards) - allows you to improve the anti-aliasing requested by applications in problem areas at a lower performance cost than using "Override Application Settings".
Error messages. Determines whether applications can check for rendering errors. The default value is “Off”, because many OpenGL applications perform this check quite often, which reduces overall performance.
Appropriate texture binding. Possible values are “Off.” , "Hardware is used", "OpenGL specification is used". By “texture snapping” we mean snapping texture coordinates beyond its boundaries. They can be snapped to the edges of the image or inside it. You can disable snapping if texture defects occur in some applications. In most cases, changing this option is not necessary.
Triple buffering. Possible values are “On.” and "Off." Enabling triple buffering improves performance when using Vsync. However, you should remember that not all applications allow you to force triple buffering, and the load on video memory increases. Only works for OpenGL applications.
Accelerate multiple displays. Possible values are Single Display Performance Mode, Multi-Display Performance Mode, and Compatibility Mode. The setting determines Extra options OpenGL when using multiple video cards and multiple displays. The control panel assigns the default setting. If you have problems with OpenGL applications running on multiple graphics cards and displays, try changing the setting to compatibility mode.
Texture filtering - anisotropic filtering optimization. Possible values are “On.” and "Off." When enabled, the driver forces the use of the point mip filter at all stages except the main one. Enabling this option slightly degrades the picture quality and slightly increases performance.
Texture filtering. Possible values are " High quality", "Quality", "Performance", "High Performance". Allows you to control Intellisample technology. This parameter has a significant impact on image quality and speed:
- "High Performance" - offers the highest possible frame rate, which gives better performance.
- "Performance" - Setting up optimal application performance with good image quality. Gives optimal performance and good image quality.
- "Quality » — standard installation which gives optimal quality Images.
- "High quality" - gives the best image quality. Used to obtain images without using software optimizations for texture filtering.
Texture filtering - onegative deviation of LOD (level of detail). Possible values are “Allow” and “Binding”. For more contrast-rich texture filtering, applications sometimes use a negative Level of Detail (LOD) value. This increases the contrast of a still image, but creates a “noise” effect on moving objects. To get more high-quality image When using anisotropic filtering, it is advisable to set the option to “snap” to prohibit negative LOD deviation.
Texture filtering - trilinear optimization. Possible values are “On.” and "Off." Enabling this option allows the driver to reduce the quality of trilinear filtering to improve performance, depending on the selected Intellisample mode.
Software settings

The bookmark has two fields:
Select a program to configure.
In this field you can see possible profiles applications that serve to replace global driver settings. When you run the corresponding executable file, the settings for the specific application are automatically activated. Some profiles may contain settings that cannot be changed by users. As a rule, this is an adaptation of the driver for specific application or troubleshooting compatibility issues. By default, only those applications that are installed on the system are displayed.
Specify settings for this program.
In this field you can change the settings for a specific application profile. Scroll available settings completely identical to global parameters. The “Add” button is used to add own profiles applications. When clicked, a window opens Windows Explorer, with which you select executable file applications. After that, in the “Specify settings for this program” field, you can set personal settings for the application. The “Delete” button is used to delete user application profiles. Please note that you cannot delete/change initially existing application profiles using driver tools; to do this you will have to use third party utilities, such as nHancer.
Setting up PhysX configuration
Allows you to enable or disable physics effects processing using NVIDIA PhysX technology using the graphics card, provided that it is based on a G80 (GeForce 8X00) or newer GPU. Support is enabled by default; disabling it may be necessary when solving problems with applications that do not use PhysX correctly (for example, the game Mirror`s Edge without patches). If there is more than one graphic NVIDIA processor in the system, the user is given the opportunity to select the GPU on which the physical effects will be processed, unless SLI mode is used. You can find out more about the features of using NVIDIA PhysX in the special FAQ section of our website.
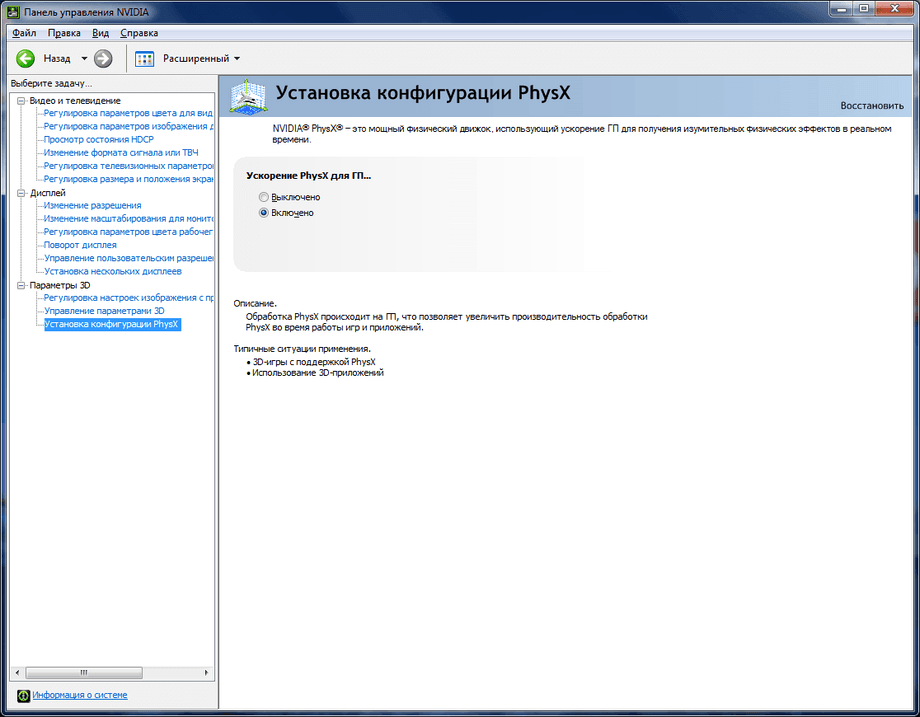
Additionally, starting with driver version 195.62, you can enable the display of the PhysX acceleration indicator in games. For this purpose in top menu In 3D Options, check Show PhysX Visual Indicator. The acceleration status is displayed in the left top corner Images.

Hi all! Today is very interesting article O fine tuning video cards for high performance V computer games. Friends, agree that after installing the video card driver, you once opened the “Panel Nvidia control"and seeing unfamiliar words there: DSR, shaders, CUDA, sync pulse, SSAA, FXAA and so on, we decided not to go there anymore. But nevertheless, it is possible and even necessary to understand all this, because performance directly depends on these settings. There is a misconception that everything in this sophisticated panel is configured correctly by default, unfortunately this is far from the case and experiments show that correct setting rewarded with a significant increaseframe rate.So get ready, we will understand streaming optimization, anisotropic filtering and triple buffering. In the end, you will not regret it and you will be rewarded in the formincreasing FPS in games.
Setting up an Nvidia graphics card for gaming
The pace of development of game production is gaining more and more momentum every day, as is the exchange rate of the main currency in Russia, and therefore the relevance of optimizing the operation of hardware, software and operating system has risen sharply. It is not always possible to keep your steel stallion in good shape through constant financial injections, so today we will talk about increasing the performance of a video card through its detailed tuning. In my articles, I have repeatedly written about the importance of installing a video driver, so , I think you can skip it. I'm sure you all know perfectly well how to do this, and all of you have already had it installed for a long time.
So, in order to get to the video driver management menu, right-click anywhere on the desktop and select “Nvidia Control Panel” from the menu that opens.
Then, in the window that opens, go to the “Manage 3D parameters” tab.

This is where you and I will set up various parameters, affecting the display of 3D images in games. It's not hard to understand what to get maximum performance video cards will have to greatly reduce the image in terms of quality, so be prepared for this.
So, the first point " CUDA - GPUs" Here is a list of video processors from which you can select and it will be used by CUDA applications. CUDA (Compute Unified Device Architecture) is an architecture parallel computing used by all modern GPUs to increase computing performance.

Next point " DSR - Smoothness“We skip it because it is part of the “DSR - Degree” item settings, and it, in turn, needs to be disabled and now I will explain why.

DSR (Dynamic Super Resolution)– a technology that allows you to calculate images in games at a higher resolution, and then scale the resulting result to the resolution of your monitor. In order for you to understand why this technology was even invented and why we don’t need it to get maximum performance, I’ll try to give an example. Surely you have often noticed in games that small details such as grass and foliage very often flicker or ripple when moving. This is due to what lower resolution, the smaller the number of sampling points to display fine details. DSR technology allows you to correct this by increasing the number of points (than higher resolution, those larger number sampling points). I hope this will be clear. In conditions of maximum productivity, this technology is not interesting to us as it spends quite a lot system resources. Well, with DSR technology disabled, adjusting the smoothness, which I wrote about just above, becomes impossible. In general, we turn it off and move on.
Next comes anisotropic filtering. Anisotropic filtering is a computer graphics algorithm created to improve the quality of textures that are tilted relative to the camera. That is, when using this technology, textures in games become clearer. If we compare antisotropic filtering with its predecessors, namely bilinear and trilinear filtering, then anisotropic filtering is the most voracious in terms of video card memory consumption. This item has only one setting - selecting a filter coefficient. It's not hard to guess that this function must be disabled.

Next point - vertical sync pulse. This is synchronizing the image with the monitor's refresh rate. If you enable this parameter, then you can achieve the smoothest possible gameplay (image tearing is eliminated when the camera turns sharply), but frame drops often occur below the monitor’s scan rate. For getting maximum quantity frames per second, it is better to disable this option.

Pre-trained personnel virtual reality . The function for virtual reality glasses is not interesting to us, since VR is still far from everyday use by ordinary gamers. We leave it at the default - use the 3D application setting.

Background lighting shading. Makes scenes appear more realistic by softening the ambient light intensity of surfaces that are obscured by nearby objects. The function does not work in all games and is very resource intensive. Therefore, we take her to the digital mother.

Shader caching. When this function is enabled CPU saves shaders compiled for the GPU to disk. If this shader is needed again, the GPU will take it directly from disk, without forcing the CPU to recompile this shader. It's not hard to guess that if you disable this option, performance will drop.

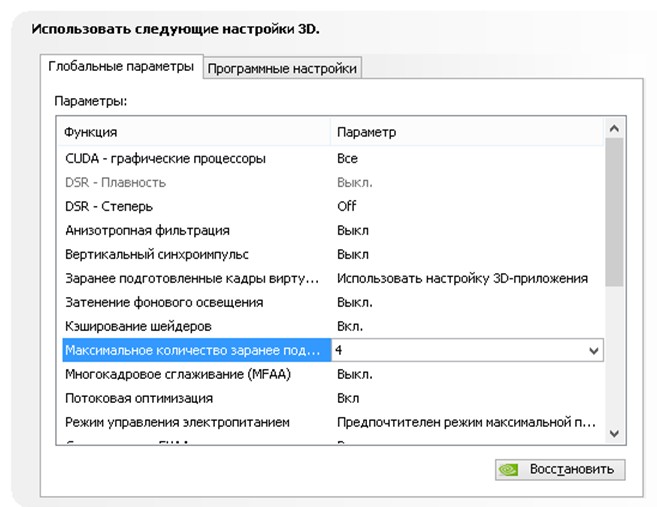
Maximum number of pre-prepared frames. The number of frames that the CPU can prepare before they are processed by the GPU. The higher the value, the better.
Multi-frame anti-aliasing (MFAA). One of the anti-aliasing technologies used to eliminate “jaggedness” at the edges of images. Any anti-aliasing technology (SSAA, FXAA) is very demanding GPU(the only question is the degree of gluttony). Turn it off.

Stream optimization. By enabling this feature, an application can use multiple CPUs at once. If the old application does not work correctly, try setting the “Auto” mode or disabling this function altogether.

Power management mode. There are two options available - adaptive mode and maximum performance mode. During adaptive mode, power consumption depends directly on the GPU load. This mode is mainly needed to reduce power consumption. During maximum performance mode, as you might guess, the highest possible level of performance and power consumption is maintained, regardless of the GPU load. Let's put the second one.

Anti-aliasing – FXAA, Anti-aliasing – gamma correction, Anti-aliasing – parameters, Anti-aliasing – transparency, Anti-aliasing – mode. I already wrote about smoothing a little higher. Turn everything off.

Triple buffering. A type of double buffering; an image output method that avoids or reduces artifacts (image distortion). If we talk in simple words, then increases productivity. BUT! This thing only works in conjunction with vertical sync, which, as you remember, we disabled before. Therefore, we also disable this parameter; it is useless for us.


