Import posts into WordPress from csv. How to install and configure the WP Ultimate CSV Import plugin. Creating a CSV Import Data Type in WordPress
It's fairly easy to migrate your WordPress site using backup plugins. But what if you only need to transfer a custom post type? In today's article we will show you how to import and export custom types posts in WordPress. We'll also show you how to import any custom taxonomy associated with your post type.
There are two steps when exporting and importing custom post types in WordPress. The first step involves migrating the custom post type itself and taxonomies. The second step is to import the post type data.
Most often, custom post types in WordPress are associated with their own custom taxonomies. We'll show you how to export/import your custom taxonomies along with the post type.
Exporting Custom Post Types and Taxonomies to WordPress
Some users prefer to create their own custom post types and taxonomies by adding code to the theme's functions.php file or . In this case, all you need to do is copy the code you added earlier and paste it on the site where you want to import the post type.
However, in some cases you may simply not find where the code is located. Don't worry, you can create the same post type on your new site.
All you need to know is the value of the entry key. This is the name that is used for the post type in your WordPress database. You can find it by simply visiting the post type page in the WordPress admin panel.

Once you find the post key, go to the site where you want to import the post type and use the Custom Post Types UI plugin to create your custom post type.

You can also get a custom taxonomy key by viewing it in the site admin area.

Use the CPT UI plugin to create the same taxonomy on a new site where you need to import it.

Repeat for all custom post types and taxonomies that need to be migrated.
Clue: If you used the CPT UI plugin to create post types, you can also use it for migration. But, it only works if the original post type was created using this plugin. Go to the Import/Export section in the plugin settings and follow the onscreen instructions.
Custom post types and taxonomies created by plugins
Many popular WordPress plugins use custom post types and taxonomies to handle custom content types. For example, Soliloquy uses them to create sliders, eCommere plugins are used to create products, etc.
If you want to continue using these plugins, you do not need to import CPTs. Just install the plugin on your target site and you will already have custom post types and taxonomies.
Many of these plugins provide the ability to import/export, but if it does not have such an option, then the data can still be exported.
Export/import data of custom post types and taxonomies in WordPress
WordPress has powerful tool import/export, which allows you to export and import WordPress data. Just go to Tools » Export.

You'll see all your post types. Select the one you want to export and click on the corresponding button.
WordPress will prepare XML file to export and your browser will start downloading.
Now we switch to the target site where we need to import this data. Let's go to Tools » Import. You will see a list of options, click on WordPress.

A pop-up window will appear asking you to install the WordPress import plugin. Click on the install button and then on the link Activate plugin & start import.

On the import screen, you need to click on the file selection button and then select the XML file that you downloaded earlier. Next, click on the file upload and the export button.

Whenever I need to move a website from one server to another, I either use plugins like Duplicator or Backup Buddy or do it manually. This includes creating backups, manual copying media files, downloading the database and some other actions, which all together take approximately 30 minutes or more depending on the size of the site. While this is an entirely possible route to take, I think it is unnecessarily complicated and thorny, especially if you want to migrate a small site.
The WordPress Plugin Vault contains a nifty plugin that allows you to easily export content to another website using an XML file. The plugin is called WordPress Importer. It can move:
- Posts, pages, custom post types
- Categories, tags, taxonomies
- Comments (including approved, pending, deleted, and spam)
- Full information about the authors
You can move everything stored in your database, including custom fields and post metadata. However, there is also something that the plugin cannot transfer:
- Themes and plugins
- Attachments and media files
The last time I used the plugin was to migrate my blog from BlueHost hosting to Media Temple.
This process usually takes a few minutes and does not require any technical knowledge. I think that this plugin ideal for migrating small sites containing less than a hundred posts and pages.
In this article, I will show you how to export and import content from one WordPress website to another. Before you begin, I recommend that you make a backup of your site so that if anything happens, you can restore it from a backup.
Export your content
WordPress core has a built-in export feature. You can find her at Tools section(Tools).
Export comes in three main options: all content, posts, and pages. The remaining options that are listed in the screenshot are the result of the two plugins that I used.
The export feature also outputs any custom post types and taxonomies used on your site. For example, on our site, WPKube, we use a lot of premium and custom plugins that, as you might guess, add custom post types and taxonomies. Thus, WordPress allows us to export custom post types, as well as posts and pages, to another site.
Additionally, you can also filter the content you want to move. For example, you can filter posts by category, author, date range, and post status.

Once you decide which posts and pages you need to export, click the "Download Export File" button. The download process will take a few seconds or minutes, depending on the file size.
Import an XML file to another site
The import option can be found in the Tools section WordPress console, however, it is not a functionality built into the kernel. This is mainly due to the numerous platform options (Blogger, LiveJournal, Tumblr, etc.) from which users can choose the right one.
You can either install the WordPress Import plugin manually by downloading it from the official WordPress repository, or click the appropriate button on the Import page. The last option is the most practical, since you will need a couple of seconds to do everything.

To install the plugin from the Import page, click on the WordPress link and you will see a pop-up window where you can install the plugin directly through the console.

Once you install the plugin, you will be taken to the import page where you can upload your previously exported XML file.

As soon as you click on the “upload file and import” button, you will have the option to link the imported authors to existing authors on the site. You can also allow the creation of new accounts for authors. It may turn out useful opportunity, if you have the same authors on both sites.
You will also be given the option to import all images that are attached to posts.
Conclusion
Of course, this solution is not ideal, but it gets the job done. At the same time, I usually encounter a mountain of problems. For example, the plugin is unable to import attachments, so I have to manually download all media files from the old server and upload them to the new site.
You should also be aware that certain problems may arise when downloading files. Some hosting providers set limits on the size of uploaded files. You can deal with this problem by changing the limits in the functions.php or .htaccess file.
Once the transfer is complete, you can use the Search and Replace plugin to change the URLs and all links from your old site.
Finally, if something goes wrong, you can always easily restore the imported website from a backup you created earlier. I hope that this manual helped you. If you have any questions, you can always ask them in the comments to this post.
(Last update: 11/18/2018)
Hello ladies and gentlemen! Today we will talk about such an important topic - Transferring a site from Blogger to WordPress. I’ll tell you in this post: how move blog from Blogger to WordPress, and to be a little more precise, import posts and comments from Blogger to WordPress.
Naturally, the owners of blogs on Blogger do not want to part with their brainchild and lose all their masterpiece articles written with such difficulty, but they can safely take them with them to the new site. And not only articles, but also all the comments left on your blog. The creators of WP foresaw in advance this possibility of moving not only for the Blogger platform, but also for LiveJournal, Tumblr.
Migrating a site from Blogger to WordPress
Import Posts and Comments from Blogger to WordPress
And so, you have created your website on CMS WordPress(how to create, detailed instructions, ) and decided move your blog from Blogspot to new WP site. A very correct and wise decision. You will never part with WP and will walk with it, hand in hand, all your life. Yes, just like I did.
Go to your administrative panel site. Section Tools - Import:
 Click on the Import subsection
 After you click the “Import” subsection, a page will open for you to select from where you want to import posts and comments:

The Blogger system (Install a plugin for importing posts, comments from Blogger) takes an honorable first place, so we choose it. Next, a page will open where you are asked to install Blogger Importer plugin:

Click install, button at the bottom. After successful installation of the module, click the link “Activate the plugin and start importing”. The plugin will ask for authorization permission in your Google account, click the "Authorize" button. After this, a warning will appear - WordPress is asking for permission:

Naturally you allow it. After a couple of seconds, a page will appear with a list of your blogs, where you can select the right blog to import and see information about how many posts and comments will be imported:
 List of your Blogger blogs
 You now need to select a blog whose articles and comments will safely move to your new blog W.P. Feel free to click the "Import" button when the numbers on the left and right are equal:
this is a signal that the import has ended. You can open your new website with your posts and see the result:

Now you will have to tinker a little, namely:
2. Blogger labels: be sure to edit, delete unnecessary ones, add categories and tags to them;
3. Static pages: you need to create new ones and manually copy the material from Blogger. You can create as many pages as you like.
4. Images: images will remain on Google, if you have few posts then it is better to reinsert them into the post using the WordPress uploader and edit them (size, frames, title, add alt attribute and so on) for better indexing of pictures. And if there are a lot of pictures and you don’t want to bother, you can leave them on Google so as not to take up space on your hosting.
And further, old blog It’s better to delete, otherwise the content will be the same, this is very bad. It will take some time to get everything in order, but as they say, the game is worth the candle. You'll soon feel it with an increase in visitors to your new blog. That seems to be all I wanted to tell you about - transfer blog Blogger on WordPress.
Until we meet again, bye, bye.
The import procedure (be it Wordpress) or any other CMS allows you to add certain information to the database - notes, pages, news, etc. In our case, we will talk about importing from special file eXtended RSS format which is also called WXR file. By luck, it contains everything that is in a classic WordPress blog - posts, pages, custom types posts, comments, custom fields(custom fields), categories, tags and users. If you have a WXR file, then importing will be simple and effective - let's look at all the nuances of this process.
First, a few words on how to get such a WXR file. It is usually created using the WordPress export procedure in the menu section of the same name. In general, in theory, you should start with this, but there is nothing to tell there - go to the admin section “Tools” - “Export” and you will see everything for yourself. Under different tasks There are formats, for example, I recently talked about one for store products.
This WXR file can also be obtained from special programs, say the same Zebroid or other parsers-posters can “output” give you the format you need (webmasters generally have a lot interesting software). By the way, you can import into WordPress from many engines - on this page you will find a complete list of them. In addition to the standard and popular Blogger, Drupal, e107, Joomla, LiveJournal, Movable Type, PostNuke, Twitter, TypePad, it is possible to “process” RSS feed, [X]HTML and CSV files, and static pages! For each option there is a plugin or description necessary actions on import.
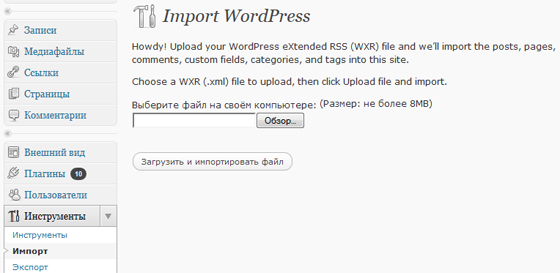
But let's return to importing from wordpress file. To do this, go to the admin section “ Tools» — « Import". Here are some basic options, including WordPress. By clicking on it, in most cases you will see a pop-up window asking you to install a special plugin - WordPress Importer.

This module can be downloaded from here. It allows you to import all your blog content, from posts and pages to tags and comments, from a special WXR export file. Installing the plugin takes just a few minutes - you need to download, unzip the module and upload it to the blog's FTP in the /wp-content/plugins/ directory. Or, from the WP admin panel itself, in the plugins section, find WordPress Importer and install it there.
As soon as the WordPress Importer module is connected in the “Import” section, when you click on the Wodpress link you will be taken to a special page.
Attention, first of all, before importing, I advise you to make a backup of the database. Anything can happen: the process can go wrong, and the final result will not suit you - in any case, in order to quickly return to “ initial version site" this backup will come in handy.
When backup copy saved on your computer, we proceed directly to the import process. On the same page, click on the “Browse” button and select the source WXR import file. Then click on “Download and import file”.
On next step You will be asked to clarify two things:
- to which user should all articles be assigned - a new one (create one at the same time) or one already existing in the system. Frankly, I don’t know if this always happens, perhaps in some cases the user is already registered in the WXR file itself.
- the second question is whether it is necessary to download the images that are indicated in the imported posts and pages: if yes, check the appropriate box.
For a new user, by the way, you will then need to set a password, email and its access rights. As soon as the file is imported, you need to check the blog itself - whether everything has loaded, whether new posts, categories, tags, etc. are displayed correctly.
By the way, for downloading files and executing scripts in different hostings, dedicated different resources, for example, I upload files up to 8MB. As for the execution time of the import script, it may not be enough PHP values memory limit. In the post about this you can find a solution to the problem or contact your hoster with a request for help. There is also an option to split the imported file into several smaller pieces. In general, the import task is not that difficult if you have a suitable and working WXR file with all the necessary content.
P.S. Electronic money is being used more and more actively, the best exchange wmr - wmb of all the available rates in different exchangers will be of interest to residents of Belarus.
If you don’t know what to give your girlfriend, visit the online perfume store http://makeup.com.ua/ and necessary ideas They'll come to you - there's a lot of choice.
If you often move from server to server or change hosting provider, then you have probably already developed your own scheme for transferring site files. But what should site building beginners do, for whom the word “backup” is as new as “hosting” or “domain”? Developers WordPress platforms did a great job releasing a special CMS WordPress plugin Importer, which is essentially regular system to create a backup of both the entire site as a whole and its individual parts. However, you do not need to have any special knowledge of WordPress or programming to learn how to work with this plugin.
Of course, no one has canceled the generally accepted methods of moving sites from one hoster to another. You can still dump the database in PHPmyAdmin, download it via FTP, and then upload it to new server. If the blog is “young”, then manual moving will take no more than an hour. But when we're talking about about a WP site with a large volume of files, then data backup may take a long time, and in some cases, due to a crookedly filled database, it may even result in the project being inoperable. It is for these cases that there is a WordPress Importer plugin that allows you to unnecessary problems It’s easy to transfer data from one server to another, as well as create clone sites from one saved database.
In addition, if you have ever used purchased themes, then, as a rule, downloading demo data and settings is also done using this extension.
Installing the plugin
Working with WordPress Importer is very simple. First, you will need to install the plugin in the CMS. To do this, log in to the blog management console, go to the “Plugins” tab and click on the “Add new” button at the top. Then on new page In the search box, type “Wordpress Importer” and press ENTER.
Once you've finished searching for the plugin, click Install. The plugin is distributed by the developers of the engine itself, and therefore its author will be wordpressdotorg. Please note that this plugin is one of the most popular extensions for WP (over a million installations).

After installing the extension, activate it. However, the installation can be done in another way. Just go to the “Tools” section, then to “Import” and click on the “Wordpress” link. If WP Importer is not installed, the CMS will notify you about this and require its installation.

Export and import data
The entire process of data export comes down to several simple actions. Go to the Export section in Tools and select the type of files to export. You can save the entire content of the site, or its individual parts, for example, posts, pages or media files. Select the desired item with the trigger and click “Download export file”. The exported file will be saved on your computer in WXR format (this is a file with XML extension WXR stands for WordPress Advanced RSS).

To import a finished WXR file, just open the “Import” section in the CMS, follow the “Wordpress” link and point to the file location. After loading the data, WP will prompt you to create a new author or assign the imported articles to one of the current authors. Specify the desired option and complete the data import procedure.

Possible problems
When transferring data, you need to take into account that WordPress has a limit on the size of the downloaded file (usually 2 MB) and if it is larger than this size, it will not download. Fortunately, there are ways how.
And remember the main rule: you should always make site backups, regardless of whether there are problems with data transfer or not!


