What are touch id functions? How to enable AssistiveTouch on iPhone and iPad? What to do if the fingerprint scanner is not working well - video
Touch ID is a fingerprint scanner that was developed by Apple and is used on the company's smartphones and tablets, including: iPhone 5, iPhone 6, iPhone 6s, iPhone 7, iPhone 7 Plus, iPad Air 2, iPad mini 4, etc.
Why is it needed? Touch ID is mainly used to unlock a smartphone or tablet. Previously, you used a password and PIN to unlock, but now you just need to put your finger on the fingerprint scanner, as shown in the image below:

However, Touch ID is needed for other purposes as well. For example, you can use it to pay for purchases, including in a regular store thanks to the payment system Apple Pay. The idea is this: you link a bank card (or several) to your iPhone, come to the store, choose a product, when paying at the checkout, take out your smartphone, bring it to the payment terminal and put your finger on the fingerprint scanner, after which you pay for the product. It's even more convenient than using a physical one by bank card— payment occurs instantly. True, not all stores yet support Apple Pay, as well as the banks with which the system works, but in the future everything will change for the better.

What does Touch ID look like?
It’s not hard to guess that Touch ID is integrated into the Home button, which, by the way, starting with the iPhone 7, is not physical, but has become touch-sensitive.

Touch ID Security
The built-in sensor scans the fingertip using special resolution and recognizes the finger pattern, even if it is at different angles. The fingerprint image is located in a special zone of the processor, which is protected. Moreover, what is interesting is that this is not an image of the fingerprint itself, but its mathematical image, from which, according to Apple, the fingerprint itself cannot be restored.
It is also stated that each individual touch scanner ID is tied to a separate processor, that is, if the fingerprint scanner is moved from one iPhone to another, it will lose its functionality.
Rumors appear on the Internet every now and then that fingerprints are not only stored on the device, but are also transferred to a separate server. Of course, Apple does not confirm such rumors, and no evidence was provided for this.
About the global benefits of Touch ID
Those users who follow the release of new mobile devices, probably know that many companies are not averse to borrowing ideas from the same Apple. Touch ID is no exception.
The idea of using a fingerprint scanner on a smartphone is not new, but it was with the advent of Touch ID that scanners became widespread. If before we only saw them on flagship smartphones, then today scanners are used even on budget devices!
Here is an example of a device, the cost of which at the time of writing is only 5-7 thousand rubles, and it is already equipped with a fingerprint scanner. True, this smartphone has a scanner located on the back of the case:

The smartphone is called DOOGEE X5 Max.
Assistive touch- This is a function of universal access and control of the device using gestures with one or more fingers, thereby quickly accessing applications or managing device functions without going into settings. Assistive touch can also be very useful for those users whose device buttons do not work correctly or do not work at all.
Despite the fact that the Assistive touch feature first appeared in iOS 5, many users often ask questions about what capabilities it provides and how it can be configured. This is exactly what this article is dedicated to.
How to enable Assistive touch on iPhone or iPad?
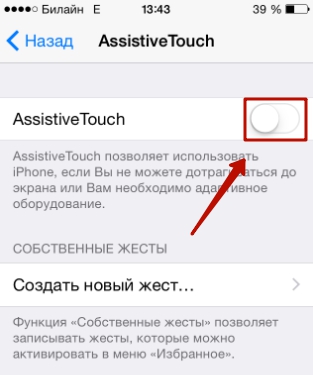
You can activate the Assistive touch function in the device settings. To do this, go to "Settings", then go to "General", there select " Universal access" and then scroll down a little - in the "Physiology and motor skills" section, select "Assistive touch" and turn it on.
After turning on, a translucent button will appear on the device screen, when clicked the user gains access to basic control functions and own elements, the configuration of which we will describe below.
How does Assistive touch work?
Transparent button that launches Assistive functions touch, you can move it around the screen and place it in the place where it will be convenient for you to use it. When you press the button, the first menu opens, consisting of the items “Siri”, “Device”, “Home” and “Favorites”. On devices that do not support Siri or devices where the voice assistant is disabled by software, instead of the "Siri" item there will be a "Gestures" item.

Pressing the "Siri" button, as you might guess, initiates an instant launch voice assistant Apple without having to go into settings
The “Home” item means pressing the central Home key; accordingly, when you press the on-screen button, the device will react exactly as if you had pressed the Home button. If you do double tap soft button"Home" operating system will launch the multitasking panel. Thus, if your device has a poor or non-functional Home button, this feature will be very useful for interacting with the device.
The "Device" item is a submenu that contains several buttons that replace some standard actions and controls:

- screen lock(useful if the top power button on your iPhone or iPad does not work). A single press of the button locks the screen, a long press causes standard window turn off the device.
- screen rotation allows you to rotate the image on the display horizontally or vertically in both standard and third party applications(this function will be useful if for some reason the accelerometer on the device, which is responsible for automatically recognizing the device in space, does not work).
- turn sound on or off, as well as the “Louder” and “Queter” buttons are responsible, respectively, for setting sound effects and sound volume control if the mechanical buttons of the device responsible for this do not work.
Paragraph "More" hides in itself additional functions and controls: quick screenshot (similar to mechanically pressing the power and home buttons simultaneously); calling the multitasking panel; shaking the device; using multi-finger gestures.
Native gestures in Assistive touch on iPhone and iPad
Assistive touch allows you to create your own screen gestures that will be launched on the system with one click of a virtual button. They are available in the “Favorites” menu; you can also add new gestures directly from there by pressing the “+” button.

Creating a gesture is an intuitive process. We make a certain gesture on the screen with our finger, which will indicate some kind of movement on the screen (for example, a gesture from bottom to top will indicate scrolling vertically). Then press the “Stop” button and assign a name to the new gesture. All: further by pressing a button through the "Favorites" item in Assitive touch operating room the system will play back the recorded gesture.
It should be understood that gestures in Assistive touch are memorized movements on the screen by iOS, which the user plans to repeat more or less regularly. That is, instead of playing a gesture every time, you can record it, and the system will play it every time you select this gesture in the Assistive touch Favorites menu - just select a point on the screen that will be the starting point of the recorded movement.
Unfortunately, on this moment You cannot assign Assistive touch gestures to launch any programs or perform a preset task. a certain sequence actions. Perhaps in the future this feature will be available iPhone users and iPad. Then use quick panel universal access will become relevant not only in the event of a malfunction of certain device buttons, and there is currently no way to repair them.
If you need our help, just call us and come to our service centers:
Tags:
On iPhones there is only one physical navigation button - the “ Home", which is located under the screen in the middle. This key allows you to minimize applications, call virtual assistant Siri and perform a lot of other necessary actions. Control your gadget without the " button" Home"becomes almost unrealistic - but what to do if it fails?
Fortunately, Apple developers have provided the ability to display the “ Home"on the iPhone screen. You will learn how to do this by reading this article.
Display the button " Home"The Assistive Touch function allows you to access the iPhone screen. This function is intended for people with disabilities, however, it is more often used by owners of gadgets with faulty physical keys.
The Assistive Touch function is especially popular among Chinese users - in the Middle Kingdom, almost half of iPhones are controlled “from the screen”. Practical Chinese claim that this method of control is not only more convenient, but also prevents wear and tear on the physical buttons.
How to set up Assistive Touch? All you need to do is follow a few steps:
Step 1. Go to " Settings" and follow the path " Basic» — « Universal access».
Step 2. In chapter " Universal access» find the block « Interaction" It will have a subsection “ Assistive Touch- go into it.

Step 3. Switch the slider " Assistive Touch» to active position.

A translucent square with a white circle inside will appear on the screen - the menu launch button.

This means that the function " Assistive Touch"is activated and you can control the gadget without using physical keys.
“Assistive Touch” can be enabled on any Apple device with iOS version above 5.0.
How to use Assistive Touch?
First of all, you need to place the function menu launch button in a convenient place. You can move it along the screen frames by holding it with your finger. Placing the key in the center of the screen will not work.
Once you have decided on the location of the button, click on it. You will see a menu like this:

At the bottom of the menu and there is a displayed virtual button « Home» . The functionality of the virtual button is 100% identical to the functionality of the physical one - in particular, by long pressing it you can launch Siri.
In the main menu " Assistive Touch» there are other options:
- Notification Center– allows you to call up the notification screen. The traditional way to bring up this screen is to swipe from top to bottom.
- Voice control- another way to “wake up” Siri.
- Command centre– makes it possible to display a menu for quick control some of the iPhone's features. Pressing this key actually replaces the bottom-up swipe.
- Favorites. Through " Favorites» You can activate gestures that the user has created independently. To start creating a new gesture, go to “ Favorites" and click on any of the squares with the sign " + " inside.

Also in the main menu " Assistive Touch"there is a button" Apparatus" By clicking on it, you will be taken to a submenu where you will find softkeys, allowing you to perform actions such as lock/rotate the screen and change the device volume.

Through " Assistive Touch"You can even take a photo iPhone screen– to do this, go to the function menu along the path “ Apparatus» — « More" and click on the button " Snapshot screen" Only static images should be photographed this way, because the screen element responds with a significant delay.
On devices with iOS 9, the main menu “Assistive Touch” can be customized. In particular, users can increase the number of icons in the main menu to 8 pieces.
How to remove the Home button from the iPhone screen?
Deactivating the function " Assistive Touch" is performed in the same way as activation. You just need to follow the path on your iPhone " Settings» — « Basic» — « Universal access» — « Assistive Touch" and switch the toggle switch of the same name to the inactive position.
The square with a white circle inside will disappear from the screen.
How do I set up quick access to Assistive Touch?
You can adjust your iPhone so that to start " Assistive Touch“I didn’t have to go through the settings every time. Here's how it's done:
Step 1. Go to the section " Universal access» in the main settings of the gadget and scroll the screen to the very end. At the bottom you will see a subsection “ Keyboard shortcut».

Proceed into it.
Step 2. In the subsection " Keyboard shortcut"Tick the box next to " AssistiveTouch».

After this, you will be able to call the menu launch button " Assistive Touch» triple click on physical key « Home” and hide it in the same way.
Conclusion
At least the virtual button " Assistive Touch"and can completely replace physical button « Home“, this does not mean that you can delay repairing the device. If the gadget is under warranty, the user should go to service center immediately - otherwise he risks saying goodbye to hope for free elimination lack.
What password can be called the most reliable and at the same time constantly accessible to the owner of the equipment? Fingerprint. IN new development Touch ID uses a fingerprint sensor as a means of identification. This method allows you to quickly or otherwise Apple devices and at the same time be confident in the security of the stored data.
Of course, the question immediately arises: Touch ID - what is it? The device itself, the technology or, in general, the phone model? Apple Touch ID is a technology that involves the use of a sensor that recognizes the user's unique fingerprint pattern. The unlocking process is simple: just place your finger on the Home button. The installed sensor reads the received data from absolutely any angle and in any way the iPad is positioned.

button iPad unlock mini 3 is made of sapphire crystal, which is enclosed in a stainless steel ring. Each part: the ring detects touch, and the glass part transmits fingerprint data to the sensor. The reading program carries out comparative analysis and signals compliance. It is noteworthy that the Touch ID sensor performs the entire operation within a fraction of a second.
Advantages of the technology:
- Speed of response and minimum number of required operations.
- Safety confidential information(due to the specific architecture of the A7 processor).
- Information Security user (the password and fingerprint used cannot be copied or transferred in any way, and is also not available to the OS and applications).
- Authorization in applications (Touch ID technology is already integrated to simplify the process of confirming actions or signing).
- Using your fingerprint, you can confirm your purchase and iTunes - use Touch technology ID will eliminate the need to enter payment data and passwords.
How to enable and configure Touch ID?
Unfortunately, it is not yet possible to put a single checkmark to implement the functions of the technology. Then a logical question arises: how to enable Touch ID?

Initial setup
First of all, you should deal with the initial setup. She :
- Before starting the process, thoroughly wipe the button and fingers.
- Enter a four-digit password that you have created, which the program will use without recognizing the fingerprint (the request is also possible after a reboot, two days after the last unlocking of the device, or to access functions).
- Holding the device as if you normally press “Home”, place your finger on the button (a light touch is enough) and hold it until there is a slight vibration or until the system signals that you can remove your finger.
- After the initial recognition is completed, the system asks you to change the position of the pad - this is necessary to complete the scanning. Now you need to attach the edges of the fingertip.
If the device is activated, then the initial setup can be done through the main menu: by going to “Settings”, select “Touch ID and password”, then “Fingerprints”. The system itself will offer to go through the described registration process and about fingerprints.
Activation methods
If you can't set up Touch ID, you can use the sensor for purchases and password entry. To unlock an iPhone using technology, simply wake it up from sleep mode by pressing the “Power” or “Home” buttons, and then place your finger on the “Home” button. To use a sensor as an identifier account, you need to go to the settings section, then select “Touch ID and password” and activate “ iTunes Store, App Store" When downloading content, the system will inform you that you need a fingerprint on your iPad or other device.

Authorization using a scanner is activated separately, in the settings. Below are the relevant actions for Touch activation ID on iPhone 5s, iPhone 6 Plus with iOS 8 and updated iPhone 6 free application 1Password:
- Open “Settings” (tab located on the bottom panel of the program).
- Select the “Security” section.
- Scroll to the tab with the name of the technology.
- Switch the toggle switch to the “On” position.
Now the entrance to the program is available after pressing the fingertip against the sensor for a second!
Non-working function: defective or improper operation?
Undoubtedly, but what should you do if Touch ID stops working or does not work initially? There may be several reasons for this:
- Household reasons (incomplete coverage of the button with a fingertip, contamination of the sensor, and even others). It should be noted that most of the complaints about Touch ID not working well fall precisely under this and the next category.
- Just a glitch in the recognition program. In this case, it is better to register a different fingerprint.
- There is, unfortunately, such an option as marriage. An indicator of such a situation is the lack of effect from rebooting the device and a scanning error. Moreover, it does not matter whether the defect was made at the production stage or by a rogue seller who assembled one iPhone out of two without taking into account the binding of the Touch ID sensor to “its” processor, the phone will still have to be taken to a service center.
With customization of the functionality, the functions in each application are more than covered by convenience, speed of operation and optimization of purchasing processes. Although the possibility of a marriage that could bring trouble cannot be ruled out.
Fingerprint sensor finger Touch ID on a fairly recent iPhone does not always work when touched and you have to constantly enter the password? If you are faced with similar problem, then in this material we will tell you how to fix it.
In contact with
Everyone knows that after purchasing a new iPhone, it is necessary to complete the activation procedure and initial setup of the device, which includes setting up the Touch ID fingerprint sensor built into the Home button. The user is asked to add a fingerprint with which the iPhone can be unlocked.
From our many years of observations of users setting up new iPhone, we can say with confidence that adding a fingerprint to Touch ID during the initial setup of the device is often done very quickly and not always with an understanding of the process. Most users hold their iPhone in a completely different way when setting up the biometric sensor. normal use. This is where the whole secret lies.
Moreover, after initial setup iPhone, few people return to Touch ID options (in iOS settings) to continue the process of improving sensor performance. As a result, users continue to use the only fingerprint that was recorded in Touch ID the first time setting up iPhone. But in the sensor parameters you can add as many as 5 prints. So…
Touch ID doesn't work well on iPhone: how to properly set up the fingerprint sensor on iPhone or iPad
1 . Open the Settings app on your iPhone or iPad and go to Touch ID & Passcode.
2 . Enter your passcode.

3 . Remove any added fingerprints. To do this, select each fingerprint and click Delete fingerprint.

4 . Click Add a fingerprint.

5 . Hold your iPhone or iPad the same way you would normally hold the device before unlocking it.

6 . Go through the process of adding all five fingerprints this way:
- add your fingerprint twice Right thumb;
- add your fingerprint twice Left thumb;
- add your fingerprint once Index finger of the right hand(if you are right-handed) or left hand (if you are left-handed).
The point of this operation is to add more fingerprints to the most used unlock option.  The scheme we have proposed can be changed if desired. For example, if you always unlock the device using one hand, then it would not be superfluous to add 3, 4 or even all 5 possible fingerprints to the Thumb.
Try it now. In the vast majority of cases this will solve the problem bad work Touch ID.
If, after completing the procedure for adding fingerprints, the sensor still does not respond well, try rebooting the device. If the reboot did not help, then there are two options left - either you are the owner of hands with an anomalous fingerprint structure (we have met such users) or the problem is still in the touch sensor ID.


