Change internal memory to sd. Dividing the device card into sections if there is a custom Recovery
Most owners of Android devices sooner or later face the problem of lack of internal space for storing files. Regular installation of applications gradually reduces the number free space in the gadget, which leads to slowdowns, incorrect operation, or even a complete failure of the system to work normally. In this case, replacing the internal Android memory with a memory card will help. How to do this and what other ways there are to deal with such a nuisance, we will consider further.
Before delving into the settings and transferring all applications to a flash drive at once, you need to understand what types of memory generally exist on your Android device:
- operational - necessary for correct operation applications, programs and other processes that run on your phone or tablet;
- ROM - stores information about the operating system during firmware and this data cannot be transferred to third-party media;
- internal - applications are installed here automatically, as well as any user information; the system reports how much free space is left when installing new software;
- expansion card - an external drive that is designed to expand internal memory devices and store applications and user information.
Why can't I save apps to my SD card?
In many gadgets, it is not possible to automatically allow the installation of new applications on a flash drive. This applies to phones and tablets from version 4.4.2 to 6.0.1. In this case, replacing the internal memory with an SD card is simply necessary, and this can be done in several ways (including using third party applications). But first you need to find out the version of Android that is installed on your gadget. To do this, click sequentially on:
- Menu;
- Settings;
- About the phone.

The OS version will be indicated in the list that opens.
Programs for transferring applications to a memory card
The developers took care of the users and created programs to make the flash drive memory the main one on Android. This is especially useful for older versions of the system, such as 2.2 or even earlier.

Convenient software that contains all the necessary tools for transferring information from internal memory to an external drive. The interface is intuitive and simple. Applications available for moving are marked with icons, which, when clicked, opens all available information about them, as well as possible actions(move, copy, delete).
Move2SD Enablerv
This software is interesting to users for two reasons. The first is that it is compatible with different versions Android (including later ones). And the second is the ability to transfer data and applications that are marked in the system as “unacceptable for transfer.”

Another interesting development that simplifies the life of Android gadget users. Main advantages - easy installation Software (without the need to additionally download scripts and libraries) and the ability to transfer information not as complete libraries, but only as parts of them.
What other methods are there?
There is another option to make an SD card into the internal memory on Android. If the version of your gadget is from 2.2 to 4.2.2, then the instructions are extremely simple, click on:
- Settings;
- Memory;
- Default recording disk;
- SD card.
A checkmark or circle will appear opposite the flash drive, indicating that the settings have changed. Now installation of applications will automatically go to the flash drive.
For users Android KitKat and above the process will be more difficult and dreary. the main problem is that you will need to root your device. You can do this at home, but there is a risk of turning your device into a “brick” that either cannot be repaired or will only be brought to life in service center at extra charge.
Remember that by installing root rights yourself, you void your device’s warranty and act at your own peril and risk. Whether it's worth it or not is up to you to decide. Maybe it's less risky to manually migrate new applications each time?
What do you think? Tell us in the comments if you had to get root rights, whether it was successful, or maybe you know other ways to switch the memory of a tablet/phone to a memory card.
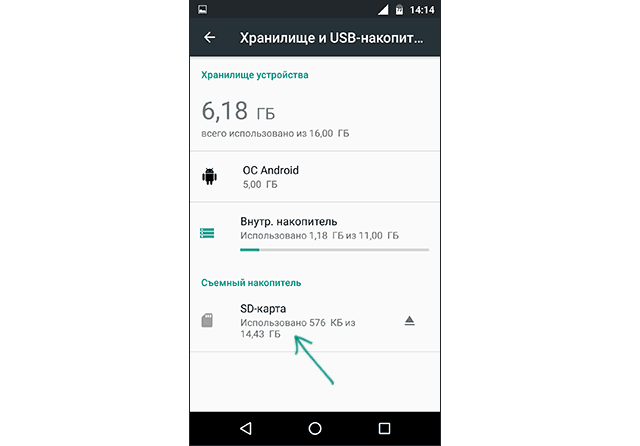
If your device does not have enough internal memory, can use SD card as internal storage for your Android phone. This function, called Adoptable Storage, allows Android OS to format external media data as permanent internal storage. The information on the installed SD card is encrypted and cannot be subsequently used on another device.
SD Card is very convenient option for storing photos, songs and videos. Even if you have a large amount of internal memory on your Android smartphone, you may always need big piece memory for storing long videos captured by the camera high resolution your phone.
It is important to know
There is one drawback, the SD chip can lag when recording high-definition video.
Android by default in the internal memory and only occasionally uploads data to the SD card. Thus, you are deprived of installing any additional applications if there is a noticeable lack of volume on your phone internal storage, for example, in the case of budget Android One devices.
What is storage storage?
Storage storage is the main memory of your smartphone, but if necessary, it can be expanded using an SD card. This on Android it is called Adoptable Storage. This will allow you to use removable card microSD installed on Android phone,as the main storage. This way, you can easily solve the problem of how to make an SD card the main memory on Android and overcome the lack of space if the phone has a small internal volume.
Features of using the card as the main storage
There are a number of some important features, which should be taken into account during this procedure.
Will be useful
When using a storage device, be it an SD flash drive or a USB drive, it is important to remember what format it is in. this device and does the operating system support it? Android system, and the main file formats There are four types: FAT32 or exFAT, ext4 or f2fs.
How to change phone memory to android memory card? The question is not entirely correct, it is impossible to completely replace it, you can only “increase” additional volume.
Using your SD card as your main storage can be a great solution for music lovers and those who like to watch TV shows on the way to work or on a long trip. But, as often happens, memory expansion always depends on the cost of the required device, after all, they differ both in speed and in volume, as well as in the adaptable information storage function. Here are some nuances that you can consider with different sides- how in negative side, and in the positive:
How to use SD card as internal memory on Android?
How to replace the phone's internal memory with an external SD card on Android? Configuring your SD card to act as internal storage on Android is essentially a fairly simple process. There is nothing complicated about this and you will see for yourself later.
It is possible that the Adoptable Storage feature is not supported by your device, even if the smartphone is running Android control 6.0 and higher (this also happens, it all depends on the model and brand of the smartphone). The device manufacturer may have disabled this function. However, there are methods to use command line, which allow you to force the use of a flash drive to store data.
Below are the basic formatting steps.
On the next screen you have one last chance to decide for yourself if you want to change your mind

It is important to know
Don't forget to back up your data; after formatting, the information will disappear without a trace!

Once the formatting process is complete, you can use the removable SD card as a “temporary” or “removable” permanent location. But keep in mind that they will now be unavailable hot swap and extraction as you may have done before. That's why Do not remove the flash drive without using the Eject parameter. In addition, you can practically delete the place accepted by the operating system, which, accordingly, is not recommended, since this can cause certain errors in the operation of the device. Now you know how to make a memory card the main memory on Android.
Owners Samsung smartphones latest models has a fairly large internal memory, but in budget options or earlier versions things are much worse. Therefore, users simply do not have enough space for their favorite applications, games and music. What to do in this case? – there is a way out, but we warn you right away that it is not safe.
Replacing the internal sdcard with an external external one
In the way to solve this problem we see the substitution internal map from the outside. This procedure possible on phones from Samsung and we need full root And file manager system files - .
Instructions for replacing memory
1. We get the full one, one of the methods;
2. Download a special hack from our server and unpack it to your computer;
3. We do everything backup devices, for example, using , or go to and make a full backup (we recommend two options);
4. Go to RootExplorer and copy the files (from the hack) to the system/etc folder and agree to replace them. It is advisable to first copy the contents of the folder to your computer;
5. Reboot the smart and enjoy the result.
Reverse procedure
There are three methods to perform a rollback; if one does not help you, then move on to the next one; you don’t need to do everything at once. Execution procedure is ok
1. I reversely replace the etc folder from my computer and reboot;
2. Download the return hack and upload it to the system/etc folder;
3. Let's do it full recovery from previously made backups.
The capabilities of the device can be seriously expanded if you replace the internal Android memory to a memory card. This will allow you to install many more applications on your tablet or other gadget, but the main requirement for this update is the presence of root rights on the device. Let's look at ways to use an SD card as system memory device, as well as related conditions.
Risks and conditions for replacing the gadget’s internal memory with an SD card
Before repeating the steps below, the user should consider several important points:
- The lifespan of the SD card will be greatly reduced due to frequent read/write cycles when running applications.
- The speed of the gadget may drop noticeably if you use microSD card low class.
- If you make an error while editing system file The phone may not boot next time - you will have to reflash it.
In general, the procedure (especially for inexperienced users) is quite risky, so it makes sense to carry it out exclusively for old gadgets with a small amount of their own memory.
Using the Root Browser utility and editing the vold.fstab file
To swap memory, from Google Play You will need to install Root Browser.
Let us repeat that you can only fully work with it on rooted devices. After running the above application:

In Android, sdcard stands for internal memory, and extsd stands for external memory, i.e. SD card. By replacing these lines, we actually swapped these types of memory. On some systems these pieces of code may look different, for example like this:
They need to be replaced as follows:
After completing the described procedure, reboot the gadget. Before doing this, be sure to check that there are no errors in the modified code, so that in the future there will be no need to reflash it.
The second way to increase memory using Link2SD

The application is available in Play Market and only works on devices with root rights. This file manager does not physically replace the device’s internal memory with an external drive, but it is capable of transferring any utilities to an SD card, significantly saving the gadget’s resources.
The peculiarity of the application in question is that the MicroSD itself will have to be split and properly formatted. Therefore, copy everything valuable from your card to your computer and start dividing the drive into sections.
Dividing the device card into sections if there is a custom Recovery
Every Android device has a recovery mode, but the method described below is only suitable for devices with . If you've never heard of CWM, move on to the second drive partitioning option. Next, we’ll tell you how to solve the problem if your device recovery mode has the Partition SD Card item:

Partitioning a MicroSD card via a computer
Connect the card to your laptop or PC. To do this, you can use a card reader or other equipment, the main thing is that it should be defined as a drive and not an MTP media device. Further:

How to swap memory on Android and why is it even needed? Should we engage in such manipulations at all and are they capable of causing irreparable harm to our device? Such questions are often of interest to people who are in control of a device with a small amount of built-in memory. If your smartphone has a corresponding capacity of, for example, four gigabytes, then you know that using such a device is nothing short of a pain. Because loading a sufficient number of multimedia files onto it is very, very problematic. So how can you swap memory from internal to external on Android?
Introduction to the problem
By the way, you should not think that only the Android operating system suffers from such a problem as a small amount of built-in memory. It is also available on iOS. These two systems constantly compete with each other. From time to time, “Windows Fawn” also intervenes in the combat, but it soon finds itself thrown out behind the tatami. What is affected? iOS theme? There are facts that invariably prove the “exposure” of this operating system in front of users. Initially, its code was a mystery. Nevertheless, a similar trend does occur. But the Android operating system, developed by Google specialists, is currently becoming more and more closed to potential developers with each update. This is exactly what bothers people who are so accustomed to this operating system.
Why do you need to know the answer to the question of how to swap memory on Android?

Currently, the OS we are talking about no longer allows users to install applications with the appropriate software - the so-called cache - on an external memory drive. In our case, let it be a MicroSD memory card. Probably, owners of devices with a capacity of 32 gigabytes and above will grin, but what should people do who have at their disposal from 4 to 8 GB, part of which (note this!) is spent on maintaining the operating system? The only way out of this situation is to perform certain manipulations. And here it is more important than ever to know the answer to the question of how to swap memory on Android. Actually, this is not difficult to do. However, extreme attention and, by the way, straight hands are required. If you have these parameters, then we will move on to consider the meaning of the operation in order to understand what will be performed and why.
How to swap memory on Android 5? What to do with other versions?

There is a way out of the current situation, when we have only a couple of gigabytes at our disposal to host a multimedia contingent. It consists, firstly, in the acquisition of external And secondly, in software replacement specific code, which can convince our device that the internal one is external. Well, and, of course, vice versa. Thus, the smartphone will treat the MicroSD card as an internal board. I would like to note that the question of how to swap memory cards on Android sounds fundamentally incorrect, since there are several external drives cannot take part.
What is needed for replacement?
Regardless of what version of the operating system you have installed and what manufacturer’s device you have, we will need the same set of utilities. These are programs called and Total Commander(which he knows great amount users). Additionally, you will need to obtain one for the device.
Replacement process
In order to begin the operation, open the program Root Explorer. We move to the address /system/etc. There you need to find a file called vold.fstab. In it you should find lines and parameters that are responsible for the mount points of external and internal memory. They are called, respectively, like this: SDcard and extsd. After this, you will need to swap the parameters. This will complete the active phase of the operation. Don't forget to do backups files, and remember that such operations are performed by the user at his own peril and risk.


