Failed to install application 971. How to resolve Google Play errors when installing and updating applications. What to do if an error in the Play Market application is represented by a certain code
A message appears on the screen of your Android device: “ Failed to install application, error 971"? And the good old reboot of the phone does not help - which means it’s time to take a couple of minutes of precious time to read what is written below.
So, for those who are interested in “what and how,” error 971, in most cases (we emphasize the word “in most”), appears due to three reasons:
- Problems with cache or data of specific applications;
- Problem with Play Market updates;
- There is a problem with authenticating your Google account.
Ok, we figured out the reasons; Now we will tell you how to fix error 971 in the play market. Follow the written methods one by one and do not forget to check after each action to see if the culprit of these actions has disappeared. Go!
Open your device's settings and find a submenu called "Applications". Go to this submenu (which should provide you with a list of all installed applications. Depending on the version of Android, before getting to the mentioned list, you will need to click on “Application Details”). Scroll down the list and select “Google play store” there. In the window that opens, first click on the “Stop” -> Ok button. Now go to the “Storage” subsection and click “Erase data”, and then “Clear cache”.


The next step is this: go back to the list of applications (make sure you are in the “All applications” tab) and open “Google Play Services”. Now: “Storage” -> “Clear cache”; “Manage space” -> “Delete all data”.

We return to the list of applications again and click on the three dots in the upper right corner, where we select “System processes”. We find the name “Google Services Framework” and go into it. In the already familiar “Storage” section, we clear the data and cache one by one. So, here we should say that the last two cleaning procedures will also assign a new ID to your market account. Don't forget to check if error code 971 has disappeared from the play market?

If the error remains illuminated, then the problem is not with corrupted data or cache. In this case, we try to roll back the updates in the Google Play Store. Select it from the list of applications (in the device settings) and click on the three dots next to the inscription “About the application”. A small window should appear with the “Delete updates” option, which we click on (we confirm the action by clicking “OK” again).

The final method to resolve error 971 is to relink your Google account (Don't worry, your personal data on your phone will not be affected). To do this, go to the Accounts subsection (in the “Personal Data” menu in the smartphone settings) -> “Google”. The already familiar three vertical dots will provide access to the “Delete Account” item. Click and then click again on the action of the same name to confirm. Now we reboot the device (press and hold the “Power” button until the desired menu appears).


After the reboot, return to the “Accounts” section and click on “Add account” -> “Google”, where we enter the desired address (the one we deleted recently). We wait for the necessary time for subsequent synchronization.

Error 963 – occurs for Android users when trying to download or update any application from the Google Play Play Market. If you are one of them, then we are glad to tell you that your search will end on this page because below are the solutions that actually work.
There are three main methods that will help you fix error code 963 in the play store. You just need to follow the instructions below point by point.
Solution to error 963 in Play Market
1. Clear application cache
Play Market is also an application installed on your device and the data in its cache can cause this error, so let's start with such a simple action as clearing the cache and application data, to do this, follow these steps:
Let's go to Settings->Applications
And go to the tab All. To do this, scroll the screen with your finger to the left:


We see a list of all applications and services running in the system. We are looking among them Google Services Framework and click on it:

The application settings screen opens, where you need to press two buttons Clear cache And Erase data
![]()
Try to download the application again, if the error persists, then proceed to the next step.
2. Unmount the SD card
Unmounting the SD memory card on your phone can help you get rid of error 963 in the play market. The theory is this: we unmount the memory card, try to install (update) the application, and then connect the card back.
Let's go to Settings–Memory and press Remove SD card
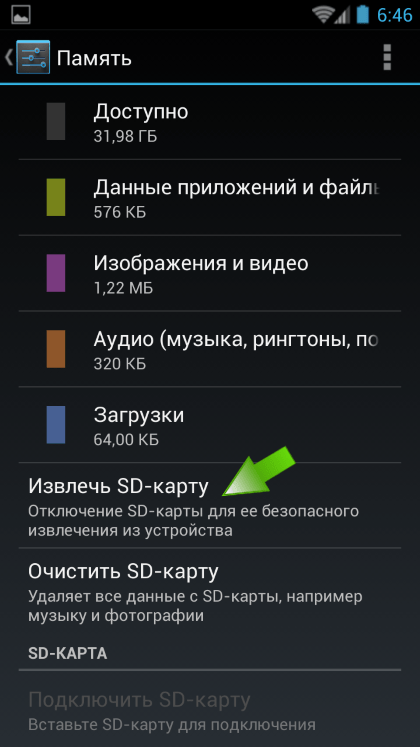
Now try downloading or updating the application that was causing the error. After everything loads successfully without any errors, you need to remount the card back by going to Settings-Memory-Connect SD card.
If, when installing an application, it gives an error related to the SD card, then you must first try to move it to the internal memory. To do this, go to the menu Settings - Applications - All - Select application > Move to internal memory.
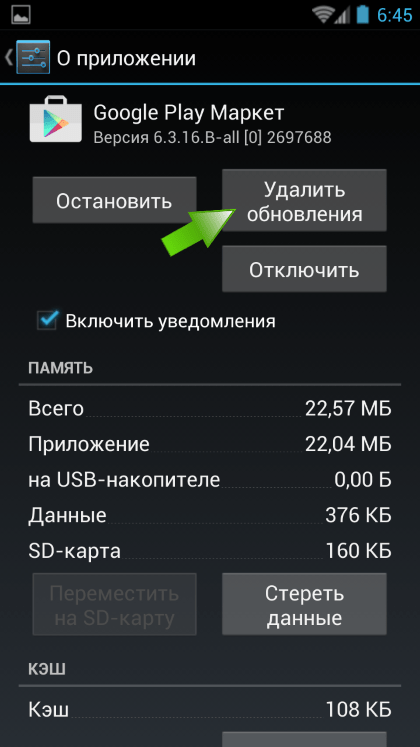
3. Uninstall Google Play updates
There is a possibility that Google Play updates are causing this error, for example due to compatibility issues, etc. So in this case, you will need to uninstall these updates.
Let's go to Settings>Applications>Google Play Store press the button Uninstall updates. This method should most likely solve your problem.
In rare cases, when none of the above methods work, you can try completely uninstalling the Google Play Store app and then installing it again from a trusted source. You can try deleting your Google account, rebooting your phone, and linking your account again.
Play Market error code 963
Android deservedly takes first place among mobile operating systems thanks to the impressive list of devices on which it is used. However, there is also the other side of the coin: the attempt to adapt the OS to many different devices becomes the root cause of many bugs and errors. Luckily, most of them can be fixed with the click of a couple of buttons.
Meanings of errors and reasons for their occurrence
Despite the abundance of various errors, the methods for treating them very often turn out to be the same and the same method can correct several different problems at once. In order not to confuse you, this chapter provides only descriptions of errors and methods for eliminating them, and detailed instructions for each method can be found in the second part of the article.
Table: meanings of errors and methods for treating them
| Error code | Causes | Remedies |
| 902 | Application update: the system thinks that a new version of the application is already installed and blocks the process | Resetting service application settings |
| 903 | The antivirus does not work correctly when updating applications: the program prohibits the deletion of some files of the updated application, which does not allow replacing them with new ones | Disable your antivirus |
| 904 | Usually the error appears on Chinese smartphones and is fixed by the manufacturer in the first day update | System update |
| 905 | Play Market self-updating: inability to close key processes that prevent files from being replaced | Rolling back Play Market updates |
| 906 and 963 | An error occurs on some HTC models: the smartphone confuses the SD card with the main memory of your smartphone, and installing the application directly to external storage is impossible | Disabling the SD card |
| 907 | Application update: Play Market is trying to install an update on the SD card |
|
| 909 | Purchasing an application when using multiple accounts: confusion among services regarding your account payment information | |
| 911 | Page authentication expiration: appears when connecting to a Wi-Fi network that uses non-standard APN settings |
|
| 913 | System folder permissions mismatch: the error occurs on Chinese smartphones and appears after updating Android to version 4.4, which changes the position of system files | Changing system folder permissions |
| 919 | Low memory or problem with APN settings: the problem only occurs if you are using a very old SIM card or due to the peculiarities of your local operator |
|
| 920 | Play Market doesn't trust your Wi-Fi for certain reasons; There may be no internet connection |
|
| 921 | Ban on installing new applications: services are not working correctly or there is an error when connecting to your Google account on your device |
|
| 922 | After updating Android to version 4.4, unimportant files are given inappropriate priority, as a result of which they become undeletable, and the corresponding application cannot be updated or reinstalled | Manual removal |
| 923 | The error is caused by your device's cache being full or services not working properly |
|
| 924 | Error loading additional files after installing the main part of the application: most often the problem is incorrect information about the total weight of the application indicated on the Play Market website |
|
| 927 | Play Market is updating and can't download anything else, or the download queue has exceeded |
|
| 933 | Incorrect change in security settings: this error can be caused by viruses or the use of low-quality security programs |
|
| 944 | The Play Market servers are being rebooted/repaired/replaced: the error code is usually accompanied by a corresponding message and cannot be caused by anything else | Wait for the specified time |
| 926, 932, 936, 940, 941, 942, 951, 960 and 972 | This is a series of errors, the causes of which are unknown, but they are all corrected in the same way |
|
Troubleshooting
The first two methods described below are universal: they cope with most problems associated with the Play Market. In case of any unknown error, use them first.
Resetting service application settings
This method of solving the problem will help to cope with conflicting settings in Google services, which usually occurs on Chinese smartphones.
China is not served by Google services. The processors created there have a somewhat unique architecture, which is the reason for the poorly compatible method of data logging.
- Click here on "Play Market".
- Click “Stop”, “Clear cache” and “Erase data” one by one.
- Repeat these steps with the “Download Manager”, then restart your device and try to download something from the Play Market.
- If it doesn't help, repeat the same steps with Google Accounts.
- Same with “Google Play Services”.
- And the same steps with the “Google Service Framework”, then reboot the device again.
Video: Clearing the App Cache
Rolling back Play Market updates
On devices with an MTK processor, in a series of Play Market updates there are “dead-end” versions that do not allow you to download anything and, accordingly, cannot be updated. In this case, you need to roll back Play Market updates.
- Go to Android settings and click on the Apps tab under Device.
- By clicking on the "All" section, go to the list of all applications.
- Find Play Market here and click on it.
- Click remove updates.
- Similarly, remove updates from Google Service Framework - in rare cases this helps. Reboot your device. Play Market will update itself to the required version.
If the Play Market worked as it should, but this effect lasted no more than five minutes, repeat steps one through five, and after rebooting the device, do the following very quickly:

If this option does not help, then you need to download the latest version yourself. This can also be done in cases where the earlier version to which you rolled back does not suit you. If you have not previously installed anything downloaded from the Internet, you may need permission to install from external sources.
- Go to Android settings and go to the “About phone” tab in the “System” section.
- Remember your Android version.
- In the search engine of the built-in browser on your device, enter “4pda google play technical problems”. Go to the first site and open the spoiler with previous versions. Download the version of the Play Market that is suitable for your operating system (same or earlier) marked “No Update” or “Team Black Out”. Registration is required on the site.
- Run the downloaded installer. It will be located in the "Download" folder in the phone's internal memory (by default).
- Install the update. If you encounter an error parsing the package, download a different version.
Video: Uninstalling Play Market updates
Using a VPN
A VPN connection is a virtual private network connection that allows you to create a new Internet connection over an existing one. In simpler words, this is the inclusion of an additional link in the connection system between your device and the Internet, so that the resource you are accessing will think that it is not you who are connecting to it, but your VPN.
- Go to the Play Market and enter “VPN” in the search bar. Select the first app you like.
- Install the application. They are all identical. We will look at their use using the Turbo VPN application as an example. If due to an error you cannot even install this application, you will have to download it from external sources.
- Open the application and click on the largest button. In this case, this button is in the form of a carrot.
- Confirm the creation of the connection.
- To disable VPN, click on the cross.
Video: what is a VPN and how to use it
Deleting an account and reconnecting
This method is quite popular and eliminates many problems associated with the interaction between your Google account and the Play Market application.
- Go to Android Settings and open the Accounts tab under Personal Information.
- Select Google accounts.
- Select the account you want to sign out of.
- Click on the three dots in the upper right corner.
- Click "Delete Account".
- Return to the Accounts tab and click Add Account.
- Select "Google" and sign in to your account.
Video: account deletion
Disabling the SD card
Some HTC smartphones may confuse the SD card with the phone's main memory. If you are facing this issue, you will have to unplug your memory card every time before installing or updating any application.
- Open Android settings and go to the "Storage" tab in the "Device" section.
- Select your memory card.
- Scroll down and tap Unmount SD Card.
Moving an application to main memory
If you have moved some of your applications to the memory card, you may have problems updating them and will have to move them back.
- Open Android Settings and the Applications tab.
- Go to the All section and select the app that is having trouble updating.
- Move the application back to the device memory.
Setting up APN for SIM card
Not all modern SIM cards have pre-set settings for connecting to the mobile Internet. If you encounter a very old card, its presets may be missing or incorrect. In such cases, you will have to prescribe them yourself.
- Open Android Settings and tap More... under Wireless & Networks.
- Open Mobile Networks.
- Click Access Points (APN).
- Select your operator's connection or add a new one if it doesn't exist.
- Write down the necessary APN settings (they can be found on your operator’s website).
Freeing up memory
Over time, the Android operating system accumulates a large number of unnecessary files that are not used by the user, but take up a decent amount of memory. To free up the space you need, you don't always have to sacrifice something necessary: sometimes it's enough to simply clear the cache.
- Go to Android settings and open the "Memory" tab in the "Device" section.
- After a short analysis, you will be able to see what is occupied by the memory of your device. By going to any partition, you can start cleaning it.
- The first step is to clear the “Cache Data”. They tend to be system junk.
- If there is still not enough memory, delete everything unknown to you from the “Other” section and unnecessary from the “Downloads”. If this does not help, you will have to sacrifice some of the applications and music with videos.
Video: clearing phone memory
Clear device cache
A device's shared memory and its cache are not the same thing. Standard memory clearing may not solve the problem. The Recovery menu will help you deal with a full device cache.

Video: how to clear the device cache using the Recovery Menu
Obtaining Root rights
For the next two methods you will need Root rights. Root rights or superuser rights provide the user with special powers: deleting system files, activating hidden Android functions, etc.
Before you decide to get Root rights, consider:
- obtaining Root rights will void the warranty of your device;
- each device has its own characteristics, and the risk of harming the system by obtaining Root rights only increases;
- Having Root rights, you will not be able to receive updates from the manufacturer “over the air” (warranty update of the operating system).
If you have not previously installed applications from external sources, you will need to make changes to your security settings.
- Download the latest version of Framaroot. Enter “xda developers framaroot download” in the search engine and go to the first site. This application has analogues in the Play Market, but they are not as reliable.
- Install Framaroot. If the installer blocks the process, click on "Additional information" and "Install anyway (not safe)."
- Launch Framaroot and select "Install SuperSU". Click on one of the root methods. Once received, reboot your device.
- There is a possibility that your device is not supported by this application. You can try alternatives, but this will increase the risk of dropping your system. It is best to find out the individual method for your device. Most likely, this method will be more complicated, but certainly proven.
- Type the name of your device + root into Google and open the first link.
- Follow the instructions.
Changing system folder permissions
This method is quite complicated, but there is no alternative to it, since even resetting the system will not help fix the problem.
For this method you will need Root rights and Root Explorer. How to get Root rights is written just above, and the Root Explorer can be downloaded from the Play Market or the Internet.
- Launch Total Commander and go to the start menu if you have something else open. You can do this by clicking on the button in the shape of a house in the upper right corner of the screen.
- Go to the root of the file system ("File System Root" may also be called "Root Directory" or "Parent Folder").
- Go to the "data" folder.
- Find another “data” folder here and go into it.
- Find the folder “com.android.vending” and hold it with your finger (long tap).
- Select “Delete” from the drop-down menu and confirm your choice if prompted.
- Return to the first “data” folder, find the “dalvic-cache” folder there and go into it.
- There should be a large list of files with long names. If you see multiple folders instead, go to the folder with the name of your processor.
- Now you need to find a folder with the word “vending” in the name. The easiest way to do this is to use the search. To do this, click on the magnifying glass icon at the top of the screen.
- In the window that appears, enter “vending” and click “Search.”
- Delete the found file in the same way as the folder you deleted earlier.
- Using your browser, download the file com. It can be found via Google by searching for “com.android.vending-4.8.19.apk”.
- Return to the start menu and go to "Downloads". If the “Downloads” folder is not available, go to the internal memory (may be called “Internal memory”, “SD card”, “Storage”, “SD card_0”, “sdcard0”) and open the “Download” folder there. This is the default folder for all files downloaded from external sources. If you have a different folder assigned to save downloaded files, go to it through the internal memory.
- Make a long tap on the downloaded file.
- Click Cut to Clipboard.
- Return to the start menu, go to the root of the file system and open the “system” folder.
- Make a long tap on the “app” folder.
- Go to Properties.
- Click "RWX".
- Check the boxes highlighted in the screenshot if they are not there and click “Apply”. Confirm refurbishment. Go to the "app" folder.
- Long tap on any file or folder, scroll down and click “Insert here”. In all pop-up windows, confirm your choice.
- Find the moved file (you can use the search) and give it rights similar to the “app” folder. In this case, you must assign rights strictly in accordance with the screenshot - there should be no extra checkboxes. Reboot your device.
Manual removal
This method is also quite complex and confusing. For this method you will need Root rights and Root Explorer.
If you are an insecure user and you have the opportunity to reset the system, then you should use it. You can also find an alternative to the problematic application that is causing the error.
- Log in to Total Commander and click on the button in the form of a house if you are not in the start menu.
- Go to the root of the file system.
- Open the "data" folder.
- Find another “data” folder here and open it.
- Next, you need to find the folder responsible for the application with which you are having a problem. Its name should contain words from the name of the application (you can use the search). You can try to find the name of this folder on the Internet. Having found the required folder, make a long tap on it (press with your finger).
- Click "Delete". Return to the start menu by clicking on the house icon.
- Go to “Internal memory” (“SD card”/”sdcard0”).
- Open the Android folder.
- Go to your local "data" folder.
- Find and delete the folder that is causing the problem. After uninstallation, reboot your device.
System update
Not the most popular option, but sometimes the only way to solve the problem.
Not all smartphones notify users when operating system updates are available. But periodically checking the OS for the latest updates will be useful.
- Go to Android Settings and open the About Phone tab under System.
- Click "Software Update".
- Check for updates and install them if found.
System reset
The latest, but most effective way. It should be remembered that resetting the system will delete everything stored in the internal memory of your device, so the necessary files must be copied to other media in advance.
- Go to Android Settings and open the Backup & Reset tab under Personal Data.
- Select Reset Settings.
- Click Reset Phone.
- Click "Erase everything."
Permission to install applications from external sources
This method is rarely used as an error resolution option.
- Open Android settings and go to the "Security" tab in the "Personal data" section.
- Activate "Unknown Sources".
- Confirm the change in security settings.
Unfortunately, it is not possible to fix all the bugs and errors from the Play Market even with Google support, but many of them, albeit temporarily, can be fixed on your own. And if the error appears again, use proven methods based on the experience of other users who managed to cope with this problem.
Apparently, the vast majority of users of mobile devices running Android operating systems have encountered situations where, during automatic and manual updates or when trying to install an application, a Play Market error message 941 appears on the device screen. It reads that it is not possible to download the application. The exact cause of the failure is never stated. Read about how to correct this situation in the material below. The whole procedure boils down to freeing up the device’s memory, but this can be done in different ways.
Why does Market error 941 appear when I try to update?
Digressing somewhat from the topic, first I would like to say that many users and specialists in Android systems and Google services note that this glitch began to appear after the Play Market was renamed to Google Play. How true this is is unknown, but today there is no connection with 941 itself.
It is believed that in most cases it appears in situations where the internal memory of a mobile device or removable storage device is full, if the installation and saving of applications is set for it by default. However, there are also frequent cases when the cause is a short-term failure or disruption of communication just at the moment of loading content.
in the Play Market: what to do first?
So what is the easiest method to use? As usual, it is recommended to simply restart your device first.

It is quite possible that after restarting it, everything will return to normal, and error 941 in the Android system when trying to access the described service will disappear by itself. Such cases are known in quite a large number. If this doesn't help, move on.
Checking available memory
First, check the available physical memory from the appropriate settings section. If there is any file manager, you can use that too.

If the drive on which applets are installed by default is critically full, remove unnecessary applications. If this is an internal device, but the mobile gadget supports moving applications to the SD card, move heavy programs there.
Note: As an additional measure, delete unnecessary pictures or videos (they take up a lot of space on your drives).
Cleaning downloads
But sometimes there are situations when there seems to be enough memory, but error 941 in the Play Market appears with enviable consistency. What could cause such a phenomenon?

In most cases, this is associated with undeleted downloads. In this case, in settings, go to the applications section, select “All” and find “Download Manager” in the list. After this, enter the menu for editing parameters by tapping on the line with the name of the applet, and then perform the following steps one by one using the appropriate buttons:
- stop;
- erase data;
- clear cache.
Clearing Google applets cache
If Play Market error 941 appears even after performing these steps, you need to go back to the applications section and find Google Play and Play Market services there.

As is already clear, for them it is necessary to perform similar actions, only in this case, to be sure, it is advisable to restart the device or restart the applications yourself.
We use optimizers
Finally, error 941 in the Play Market using similar actions can be eliminated using special applets that can automatically optimize the system and perform a deeper cleaning of accumulated garbage.
Today you can find quite a lot of such applications, and you can download them not only from the official repository, but also from third-party resources that are designed to support Android systems of any rank. Among them, the most popular are:
- CCleaner;
- All-in-One Toolbox;
- Super Cleaner;
- Speed Cleaner and the like.
All such programs have not only phone or tablet acceleration functions, but also quick or deep cleaning modules. It is enough to perform such operations, and as a result, both the system cache and the application cache will be deleted. If desired, again, you can remove unnecessary applets.
What else could it be?
In principle, although not often, you can come across situations where the default location for installing applications is a removable card, it is detected in the system, there seems to be enough space, but applets still do not want to be installed on it. Apparently, this is due to irregularities in its operation or the presence of errors.
Alternatively, try removing it and connecting it to a card reader on your desktop computer or laptop. After this, perform a standard scan using Windows systems or using specialized applets, installing automatic correction of bad sectors. In principle, this is exactly the same operation that can be used to scan disks and partitions in Windows. After that, insert the card back and perform the necessary steps to download or update applications on your mobile device.
Brief summary
If we draw brief conclusions about eliminating error 941 in the Play Market, in most cases it is enough to clear the downloads and cache of applications associated with the described service. Which method will be used (standard tools or applications for optimization or cleaning) does not play a fundamental role. Checking the card may be required only if applets are installed on it by default.
Determining the P0971 Error Code
Trouble code P0971 indicates an electrical problem with the pressure control solenoid valve C.
What does error code P0971 mean?
Trouble code P0971 is a standard trouble code that indicates there is a problem with the pressure control solenoid valve C. The pressure control solenoid valve is an integral part of the automatic transmission. The transmission control module (PCM) determines the required hydraulic pressure (used to shift gears and lock up the torque converter) based on engine load, engine speed, vehicle speed, and throttle position. The pressure control solenoid valves are responsible for regulating hydraulic pressure, which is controlled by the PCM. If the PCM receives a voltage signal from pressure control solenoid valve C that is too high, a P0971 code will appear.
What causes P0971?
The most common causes of P0971 are:
- Pressure control solenoid valve C malfunction
- Low transmission fluid level
- Transmission fluid contamination
- High pressure pump malfunction
- Damage to electrical components such as wires, connectors and fuses
- Blocked transmission fluid passages
- Mechanical faults inside the transmission
- In rare cases, a PCM or TCM malfunction
What are the symptoms of a P0971 code?
When trouble code P0971 occurs, the Check Engine light will come on first, followed by the warning light. Reduced fuel efficiency may also occur. Transmission problems such as rough shifting, slipping transmission, overheating transmission, constantly stalling engine and inability to shift gears may occur.
How does a mechanic diagnose a P0971 trouble code?
Trouble code P0971 is diagnosed using an OBD-II scanner. The mechanic uses a scanner to view data and gather information about the code, as well as check for other error codes that may be present. If there are multiple errors, they must be corrected in the appropriate order. The mechanic will then clear the error codes and retest the system to see if the code appears again. If the code does not appear, then most likely it appeared by mistake.
If the error code appears again, a mechanic will check the transmission fluid. If the fluid level is too low, he will top it up and perform a thorough check for leaks. If the fluid is contaminated, the mechanic will flush the system and replace the fluid. However, if the transmission fluid is severely contaminated, it may indicate a serious transmission problem, which will likely require a major transmission overhaul or replacement.
The mechanic will then visually inspect the electrical components and replace any shorted wires, damaged connectors, or blown fuses. Next, he will connect a hand-held pressure gauge to the hydraulic pump to compare the hydraulic pressure value with the value specified in the manufacturer's technical manual. If the pressure is too low, the problem may be a clogged transmission fluid passage or a faulty solenoid valve, pump, or pressure regulator.
If the error code persists, your mechanic will perform a thorough check of the transmission, PCM, and TCM.
After replacing any component, the mechanic must clear the error codes and retest the system to see if the code appears again. This will allow you to accurately determine whether the problem is resolved.
Common errors when diagnosing code P0971
The most common mistake when diagnosing a P0971 code is failure to follow the diagnostic protocol. The mechanic must always follow protocol to perform all inspections and repairs properly.
It is also a mistake to decide to completely replace the transmission or high-pressure pump, although the problem is an electrical fault.
How serious is P0971?
Normally, the P0971 code will not affect the vehicle's drivability, but in some cases the vehicle may stall so frequently that it becomes almost impossible to drive. There may also be problems with the transmission that will affect the performance of the vehicle. Even if the vehicle operates normally when the P0971 code appears, driving it can cause serious damage to the transmission, so it is recommended that you have the fault diagnosed and repaired by a qualified technician as soon as possible.
What repairs can fix the P0971 code?
- Replacing the pressure control electromagnetic sensor C
- Replacing the high pressure pump
- Filling or replacing transmission fluid
- Cleaning transmission fluid passages
- Replacing fuses, wires and connectors
- In rare cases, major overhaul or replacement of the transmission
- In very rare cases, replacing the PCM or TCM


