Why doesn't the flash drive display files? Malfunction of the power supply or excessive current overload of the USB portal. Problems accessing the flash drive
In this manual I will describe all the ways I know to solve this problem. The simplest ones will go first and, at the same time, the most effective ways in most situations, when the computer does not see the flash drive, it reports that the disk is not formatted or produces other errors. There are also separate instructions on how to.
There are many reasons why you may encounter the fact that your computer does not see the flash drive. The problem can appear in any version of the Microsoft operating system - Windows 10, 8, Windows 7 or XP. If the computer does not recognize the connected flash drive, this can manifest itself in several variations.
- The computer says “insert disk” even when the flash drive has just been connected
- The icon of the connected flash drive and the connection sound simply appear, but the drive is not visible in Explorer.
- It says that it needs to be formatted because the disk is not formatted
- A message appears indicating that a data error has occurred
- When you insert a flash drive, the computer freezes
- The computer sees the flash drive in the system, but...
- If your computer says that the device is not recognized, you should start with these instructions:
- Separate instructions: .
If the methods described at the beginning do not help to “cure” the problem, move on to the next ones - until the problem with the flash drive is resolved (unless it is serious physical damage- then there is a possibility that nothing will help).
Perhaps, if the description below does not help, you will find another article useful (provided that your flash drive is not visible on any computer): (Kingston, Sandisk, Silicon Power and others).
Windows USB Troubleshooter
I recommend starting with this, the safest and simple way: Recently, Microsoft’s official website appeared with its own utility for fixing problems with USB connection drives, compatible with Windows 10, 8 and Windows 7.

After running the utility, all you need to do is click Next and see if the problems have been fixed. In the process of correcting errors, they check the following elements(descriptions taken from the troubleshooter itself):
- A USB device may not be recognized when connected via a USB port due to the use of upper and lower filters in the registry.
- A USB device may not be recognized when connected via a USB port due to the use of corrupted high and low filters in the registry.
- The USB printer does not print. This is probably caused by a failure when trying to print or other problems. In this case, you may not be able to turn off the USB printer.
- The USB storage device cannot be removed using the Safely Remove Hardware function. You may receive the following error message: "Windows cannot stop the Generic Volume device because it is being used by programs. Quit any programs that may be using this device, and then try again."
- Windows Update is configured to never update drivers. Windows Update does not update driver updates when it detects them automatic installation. Because of this, the USB device drivers may be out of date.

If something has been fixed, you will see a message about it. It is also a good idea to try reconnecting your USB drive after using the USB troubleshooter. You can download the utility from the official Microsoft website.
Check if the computer sees the connected flash drive in Disk Management
Start Disk Management using one of the following methods:
- Start - Run (Win + R), enter the command diskmgmt.msc, press Enter
- Control Panel - Administrative Tools - Computer Management - Disk Management

In the disk management window, pay attention to whether the flash drive appears and disappears when you connect and disconnect it from the computer.
The ideal option is if the computer sees the connected flash drive and all partitions on it (usually one) are in the “Good” state. In this case, just right-click on it and select context menu“Make the partition active”, and perhaps assign a letter to the flash drive - this will be enough for the computer to “see” USB disk. If the partition is faulty or deleted, then you will see “Not distributed” in the status. Try right-clicking on it and, if such an item appears in the menu, select “Create a simple volume” to create a partition and format the flash drive (the data will be deleted).
Further simple steps
Try going to Device Manager and see if your device is listed as unknown, or in the “Other devices” section (as in the screenshot) - the drive may be called there by its real name or as a USB mass storage device.

Right-click on the device, select Delete, and after deleting it, in the Device Manager menu, select Action - Update hardware configuration.

Perhaps this action will be enough for your flash drive to appear in Windows Explorer and was available.
Among other things, the following options are possible. If you connect the flash drive to the computer via an extension cable or USB hub, try connecting directly. Try connecting to all available USB ports. Try turning off the computer, disconnecting all foreign devices from USB (Web cameras, external hard disks, card readers, printer), leave only the keyboard, mouse and flash drive, then turn on the computer. If after this the flash drive works, then the problem is in the power supply. USB port ah computer - perhaps the power supply of the PC is not enough. Possible Solution- replace the power supply or purchase a USB hub with its own power supply.
Windows 10 does not see the flash drive after updating or installation (suitable for Windows 7, 8 and Windows 10)
Many users have encountered the problem of USB drives not being displayed after upgrading to Windows 10 from previous operating systems, or after simply installing updates on an already installed installed Windows 10. It often happens that flash drives only via USB 2.0 or USB 3.0 are not visible - i.e. It can be assumed that USB drivers are required. However, in fact, this behavior is often caused not by drivers, but by incorrect registry entries about previously connected USB drives.In this case it may help free utility USBOblivion removing from Windows registry all information about previously connected flash drives and external hard drives. Before using the program, I recommend.
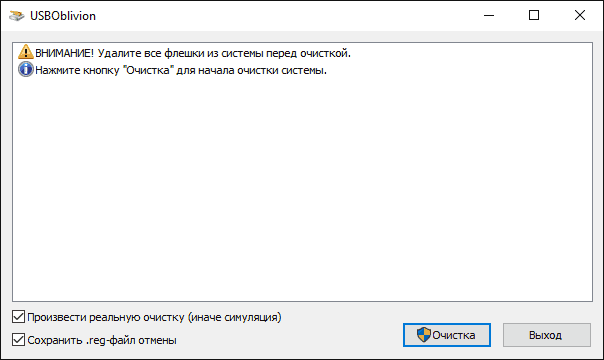
Disconnect all flash drives and other storage devices USB devices and from the computer, run the program, check the boxes Perform real cleaning and Save reg file undo, then click the “Cleaning” button.

After cleaning is complete, restart your computer and connect the USB flash drive - most likely, it will be detected and become accessible. If not, then try also going to the device manager (by right-clicking on the Start button) and follow the steps USB removal drive from the Other devices section and subsequent updating of the hardware configuration (described above). You can download the USBOblivion program from official page developer: www.cherubicsoft.com/projects/usboblivion
But, in relation to Windows 10, another option is possible - actual incompatibility USB drivers 2.0 or 3.0 (usually then they are displayed with exclamation point in Device Manager). In this case, the recommendation is to check the availability necessary drivers USB and chipset on the official website of the laptop manufacturer or motherboard PC. At the same time, I recommend using the official websites of the device manufacturers themselves, and not the Intel or AMD websites to search for such drivers, especially if we're talking about about laptops. Also, sometimes updating the motherboard BIOS helps solve the problem.
If the flash drive is not seen by Windows XP
The most common situation I encountered when calling to set up and repair computers was when the computer with operating system Windows XP did not see the flash drive (even if it sees other flash drives), was caused by the fact that it was not installed necessary updates for working with USB drives. The fact is that many organizations use Windows XP, often in the SP2 version. Updates due to Internet access restrictions or bad work system administrator, were not installed.
So, if you have Windows XP and the computer does not see the flash drive:
- If SP2 is installed, update to version SP3 (when performing the update, if you have Internet Explorer 8, remove it).
- Install all Windows XP updates, no matter what Service Pack used.
Here are some of the fixes for working with USB flash drives that were released in Windows updates XP:
- KB925196 - fixed errors that appear in the fact that the computer does not detect the connected flash drive or iPod.
- KB968132 - fixed errors where when connecting multiple USB devices in Windows XP they stopped functioning normally
- KB817900 - The USB port stopped working after removing and reinserting the flash drive
- KB895962 - USB flash drive stops working when the printer is turned off
- KB314634 - the computer sees only old flash drives that were connected before and does not see new ones
- KB88740 - Rundll32.exe error when inserting or removing a USB flash drive
- KB871233 - the computer does not see the flash drive if it has just been in sleep or hibernation mode
- KB312370 (2007) - USB support 2.0 on Windows XP
By the way, despite the fact that Windows Vista almost never used, it should be noted that installing all updates should also be the first step if a similar problem occurs.
Completely remove old USB drivers
This option is suitable if the computer says “Insert disk” when you insert a USB flash drive. Old USB drivers available in Windows can cause this problem, as well as errors associated with assigning a letter to the flash drive. In addition, this may also be the reason why the computer restarts or freezes when you insert a flash drive into a USB port.
The point is that according to Windows default installs drivers for USB drives the moment you connect them to the corresponding port on your computer for the first time. At the same time, when the flash drive is disconnected from the port, the driver does not go anywhere and remains in the system. When connecting a new flash drive, conflicts may arise due to the fact that Windows will try to use the previous one. installed driver, corresponding this USB port, but to another USB drive. I will not go into details, but will simply describe the steps necessary to remove these drivers (in the manager Windows devices You won't see them).
How to remove drivers for all USB devices
- Turn off the computer and disconnect all (and other) USB storage devices (flash drives, external hard disks, card readers, web cameras and others. You can keep the mouse and keyboard provided they do not have a built-in card reader.
- Turn on your computer again.
- Download DriveCleanup utility http://uwe-sieber.de/files/drivecleanup.zip (compatible with Windows XP, Windows 7 and Windows 8)
- Copy the 32-bit or 64-bit version of drivecleanup.exe (depending on your Windows versions) to the folder C:\Windows\System32.
- Run command line as administrator and enter drivecleanup.exe
- You will see the process of removing all drivers and their entries in the Windows registry.

When the program finishes running, restart your computer. Now, when you insert the USB flash drive, Windows will install new drivers for it.
Update 2016: It is easier to perform the operation to remove the mount points of USB drives using free program USBOblivion, as described above in the section about non-working flash drives in Windows 10 (the program will work for other versions of Windows).
Reinstalling USB devices in Windows Device Manager
If none of the above has helped so far, and the computer does not see any flash drives at all, and not just one specific one, you can try the following method:
- Go to Device Manager by pressing Win+R and typing devmgmt.msc
- In Device Manager, open the USB Controllers section
- Delete (via right click) all devices called USB Root Hub, USB Host Controller or Generic USB Hub.
- In Device Manager, select Actions - Update hardware configuration.
After repeated USB installation devices, check if they are working USB drives on your computer or laptop.
Additional actions
- Check your computer for viruses - they may cause inappropriate behavior of USB devices
- Check the Windows registry, namely the key HKEY_CURRENT_USER\ Software\ Microsoft\Windows\ CurrentVersion\ Policies\ Explorer. If you see an option named NoDrives in this section, remove it and restart your computer.
- Go to the Windows registry key HKEY_LOCAL_MACHINE\ System\ CurrentControlSet\ Control. If the StorageDevicePolicies parameter is there, remove it.
- In some cases, completely de-energizing the computer helps. You can do this this way: unplug the flash drives, turn off the computer or laptop, unplug it (or remove the battery if it’s a laptop), and then, with the computer turned off, press and hold the power button for a few seconds. After that, release it, reconnect the power supply and turn it on. Oddly enough, this can sometimes help.
Recovering data from a flash drive that the computer cannot see
In case the management Windows disks the computer displays the flash drive, but in the state “Not recognized”, “Not initialized”, and the partition on the flash drive is “Not distributed”, then most likely the data on the flash drive is damaged and you will need to use data recovery.
There are a few things to keep in mind that will increase the likelihood of successful data recovery:
- Do not write anything to the flash drive you want to recover.
- Do not try to save recovered files to the same media from which they are recovered
If nothing helps, and your computer still does not see the flash drive, and the files and data stored on it are very important, then the last recommendation would be to contact a company professionally engaged in file and data recovery.
Have you ever experienced a situation where you open a flash drive on your computer and it doesn’t show any files or files? If yes, then you have come to the right place. In this article we will tell you what to do in a situation where files and folders are not visible on the flash drive.
Hidden files
If there are no files or folders visible on the flash drive, then the first thing you need to do is enable the display of hidden files in Explorer. To do this you need to go to "Control Panel" Then go to the section " Design and personalization».

In chapter " Design and personalization"go to the subsection" Show hidden files and folders».

The dialog box “ Folders settings» with many additional parameters, which can be disabled or enabled by checking the box next to them. So that they become visible on your flash drive hidden files You need to uncheck the options that are shown in the image below.

Then click the “Apply” button. Close this dialog box and return to your flash drive. You should now see hidden files or folders.
Now let's make them visible on any computer into which you connect your flash drive. To do this, right-click on the file or folder and select “ Properties" In the dialog box that opens, at the very bottom, you will see the section “ Attributes " Uncheck the attribute " Hidden».

Checking for errors
If files and folders are still not visible on the flash drive, then you need to check for errors on it. This can be done using special utilities or programs, but today we will look at the simplest method, which is provided Windows system.
So, to check the flash drive for errors, you need to open “ My computer"and find the shortcut to your USB flash drive. Then right-click on it and select “ Properties».

In the removable drive properties dialog box that opens, go to the " Service».

In this tab you will see two sections:
- Checking for errors;
- Disk optimization and defragmentation.
Click on the button Check" in the first section.

After checking the flash drive, it file system will be restored. Among other folders on your removable storage a folder may appear FOUND.000" It may contain files in which recovery after verification is encrypted. To open them you need to use special utilities, For example " CHKParser32».
Antivirus
Probably the most best tool, which can solve your problem when, when you open a flash drive, files and folders are not displayed on it.
Usually, by default, it is installed in all automatic check check for viruses on all devices that are connected to USB. But if this does not happen, we recommend that you manually check your removable drive.
The most common virus on USB flash drives is “ RECYCLER" He specializes in automatic change attributes of files located on removable media. It can be cured with antivirus program or full formatting flash drives.
Now you know what to do when files or folders are not visible on the flash drive. There is nothing wrong with this and this problem can be solved in a matter of minutes using our instructions.
They are the main method of transporting data. To copy files, users connect their flash drives to dozens of various computers. It's no surprise that the developers malware Flash drives are very often used to distribute malware.
By connecting your flash drive to a computer infected with viruses, you will instantly become a victim. The virus is copied onto the flash drive, and your files are modified. In the majority similar cases, after a flash drive is infected with a virus, the following picture is observed: there are no files visible on the flash drive, it seems that the disk is completely empty. But when checking occupied space it turns out that the files take up free place on disk. Accordingly, nothing has been deleted, you just do not have access to the files. In this article we will talk about how to solve this problem.
Step #1: Check for antivirus.
If no files are visible on the flash drive, it means it is infected with viruses. Therefore, you should not connect it to all computers in a row, in the hope that your files will become available on one of the computers. So you just spread the virus and do good service virus writer.
You can only connect an infected flash drive to computers that are protected by an antivirus. Before connecting the flash drive, you need to make sure that the antivirus is running and running. Computers with disabled or unloaded antivirus will also become a victim of infection.
Step No. 2. Checking the flash drive for viruses.
After connecting the flash drive, the first thing you need to do is . To do this, open “My Computer,” right-click on the flash drive and run a virus scan.
Step No. 3. Enable display of hidden files.
After the virus scan is completed, you can work with the flash drive. If there are no files visible on the flash drive, this means that they are hidden. To view hidden files, you need to enable the corresponding function.
To do this, in any window, press Alt key and open the menu “Tools - Folder Options”.

In the window that opens, go to the “View” tab. Here you need to uncheck the box next to “Hide protected system files" and check the box next to " and disks ".

Step No. 4. View hidden files on the flash drive.
After these steps, you need to open the flash drive again. Now you can . Hidden files and folders are displayed with translucent icons, making them easy to distinguish from regular files and folders.

In order to turn hidden files and folders into normal ones, just call up the object’s properties and uncheck the “Hidden” box.
A compact USB drive, known to most users as a flash drive, is today considered the most common device for storing and exchanging various data. A frequently occurring problem: “No files are visible on the flash drive” can have quite disastrous consequences. After all, often transferred to Flash USB Drive device important documents confidential, unique photos and other types valuable information may be in a single copy. If you encounter similar problem for the first time, don't panic. There is a high probability that the missing data is still there - on the flash drive. You just don't see them because they are hidden. To solve the problem of “invisibility”, let’s turn to the practical experience of experienced ones and consider the main aspects of digital restoration.
Two main reasons: why did the information disappear?
So, when you inserted a USB drive into your computer, you discovered that there are no files visible on the flash drive. In the vast majority of cases, it is the user who is the culprit of this kind of trouble. And most often, it is as a result of improper operation that the Flash device begins to work in “magician” mode. Of course, one cannot discount manufacturing defects in the production of a product and unfavorable accidents of a metaphysical nature. However harsh reality indicates that the cause of the malfunction may be either hardware or software.

Files are not visible on the flash drive: ways to fix the problem
The first thing to do is to carry out visual inspection the subject of our attention. It is possible that the data transfer device is purely mechanically damaged. A once-spilled cup of coffee can also have a direct connection with the disappearance of files. Make sure that the contacts of the Flash drive are not oxidized. If the device is equipped with a signal LED, operability should be confirmed by the indicator lighting. However, if the computer detects a connected device, then, most likely, the “hero of the occasion” has software roots that could well be undermined by a malicious one. However, such “tricks” can be exposed as a result of using special software, but first...
Standard methods of combating “invisibility”
If you don't see any files on the flash drive, try the following:
- Connect the USB device to your computer.
- Use the key combination “Win+R” to open the “Run” window.
- Next, enter “cmd” in the checkbox.

- In the “Command Editor” write “Attrib -h -r -s / c /d k:\*.*”, where the Latin k should have the literal value of your removable storage device.
- Press Enter and hidden files will become visible again.
Second Windows solution: Changing system settings
It is quite possible that the folders and files located on the flash drive have been assigned the “hide” attribute. In this case, the Flash drive connected to the PC will appear empty.
- Go to the "Control Panel" menu.
- Now go to the “Design and Personalization” section.
- In the “Folder Options” block, activate the “Show hidden files” link.
- The last item in the list must be activated. That is, the item “Show hidden files, folders...” must be marked with a marker.
If this method did not have the desired effect, and everything is also not visible, try the method described below.
Option three: checking the parameters of one of the registry branches
As a result of a virus infection, malicious code can change records in the system Windows log OS. Therefore, it is necessary to ensure the integrity of the parameters involved. It is worth noting that when working with the registry, extreme caution should be taken, since incorrect actions and changes made can critically affect the full functionality of the Windows system as a whole.

- Using the "Run" menu, you need to open
- Enter the command "regedit".
- After the utility utility opens, follow the path: HKEY_LOCAL_MACHINE\SOFTWARE\Microsoft\Windows\CurrentVersion\Explorer\Advanced\Folder\Hidden\SHOWALL.
- The “CheckedValue” key entry (right area of the editor working window) must correspond to the value “1”.
- There should be nothing in the “Type” column except “REG_DWORD”.
If the entry did not match the specified pattern, your PC is probably infected computer virus, which means it is necessary to check the system for the presence of “destructive code”.
An obvious question: “How to open invisible files?” and an effective answer to it
Algorithm of actions:
- Download to PC antivirus utility Malwarebytes Anti-Malware Free.
- Launch the installed software.
- Scan everything sections of hard PC disk and USB flash drive.
- If a “digital infection” is detected, remove the source of infection.
It is worth noting that in some cases, even after treating the hard drive and storage area of the flash drive with antivirus software, the problem will not disappear. Because as a result of the destructive activity of unfavorable code, OS service files and even the disk structure could be changed. In such cases, the recovery process, and in the case of the system - complete Windows reinstallation, it simply cannot be avoided.

How to recover lost data
As a rule, as a result of incorrect manipulations with removable media Beginners have a question: “Why doesn’t the flash drive see the files?” To resolve this kind of problem, you need to download and install it on your PC. special program. Among huge amount The most attractive of such software is the free data recovery utility Recuva, which you will learn about in the section below, and also learn the basic techniques for working with it.
Recuva is a free data “reincarnator”
So what needs to be done?
- Download this software product from the official website.
- After installation, run the utility.
- Choose a type the information you are looking for. The most acceptable option is all files.
- In the next window, select “On the memory card”.
- Once you have confirmed your choice, the scanning process will begin.
- If the result turns out to be ineffective, go to the “Advanced Mode” tab in a special program window.
- Check all inactive items and repeat the startup process again.
- The files found in this way need to be restored. Click the button of the same name in the lower right corner of the program.
- Check the checkboxes next to the found files.
- After activating the “Restore” button, your data will be saved to the directory you specified.

As you understand, this program will also effectively cope with the possible difficulty when the memory card does not see files. However, with using Recuva can be restored deleted information from almost any type of media.
Instead of an afterword
So, you have learned what to do if the flash card does not see files. Nevertheless, do not forget about basic operating rules, the observance of which guarantees long-term operation of the storage device:
- Do not save information to a flash drive that has not previously been scanned by antivirus software.
- Remember that you need to disconnect the USB drive correctly, deactivating it using the Windows tool: “ Safe removal devices."
- You should not use the same flash drive in various systems. Especially relevant this warning in relation to mobile storage devices (for example, SD memory cards).
- Don't forget to make a copy of the data from the USB drive to the hard drive of your PC.
- In some cases, to recover lost files from a specific modification of a storage device, you may need specific specialized software.
All the best to you and your flawless Flash devices!
Question from a user
Hello.
I had it on a flash drive various documents and folders. After reinstalling the system, I don’t find any files on the flash drive, they have now become invisible (although they take up space on it, I see it in the disk properties).
How to restore them, why could they become invisible...?
Hello.
Hmm, some of the most basic reasons for this problem are: viral infection flash drive (or your PC), a failure in the file system of the flash drive (although Windows usually offers to check the drive for errors), for some reason the attributes of files and folders were changed to “hidden” (and Explorer does not show them by default ).
Actually, in this article I will look at how to solve this problem...
What to do with the "invisibility" of files
1) Turn on the display of hidden files
How to do it:

By the way, you can also open Explorer settings using the panel Windows management: Switch the display to "small icons", and select "File Explorer Options". See example below.

2) Selecting an alternative to the conductor ( Far Manager)
In general, I would recommend that the conductor have some other file commander(manager). There are quite a lot of them, but I personally like two: Total Commander and Far Manager. The second, in my opinion, is perfectly suitable when various kinds of problems arise, for example:
- if there are a lot of files in the directory and Explorer freezes, Far will easily enter it and help you find or delete unnecessary files;
- you can easily and quickly change the attributes of any files (Far sees everything);
- when running old programs that need to pass certain parameters via the command line...
FAR Manager

Many users are put off appearance this file manager(but I repeat, in terms of capabilities it is not inferior to the same Total Commander!). You quickly get used to the “blue” speakers, and they become like “family” (I could be wrong, but now he can easily change his appearance).
Now about what to do in Far in order to make hidden files visible:

Note: I have given all the button combinations for Far v.3, which are used by default.
3) Checking the flash drive for errors
Even if Far did not “see” the data on the flash drive, it may be worth checking it for errors (for example, if you incorrectly disconnected the flash drive from the USB port, this could very well happen. Or the PC turned off while copying information to it...). You can check regular means Windows.
To do this, you need to open “This Computer” (“My Computer”) and right-click on your flash drive: in the menu that appears, select “Properties”.


Then agree to scan the disk (by the way, Windows can immediately report that it found errors on it, as in my case).

Upon completion of the check, the file system of the flash drive will be restored. “FOUND.000” may appear among the new folders on the drive - it will contain recovered files (to read them, use the unCHKfree utility, for example). But as a rule, in most cases, after checking, the flash drive starts working in normal mode, and there’s no point in messing around with “FOUND.000”...
4) Checking the flash drive with an antivirus product
If you have a standard classic antivirus on your system, check it with it.
Personally, I like ESET Scaner (the light weight of the program, coupled with powerful scanning filters, leaves most viruses no chance).
I’ll show you below how the scan works in ESET Scanner. After downloading and launching the anti-virus module (and it weighs only a few megabytes), I recommend enabling detection of potentially dangerous software and setting the scanning settings (number 2 in the screenshot below).

Next, it is advisable to select RAM, boot sector, system disk with Windows (usually this is "C:\". If anything, such a drive is marked Windows icon) , and the flash drive itself. Then you can start scanning.

Scan time depends on the selected drives in previous step, depending on the size of your flash drive and the number of files on it. I recommend waiting until the process is completely completed.

If viruses are detected, it would be a good idea to run the system with several more antivirus products. I would recommend this material:
5) If information from the drive has been deleted
If the data on the flash drive was accidentally deleted by you (either a virus did it, or the drive was mistakenly formatted) - do not rush to despair. Most likely, most of the information will be able to restore . The main thing is to disconnect the flash drive from the PC and do not copy anything to it!
- recovery deleted files(photos, pictures, texts, etc.) from USB flash drives and SD cards -
- recovering deleted files from disks, flash drives, etc. -
Additions are welcome...


