I just deleted a file, how can I recover it? Recovering information from an external hard drive (flash drive, local partition) using the Recuva program

If you accidentally deleted vital files or formatted a hard drive that contained valuable information, then you have come to the right place. In this article we will talk about how to recover deleted files on a computer or flash drive. We admit that the situation is unpleasant, but there is no need to panic either. Let us tell you right away, we will restore everything! Let's not philosophize too much, let's get down to business right away. You can recover deleted information using the completely free DMDE program , which you can download from the link.

Picture 1

Oh yes, I completely forgot, this program is portable and can be run on any computer without installation. You can write it to a flash drive and carry it with you everywhere - thereby being sure that at any time you can restore any deleted files. After unzipping, run “dmde.exe”.

Figure 2

Figure 3

Figure 4

Then we will permanently delete this folder.

Figure 5

Let's assume that these files were very important to us and we want to recover them. What to do? Now let's return to the program itself. After launching it, it will automatically detect all physical and logical devices on your computer. Then:

  1. The program clearly needs to indicate that the information was located on a logical drive
  2. We need to select the logical drive on which the files we are trying to recover were located. You can check whether we have chosen the right disk by size.
  3. Click the “Ok” button
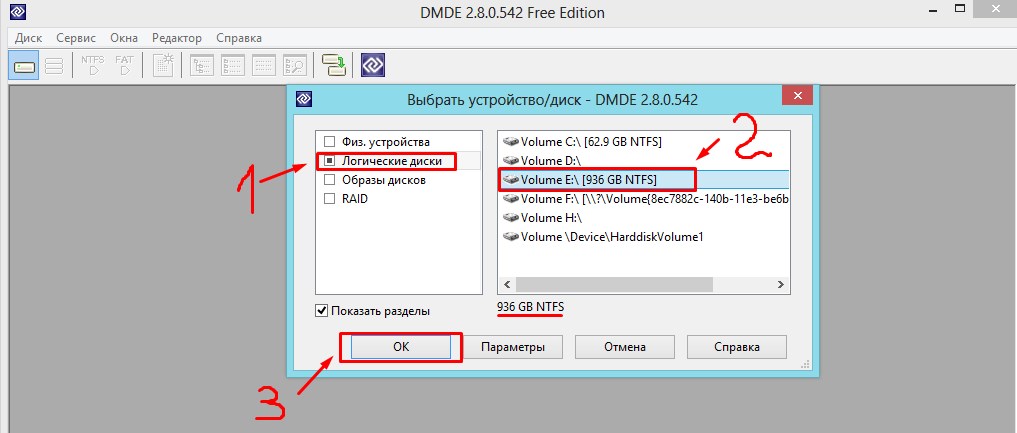
Figure 6

After this, a check of all directories and folders that were and are on the disk begins. After finishing you will see the following window. Double click on our disk.

Figure 7

Then we select .

Figure 8

After selection, virtual reconstruction of all disk files begins. Click “Ok” and wait for the process to complete.

Figure 9

After reconstruction, in the window we can find the “FILES” folder that was deleted (it is indicated by a red cross).

Figure 10

It won’t be possible to restore the entire folder at once, since our program is free, but we don’t care, because the information in this folder is very important (instead of music there may be valuable work documents or something else). To restore files, go inside the folder and restore everything separately. To do this, check the box next to the object to be restored and right click for this object, select from the drop-down menu "Restore object".

Figure 11

After this, a menu will open in front of you, where you will be asked to select the location where you want to restore the object. We strongly recommend that you DO NOT restore to the location where this object was previously. There is a possibility that the sector may have been overwritten or faulty.

Figure 12

After recovery, this file played normally in my player.

Figure 13

Second case of critical difficulty

The case we discussed above is the simplest. Let's analyze the situation when you need to recover deleted information from formatted hard drive or flash drive. I will show you how this can be done using a flash drive as an example. I’ll tell you right away that the actions here are carried out in the same way as in the previous case (Starting with FIGURE 6 and ending with FIGURE 9). However, there are still differences here. After selecting the item “All found + reconstruction” search for deleted files did not give results.

Figure 14

But we will still try to conduct an in-depth search. To do this we go:

  1. To the "Disk Partitions" tab
  2. Select our disk (flash drive)
  3. Click “Search by NTFS”

Figure 15

After that, we are prompted to select a search area. We don’t change anything here so that the program will completely scan the flash drive and find all kinds of information on it.

Figure 16

Then click the “Ok” button and the scanning process starts. Its duration depends on the size of the hard drive or flash drive.

Figure 17

After scanning is completed, we are prompted to save the logo. We agree.

Figure 18

Then click “Everything found + reconstruction”, as in FIGURE 8, and we get a list of files that can be recovered. Oh yes, I completely forgot, here we will try to restore an archive with photos that were previously on a formatted flash drive.

Figure 19

After that, right-click on the archive and click "Restore object"

Figure 20

After you have chosen "Restore object" in the same way as in the previous case (FIGURE 12), you will be asked to select the place where this object should be restored. After which the recovery process begins.

Figure 21

After all that has been done, it will not be difficult for you to recover deleted information.

Important Note:In fact, the amount of information deleted and the time of its deletion do not play any role. After all, even when formatting the hard drive, the top level of the address is erased, that is, you will not be able to access this information in a simple, familiar way. But if you overwrite the hard drive or flash drive (and even repeatedly), then it will be much more difficult to restore the files. However, all this is done in exactly the same way as we discussed above. There is no 100% guarantee when rewriting multiple times. That's why REMEMBER: if you accidentally overwritten the files you need, then Nothing Do not write to a flash drive or hard drive, otherwise newly recorded files may occupy the sector of the media where your files are located.

Let's summarize: After reviewing this article, we learned how to recover deleted files from a flash drive or hard drive. The DMDE program is a very convenient (and most importantly - free) assistant in the recovery of information and data.

A fairly common problem among PC users is data loss. There can be many reasons: viruses on the computer, accidental deletion of data by the user, disk formatting, system failure of the PC, etc. So how can you recover deleted files from your hard drive yourself? In this article you will find the answer to this question.

Once you delete data on your computer, it is not erased without a trace. In the file table, such files are assigned the label “0”. That is, other information can be recorded on this place on the hard drive, and deleted files are just hidden from your eyes, which allows you to restore them if necessary.


1 step. Installing software on PC

First, you need to download a file recovery program and install it on the computer where the data was lost. The powerful program is convenient because it does not require special PC skills. A convenient Russian interface allows you to get started right away, without wasting time on training video tutorials. All the steps to recover files are simple, so you can get back deleted files yourself.

Step 2. Beginning of work

After installing the software on your PC, launch PHOENIX and click “Next” to select the disk on which the data was stored. The window that opens will display a list of available storage locations (disks, flash drives, memory cards, etc.). Select the desired disk by clicking on the line with the mouse, and to proceed to the next step, click “Next” again.

Window when starting the program


List of disks

Step 3. Selecting Scan Options

PHOENIX allows you to recover images, documents, video files, archives. At this stage, you can specify additional parameters for the files to be scanned. Check the boxes next to the required formats and indicate the size of the data you are looking for. It's okay if you don't remember the exact format of the deleted file or its size. You can select several formats at once and specify any file size for search. After the parameters have been set, click on “Scan” and wait for the program to generate a list of deleted files.


Selecting options for disk scanning

Step 4 Sorting deleted files

Now you need to select the necessary files to restore. If you need to restore all found data, then just click the “Recover” button and proceed to the next step.

If you need to find and restore specific files from the list, then use features such as filtering and sorting. The program allows you to sort files by size, name or format. To view information about a file, highlight any line and click View. In the window that opens, you can check the file if it is required for recovery.


List of found files

Step 5 Data recovery on PC

All that remains is to recover deleted files from the disk. Check that all files that need to be returned to your hard drive are checked. Then click "Restore" and select one of the options presented.

To return files to your computer, select the first option “Recover and save to folder”, then select any folder on your PC and wait for the recovery to complete. You can also burn files directly to a CD or DVD or send them to an FTP server.


Work is done! You see how fast and completely uncomplicated it is. The PHOENIX program also allows you to return deleted files from cameras, phones, tablets, laptops, USB flash drives, and various memory cards.

Recovering files from a hard drive is an issue that worries many personal computer owners.

This includes the loss of valuable information and the time required for its successful recovery.

Specialized services charge a lot of money for this, but if the media is in good condition, it makes sense to try to recover the data yourself.

Reasons for losing information

If the storage medium is undamaged, the main reason may be:

  • errors that occurred in the partition table or file system devices. Most often this happens due to incorrect shutdown of the personal computer, failures, malfunctions in hardware and software;
  • the harmful effects of viruses, as well as user errors, often lead to the loss or corruption of data. With such failures, the information usually remains on the disk, but data about its location is lost. This is expressed in the loss of several disk partitions, displaying the partition as unformatted;
  • Inaccurate file system entries can also lead to partial or complete loss of individual files and directories.

The main causes of malfunctions that lead to loss of information

Or maybe files, important data were accidentally deleted or the partition in which they were located was formatted. Information recovery is carried out using certain software in manual or automatic mode.

When using the appropriate programs, all information that exists on the media is scanned. Based on the detected information, a “map” of fragments of recovered data is created. It contains information: which file belongs to which sector, names, sizes and other parameters of the elements of the system being scanned. The selected data is then transferred to another drive.

What to do if data is lost?

If nothing was written to the sectors from which information was deleted, then the data was not physically destroyed, but information about its location was distorted or lost. First of all, it is necessary to determine exactly where the sectors that store the necessary information are located, and also reproduce it in the correct sequence.

If information was written to the disk from which the files were deleted, for example, formatting and installation of a new operating system, there is a high probability of physical destruction of the data. In these cases, the feasibility of successful information recovery depends on the ratio of lost and recorded data. For example, if you delete 2 gigabytes of databases and write 100 gigabytes of music and movies in their place, the probability of successful recovery approaches zero.

Data recovery mechanism using programs

  • media scanning;
  • Based on the scanning results, a map of the location of pieces of information is compiled, based on the detected service records, and a directory tree is built;
  • the map contains data about which file belongs to which cluster, the name, size and other parameters of the file system elements;
  • if the information received is not enough, then certain extrapolation methods are used;
  • folders and files that need to be restored are selected in accordance with the compiled map and transferred to another medium.

This article will review a variety of programs, both paid and free, and analyze their strengths and weaknesses so that the reader can quickly choose the most suitable software for his request.

5 Best Data Recovery Software

Recuva

Recuva is one of the most common programs for recovering lost data or formatted disks. The high demand for this program can be explained by its simple and intuitive interface. Recuva does not require experience or special knowledge in the field of data recovery, it is very convenient and easy to use. You can download it from here

The program scans the selected hard drive in detail (various hard drives and flash drives are supported). Information can be recovered even if the drive has suffered any physical damage or was formatted using a standard system command.

It is recommended to perform recovery using the program without changing the standard settings, unless, of course, you are an expert in the field of data recovery. This utility has a simple interface and will provide effective information recovery, even if the user does not have the necessary knowledge.

The program will prompt you to select the type of file to be restored. When searching for a specific file (music, picture, document), it is worth specifying the category to save time necessary for the recovery operation. But, if you do not know the file type or want to find data from different categories, specify “Other” and the program will search for all deleted information.

Choosing WHAT to look for

Next, you need to select the location where the file was located before deletion. You can select not only a separate folder, but also more extensive areas, for example: “My Documents” or “On a memory card”, and the program will check the selected area for the presence of the necessary data. If the exact location is unknown (the file was deleted using special programs or simply disappeared), you should leave “Exactly unknown” by default so that the utility scans the entire surface of the media.

We choose WHERE we will look

A window appears when you are ready to perform the restore operation. It is recommended to conduct an in-depth analysis: it takes longer, but its efficiency will be many times higher.

It is worth waiting a while while the program searches for files. If you did not choose in-depth analysis, the operation will take very little time.

Selecting information to restore

A window will open indicating the deleted data found. From this list, you should select the information that needs to be restored, after which the program will prompt you to select a folder for recovery.

It is important to correctly select the folder where our files will be restored, because this will affect the efficiency of their recovery. Restoration should be carried out to a drive other than the one from which the recovery is being carried out. This is especially true when returning a large number of files. You can connect an additional hard drive or flash drive to return data to them. The space should be slightly larger than the size of the files being restored.

The recovery procedure will not take much time and depends on the number and size of files.

R-Studio

R-Studio is a convenient and functional program for recovering information from various drives that was deleted by mistake. With its help, you can scan various media and recover lost data not only from hard drives, but also from flash drives. You can download the utility from the website http://www.r-studio.com/ru/Data_Recovery_Download

Initially, you should decide on the choice of version: demo or full. If you do not perform data recovery on a regular basis, it is better to choose the demo version. A 20-day period is more than enough to restore all information.

If you are not a pro, it is better to use the demo version

In addition to recovery, the utility can also perform a preliminary scan. This operation will speed up and increase the efficiency of the recovery procedure. It is worth noting that you can scan the device with third-party programs, and upload a file with a report on the work done to R-Studio. The utility always conducts a detailed scan by sector. This may take some time, depending on the size of the partition being scanned.

We scan the selected partition

After the scan is completed, it will be possible to view all the files that it was able to detect and then select those that can be restored. In order to restore a file, you need to right-click on it and select the “Recover” command.

R-Studio is convenient and multifunctional

If you don’t know exactly what was deleted from the device, and you are going to recover all lost files, in this case, right-click on the desired media and select “Recover all files.”

At the end, simply select the partition where to restore

At the end, you will need to select a folder where the seized information will be restored. Important! It is imperative to take into account that the folder should not be located on the hard drive from which the information will be returned, because during the recovery of some files, others may be completely overwritten by them.

After selecting a folder, you need to wait while the program diagnoses the drive and restores lost information.

Easy Recovery

Easy Recovery can safely be called a high-quality program for professionals, which can be mastered by an ordinary user. It has gained popularity due to its excellent efficiency and, at the same time, ease of use in comparison with similar utilities. The advantage of this program is that it can also perform preliminary diagnostics of the media. Download the program

Click on “Disc Diagnostic” and select the required command. If the utility was downloaded in order to recover data, then we conduct a deep scan “SmartTests”. In addition to scanning, the program will perform diagnostics and determine whether the hard drive has problems, for example, unreadable sectors or any others, in order to prevent troubles.

Diagnostic menu

After selecting the command, the type and number of media that are currently running on the device are determined. We choose which one we will work with and where to restore the information.

For the most accurate and complete diagnostics, select “Run extended SMART test”. First of all, you should be patient: the verification will take a lot of time.

Be patient and choose scanning

To restore files, go to the “Data Recovery” section and select the mode that is interesting to us. In this program, modes are selected depending on the specific situation.

For example, if you accidentally formatted your hard drive, select the “Format Recovery” category. Next, select the file system of the drive and the partition that was formatted.

If there is a need to recover deleted files, then select the “Deleted Recovery” function - the disk selection menu opens and the formats of the recovered files are determined.

Recovering lost files

If the data is lost as a result of a software failure or the reason for the loss is unknown, select the “Advanced Recovery” option. After scanning, the program will find information that was deleted within a certain period of time.

We choose what we need to restore. Typically, the diagnostic and recovery procedure does not take much time. This will depend on the amount of data that needs to be returned.

PhotoRescue Pro

PhotoRescue Pro is a utility that will help you recover deleted photos or videos. Today's digital devices provide ample opportunities for recording, dubbing and optimizing media files. If you accidentally deleted the necessary files from a digital gadget, this utility will solve this problem.

With this program you can recover data from any type of flash drive, hard drive or mobile phone. It is possible to recover data even from damaged and formatted media.

Working with PhotoRescue Pro is very convenient and accessible. You can download it from here. The program supports many languages, including Russian. After selecting the language, a window appears in which we click the “Next” button and the registration window appears. If you just want to recover a few photos, there is no point in registering the program, but if you constantly work with your camera and this problem occurs to you quite often, it is worth purchasing the full version.

First, we select the drive from which we will return information. The utility works with several file systems at once, which is very beneficial. Click “Next”.

Analyzing the content

After selecting the drive we need, click “Next”, wait a couple of seconds - the utility will check the partition we have selected. A list of folders is displayed, we need to select the one that interests us. If the location of the file is unknown, click on the checkmark at the very top to highlight all the data found. "Next"

Select the desired folder

We select the formats of the files that interest us. To avoid mistakes, it is better not to uncheck individual formats so that the utility can find as much information as possible. Next, select the required files. Click “Next”.

Select the desired folder

Once you have completed selecting formats, the scanning operation will begin. The verification time will depend on the volume of data and will take from a few minutes to a couple of hours.

Scan duration depends on data size

The advantage of the program over analogues is that it simultaneously checks the drive for the presence of unreadable sectors. Thanks to this, you can not only restore lost information, but also carry out diagnostics and troubleshooting.

All that remains is to restore the data

After scanning is completed, a list of files opens. It is possible to search for files by categories (video, photo, audio) and formats, and not by sections and various folders.

The program shows how much data was found and what was deleted. Thanks to this, you will quickly find out which files were found and which were irretrievably lost.

GetDataBack

GetDataBack is one of the most effective and most powerful. With its help, you can recover data in almost any situation. The developer divided the program into two subtypes: the first for the NTFS file system, and the second for FAT. Download it from here: https://www.runtime.org/data-recovery-software.htm

We recover all deleted files for effective results

This utility must be installed on a foreign hard drive. You cannot restore to the media from which files will be restored, since the necessary information will be overwritten.

After opening the program, a menu of four items appears. For maximum efficiency, it is recommended to select the fourth option – “I want to recover deleted files” (I want to recover deleted data).

Select the required section

In the list of local drives that opens, which the utility will find while scanning the hard drive, you need to find the partition where the deleted files were located. The program provides many possibilities in the field of data recovery, but if you just want to return information from the drive and do not know where it was, you should select the “Physical drives” category.

A file system window opens and you need to select the one that is supported by this version of the program (in our case, NTFS). Modern computers use different file systems simultaneously, so check the box next to “Show recommended”.

Select the file system we are interested in

After a detailed scan, the utility will open a folder explorer, which is simple and easy to understand. The contents of the selected folder will be displayed on the right; if the information was deleted, after recovery GetDataBack will show the files in strikethrough font for ease of classification. Each file is equipped with a special marking, with which you can determine the type of information found.

Data recovery is easy and convenient

As a result, we select the data we need and start the recovery. Once finished, the recovered file will be available in the editor

Restoring files using this program in the FAT file system is carried out in the same way.

Conclusion

This article discussed, in my opinion, the most popular and effective programs for recovering deleted data from a hard drive and various media. For beginners, the popular Recuva with a simple interface is suitable; if you lose media files, you should choose PhotoRescue Pro, it can recover data from almost any modern gadget; for constant work with returning information, GetDataBack is ideal - it has powerful functionality, is efficient and at the same time has an ergonomic main menu.

If for some reason you were unable to recover your data, but the information is valuable, it makes sense to contact specialists. They have more powerful software and can help where these utilities are powerless.

The loss of information stored on a hard drive (HDD) is a sad event, but most often not fatal. Accidentally deleted documents, folders, and even entire sections can be restored if nothing happened that could prevent this.

We will tell you further how to recover files from a hard drive, in which cases you can do it yourself and when it is better not to take risks and turn to specialists.

When can missing files be recovered?

The main condition for successful data recovery is the physical health of the hard drive.

Most likely, you will be able to return data that:

  • were deleted without going to the Recycle Bin;
  • destroyed by a virus;
  • disappeared due to a file system failure (with such problems, entire directories and partitions are usually lost);
  • were in a partition that was formatted (formatting erases some of the information about the location of the files on the hard drive, but they themselves remain in place).

But in what cases it will not be possible to restore information:

  • if the area of ​​the hard drive where the data was stored was overwritten (for example, when reinstalling the operating system and formatting the volume, all objects of the old OS are permanently destroyed);
  • if objects were deleted using a shredder program (shredders also overwrite the storage areas of deleted objects, many times);
  • if the magnetic surface of the hard drive “pancakes” is damaged.

When you shouldn’t do recovery yourself

If you are not confident in the serviceability of the drive, but the information is very valuable, it is better to refrain from experiments and contact a specialized service for restoration. The service is not cheap, and the specialists working there are not omnipotent, so the less you torment the “sick” disk, the lower the price will be and the higher the chances of success.

The following symptoms indicate a malfunction of the hard drive::

  • Unnatural noise during operation (clanging, clicking, clanging, whistling, etc.).
  • The HDD from time to time ceases to be detected by the computer - it either disappears or appears.
  • The operating system runs very slowly, the hard drive is loaded at 100% all the time without a high load on the RAM.
  • Various errors occur when writing and reading files.
  • The operating system or programs that monitor the status of the HDD in real time (if installed) inform about a drive malfunction.
  • The computer stops booting from the hard drive (provided that it boots normally from other media).
  • Blue screens of death often occur indicating errors typical of disk problems (INACCESSIBLE_BOOT_DEVICE, NTFS_FILE_SYSTEM, KERNEL_MODE_EXCEPTION_NOT_HANDLED).

Four most important rules for data recovery

I will tell you a little later how and with what help data is recovered on hard drives, but now a few words about what needs to be done before and how to correctly perform the recovery procedure.

  1. The recovered data can be reset to another partition of the same hard drive or to another physical medium, but not to the same place from where it was read. Therefore, if your HDD is not partitioned, prepare a flash drive or another hard drive of suitable capacity.
  2. As soon as you notice the loss of important data, stop all operations with the HDD and immediately begin recovery. This will prevent accidental overwriting.
  3. Try to restore everything you need in one session without stopping the program. Moreover, without restarting the computer.
  4. If one program does not help, use others until all the information is recreated.

Three popular HDD data recovery programs

R-Studio

R-studio from the Canadian company R-Tools Technology - the most powerful software package for recovering information from various types of media. It is aimed at professional service engineers, but can also be used by non-specialists, as it is easy to operate and intuitive. Translated into many languages ​​of the world, including Russian.

Main features of R-studio

  • Supports all major file systems: FAT12-FAT32, NTFS, exFAT, ReFS, NTFS5 (encrypted), HFS, HFS+, Ext2-Ext4, UFS1 and UFS.
  • Able to determine object types based on file signatures. This helps to extract information from damaged drives where the file system is defined as RAW (unknown).
  • Supports RAID arrays and dynamic disks. Has RAID reconstruction function.
  • It can create images of physical drives, their partitions and individual directories, from which it then reads data. After creating such an image, the media from which recovery is being carried out can be disconnected.
  • Allows you to view the contents of read objects, even if there is no program associated with them on your computer.
  • Recreates MBR, GPT and BCD service records.
  • Contains a hex editor for manually fixing damaged files.
  • Displays S.M.A.R.T parameters. – results of self-test of the current state of the HDD, as well as SSDs (solid-state drives), diagnoses the condition of the read heads, corrects surface defects.

How to use

  • Launch R-studio with administrator rights.
  • Select the drive from which you want to read information.

  • Specify scanning options. In particular, note the types of files that are recoverable.

  • After finishing reading, select the “Recover all files” option in the “Disk” menu.

  • Specify the saving parameters - location, structure, attributes, etc.

  • Wait until the operation is completed.

Ontrack EasyRecovery

Ontrack EasyRecovery from Polish developer Kroll Ontrack is another lost file recovery software package that can be used by both professionals and beginners. Available in several versions with different sets of functions, translated into Russian.

EasyRecovery features

  • Recognizes more than 250 file types.
  • Works with different types of media, including damaged ones.
  • Creates drive images.
  • Equipped with tools for analyzing the current state of the HDD.
  • It has a built-in hex editor, as well as a shredder for permanent destruction of file system objects.
  • Allows you to create emergency bootable media with EasyRecovery in case the operating system stops booting.
  • Can connect to other computers over the network.
  • Capable of reading information from VMware virtual environments.

How to use

  • Run the program as administrator. Click the Continue button.

  • Select the media type on which you lost data and click Continue again. This button must be pressed after each step, so I will not repeat myself.

  • Specify the section you want to scan.

  • Select a recovery scenario (we are particularly interested in deleted or formatted data).

  • Wait until the reading process is completed.

  • The found documents will be displayed in the EasyRecovery window. You can view them as a list or thumbnails.

  • To save the file, right-click on it. Select “Save As” or, as elsewhere, press Ctrl+S.

Recuva

Recuva, a product of the British developer Piriform Limited, is one of the most popular free data recovery tools. The utility is very easy to use and very effective. Features high scanning speed.

Recuva features

  • Can work without installation (has an official portable version).
  • Supports FAT16-FAT32, NTFS and ExFAT file systems.
  • Works with damaged media.
  • Has a file shredder.
  • Capable of recovering directory structures, email messages, Microsoft Word documents, texts, music, images, saved web pages, video files and system objects, including hidden and zero-sized ones.

Compared to the two previously reviewed programs, Recuva's capabilities are much more modest. This applies to both restorative functions and additional tools. Thus, Recuva is best at restoring recently deleted objects, and although it detects old ones, it often cannot read them, despite the fact that they were definitely not overwritten. And yet, let’s not find fault with her too much, because “don’t look a gift (free) horse in the mouth.”

By the way, in addition to the free version of the utility, there is a paid version - Recuva Pro (costs $24.95). Its differences include advanced recovery functions, automatic installation of updates, support for virtual media, and the ability to contact Support.

How to use

  • Launch the utility. If it opened in the English version, go to the “Options” menu and select the Russian language on the “General” tab.

  • From the drop-down list on the left side of the window, select the scan area.

  • After the scan is completed, the utility window will display a list of found objects, some of which are marked with green circles, some with red and some with yellow. A green mark indicates a good chance of restoring the object, a yellow mark indicates a weak one, and a red mark indicates the complete absence of any chance.
  • To restore something found, mark it in the list and click the button of the same name at the bottom right of the window.

Each of the three applications reviewed is good in its own way. Recuva is convenient to keep on hand for everyday use - despite its limited functionality, it solves its problems well, but most importantly - quickly. And if we can’t cope with something, we use EasyRecovery and R-Studio - “heavy weapons” for the most intractable situations. For 90% of users, this set is enough for almost all occasions.


If you have lost valuable files, do not rush into depression: recovering information from your hard drive is possible, and you can do it yourself.

A file deleted from the hard drive actually remains on the same sectors of the disk. In the file table it is marked “zero”. As long as this information is not overwritten, the files are recoverable.

The most important thing is to choose the right tool. We have selected the best programs for hard drive data recovery. In this review, we will list the necessary functions of the programs and briefly describe how they work.

2. TestDisk – recovery of deleted HDD partitions (Windows / Mac OS / Linux)


Strict console interface of the TestDisk program

TestDisk is a program for data recovery and . Supports file systems FAT, NTFS, ext2, etc. Works only from the command line; detailed documentation will help you understand the commands.

It makes sense to use the program in cases where data has been lost

  • as a result of errors in the file table,
  • in the presence of bad blocks
  • if you accidentally delete a HDD partition.

In such cases, other utilities such as Recuva or PhotoRec may not be able to cope.

With TestDisk you can restore boot sectors, fix tables in FAT, Master File Table - in general, fix errors on your hard drive, which are often the reason for deleting files.

If the operating system does not boot and/or you are running Linux, you can make a byte-by-byte copy of the HDD partitions and restore files safely, avoiding overwriting.

If TestDisk did not help or seemed complicated, test PhotoRec (see below), since the programs are distributed in a common archive.

3. PhotoRec – recovery of photos and videos on your hard drive (Windows, Linux, Mac OS)

PhotoRec main window: search and save settings

PhotoRec is a cross-platform program for recovering data from disk. Searches by file signatures and works best at finding deleted images and videos.

In total, PhotoRec covers about 300 file types and 480 file extensions. Data recovery is carried out both on the hard drive and removable media – flash drives, memory cards.

You can download the program for free for desktop. Major file systems are supported, including NTFS, FAT, exFAT, ext2/3/4, partially ReiserFS, etc.

Included with the program is the TestDisk console utility. Let us remind you that it is designed to recover deleted partitions, correct the boot record on the disk and other errors on the HDD.

Note. Despite the fact that data recovery on the disk takes place in read mode. When saving files, you must specify a directory on another drive - otherwise the deleted data will be overwritten.

4. Diskdigger for PC

Diskdigger exists in desktop and mobile editions. We will be looking at the Windows version. It supports HDD, SSD, SD cards and USB flash drives and virtual disks (VHD/VDI, etc.) connected to the computer.

The program offers you to choose one of two scanning options – Dig deep or Dig Deeper.

Accordingly, the Dig deep method is suitable for recovering files on a hard drive, deleting files to the Recycle Bin, deleting any data in the FAT, exFAT and NTFS file system.

The Dig Deeper recovery method will be extremely useful in more complex cases involving the deletion of information. This method involves searching for files by signatures, bypassing the file system. Scanning in Dig Deeper mode will take much longer than Dig deep.

It should be noted that the desktop version of Diskdigger has a user-friendly interface and allows you to flexibly configure the search for files on the HDD. It is convenient to use previews when restoring and saving results as a list or thumbnails. In general, Diskdigger is designed for photo, audio and video recovery, similar to PhotoRec.

5. EaseUS Data Recovery Wizard (Windows)

EaseUS Data Recovery Wizard is an excellent, although not free, program for recovering deleted files from the HDD. However, 500 MB can be restored without purchasing the full version. To do this, just download the 30-day trial version of the product on the website.

Scenarios in which the EaseUS Data Recovery Wizard will be useful:

  • Deleting files bypassing the Recycle Bin (via Shift+Delete)
  • Removing an entire HDD partition
  • Quickly format your hard drive
  • File corruption, or bad blocks
  • Hard disk partition is defined as raw

The program interface is simple; beginners will find the step-by-step setup wizard useful. It allows you to select file types, scan type (Quick Scan / Deep Scan). As the scan progresses, you can view the results in a convenient preview window.

That's why EaseUS Data Recovery Wizard is great for image and video recovery.


EaseUS Data Recovery Wizard interface

Data Recovery Wizard supports data recovery from hard drive, SSD, memory card, USB flash drive.

The list of supported operating systems includes Windows 8, 7, Vista, XP, Server 2008 and 2003, 2000 and older.

Stellar Phoenix Windows Data Recovery supports more than 300 file extensions, suitable for recovering deleted partitions on HDD/SSD, ignores read errors. The description states that the main file systems for searching files are FAT, NTFS and ExFAT. However, Phoenix Windows Data Recovery can go around and detect files regardless of the file system type. To do this, use a signature search, which is activated by the Deep Scan option.


Stellar Phoenix Windows Data Recovery main window: disk selection

The Technician version of the program will be indispensable if the files were in a RAID archive and one of the array disks failed. Other versions of the program also have useful backup add-ons. However, for home use, the Home or Professional versions will be optimal (cost from $60 to $100).

7. Minitool Power Data Recovery – a program for recovering files from a hard drive

Minitool Power Data Recovery is a program for recovering data on damaged, faulty hard drives, emergency hdds - those that are not detected on the computer.


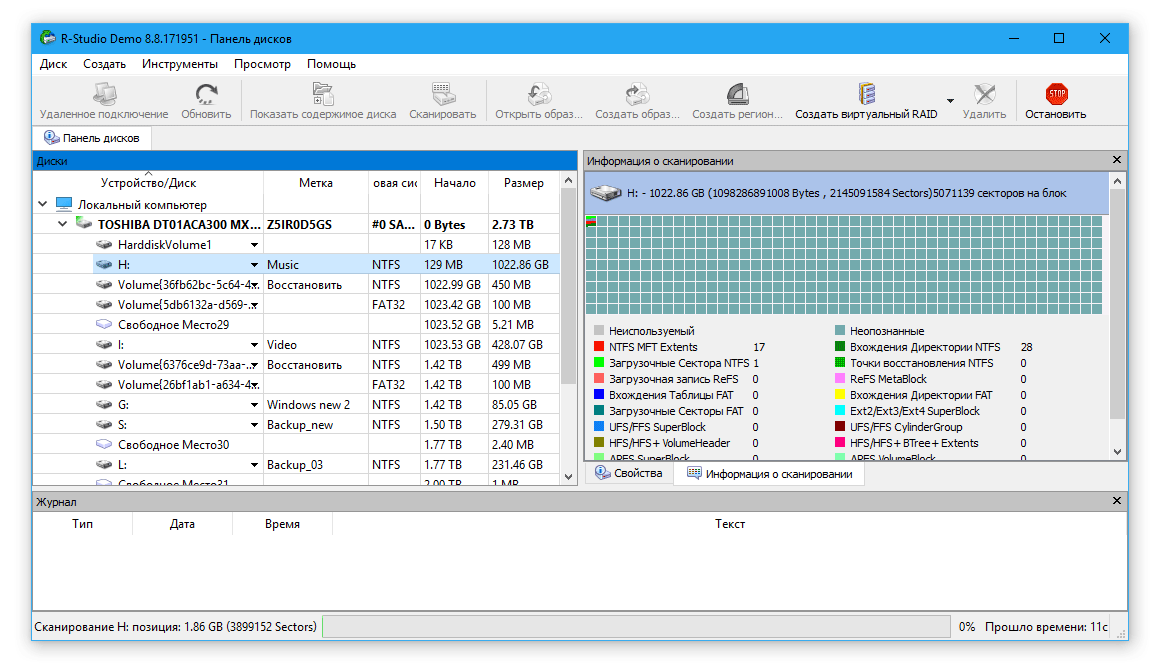
MiniTool Power Data Recovery main window: selecting a disk partition

Some features of the utility:

  • Power Data Recovery recovers entire disks, works with large dynamic disks (> 1 TB), RAID arrays,
  • when scanning, it bypasses errors, cyclically reads data, bad blocks, switches the head to a “sparing” mode when reading information from the disk,
  • works with FAT 16/32 file systems,
  • The “deep scan” option allows you to find deleted files that are not detected during normal scanning,
  • Free recovery of 1024 MB of any data.

How to recover information from a hard drive

The program has a step-by-step data recovery wizard. After selecting Logical drive and clicking the Scan button, a list of Scan Results will be displayed. Files are sorted by File name, Size, Creation date.

Video on how to use Power Data Recovery:

8. Undelete Plus (Windows)


Undelete Plus main window interface

Undelete Plus is a shareware program for recovering deleted files. Supports recovery:

  • office documents and mail,
  • photo, video, mp3 audio,
  • files after emptying the Windows Recycle Bin,
  • system disk after formatting / reinstalling Windows.

Undelete Plus works on all versions of Windows and supports storage devices with the FAT or NTFS file system.

Similar to Recuva, the program determines the probability of recovery for found files. You can sort results by type, set filters by time and size.

9. Glary Undelete: recovering information from your hard drive

Glary Undelete is a free program for recovering deleted files from HDD, easy to use, with a convenient user interface.


Recovering to HDD using Glary Undelete

Glary Undelete recovers files from hard drives, SSDs, any removable media devices - memory cards, USB flash drives, etc.

There are no settings, to get started you need to click Start. There is a filter by name/date/size. The sidebar allows you to group results by file extension. The probability of recovery for each file can be found in the “Status” column.

10. R-Studio - a popular program for recovering data from a hard drive

11. Puran File Recovery - a simple program for recovering from FAT/NTFS drives

This is not to say that Puran File Recovery stands out from other data recovery programs in the review. However, we list the main functional features of this free product.

Puran File Recovery works with Windows 8, 7, Vista, and XP. The application is available in portable form for both 32-bit and 64-bit versions of Windows, so it does not require installation. The program has a simple and fast interface.

FAT12/16/32 and NTFS file systems are supported. If the disk is deleted or has a raw format, the Full Scan option will detect the partition and then restore data from the hard disk in normal mode.

There are two modes for recovering data from HDD - fast and deep (byte-by-byte) scanning of deleted information. During deep scanning, Puran File Recovery does not simply search through records in the file table; it scans known patterns, trying to detect a particular format. By the way, the utility can recognize about 50 file types.

Found files are restored, preserving full paths and names (if possible). Before saving to disk, the user can sort the recovery results and familiarize themselves with the files in preview mode.


Tools included in Puran File Recovery

Other disk recovery programs

  • (now "EASEUS Data Recovery"): professional recovery of damaged information in FAT and NTFS file systems.
  • Data Rescue PC3: program for searching deleted files from Prosoft Engineering, supports FAT and NTFS file systems
  • : a program for recovering files and SSD partitions for Windows and .
  • FileSalvage: data recovery from disk, resuscitation of deleted/damaged information
  • : works under Microsoft Windows 2000 and higher, supports FAT, NTFS and HFS file systems, RAID arrays.
  • : Recovers damaged data on NTFS, HFS, FAT 16/32 partitions.

Answers to readers' questions

1. The lid of a Lenovo laptop was accidentally slammed shut. I don’t know whether it was because of this or not, Windows itself reinstalled itself and all the information from the Desktop disappeared. Then a window with a red Windows cross appeared. There it was suggested that we print out the instructions and save them on a flash drive, something about the hard drive and not use the computer until we restore the hard drive. What should I do, I would like to recover files on my hard drive :-)

2. There were files on the Desktop. They disappeared. I only found the names in MS Word. Please help me so that I can work with them as before.

Answer. The answer will be short. See programs for recovering data from a hard drive in the list above. Indicate in the list the system drive on which WIndows was installed. If you need to return some files from the Desktop, when scanning, specify “[system drive letter] > Users > [User name] > Desktop.

After reinstalling the system, photos and videos were not copied to the hard drive and, apparently, were deleted. Is it possible now to recover data from hdd for free?

Answer. The question is imprecise in its wording, but it is not difficult to answer. Use any recovery program mentioned in the article. Actually, before the data recovery process, it is highly undesirable to use the hard drive to write and read information, so if possible, install the software on another medium and do not work in the OS before you begin restoring data on the disk.

Yesterday I deleted the entire folder on my hard drive. There was 1 GB of content, there were many folders and other valuable data! I looked a few times and there was nothing there. Then I went and deleted the entire folder, but it turns out that there were my hidden photos and videos... How to recover data from a hard drive?

Answer. Almost any data recovery program is suitable for these purposes. For example, R-Studio, Minitool Power Data Recovery, Power Data Recovery or Recuva. In general, there is no shortage of such programs, choose any one, read the instructions on Softdroid and start recovery.

I uploaded files to the mail.ru cloud, after a few days the files disappeared. Before that I logged in from another device - the files were there! Is it possible to recover files for free?

Answer. Yes, recovering files from your hard drive is quite possible if you have synchronized files uploaded to the Mail.ru cloud with your PC. To do this you need to use R-Studio, Minitool Power Data Recovery or other tools. After installing a file recovery program, point it to the drive where the synchronized cloud files were located. I assume you know the next steps.

My son's favorite game on the computer crashed. I wanted to download it to him again, but he doesn’t want to start it from the very beginning. It says "application error". Will data recovery programs help? Thanks in advance.

Answer. In theory, you can recover files (deleted game saves) using hard drive data recovery programs. To do this, find out where the saves of a particular game are stored, run a search for files, etc., everything as usual when restoring. However, it is not entirely clear how your saves were lost and in what circumstances this happened. It is quite possible that you do not need the help of data recovery programs, since many games store saves in a Windows user folder separate from the actual game application. Reinstall the game and see if you can open saves within the game.

The information has been erased. After recovering lost files, I have damaged files that I don’t know how to recover. The information is very necessary. How to recover a damaged file? Tell me the way out.

Answer. This information is not enough to answer your question correctly. If you restored files yourself and as a result received some of the information in a damaged form, this means that the deleted files have already been overwritten with new information, and this process is irreversible.

It is less likely that you used low-quality recovery software or selected the wrong scanning mode. However, we suggest that you try to recover damaged files again using .

Authors of the article: Gvindzhiliya Grigory and Pashchenko Sergey