Matte background for the inscription
HELLO!
GO!
Captions on the image in Adobe Photoshop very easy to apply. But sometimes you want to decorate a picture with more than just an inscription. At this point, you can try adding a background for the text. In this tutorial we will place an inscription on a matte background.
How to make a matte background for text in Photoshop?
First open with Adobe programs Photoshop the picture on which you want to place the inscription. In our case, this is a landscape with a mountain and hills. A matte background for text in Photoshop will be created using several steps. It will be placed at the bottom of the picture.
Open the Layers panel. If it is not displayed, check the box next to the corresponding item in the “Window” menu. Or just press F7. Commit double click on the “Background” layer. You will be prompted to rename it. Name the layer “Landscape” or something else. This will unlock the layer and you will be allowed to perform any actions with it. Although in in this case we're just trying to keep things organized in the Layers panel. Indeed, in the future the number of layers may increase greatly.
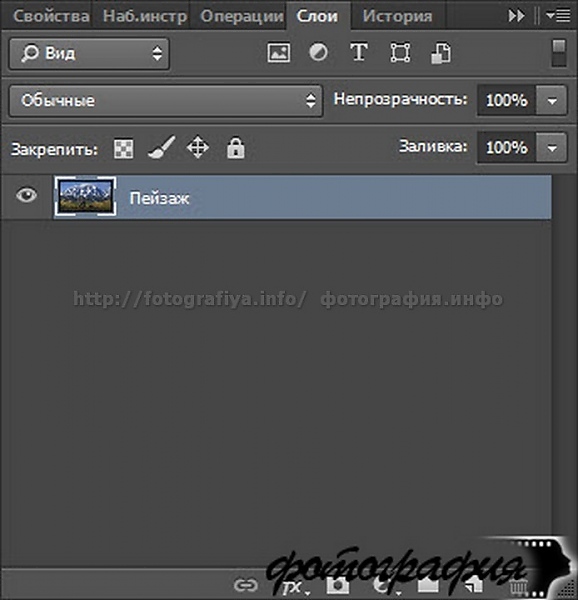
Text on background in Photoshop: Rectangular Marquee Tool
Now you might think that it's time to place the text on the background in Photoshop, but this is not so and we will place the inscription itself much later. This will almost be our last action. For now, let's mark the area in which the matte background will be located. To do this, create new layer. This is done using the keyboard shortcut Ctrl+Shift+N or going to “Layers>New>Layer”. Give this layer the name "Matte Background".
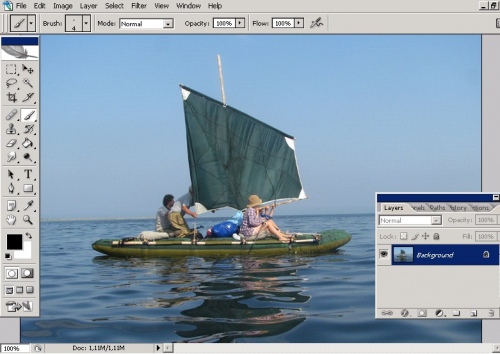
Now use the Rectangular Marquee Tool. Create a selection of the size you need. In our case, this is the area from one edge of the image to the other.
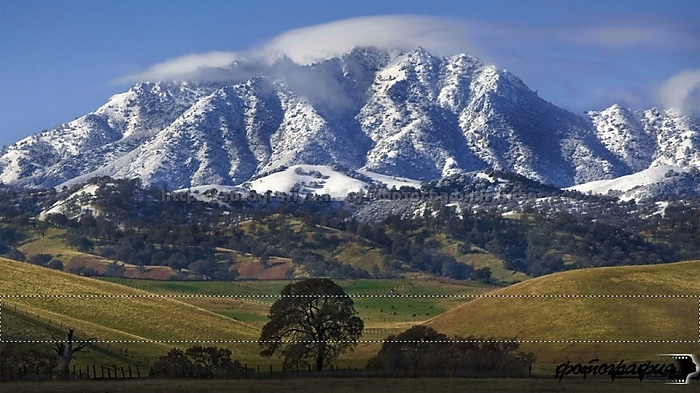
Next, select the Fill tool. You need to fill the selected area with white. To select a color, use a pair of squares on the left side of the program window. The filling itself is done by simply left-clicking on the selected area.
Text background in Photoshop: color selection
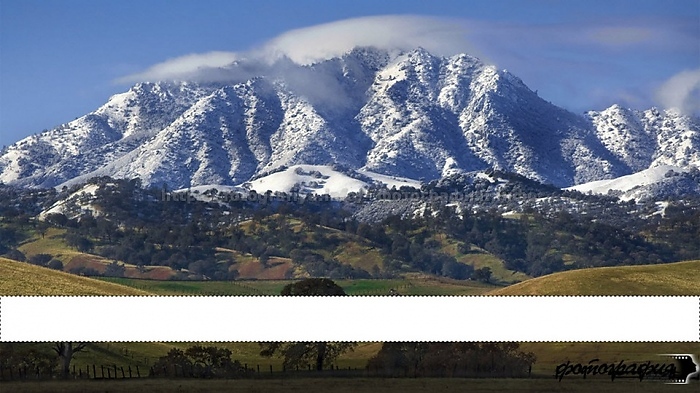
Gradually we create the background of the text in Photoshop and here the selection can be removed. This is done by going to “Select>Deselect”. Notice that this white rectangle now exists as a separate layer. This can be seen in the Layers panel. Go to this panel. Here you need to pay attention to the “Fill” item. Click on the number 100. A slider will appear, which you need to move to the left, bringing it to 20%. Then click on the "Fx" button and select in context menu"Overlay Options" item.

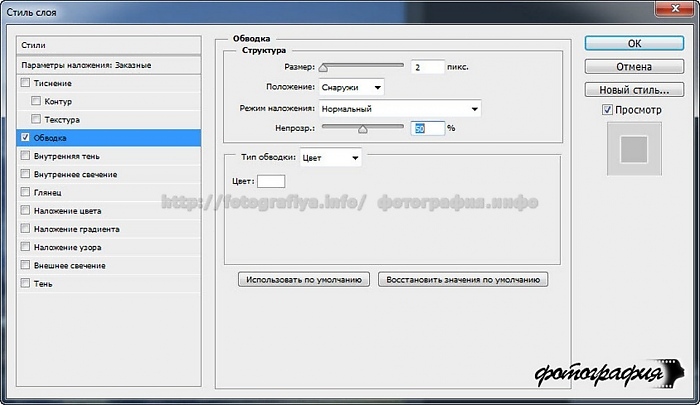
A dialog box will pop up with all sorts of layer settings. We need to achieve a more beautiful transparency of the rectangular area. Go to the "Stroke" tab. In "Color" select White color. Reduce the size to two pixels. Select "Outside" as the position. Set the opacity to 50%. When finished, click the “OK” button.
Text on transparent background in Photoshop
Now we need to change it slightly original image. To be on the safe side, it’s best to make all changes on a copy of the layer, and then we’ll create the text on a transparent background in Photoshop. Making a copy is very simple. Select the “Landscape” layer in the corresponding panel and press the key combination Ctrl+J. Or drag the selected layer onto the Create New Layer button. In any case, a copy of your layer will appear in the panel.
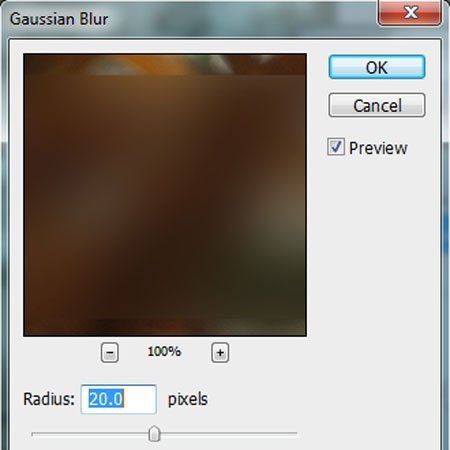
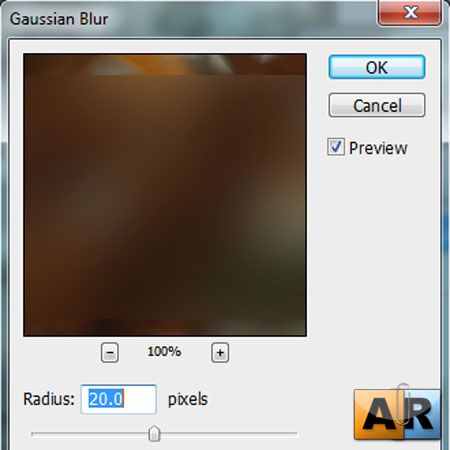
Left-click on the copy layer. Now pinch Ctrl key and left-click on the “Matte Background” layer thumbnail (not its name). You will have the part of the landscape layer selected, located under the previously created rectangle. Next, go to “Filter>Blur>Gaussian Blur”. Increase the radius to 20 pixels. If the photo resolution is very small, then the radius may be smaller.
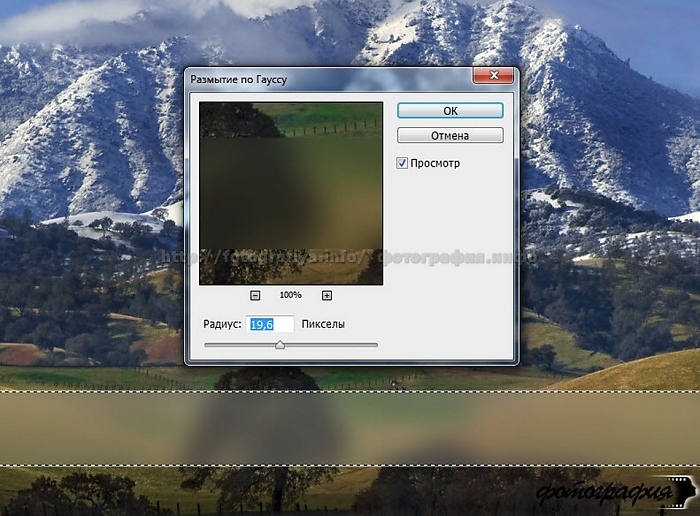
Now create a new layer. You already know how to do this. Name the new layer “Background Enhancement.” In the Layers panel, drag it to the very top. Now you need to load the matte layer selection again. If you did not perform unnecessary actions, the selection will be saved from the previous operation.
Select the Brush tool. Reduce the pressure to 0%, set the color to white. The brush size depends on the image resolution. In our case, 30 pixels was enough. With a brush, you need to make strokes along the upper and lower edges of the rectangular area, lightening them. When finished, lower the layer opacity to 60%.
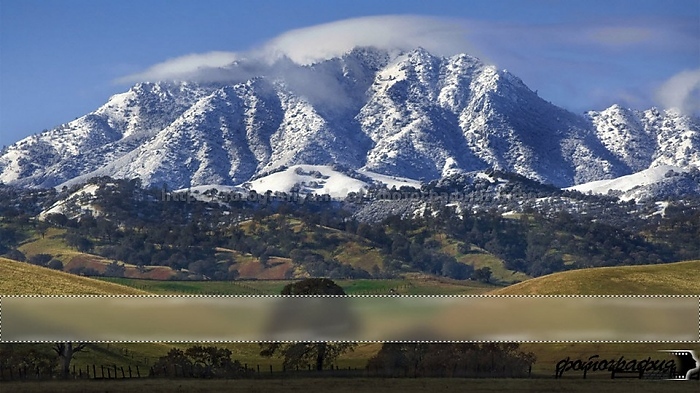
Then you can remove the selection. All that remains is to write some text. This is done using the already familiar “Horizontal Text” tool. After the inscription appears, you can edit the font size, change its type and perform other actions. It all depends only on your imagination.
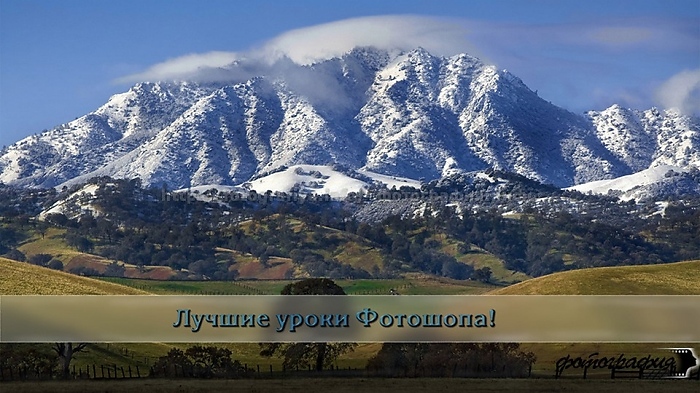
On the Internet you can also find ready-made backgrounds for text for Photoshop; all of them are primarily useful to the creators of cards and invitations. As for our lesson, all actions take a minimum of time. In the future, you can easily answer your question: how to make a matte background for text in Photoshop in just two to three minutes! Follow our other lessons, then you will learn many other wonderful things.
In this small and quick lesson, demonstrates how to improve text inscription, creating a matte background that can enhance the look of your photos or projects.
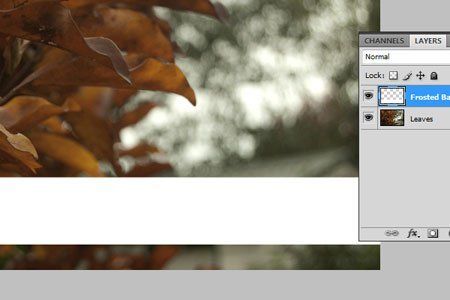
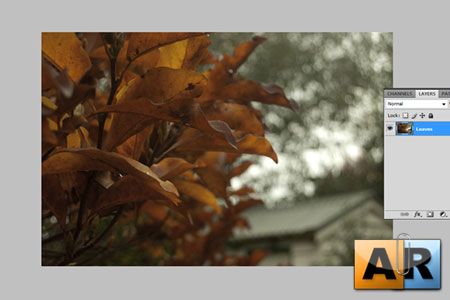
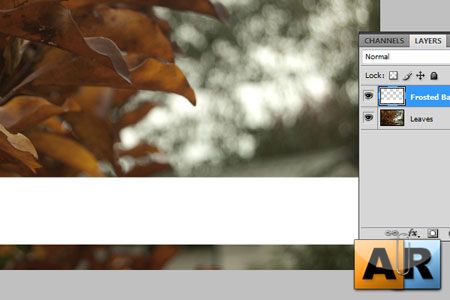
Step 1. Open any image in Photoshop. The author used an autumn photograph. You can use a similar photo if you like. Or choose any other. Rename the layer by double clicking on the layer and name it "Leaves".

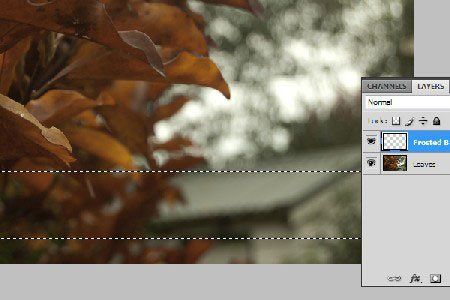
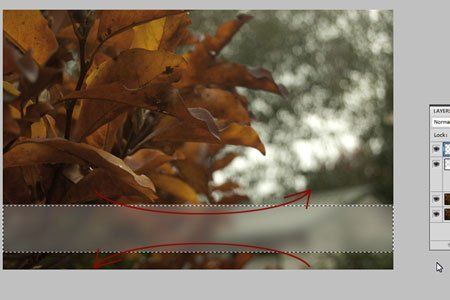
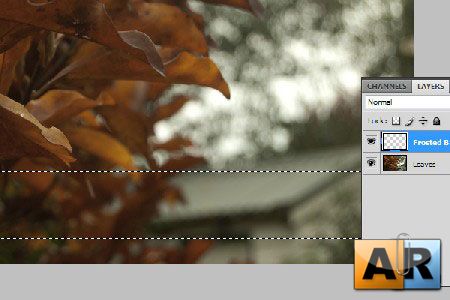
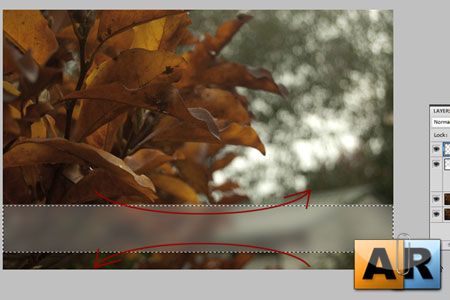
Step 2. Create a new layer (Ctrl + Shift + N) on top of the Leaves layer, and name it "Frosted Bar". Using the tool Rectangular area(M), check that the “Frosted Bar” layer should be active, make a selection of the size you need, the selection should be from one edge of the image to the other. The placement of the bar is up to you. In the author's case: the bar is located at the bottom of the image, as shown below.
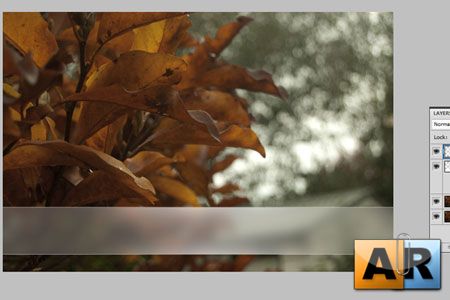
Step 3. Fill the selection with white using Fill Tool(G) (#FFFFFF) and deselect the current selection (Ctrl) + D).
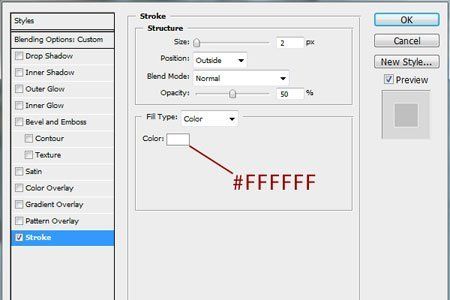
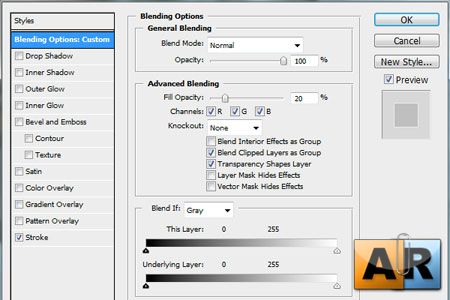
Step 4. Apply the following layer styles to "Frosted Bar". (Blending Options: Normal - Fill Opacity 20%.
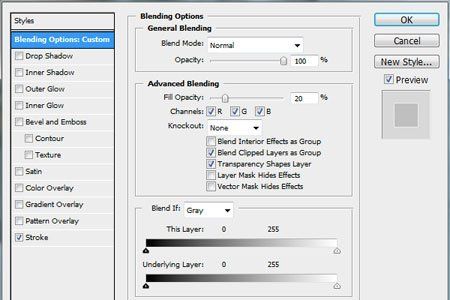
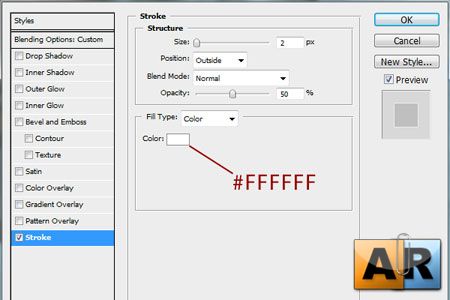
Stroke: Color White (#FFFFFF) Size 2 and Position: Outside and 50% Opacity.
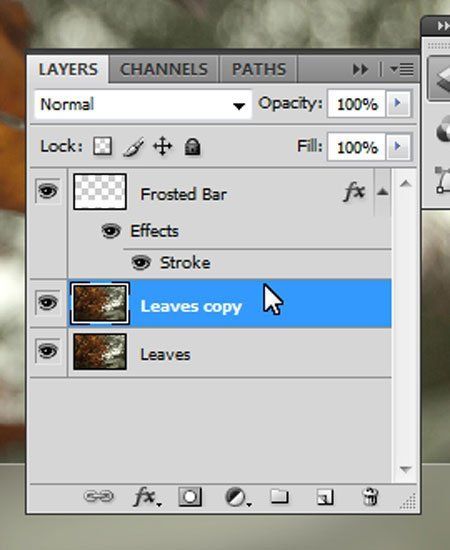
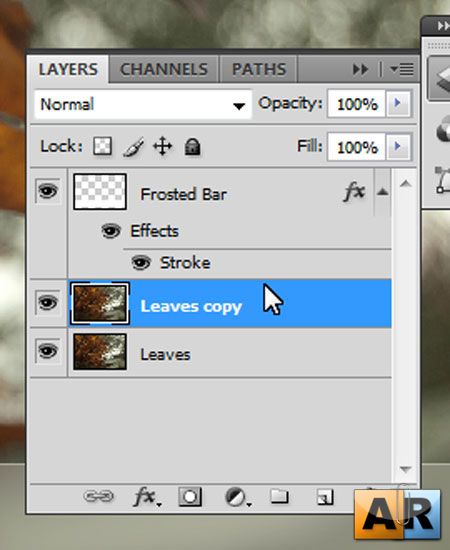
Step 5. We will have to edit our original image. This means it is better to make a duplicate, so you can always change it completely. Make a copy of the “Leaves” layer ((Ctrl) + J). Active layer "copy Leaves", load the selection of the layer with the matte image (Ctrl) + click on the layer "frosted bar" (on the layer image thumbnail). Apply Gaussian blur(Filter>Blur>Gaussian Blur) Radius 20, click OK.
Step 6. Having worked on the main points on the "frosted bar" layer. Create a new layer ((Ctrl) + Shift + N) on top of the "frosted bar" layer, and name it "Highlights". Load the matte layer selection again and select the tool Brush(B). Using a large soft brush(500px, Pressure 0% and Color White: #FFFFFF), lighten the top and bottom edges (as shown in the image) and then lower the layer opacity to 60%.

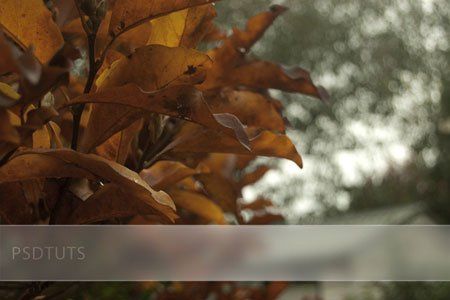
Step 7 In the final step, we will add text. Using the tool Horizontal text(T) Add any text you want within the bar of any size (In the author's case, font size 100px). Reduce the Opacity to 40% on the text layer and change the Blend Mode to Overlay.
Final image
Look at what should have happened. I hope you enjoyed the lesson!
Instructions
Launch Adobe Photoshop and open any photo in it. To do this, click the “File” menu item, then “Open” in the drop-down menu (or easier - use the Ctrl + O keys). In the window that appears, select required file and click "Open".
On this moment There is only one layer in the document - its background. Click the Layer menu > New > Layer (or use the keyboard shortcut Shift+Ctrl+N) to create another layer. In the window that appears, immediately click “OK”.
Select the Rectangular Marquee Tool ( hotkey M, switch between adjacent elements - Shift+M) and use it to select some area in the image, for example, the bottom one, as in the illustration above. Make it white color main, activate the “Fill” tool (G, switch – Shift + G) and paint over the selected area, for which click inside it with the left mouse button.
In the Layers tab, click right click mouse over “Layer 1” (you created it in the second step of the instructions) and select “Blending Options”. In the "Opacity" field, set from 20% to 40%, as you wish, leave the rest of the parameters unchanged. Switch to the Stroke style, which is at the very bottom of the list of styles, and set the Opacity to about 20%. The area you selected will take on a whitish tint.
Activate the background layer in the layer list, click Filter > Blur > Gaussian Blur, set the Radius to about 35, and click OK. The selected area will become matte.
To save the result, click the file menu item “File”, then “Save As” (or press the key combination Ctrl+Shift+S), select a location to save, name the future file something, specify Jpeg in the “File type” field and click Save.
If the photo is too sharp, small defects and wrinkles are visible on the skin, Photoshop program will help you eliminate all this. In order to do photograph matte, you just need to know the basics of this program - adding layers, applying filters and layer masks.
You will need
- - digital photography;
- - computer and Photoshop program.
Instructions
Open the image in the program, make a duplicate layer. On a new layer, remove all skin irregularities - unnecessary moles, acne, scratches, wrinkles. Use a healing (healing) brush for this.
Make another duplicate of the layer and select among the filters “Noise” / “Dust and Scratches”. Try changing the filter settings to get the perfect soft blur. Don’t worry that your eyes have also become blurry - in the future they will be bright again. On the same layer, apply a Gaussian Blur to achieve an even more matte look.
To give the skin the desired texture, make it more realistic and not so smooth, add another filter - “Noise” / “Add Noise”. Select “Monochrome noise” and select the optimal value, usually no more than 1%.
To add this layer to the original photo selectively (for example, only on the skin, leaving the eyes, hair, lips clear), click the “Layer Mask” button at the bottom of the palette. Select the Fill tool, black color and click on the document. As a result, the cloudy layer created during the first steps should disappear.
Now start adding matte to the photo. To do this, select a brush from among the tools, reduce the hardness as much as possible (you can also reduce the transparency). Make sure you are on a layer mask and tone the model's skin, being careful not to get it on the eyes, hair, eyebrows, lips. If you make a mistake, switch to a black brush and erase part of the layer.
If you additionally need to change the color, use parameters such as “Photo Filter”, “Background Color”/“Saturation”, “Color Balance”.
To make some parts of the photo sharper and leave the main part matte, duplicate the middle layer and change the blending mode to Overlay. Find “Color Contrast” among the filters and set the appropriate value. If the effect is too strong, reduce the layer's opacity.
Using Adobe Photoshop, you can add a variety of effects to images: change color settings, add new fragments, change transparency. You can make a photo translucent in different ways.
Instructions
Open the photo that will become the background.
Collapse the image without covering it and open another image, which will become translucent. Click on keyboard Ctrl and click on the layer icon. A highlight will appear around the photo. Using the combination Ctrl+C, save the drawing to the clipboard.
Restore the first photo and paste another image from the buffer using Ctrl+V. Press Alt keyboard, and at the bottom of the layers panel is the Add Layer Mask button. Layer mask applied in the usual version, hides the bottom image, in the alternative - the top one.
This quick and easy tutorial demonstrates how to enhance lettering by creating a matte background that can enhance the look of your photos or projects.
Step 1: Open any image in Photoshop. The author used an autumn photograph. You can use a similar photo if you like. Or choose any other. Rename the layer by double clicking on the layer and name it "Leaves".
Step 2 Create a new layer (Ctrl + Shift + N) on top of the Leaves layer, and name it "Frosted Bar". Using the Rectangular Marquee Tool (M), check that the "Frosted Bar" layer should be active, make a selection of the size you need, the selection should be from one edge of the image to the other. The placement of the bar is up to you. In the author's case: the bar is located at the bottom of the image, as shown below.
Step 3. Fill the selection with white using the Fill Tool (G) (#FFFFFF) and deselect the current selection (Ctrl) + D).
Step 4 Apply the following layer styles to the "Frosted Bar". (Blending Options: Normal - Fill Opacity 20%.
Stroke: Color white (#FFFFFF) Size 2 and Position: outside and 50% Opacity.
Step 5. We will have to edit our original image. This means it is better to make a duplicate, so you can always change it completely. Make a copy of the “Leaves” layer ((Ctrl) + J). Active layer "copy Leaves", load the selection of the layer with the matte image (Ctrl) + click on the layer "frosted bar" (on the layer image thumbnail). Apply a Gaussian Blur (Filter>Blur>Gaussian Blur) Radius 20, click OK.
Step 6. Having worked on the main points on the "frosted bar" layer. Create a new layer ((Ctrl) + Shift + N) on top of the "frosted bar" layer, and name it "Highlights". Re-select the matte layer and select the Brush Tool (B). Using a large soft brush (500px, 0% Pressure and White color: #FFFFFF), lighten the top and bottom edges (as shown in the image) and then lower the layer opacity to 60%.
Step 7. In the final step, add text. Using the Horizontal Text Tool (T) add any text you want within the bar of any size (In the author's case, the font size is 100px). Reduce the Opacity to 40% on the text layer and change the Blend Mode to Overlay.
Final image
Look at what should have happened. I hope you enjoyed the lesson!


