How to get back lost files. A program to recover lost data. Using a restore point
Data recovery
While working with a computer, you can often encounter various kinds of serious problems. One of these problems is precisely data recovery.
Let's say you work at the computer, listen to music and delete those songs that you don't like. So you delete and delete, and then you accidentally deleted the song that you just need. Panic immediately seizes you and you instantly try to remember whether you recorded this song on a disk or flash drive. True, you can still somehow live without your favorite song, but if you deleted it, for example thesis which you had in a single copy, and the defense of your diploma is the day after tomorrow, then this is already a very serious problem. Let's look at the entire recovery procedure step by step so that everyone can recover important data.
Start
Let's say we accidentally deleted a file. To make the events more realistic, I will delete a file from my computer that I really need. I selected a movie on my computer that I have never seen but really want to watch. And so I select it and press the key combination Shift+DEL (deleting a file without first placing it in the trash). And now my film is gone.
Important: When you have deleted a file that you want to restore, do not, under any circumstances, perform other operations with the files after deleting it: copying, moving, deleting.
Selecting a data recovery program
There are a lot of data recovery programs. I won’t tell you how to work with everyone, but I’ll just give an example using the program that I use myself.
The program is called . You can download it from It looks like this:
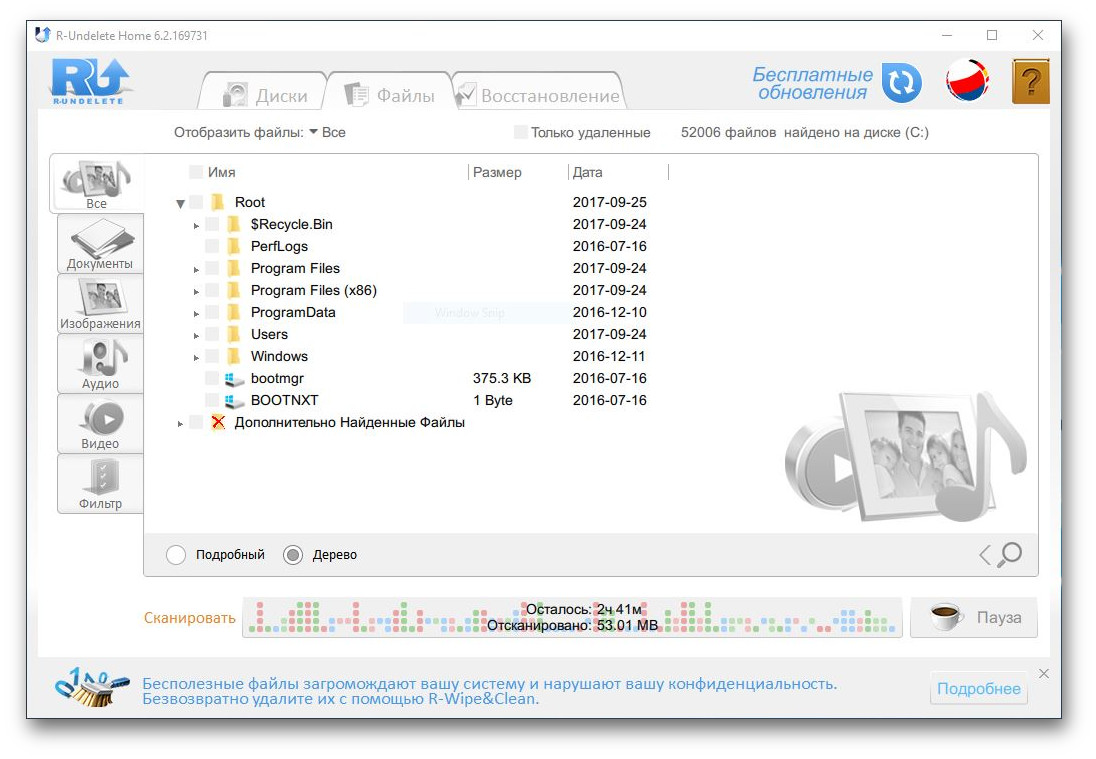
The program consists of three windows. The left one is your computer where your local, virtual and physical disks are located. The top window is the window in which we will search for our movie after scanning the computer. And the bottom one is the information window. Let's get started.
We restore
So, let’s remember where our file was on the computer before we deleted it, that is, deleted it. My movie was located at: “D:\movies\2\Other” The file itself had the name “2012.(2009).DVDRip.Rus.avi”. Go to the program and in the left window click on the item " Local Disk(D:)"A window will appear:

In this window we are given the options of scanning full (Advanced) or simple (Simple). To begin with, we choose a simple one, that is Simple. After launch, a scanning progress bar will appear at the bottom right:
After scanning is completed, go in the program to the address of the file we deleted “D:\movies\2\Other”:

We see that the program has found our movie, the program sees that it has been deleted, since our movie has a dark icon compared to other files. In order to restore a file, you need to select it by clicking on it with the mouse and clicking the “Recover” button, then select the location to restore the file and click “OK”.
If the program does not find your file, then you need to return to the scanning options and instead of the “Simple scan” item, select the “Advanced scan” item.
Good luck in recovering your lost data..
Share the post on your social networks!
Instructions
In fact, any remote files Can . For this you will need a special one. It is very convenient and easy to use universal utility TuneUp Utilities. Download and install the program. After installation is complete, restart your computer, even if you were not prompted to do so.
After reboot, launch TuneUp Utilities. The first one will be a little long. The program will scan your computer for errors, unnecessary files in and other problems. At the end of the scan, you will be prompted to resolve these issues and optimize. Agree, because in any case it won’t hurt. After the optimization process is completed, you will be taken to the main menu of the program.
In the top window of the program, select “Troubleshooting”. A window will appear with various actions. Select the action "Recover deleted files" A list with a section will appear in the next window hard drive. The section from which they were deleted files, check the box and click Next. You will see the “Search Criteria” line in which you should enter the name of the file that you want to restore (it is not necessary to enter full name file, you need to enter at least a partial name of it). If you don't know the name, you can enter, for example, doc or avi.
After selecting all the options, click Next. A search for files will be performed, after which a list of all found files with the selected parameters will appear. Select the desired file and click "Recover". You can restore to the original folder where the file came from, or select another folder.
Sources:
- Files disappear after system restore
Sometimes it happens that you deleted by mistake necessary files. For example, such files were audio or video recordings. Restoring these records will not be difficult for you, because... There are many multimedia files in the vastness of the world global web. But what about documents and reports that are of great value to you? In this case, data recovery programs can come to the rescue.
You will need
- Software to recover data on your hard drive.
Instructions
The most important thing in this matter is any work. When you delete files, they are just overwritten, but what do you think. If you look at the free disk space information, you can see that there is a certain amount of free space. Turns out, HDD constantly filled with information, but unnecessary information that you become merely invisible. Therefore, when using specialized programs, you can recover up to 99% of erased files. This is only possible if, after deleting them, no operations occurred with the files on the disk (creating and deleting folders and documents). As soon as you discover the loss necessary files, take the following steps:
Undo all the work you were currently doing;
Install specialized program to recover deleted files;
After they are restored, you can do your work.

Let's use the data recovery utility Ontrack Easy Recovery. This multifunctional program It is distinguished by its simplicity and wide range of settings. Go to the program, it will automatically start scanning your disks. Select the disk on which the file was erased, click the "Next" button. In the window that appears, the program automatically detects the disk file system; you can also set it personally by clicking on the "Advanced Options" button. After that, click "Next" again, the search will begin recently. After deep scan The results will appear in front of you: all the files that you see in this window can be restored. To do this, you can use the buttons on the toolbar or select one of the items context menu file.

When important file lost, a document you spent a week on was erased, and photos disappeared from a suddenly formatted memory card, no need to worry ahead of time. When you delete a file from the disk, its description in the system is erased. The set of bytes that made up the file remains in place until something else is written on top of them. So you can try to recover your data using any of these applications.
Be careful if you install applications on a drive that contains deleted files. There is a risk that application files will be overwritten during installation. It is better to select another partition or physical disk for installation.
Platform: Windows.
Price: free, $19.95 for premium version.
Recuva can recover data lost by mistake, for example from an accidentally emptied Recycle Bin. The program can return photos from an accidentally formatted memory card in the camera or music from an empty MP3 player. Any media is supported, even iPod memory.
Platform: Windows, Mac.
Price: free, $89 for premium version.

Disk Drill is a data recovery application for Mac, but there is also a version for Windows. This program supports most types of disks, files and file systems. With its help you can restore erased files due to Recovery functions Protection, as well as find and clean up the disk. However free version does not allow you to recover files lost before Disk installations Drill.
Platform: Windows, Mac, Linux, FreeBSD, OpenBSD, SunOS, DOS.
Price: for free.

Very functional and universal application with open source code. Him text interface, but it’s not difficult to figure it out.
TestDisk supports great amount file formats. In addition, the program can be burned to a LiveCD to recover data from a disk on which the system does not boot. The utility can restore damaged boot sector or lost data.
Comes with TestDisk PhotoRec program, which recovers deleted files, photos, music and videos.
4. R-Undelete
Platform: Windows, Mac, Linux.
Price: the free version recovers files up to 256 KB in size; $79.99 for full version.
R-Undelete is part of R-Studio. It's a whole family powerful programs for data recovery. Supported file systems FAT12/16/32/exFAT, NTFS, NTFS5, HFS/HFS+, UFS1/UFS2 and Ext2/Ext3/Ext4.
R-Studio applications can recover deleted data as local disks, and over the network. In addition to data recovery, the utilities provide tools for advanced partition copying and searching for bad blocks on disks.
Platform: Windows.
Price: free in trial mode with recovery of up to 1 GB of data; $69.95 for full version.

Eassos Recovery recovers deleted files, photos, text documents and more than 550 file formats. The application has a very simple and intuitive interface.
Platform: Windows.
Price: the free version does not save found files; $37.95 for full version.

Developer Hetman provides a set of recovery utilities various types data: entire sections or individual photographs and documents. The program supports everything hard disks, flash cards, SD and microSD.
Platform: Windows.
Price: free, $19.97 included with Glary Utilities.

Glary Undelete can recover any deleted files, including compressed, fragmented or encrypted ones. Filtering of recovered data is supported.
You know more convenient and functional applications for data recovery? Tell us about them in the comments.
USB flash drive is not the best suitable device for permanent storage of files, but in life anything can happen. And situations when valuable data located only on it were accidentally erased happen regularly. However, in about half of the cases, grief can be helped by recovering deleted files from a flash drive. Under what circumstances is this possible and how to do it, read on.
I won’t get my hopes up in vain: the chances of successful data recovery from USB flash drives are lower than from stationary drives - hard drives PCs and laptops and permanent memory mobile devices. The reason is that flash drives are usually used to transfer files from one device to another. And accidentally deleted data most often ends up being simply overwritten, sometimes even more than once. And overwriting, unfortunately, destroys the information irrevocably.
Full or partial file recovery on our own possible in the following cases:
- The user deleted them manually.
- The drive was formatted using the operating system.
- The files became inaccessible after a virus attack.
- The files disappeared after splitting the flash drive into partitions.
- A logical failure of the file system has occurred: it has become defined as RAW - unknown, or Windows and programs consider the entire space of the device to be unallocated.
The chances of recovery are extremely low or zero if:
- The flash drive is physically faulty - it is not detected by the computer at all or is recognized as unknown device, access to its memory is either completely absent, or the size of the latter is several KB instead of tens of GB. The exception is relatively simple breakdowns that do not affect the controller and device memory.
- The files were deleted using a shredder program.
- The flash drive was low-level formatted (essentially repartitioned and rewritten) or reflashed (the controller microcode was rewritten).
- The files are encrypted, but there is no decryption key. It may be the result of an attack by a ransomware virus or user actions (encrypted, but lost the key). In the first case, it is sometimes possible to recover files if you have a suitable decryptor.
In case of physical and complex logical faults, data recovery from flash drives is sometimes possible, but often costs the owner very much - up to several tens of thousands of rubles (not even the result, but the attempt at recovery, can cost that much). Therefore, in such situations, many people prefer to say goodbye to files forever.
How to increase your likelihood of success
Even if your case falls into the simple category, in order to increase the chances of a successful recovery, adhere to the following rules:
- The fewer operations were performed on the drive’s file system, the better result. Therefore, start recovery immediately as soon as you notice missing files.
- Save the recovered data only to another physical media(computer hard drive, second flash drive, etc.).
- Try to restore everything in one session. Don't interrupt unless absolutely necessary.
- If one recovery program does not help, use others. Sometimes simple free utilities turn out to be more effective than expensive paid ones. It is impossible to know in advance what will help in your case, so try everything that is available.
- If the recovery program is capable of creating and saving images of drive file systems, be sure to use this feature. In case of unexpected failure of the flash drive or accidental overwriting before the end of reading, you can restore the data from the image.
7 best programs for data recovery from flash drives
You may already be familiar with some of the storage device data recovery programs. Our site talked about them in an article about. Today our collection will be replenished with seven more applications of the same purpose. Maybe one of them will be life-saving for you.
R.saver
Wise Data Recovery
Wise Data Recovery is another worthy tool for recovering information from stationary and portable storage devices. Available only in Windows version. Like its predecessors, it works without installation on a hard drive. Is different high speed scanning and displays the possibility of recovery of each found object.
If next to the file there is:
- Red circle—data has been completely overwritten and cannot be restored.
- Yellow circle—overwriting is partial, success is not guaranteed.
- Green circle—the file has not been overwritten and is recoverable.
When you click on “green” files, if it is a picture or document, the program shows their thumbnails (if saved). It also has a function to search for certain types of data by keywords: pictures (imagies), audio (audios), videos (videos), documents (documents), archives (compressed files) and mail (emails).
Wise Data Recovery- fully free application and, by the way, with support for the Russian language.

How to use Wise Data Recovery:
- Unpack the archive with the program into any folder and run executable file WiseDataRecovery.exe.
- Select the desired media from the list and click “Scan”.
- Select the files you want to recover from the list. Click the "Recover" button.
- Specify the location to save the files on your hard drive.
Disk Drill
Disk Drill utility, well known to many Mac users OS X some time ago appeared in the Windows version. More precisely, in two: free - free, and paid - pro. The free one allows you to recover up to 1 GB of information, the paid one - without restrictions.
Unlike three previous applications, Disk Drill required mandatory installation to the computer (for which it receives a minus, since this simple operation can lead to overwriting the data that the user was just about to restore). But it has a number of benefits that others do not have.
At constant using Disk Drill keeps track of deleted files and also creates them backups, which increases the chances of their recovery even after time. In addition, it supports any type of storage device and almost all file systems (it knows more than 300 unique file signatures).
Disk Drill does not have a Russian localization, but it is quite easy to use.

How to recover deleted files from using Disk Drill:
- Install the application on your PC and run it with administrator rights.
- Select a USB flash drive with deleted data from the list of media.
- Open the drop-down list next to the Recover button, which is located opposite the flash drive, and click the desired scan type: “Run all recovery methods” (use all search and recovery methods), “Quick scan” ( quick check), "Deep scan" ( deep check) or “Load last scanning session” (load the result of the last scan). Click the "Recover" button (or "Continue" if you have already started working with the media).
- In the next window that opens after scanning, select the desired files from the list, specify the location to save them and click “Recover” again.

RS File Recovery
RS File Recovery is a paid Russian-language application. In addition to the main thing - recovering information from physical drives, it is able to save and subsequently work with their images. After creating the image physical device with data can be disabled, since the program has already “remembered” all its contents. In addition, the application has a built-in HEX editor for manual byte-by-byte correction of files, as well as FTP client to upload the recovered file to network resources.
After analyzing the RS storage device File Recovery displays information about the data on it - when it was created, when it was changed, whether it can be restored. This information appears in the bottom pane of the window.
Unfortunately, in the free demo version of the utility, the recovery function does not work, only viewing is available. The cost of a license starts from 999 rubles.
Like Disk Drill, RS File Recovery requires installation on your computer.

How to use RS File Recovery:
- Launch the application. Select a flash drive from the list of media by simply clicking on it. All its contents, including deleted files, will be displayed in the middle part of the window.
- Click on the item you want to restore. Information about it, including the forecast, will be shown in the panel below.
- Drag the required files to the recovery list on the right side of the window and click the “Recover” button.
- Select the saving method: to hard drive, to CD/DVD, to the Internet via FTP or convert to virtual image ISO.

- Specify the destination folder on your hard drive. Follow the assistant's instructions when selecting other saving methods.
Ontrack EasyRecovery
Ontrack EasyRecovery is one of the most functional and effective programs data recovery, the main competitor of industry leader R-Studio. It successfully extracts data even with very strong damaged media, supports all types of file systems and more than 250 file formats, creates virtual images of physical storage devices, can boot from DVDs and USB flash drives, and also has a lot of other useful features.
EasyRecovery is available in several paid editions with different sets of functions. The most inexpensive is home-based, which will cost the user $79 per year. Professional, enterprise and specialized (for servers) cost from $299 to $3000 for an annual license.
Despite the enormous possibilities, even a novice user can use this program, since each stage of the work is accompanied by a built-in assistant. It is also impossible to make a mistake because it is completely translated into Russian.

How to use Ontrack EasyRecovery:
- Launch the application (it is available in installation, portable and, as already mentioned, boot versions). Specify the type of media on which the deleted data is located.
- Select the volume to scan (if it is a flash drive, then, as a rule, there is only one volume on it).
- Select a recovery scenario. Restoring objects after deletion and formatting are different scenarios. First, try using the first one - it works faster, and if that doesn’t help, try the second one.
- If the data was affected by a logical failure, identify one or more types of file systems that may be on the media.

- Check again that the conditions are correct and confirm your selection. After this, the program will begin scanning the flash drive.
- After scanning is completed, highlight in the list necessary objects(to select multiple, press and hold Ctrl key). Click the “Save” button in top panel main window and specify the destination folder on your hard drive.
To create an image of a storage device and work with it in the future, after starting the program, select the device in the list of media, open the “File” menu and click “Create image file”.

Active UNDELETE
Active UNDELETE is another paid utility that successfully copes with the recovery of individual deleted objects and entire disk partitions. Supports all types of media, all file systems and more than 200 various formats files. In addition to the main problem, it allows you to solve related problems - correct partition table errors and boot records, create, format and delete disk volumes, etc. Like the bulk paid analogues,Active UNDELETE supports the creation of virtual drive images.
Demo version of the program available for free download, has full set functions, but does not allow you to recover files larger than 1 Mb.
The Active UNDELETE interface is exclusively in English, but the utility is easy to use, since each action is accompanied by a wizard.
Unfortunately, it does not have a portable version. Installation only.

How to work with Active UNDELETE:
- Launch the program. Click “Recover deleted files” in the first window that opens. This will launch the recovery wizard.
- The first window of the wizard is a brief information about how the program works on English language. To go to next step click "Next".
- Next, select one or more devices on which the desired files are located. Click "Next" and in the next window - "Scan".
- After scanning, mark the items you want to recover and proceed to the next step.
- Set the saving options - folder, file names, renaming in case of matches, etc. You can leave everything as default.

- The last step is the actual recovery. To launch it, click the “Recover files and folders” button.
If you want to create a virtual image of a flash drive, open the “Disk image management” section in the main window and run the “Create disk image” wizard.
When an important file is lost, a document you spent a week on is erased, and photos disappear from a suddenly formatted memory card, there is no need to worry ahead of time. When you delete a file from the disk, its description in the system is erased. The set of bytes that made up the file remains in place until something else is written on top of them. So you can try to recover your data using any of these applications.
Be careful if you install applications on a drive where deleted files were located. There is a risk that application files will be overwritten during installation. It is better to select another partition or physical disk for installation.
Platform: Windows.
Price: free, $19.95 for premium version.
Recuva can recover data lost by mistake, for example from an accidentally emptied Recycle Bin. The program can return photos from an accidentally formatted memory card in the camera or music from an empty MP3 player. Any media is supported, even iPod memory.
Platform: Windows, Mac.
Price: free, $89 for premium version.
Disk Drill is a data recovery application for Mac, but there is also a version for Windows. This program supports most types of disks, files and file systems. With its help, you can restore erased files using the Recovery Protection function, as well as find and clean up the disk. However, the free version does not allow you to recover files lost before installing Disk Drill.
Platform: Windows, Mac, Linux, FreeBSD, OpenBSD, SunOS, DOS.
Price: for free.
A very functional and versatile open source application. It has a text interface, but it is not difficult to understand.
TestDisk supports a huge number of file formats. In addition, the program can be burned to a LiveCD to recover data from a disk on which the system does not boot. The utility can recover a damaged boot sector or lost data.
TestDisk comes with the PhotoRec program, which recovers erased files, photos, music and videos.
4. R-Undelete
Platform: Windows, Mac, Linux.
Price: the free version recovers files up to 256 KB in size; $79.99 for full version.
R-Undelete is part of R-Studio. This is a whole family of powerful data recovery programs. Supported file systems are FAT12/16/32/exFAT, NTFS, NTFS5, HFS/HFS+, UFS1/UFS2 and Ext2/Ext3/Ext4.
R-Studio applications can recover deleted data both on local drives and over the network. In addition to data recovery, the utilities provide tools for advanced partition copying and searching for bad blocks on disks.
Platform: Windows.
Price: free in trial mode with recovery of up to 1 GB of data; $69.95 for full version.
Eassos Recovery recovers deleted files, photos, text documents and more than 550 file formats. The application has a very simple and intuitive interface.
Platform: Windows.
Price: the free version does not save found files; $37.95 for full version.
The Hetman developer provides a set of utilities for recovering various types of data: entire sections or individual photos and documents. The program supports all hard drives, flash cards, SD and microSD.
Platform: Windows.
Price: free, $19.97 included with Glary Utilities.
Glary Undelete can recover any deleted files, including compressed, fragmented or encrypted ones. Filtering of recovered data is supported.
Do you know more convenient and functional data recovery applications? Tell us about them in the comments.


