How to make a wi-fi distributor out of a laptop. How to make your computer distribute Wi-Fi instead of a router: Complete instructions
I can't help it! I read an excellent article and I want to share it with you, friends.
1.Install the program. (reboot the computer)
2. Launch MyPublicWiFi as administrator.( right click on the program icon, then select...Run as administrator).
3. In the next window, select Automatic Hotspot configuration and do the following:
Network name (SSID)… you must write the name of the new network.
Network key... you need to write a password. Minimum 8 characters.
Need to choose network connection… through which you connect to the Internet. Usually this is a connection via local network.

Then you can start distributing Wi-fi.
This is done by clicking the Set up and Start Hotspot button. The process of checking the configuration of your settings will begin.
If the settings are correct, a connection will appear that will provide access to the Internet.  It will show up as wireless in the Network Connections section. However, you succeeded and you can offer the Internet to a friend behind the wall for a reasonable price.;)
I think we need to talk about safety. You installed it in your apartment Wi-Fi router?
I think that most people do not think about the security of their Wi-Fi wireless network (default settings).
What's bad here, what is admin/admin?
But here's what... a cunning neighbor may well stick to your router, downloading large amounts of information from the network around the clock and occupying a significant percentage of the data transmission channel.
This will make it very uncomfortable for you to simply surf the Internet.
What to do?
Here's what:
1. change the name/password of our administrator account.
2. B address bar enter(192.168.0.1.) in your browser. This address may be different for each type of router.
3. A window appears for us to enter the admin username and password (by default - admin/admin).
4. Find...Maintenance, section...Administrator.
5.Create a password that you need to remember or write down (New Password), then in...Confirm Password, confirm the password.
6.In Login Name, also change the name of the administrator entry. After making changes, do not forget to click the ... Save Settings button each time.
Now an attacker will not be able to easily get to our router, even after connecting to the network.
1. Find the …Setup tab.
2.in it, select the section... Wireless Settings.
3. In the window that opens, select the option... Manual Wireless Connection Setup.
4. Find the settings section... Wireless Network Settings.
5.In this section... Wireless Network Name, you need to set a fairly complex name for our Wi-Fi network (SSID).
Of course, you need to remember.
6. To hide this network name, check the box...Enable Hidden Wireless.
7. Next we go down to the section...Wireless Security Mode.
8.There you need to select...WPA/WPA2, and in the section that appears...Network Key, we enter our password.
This will be the connection password. Don't forget to click the button... Save Settings.
Now, to connect to our network, an attacker will need to guess the point name and password, which is not at all so easy.
These simple steps provide double security.
Good luck girls and boys….Maya.
Install Hotspot Connectify (http://www.connectify.me/almost-there/) an unusual program that can create a Wi-Fi hotspot and start receiving WiFi on all devices
With virtual Connectify router, you will have a fully functional router inside your PC for Windows 7, 8, XP OS.
This easy-to-use virtual router allows you to share the Internet from your laptop, smartphone, tablet, media player, e-books, other laptops, and even with friends.
This utility is completely free, which is great!
With Hotspot Connectify you can turn your laptop into WiFi point Your smartphones and other mobile devices will be able to access and then get WiFi, and for this you will only need a few clicks of the mouse.
Just like yours home router, Hotspot Connectify virtual router is protected by strong WPA2 encryption.
Setting up takes only a few seconds, and even a beginner can handle it without any special training. I think easier to install can not be.
Of course, you need to add something from yourself... otherwise it’s somehow inconvenient.
There is a lot of talk on the Internet about the importance of passwords.
It is even emphasized in bold that for all important accounts it is necessary to select different passwords and change them periodically.
The password must include letters, numbers and symbols !
Like this one for example: Password: 72@Fee4S@tupra!
But in real life It turns out that using only a password to protect data has long been extremely insufficient...
For quite a long time and for a long time they have been talking about the fact that using high speeds GPU password selection will significantly speed up. But there are technologies that allow the search to be done even faster.
Well, very quickly... so quickly that just one password almost loses its meaning.
The Swiss company specializing in security Objectif Sécurité took advantage of SSD technology disks with rainbow tables.
Apparently the speed of the disk today, and not the speed of the processor, is what is slowing down this work factor. SSD drives can significantly speed up the process of cracking a password, but by how much?
In March of this year it was already stated that using SSD disks will allow you to achieve a search speed of 300 million passwords per second and comprehensively complex password can be hacked in 5.3 seconds.
What are the realities...
For check real speed hacking, hashes of 14 character WindowsXP passwords were taken. Let's go...:31d6cfe0d16ae931b73c59d7e0c089c0
Answer: Password: Empty password…
Hacking... Time: 2 seconds
Let's take even more than 14 characters. Like this:
Hash::6bcec2ba2597f089189735afeaa300d4
Answer: Password: 72@Fee4S@mura!
Hacking... Time: 5 seconds
Let's try again:
Hash::
Password: (689!!!<>”QTHp
Time: 8 seconds
Hash::
Password: *mZ?9%^jS743:!
Time: 5 seconds
And finally:
Hash::
Password: T&p/E$v-O6,1@)
Time: 11 seconds! I had to wait a bit.
Just awful!
Of course, with some effort, we managed to create a password that led the system into a dead end; it contained characters from the extended ASCII set. But WindowsXP will not allow the use of such a password. This program(ophcrack) is available in commercial and free version.
You can familiarize yourself with this program. Here you can also check how quickly your password is selected. Ophcrack Open Source- livecd version.
This demonstration quite convincingly shows that for reliable data storage you should use A complex approach. Having come up with strong password, further secure your Google account by using .
In this case, to log in you will not only need to know your username and password, but also have access to your phone. Even if an attacker steals or guesses your password, he will not be able to log into your account without your phone.
Additional account protection is provided by entering two types of data:
Password and code received using the phone.
Good luck, Friends!
Despite the fact that now the simplest wireless router You can buy it for only about 1000 rubles, but still not everyone can afford it yet. And some people simply don’t want to spend money on it. But there are emergency cases when you urgently need to organize a Wi-Fi network, but there is no router or access point for it. For example, you bought modern TV Smart TV and want to use it to watch videos on YouTube. What should I do? The solution is simple - we will use the means at hand to distribute WiFi without a router. I will give several working examples, and you can decide which one is more convenient for you.
How to share the Internet from a laptop on Windows 10
In modern operating systems from Microsoft, which are installed on most computers in Russia, it is possible to organize virtual point access and make a router out of a laptop. The only limitation is that this computer must be connected to the Internet either through a wired Ethernet adapter or through a 3G/4G modem. The fact is that using one adapter, the laptop will not be able to distribute the Internet via Wi-Fi and receive it. The second limitation has now practically disappeared. The fact is that wireless adapter or its driver must also support such a function. On modern computers Problems with support are very rare.
So, in order to use your laptop as a router and distribute the Internet in Windows 10, you need to enable the Wi-Fi adapter on it, and also make sure that it works and there are no problems with installed driver. After this, there are two ways - to activate the function manually or use the program. Consider both options.
Method 1: netsh wlan hostednetwork commands and ICS sharing
To set up your own virtual router Windows and enable general access to it using the built-in ICS mechanism, do the following.
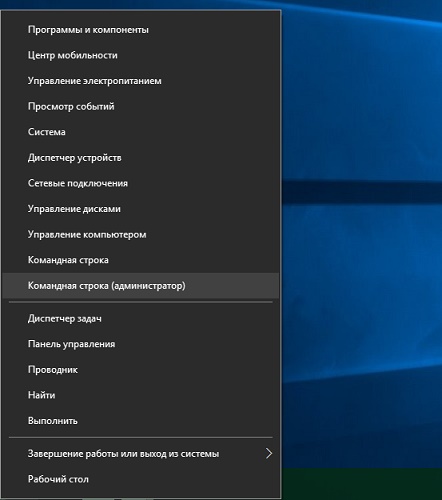
Right-click on the "Start" button in the lower left corner of the screen. The following menu will appear:
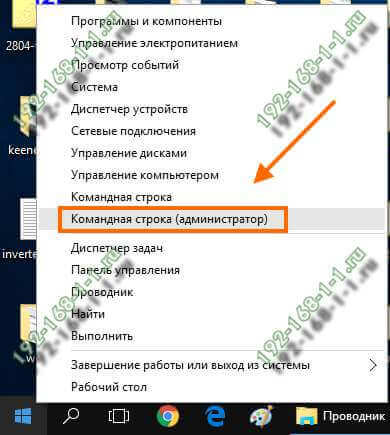
Select the “Command Prompt” item in it or, if you are not working with Administrator rights, then the “Command Prompt (Administrator)” item. A black window will appear into which you must enter commands - the so-called " Windows console". The first command is to configure the parameters of the wireless network that we will launch. Here is an example:
netsh wlan set hostednetwork mode="allow" ssid="moi-wifi" key="wifipassword" keyUsage=persistent
This is what it looks like on the command line:

Let's take a closer look. Parameter SSID- this is the name of the Wi-Fi network that you are creating and will distribute. Parameter Key is the security key or, in other words, the password for connecting to this WiFi. Settings entered using this command are saved in the registry and will retain the entered values until you change them to others.
The second command is:
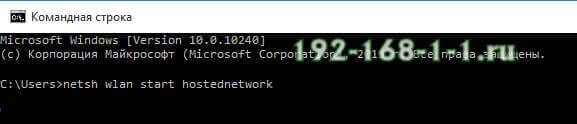
netsh wlan start hostednetwork
It runs the configured above wireless network.
In fact, this is how you force the computer’s wireless adapter to distribute WiFi without a router, that is, on its own. Unfortunately, so far you have only been able to make an access point from a laptop, which cannot distribute the Internet.
In order to now distribute the Internet on Windows 10, you need to make one more setting. Press the Win+R key combination and enter the open command in the line ncpa.cpl. Press the Enter button on the keyboard and a window will open for the network connections that are available in the operating system.
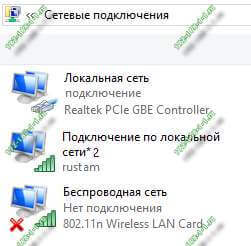
Please note that you must have two wireless connections while network adapter one. This is fine! Secondly, in my example this “Local Area Network Connection *2” is the Wi-Fi that the computer distributes. But what we need now is not that, but the connection through which your PC accesses the Internet. For me it is a Local Network. Right-click on this icon:
![]()
Note: If you use a PPPoE connection to your provider, then you need to select High speed connection. If you are connected via L2TP or PPTP tunnel, then you need to select a VPN connection.
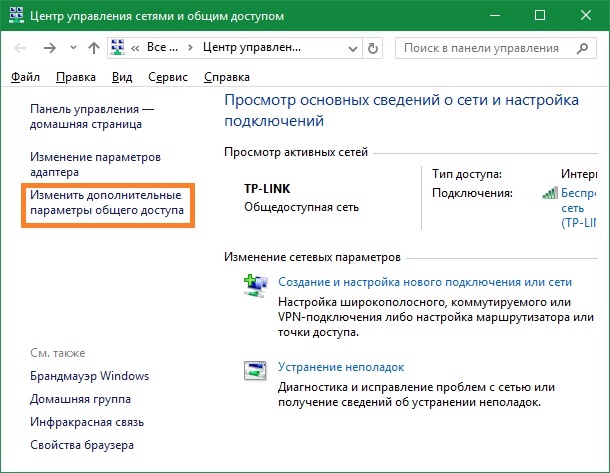
In the window that appears, open the “Access” tab:
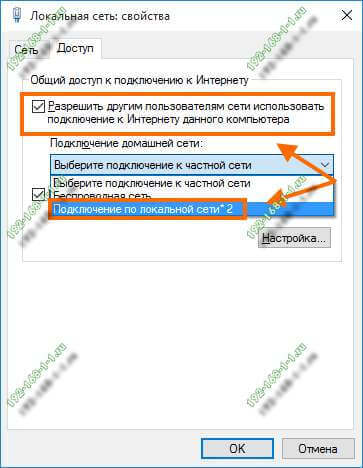
Check the box "Allow other network users to use the Internet connection" of this computer". After this, a list of "Connect to home network". Here you need to select the created wireless network, which I already mentioned above. That’s it, click OK to apply the settings.
Well, that’s basically it, now the laptop distributes the Internet via WiFi and without a router, independently performing their functions.
Advice:
Every time you turn on your computer to start a virtual access point, you will have to enter this command:
To automate this process a little, you can create on your desktop text file this is the content:
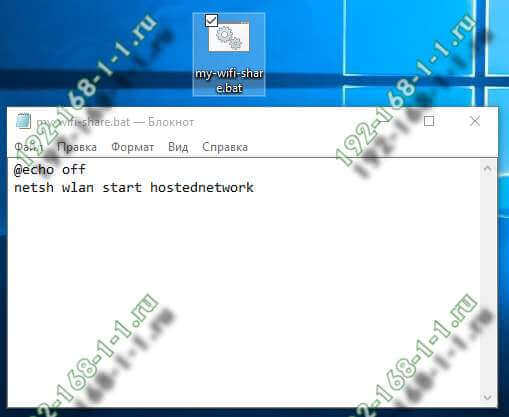
After that, save the file and rename it to change the extension from *.txt to *.bat. This will make the file executable. Now it needs to be placed in Autoload. This will force the laptop to distribute WiFi automatically as soon as Windows 10 boots up.
On previous versions OS - Windows 7 and Windows 8, everything is done absolutely exactly the same as on Windows 10. Here is a video instruction:
Possible problems: If, when you try to start a virtual access point in the command line, you receive the error “The hosted network could not be started. The group or resources are not in in the right condition to perform the required operation" - then first check whether the Wi-Fi adapter is turned on on the laptop. If it is definitely turned on, then run the following command:
netsh wlan set hostednetwork mode=disallow
After that, try starting the virtual router again. Everything should work!
Method 2. Programs for distributing the Internet from a laptop via WiFi
This is an easier way to distribute Wi-Fi, which does not require any “extra steps” at all. Typically, all you need to do is launch the application. In some cases, he needs to manually specify through which network adapter the laptop accesses the Internet. The most popular program For WiFi distribution- this is of course a utility Connectify Hotspot:
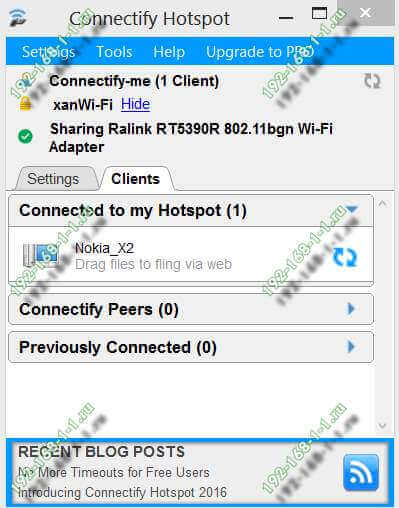
In my opinion, despite its popularity, it is not the most the best option. There are analogues that are simpler, more convenient and, most importantly, provide the same functions as Connectify Pro absolutely free.
One such example is the program mHotspot:
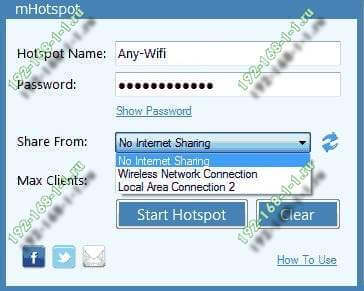
This is great free program for distributing the Internet via a wireless network. There are only a few fields in the main application window. "Hotspot Name" is the name WiFi networks or so called SSID. The "Password" field is the Wi-Fi password. In the "Share From" list, you must manually specify the network connection through which the PC accesses the Internet. We don’t touch anything else and press the “Start” button. Well, let’s enjoy the delights of wireless Internet!
In general, as I noted above, there is a sea of similar software, but personally, I liked the Chinese utility the most of all of them Ostoto Hotspot. It is distributed freely, there are no built-in advertisements yet, it works and is not buggy! What else is needed for happiness?!
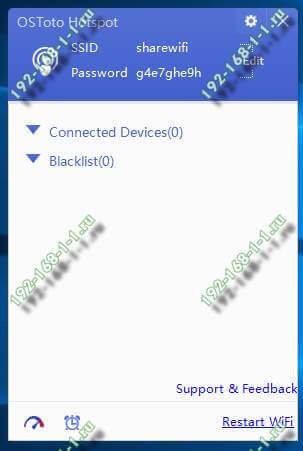
This free program for distributing Wi-Fi from a laptop has the bare minimum of settings and works right out of the box. Even a schoolboy can figure it out. To change the SSID or password for the connection, simply click on the “Edit” icon and enter your parameters in the fields that appear. Don't forget to save your changes by clicking the "Save" button.
How to distribute the Internet from a phone or tablet
Many users different reason prefer mobile access to cable Internet, because it is always at hand - not only at home, but wherever you are. The main thing is to have a confident reception cellular communication. But again, if you need to connect another device, difficulties immediately arise. Fortunately, operating system developers Android systems and iOS for mobile devices We have built in the ability to organize a Wi-Fi router via a phone or tablet. Let's look at how this is done in more detail.
How to set up an access point on Android
Click on the gear icon and open your smartphone Settings:
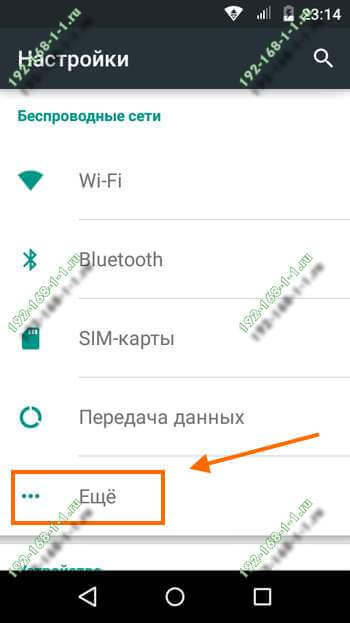
In the "Wireless Networks" section, find the "More" button and click it. In the next menu we find the item “Modem mode”:
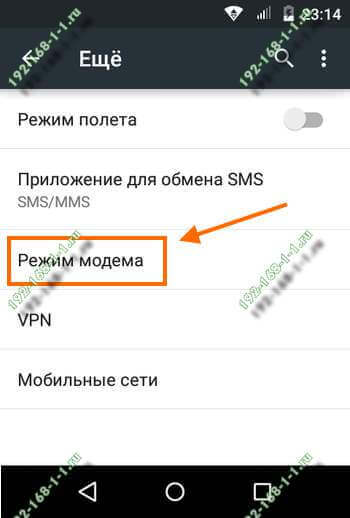
And then you need to select the “Wi-FI access point” item. The following menu will appear:
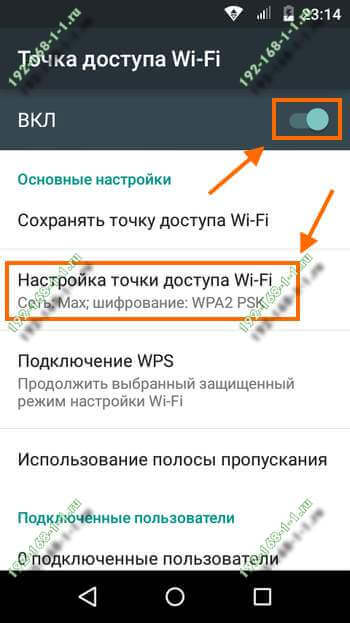
Here you need to move the slider to the “On” position.
With this, you have already launched a virtual router, which allows you to distribute Wi-Fi on Android.
To see what the password is for connecting to this wireless network or to change it, click on the line “Setting up an access point”:

If necessary, here you can change the SSID, the type of encryption standard used, and the security key.
To disable the virtual router, simply move the switch to the "Off" position.
How to distribute Internet from iPhone
Fortunately, not only Android has such a function; Apple's iOS also allows you to turn on the hotspot on your iPhone and iPad with just a few swipes of your finger. This is done as follows. Open the settings of your iPhone and find the “Cellular” item:
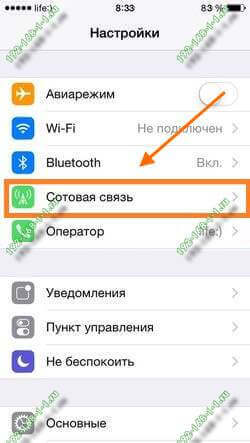
Scroll down to “Modem Mode” and select it:

The following menu will appear:

Here you need to turn on the modem mode with the slider, after which your iPhone will start distributing the connected 3G/4G Internet via Wi-Fi. The password for connecting to this wireless network can be viewed and even changed in the “WiFi Password” field.
To turn off the wireless access point on iPhone and iPad, simply turn off tethering mode.
For Wi-Fi distribution Laptops are mainly used, since they have a wireless network adapter. Connecting the host device to the Internet is done using Ethernet cable, and all other devices are connected via Wi-Fi. A router is not required.
Activating a connection using standard Windows tools
Open the panel Windows management and go to the "Network and Sharing Center" section shared access" Select the first item in the list available options. In the window that appears, select the penultimate link and click “Next”. Specify the required parameters: connection name, encryption type and password used for the connection.
Check the box at the bottom of the window to save the settings on the computer you are using. Proceed to the next step and enable file sharing on your hard drive and current Internet connection. Other properties can be specified using the link to change sharing settings on the left side of the network settings menu.
Important! To organize a local network, do not forget to activate detection of connected devices.
How to distribute Wi-Fi through the console
If the laptop or computer adapter supports operation in virtual router, you can distribute the Internet through console commands. To open it, right-click on the Start menu icon. Select the “Run” line and find the menu responsible for opening command line in administrator mode.
When working through an administrative account, you will need to grant the system the necessary permissions. To do this, click “Yes” in the User Account Control (UAC) window. If the current account does not have administrative rights, you will need to enter the main password account systems.
Enter the command shown in the following screenshot, changing the parameters as you wish. Available options:
- SSID is the name of the wireless network under which it will be displayed in the general list of connections.
- Key - Wi-Fi password used for authentication.

Note! This method also allows you to set up your computer as a repeater (wireless signal repeater).
After this, a new one will appear in the list of devices virtual adapter, which will distribute Wi-Fi. Open properties, and then allow other computers to connect to the Internet through it. Then dial in Windows console"netsh wlan start hostednetwork" command. New network will be activated and you can connect to it from another computer, tablet or smartphone.
Useful video: Distributing Wi-Fi to a computer instead of a router
Wi-Fi distribution via Switch Virtual Router
The computer can distribute Wi-Fi through utilities third party developers. One such program is Switch Virtual Router. The main interface fields include SSID, password and wireless network settings. The application can start every time you boot operating system, and when you activate the “Minimize to tray” setting, it further work becomes invisible to the user.
Windows 10 allows you to distribute Wi-Fi Internet from your computer or laptop. This is especially true when using a mobile USB router or regular fiber optics (ADSL, FTTB, etc.). This feature will be useful for people who connect to world wide web via cable, but do not have access to the network through a tablet, phone, TV or on a second home PC. If so, then this instruction may help.
Using the Wi-Fi network distribution function, you can organize a home wireless network with an Internet connection without a router. This will allow you to connect any device, including a smartphone or game console(PS4 for example) to the Internet wirelessly.
For the most convenient and extensive support for all features modern networks, it is still recommended to purchase a full-fledged Wi-Fi router. But temporarily, you can totally use this method to distribute the Internet and use Wi-Fi to transfer files between home computers (wireless home local area network). In addition, for some users the built-in Windows features 10 for network distribution via a virtual access point (router).
Any user can perform such a task as distributing Wi-Fi from a laptop or computer without a router and making it an access point. In this case, there is absolutely no need to memorize any complex commands or experiment with system files. All you may need is the well-known standard text editor Notepad (Notepad, or any other) and open access to the command line (cmd) of the system to check the built-in Wi-Fi module.
Checking your system for the ability to distribute Wi-Fi.
Not all versions and editions of the operating system Windows systems support functions wireless point Wi-Fi access. Some equipment configurations are not capable of distributing the Internet via Wi-Fi. To determine whether your PC can perform this function, take a few minutes to test the device's capabilities.
Make one left-click on the “Start” menu, then “All applications” - “System”. In the last subsection you will see a small black shortcut to launch the command line. Run the application as administrator and enter:
Netsh wlan show drivers
The application will display information about the Wi-Fi adapter built into your PC or laptop, as well as whether it supports a hosted network. When the device can work as a distribution access point, “Yes” is indicated next to the network support item. If you see "No", you will need to update your adapter drivers.
Wi-Fi distribution from a laptop or computer without a router.
To make your PC work as a router, follow these steps:
- Open Notepad and copy to Text Document these are the commands (the numbers must match the password): netsh wlan set hostednetwork mode=allow ssid=okeygeek key=11111111 netsh wlan start hostednetwork
- Next, save the document under any convenient name, but with system extension*. bat as a DOS command file.
- After rebooting the operating system, run this file double click left button. To distribute Wi-Fi, these steps are repeated after restarting the system.
As you can see, distributing Wi-Fi from Windows 10 is very simple - even a beginner who is not versed in IT technologies can easily cope with setting up the system for a router.
In order to distribute a Wi-Fi wireless network from a computer, the user will need special utility- mHotspot. It is distributed absolutely free, so it can be easily and simply found on the Internet and downloaded. This software contains everything you need to create your own access point on a computer with installed Wi-Fi adapter, while she has quite simple interface, which means no one should have any problems with operation. After the program is installed, you should go to Setup Hotspot and specify the connection name (SSID), password and login there. It is worth noting that the password must be at least 8 characters and contain both numbers and letters.
Changing network settings and connecting
After this, you will need to go to the “Network and Sharing Center”. There are two ways to do this. For example, open the Start menu, go to Control Panel, and then select Network and Internet. The “Network and Sharing Center” will be available in the window that appears. In addition, you can right-click on the network connection icon, which is located in the lower right corner of the taskbar and, accordingly, click on “Network and Sharing Center”. A new window will open with a whole list of your connections. Next, you need to return to the program and click on the Start button, after which one of the wireless connections and the identification process will begin. Remember this connection and click on the Stop button in the program. Next, return to the list of connections again and select “Local Area Connection”, then go to “Properties” (if you are using VPN connection, then you need to select it).
When a new window opens, you need to go to the “Access” tab and check the box next to “Allow other network users to use this computer’s Internet connection”, and in the “Home network connection” field indicate the name that was identified. After this, you can save the changes and start the connection through the mHotspot program using the Start button. The connection you created should appear in all connections. Select it, enter your password and connect. In order for other devices to be able to connect to the created network, you need to start searching for available Wi-Fi networks, select the same connection and enter the password.


