How the synchronization program works. Quick selection guide (download free programs for synchronizing files and folders)
Why do you need folder synchronization?
Periodic synchronization of files allows you to deliver them to another company office or to a neighboring computer over the network and constantly keep them up to date in two places at the same time.
So, we believe that at home or at work there is a need to periodically copy (mirror) one or several folders located on a local or network machine to another location, for example, to a flash drive, external HDD(Winchester), by local network or at remote server via FTP protocol.
The process of periodic mirroring (mapping) is called folder synchronization. The source data and the destination folder must always be exactly the same, both in the number of files/folders and in size.
This task is easily handled by a small but very convenient backup program Exiland Backup, which allows you to create 4 types backup copies , one of which is Synchronizing folders and files. That is, during the first synchronization, an exact copy of the original data is created in the final folder, and then the program will mirror the data at the frequency you specify. source files, updating them in the destination folder.
Synchronize files over the network and FTP- only a small part of the possibilities Exiland Backup. You can see a complete list of features on the Exiland Backup program page. In this article we will not dwell on them, but will only consider how to set up file synchronization.
What options for synchronizing folders over the network are included in Exiland Backup?
Exiland Backup allows you to at certain intervals(no more than once a minute) perform one-way synchronization, quickly and thoroughly comparing the contents of the source data with the destination folder and bringing them into compliance by copying files to the destination folder. This is especially convenient for periodic delivery of files from one branch of an organization to another. Multiple folders and files can be specified as the source folder.
Exiland program Backup initially creates exact copy source data in the destination folder and then periodically supports its updating. This way, when you add, change or delete source files, all changes are also reflected in the destination folder.
Moreover, the program Reserve copy Exiland Backup provided various settings"smart" folder synchronization. For example, the program can copy all files, or selectively according to a given mask, file attributes and specified subfolders.
TO additional features can be attributed features such as:
- Maintaining a detailed synchronization log (log) showing the number of updated, deleted or added files.
- Possibility of sending a log (log) by e-mail or notification to a mobile phone.
- Flexible setup Folder synchronization schedules.
- Start file synchronization automatically when Windows startup or connecting a flash drive or other removable media.
- Start synchronization from command line(command line).
Step-by-step wizard for setting up folder synchronization
So, let's look at how to set up Exiland Backup to synchronize folders in practice.
Let's say we need to synchronize the "C:\Documents" folder with all subfolders with every 3 minutes from 8:00 to 21:00 local machine, where Exiland Backup is used, on remote machine"Director" to the shared folder "\\Director\ActualDocsUser1".
Launch Exiland Backup. In the upper left corner of the main program window, click the create a new task button - a step by step wizard task settings.
Step 1: Job Name
Enter any name for the task, for example “Synchronize the working documents folder” and click “Next”.
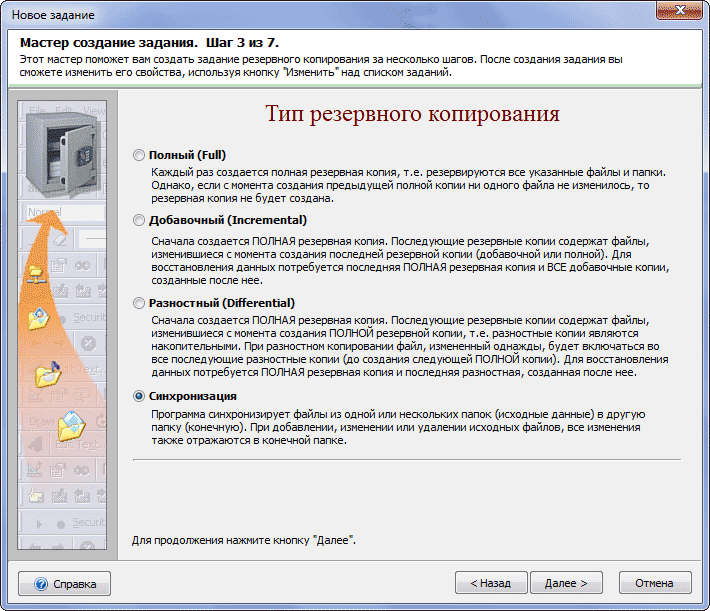
Step 2: Backup Type
Specify the type – “Synchronization” and click “Next”.
Step 3: Source Files and Folders
Specify which source files/folders you want to synchronize.

To do this, click “Add” -> “Local/network folders and files...”, specify the path to the “C:\Documents” folder and click OK, after which the folder options selection window will appear.
![]()
Here you can leave everything as default and immediately click OK.
Step 4: ZIP Compression Options
We skip ZIP compression because it is intended for backup purposes only. Immediately click “Next”.
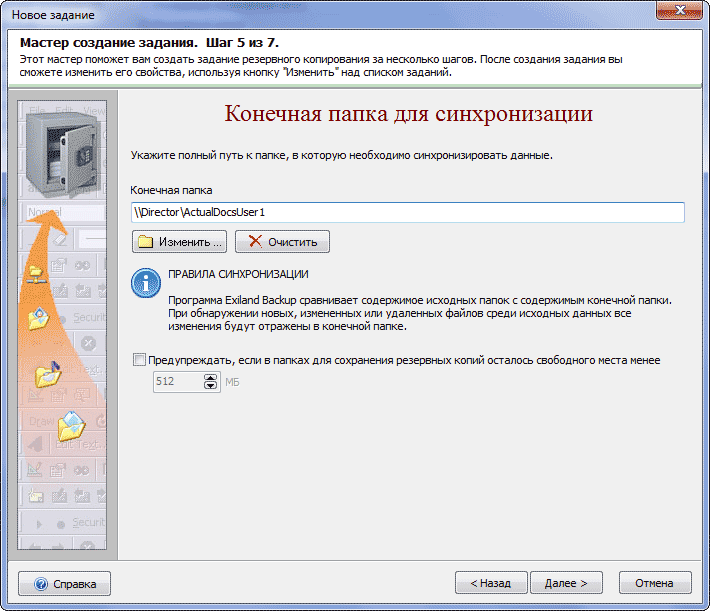
Step 5: Destination Folder to Sync
Select the path to the destination folder (destination folder), in in this case"\\Director\ActualDocsUser1"
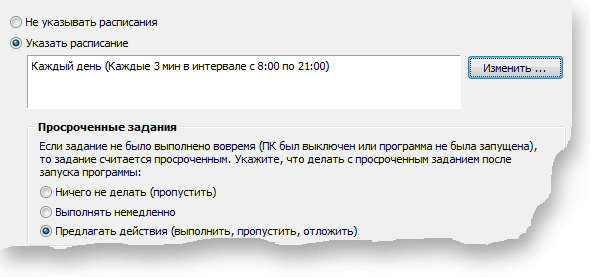
Step 6: Schedule Synchronization
Specify your schedule. To do this, click the "Change" button and in the window that appears, specify the schedule type "Daily", every 1 day, and then select the time. Click "Edit" to the right of the "Time" field, then click the "Add" button, select "Periodically" and select "Every 3 minutes", check the interval and indicate from when and until when to repeat synchronization, in our example with 8 :00 to 21:00. Ready. Click OK several times until all previously appeared windows are closed.
Step 7: Notification
Leave everything as default and click “Finish”.
The task has been created. For a customization proposal additional parameters Now answer "No".
If you need to sync files to remote computer via FTP, then select FTP when setting up the destination folder. Everything else is done as in our example above.
True, in the 3rd version of Exiland Backup Standard there is a limitation: synchronizing folders via FTP from a local/network folder to a remote machine works, but copying data from FTP to a local one is not provided. Also note that folder synchronization is only possible to one destination folder.
The program has an intuitive, well-thought-out Russian-language interface and is recommended for synchronizing files both over a local network between work computers and via FTP between branches or divisions of an organization.
There are both paid versions Standard and Professional, as well as the free Exiland Backup Free, which you can download from the backup program website to evaluate its capabilities for synchronizing your files. If the program is suitable for solving your problems, you can purchase a Standard or Professional license and become a full registered user with all the benefits.
I think each of us asked the question “What is this Briefcase that appears in the Create menu and what is its purpose?” I also became interested in what a briefcase is for in Windows. At first glance, it may seem that Briefcase performs the same functions as a folder, but has a different icon, but this is far from true. The fact is that you cannot create files and folders directly in the Portfolio, but only copy them to the Briefcase and change them. You can create only in subcategories, i.e. in subfolders! And all this is due to the fact that the functionality of the portfolio is designed to perform synchronization between files and folders.
Let's find out in this article what a briefcase is for in Windows and look at how it works.
According to the help, Microsoft recommends using Briefcase in two situations, when syncing files and folders from a PC over a network and between a computer and a removable device. I would not use the portfolio for synchronization over the network, since it is much easier to give access to resources specific user and he will be able to work with documents through the network. But synchronization via removable device we'll consider!
As a rule, the need for synchronization arises if you work with the same documents over and over again. different computers. Therefore, you always need to have latest version files. Of course, you can copy and delete the entire folder in which your documents are located each time, so as not to have to figure out which files were changed. But if there are a lot of files, this can take a lot of time. In this situation, the Windows portfolio can help us out.
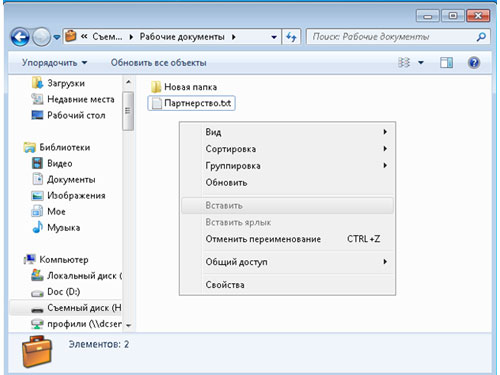
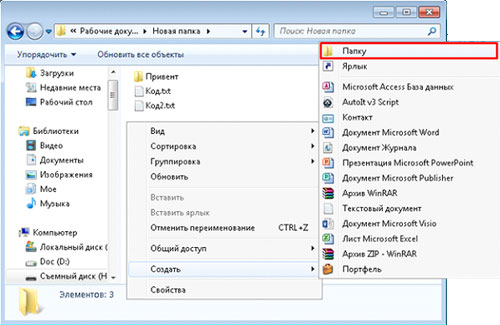
Let's create a portfolio at the root USB flash drives(RMB\Create\Portfolio\Working documents)
And we will copy into this Portfolio the files and folders that we are going to work with in the future on another computer. It is at the moment of copying documents and folders that a connection is created between them, thanks to which file versions will be compared.
As I said earlier, we cannot create anything in the Portfolio, since there is simply no “Create” item in its menu.
But, we can create files and folders inside folders
All this is due to the fact that between the files and folders inside the Portfolio there is a connection with the files and folders from which they were copied. If we try to create a file, it simply will not have a connection, which means there will be no one to synchronize it with.
After we have worked with documents on another computer (or simply with documents in our Windows Portfolio), we can perform synchronization (copy changed files and folders).
To do this we can either click right click mouse on the Briefcase and select “Update all”
![]()
Or go to the portfolio and click “Update all objects” on the toolbar
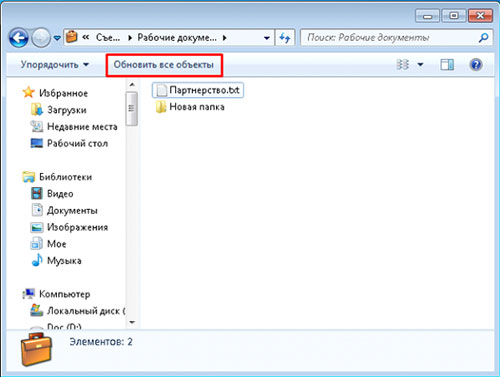

As you can see from the screenshot, since the last synchronization I have made changes to the Partnership file and created a file UUUUIIIIII in a subfolder. So, during the update process, the “Partnership” file will be replaced, the file UUUUIIIIII will be created and thus there will be identical files on both sides.
To get more detailed information, you can right-click \ Details and if any problems arise standard situations(both files have been updated since the portfolio link was created) make the right decision.

Also, by going to (File (folder) properties \ Status) you can see information about which file (folder) it is associated with.
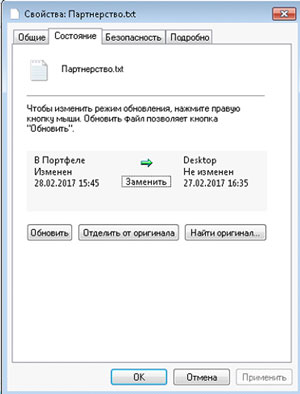
And also update separate file, separate from the original and find the original to which the file or folder is attached.
Thank you very much for sharing this material! :-) Our Training Center will not forget you!
The directory is read using the get-childitem command. To take into account subfolders, the -recurse option is added to it, and to distinguish files from folders, the PSIsContainer() function is used. If it returns True, then the element is a folder, otherwise it is a regular file:
$source = ¨c:files¨
$srcfolder = get-childitem $source -recurse | where-object($_.psiscontainer)
$srcfiles = get-childitem $source -recurse | where-object(!$_.pciscontainer)
To solve our simple task, we will need four lists: the first two contain the source files and folders, and the remaining two contain the resulting files and folders. The synchronization process comes down to iterating through these lists and copying files from one folder to another.
The first loop checks whether the folder for backup storage source directories, and if they do not already exist, they are created using the new-item command.
foreach ($folder in $srcfolders)
$srcpath = $source -replace ¨\¨,¨\¨ -replace ¨:¨,¨:¨
$dstpath = $folder.fullname -replace $srcpath,$destination
if ($dstpath -ne ¨¨) (
if (! (test-path $dstpath))
¨Creating the ‘$dstpath’ folder.¨
new-item $dstpath -type directory | out-null
A very similar cycle is performed when comparing the resulting and source list of folders, thereby creating the exact structure of subfolders. Two other cycles process files: the first copies updated objects from the source to the resulting folder, the second - those not in the source directory - from the final one. You can find out whether a file has been updated by its hash code. Note that since files are opened in read-only mode, they are not blocked from being used by other programs. However, according to the rules of good form, the file must be closed with the Close() function after the hash code has been calculated:
$md5 = new-object system.security.cryptography.md5cryptoserviceprovider
$fs = new-object system.io.filestream ($file,$mode,$access)
$hash = $md5.computehash ($fs) # file hash code
$fs.close()
Rub over new file his old copy makes no sense, so let's add commands to compare modification dates. At reverse movement No checks are required for files missing from the source folder; simply execute the copy-item instruction. The entire script is given in the listing - it is given the paths to the source and destination folders (don't forget to add closing slashes, for example c:filessource), and then it does all the work independently and only displays information on the screen about what exactly is happening. Note that even if you have not previously created the final folder, the script will create it independently:
if (! (test-path $destination))
new-item $destination -type directory -force | out-null
So, this script will help you copy photos, tables, text documents etc., without wasting time on manual file-by-file comparison. To use it, you can create a simple BAT file on the Desktop, specifying a command like powershell.backup.ps1 c:filesrc d:backup (the path to the script usually needs to be provided in its entirety). In the future, it is easy to synchronize folders by clicking on this batch file. Let us remind you that the Set-ExecutionPolicy RemoteSigned command, executed on behalf of the “Administrator,” allows the execution of unsigned scripts.
Keep copies important files in a completely unprotected form is perhaps not entirely true from a security point of view. Windows system 7, despite Microsoft's best efforts, remains vulnerable to viruses, worms and other malware. To documents that are constantly lying, in fact, in open access, they get there without problems. Fortunately, in operating system A very useful tool has appeared - virtual disks that are mounted and disconnected on the fly. They are also suitable for backing up any important files that can be accessed limited number users.
The virtual disk is presented in the system as a VHD (Virtual HardDisk) file with complete structure and content similar to those of hard drive. It is created using the built-in Windows 7 utility program for computer control, which is launched through the compmgmt.msc module. In the window of this program, you need to click on the “Disk Management” line and select the “Action Create virtual disk” command from the menu. For new virtual disk the size is set and then the volume is formatted. On last stage you can assign a drive letter or link the VHD file to an NTFS folder.
The last method is interesting because copying is allowed in specific folder no matter where the virtual volume is located. By unmounting a virtual volume in a computer management utility, you can be sure that the last copy Neither viruses nor curious users will reach important documents. The virtual volume itself, i.e. the file with the VHD extension, can be copied to backup media. Additional security measure - encryption virtual volume, available from using BitLocker users of the maximum and business versions of Windows 7. When connecting such a protected volume (and it can be used on other PCs, even where BitLocker is not installed), Windows will ask you to provide a login and password.
To sync files with other computers and devices in Windows 8.1, there is Windows Mobility Center, which is linked to the Sync Center. It is in Windows Mobility Center that you can manage any devices and link your Account with another computer or Windows server. Devices include both smartphones and tablets. If you manage your device through ActiveSync, synchronization is usually set up through Microsoft Exchange.
Sync Center allows you to manage your synchronized devices. The device you want to synchronize with your computer may already be connected, but using Sync Center you can also save an offline version of your files for working on the go.
The Sync Settings page allows you to view your current sync relationships and any conflicts that may arise.
In order to check if everything is in order, you can view the current synchronization status with devices.
To sync files with another Windows 8.1 device, click " Settings new connection synchronization" Please note that the other device must be connected to your computer. When you select synchronization in the Sync Center, buttons appear at the top of the list to set a synchronization schedule.
You can click on them and manage your sync options.
If you use Sync Center to save offline copies of files on Windows server, to control synchronization parameters, press the button " Manage Offline Files».
In the Offline Files dialog, you can control the current sync status, including the ability to specify how many are available to sync disk space on your computer. To do this, use the " Disk usage" The more on disk available space, those more files you can sync with your computer and store locally.
This dialog box also allows you to ensure that offline files, are automatically encrypted. This option is very useful if you keep offline versions of files on your laptop.
Setting up and using working folders.
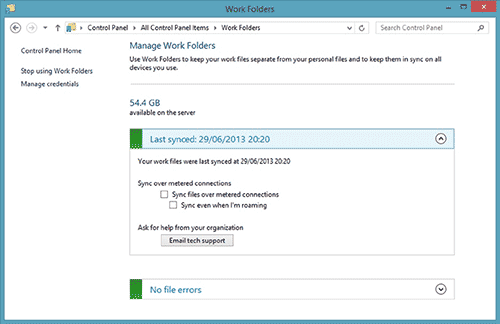
If your company uses the Work Folders feature, managing the system for saving offline versions of files for the user is much simpler and easier. Working folders are located in the control panel. To get started, click the " Set up working folders" and you will be asked to enter your work address Email or URL working folder on the company server.
After the first synchronization of files and folders, the working folders panel displays changes in the progress of the current synchronization of files from the server. This panel can be used for both general management file synchronization, as well as specific uses, such as which files should be synced over a mobile broadband connection. This is where the working folders are disabled.
 Synced work folders appear in the " My PC» file explorer where they can easily be opened and viewed.


