Program for flashing bios from under windows. Bios firmware on the programmer. Flashing the BIOS using winfast liveupdate
How to flash a computer?


BIOS - important component any computer. This is a program recorded in a ROM chip. It contains information about all the settings of your computer; you can make changes to it if necessary.
Do you need to flash the BIOS yourself? There is no clear answer. On the one hand, many manufacturers themselves recommend doing this immediately after purchasing a computer: this measure will help to avoid errors in the operation of the device and expand its functionality. However, flashing the BIOS yourself can lead to errors that will disrupt the operation of the computer. And sometimes the motherboard after failed update fails - you will have to contact a service center, where free repair under warranty they may refuse, revealing updated version BIOS.
It may be worth contacting advanced friends or a service to have your software updated correctly. If you decide to act on your own, study this issue as deeply as possible so that unpleasant consequences do not arise.
When should you flash your computer's BIOS?
It is worth flashing your computer in a number of cases. First of all, correct firmware program will increase overall performance computer. This is never superfluous, especially if you constantly use it at work.
An update is necessary if there are noticeable problems - for example, the computer starts to slow down, the operating speed drops, or the sound disappears. Then it might be worth flashing the BIOS. A different kind of problem may also arise. Let's say you bought new equipment - a processor or HDD. But the motherboard does not support it - the computer simply does not “see” the device.
In this case, you can reflash the BIOS to an improved version - then the board will be able to recognize the processor, hard drive or other equipment. And you don't have to buy a new motherboard.
Where can I find the firmware?
The simplest thing is to go to the website of the manufacturer of your motherboard and download the latest version of the program. You also need to know the BIOS version that is installed on the computer. To do this, restart the computer, and when loading data, the BIOS version number will be displayed, among others. To have time to record it, press the Pause Break key: it will slow down the download.
Use the search engine and find the version number of the desired manufacturer. Go to the official website and download the latest BIOS.
Flashing BIOS: step by step
The update itself can be done in several ways. Let's consider the most common of them - through DOS mode.
In some cases this is available via special utility, but not every board manufacturer provides this function. It is not recommended to reflash in Windows, since the OS may freeze while loading the file - then nothing will work, and only contacting a service center or buying a new board will help.
- Download the firmware - for example, AmiFlash, and a program for formatting a flash drive - HP USB Tool. The program will format the flash drive, making it bootable.
- Also download the MS-DOS image when you start HP USB Tool indicate the path to it on your computer.
- Drop the file with the firmware into the root of the flash drive, renaming it to flash.bin. Move the flash driver there, writing it as amiflash.exe.
- Now all that remains is to register Text Document. You create it on your flash drive. Call it amiflash.bat - this file will help start the flashing process. The file contains the following data: amiflash flash.bin /b /d /e /g. These launch options work in most cases.
- The main work is completed. Now restart your computer, open the BIOS, and there is the Boot tab. Please indicate your bootable media first to download. In the console, issue the command amiflash.bat.
- During the BIOS update process, do not overboot or turn off your computer, otherwise you will simply lose the board.
- After the firmware is completed, you can restart.
This is how you can flash your computer yourself without spending a penny. But be prepared for failure, since firmware is still a serious and risky matter.
First, let's figure out why we need to reflash the BIOS at all, I personally first encountered this need about 10 years ago and the situation was that I purchased a 40 GB hard drive, but operating system I saw only 20. Since at that time hard disks drives of this size just went on sale, the BIOS did not support disks of this size. And after flashing everything fell into place and the operating system saw all 40 GB. On this moment they say that similar situation may happen with hard drives with a capacity of more than 2TB, I have not encountered this situation, but this is quite possible. In general, with the BIOS there can be different problems, for example, it is not possible to boot from a USB flash drive, the computer does not turn on over the network, and so on. According to this, in this lesson Let's figure out how to flash the BIOS to the latest version.
And the first thing you need to do is download the firmware; it can be found on the official website of the manufacturer of the motherboard that is installed in the computer. But to do this you need to find out what the motherboard is called and what kind BIOS version installed at the moment. Therefore, we restart the computer and go into the BIOS.
I have, immediately starting the BIOS information about the components of the computer also appears in the BIOS Version line: M3A770DE (motherboard model) P1.10 (BIOS version). Can't always be found this information in the BIOS itself, so when you start the computer we can also find the line M3A770DE BIOS P1.10, and in order to have time to rewrite this data, press the Pause Break button, this button pauses the loading process so that we can study the information displayed on the screen.
And so, now we know the motherboard model and BIOS version, so we go to the manufacturer’s official website, but in my case, the motherboard manufacturer is not indicated, but only its model, so we enter it in the search engine this model and we see that its manufacturer is ASRock. But now we go to the manufacturer’s official website, by the way, you need to install versions downloaded only from the official source \ Download \ M3A770DE \ Loading BIOS\ in my case, the latest version of BIOS is P1.80, and since it is newer than the installed one, I will install it. Also study the information for this firmware, it indicates what corrections were made in this version. Again, I do not recommend installing versions marked Alfa or Beta, since such firmware is still being tested.
I have 3 firmware to choose from, or rather not 3 firmware, but 3 ways to install the firmware:
1) Instant Flash - through a special ASRock utility, which can be launched from the BIOS itself and is called ASRock Instant Flash. With this method, we simply copy the firmware to a flash drive, run this utility and in it we indicate the path to the firmware, and then the program itself installs the new firmware version. To be honest, it’s rare that any BIOS has a built-in utility for updating the firmware, so we won’t consider this method.
2) Installation via Windows, I did not use this method, since I don’t really trust it, you never know at some point the application may freeze and the firmware will crash altogether. And again, rarely does any manufacturer have the option of flashing from Windows.
3) Flashing from DOS, this is the option we will use, since this method is standard for any manufacturer.
Therefore, download the firmware under DOS, and be sure to make sure that the motherboard model is indicated correctly, otherwise you can kill the computer without service center you can't get by anymore.
Previously, flashing was performed from a floppy disk, but since at the moment floppy disks and drives are a thing of the past, you will need to flash from a flash drive, and the first thing you need to do is bootable USB flash drive with DOS on board. If earlier, a boot floppy could be made easily and simply (RMB\Format\Create a boot floppy MS-DOS disk), then this method will not work with a flash drive. Therefore, for our task it will help RUFUS program, go to the official website rufus.akeo.ie.
Download the utility and run \ specify the USB device that we will make bootable \ leave the rest as default, although you can change FreeDOS to MS-DOS, but this will not change the essence \ Start, as you guessed, the flash drive will be formatted and all data on it will be deleted, This is what the next window says: OK.
Now copy the firmware file from the archive with the firmware to the USB flash drive.
We start the computer and go to BIOS\Boot\Indicate USB flash drive, as the first device upon boot. This version has a separate item USB devices, if it is not there, then the flash drive may be in the menu Hard Disk Device, so in this menu We specify the flash drive as the first device when booting. Save the settings and exit the BIOS.
Now it starts from the bootable USB flash drive and we find ourselves in DOS. So, here we may need three commands:
Dir – display the contents of the current folder
Cd – change directory if the firmware is not in the root of the flash drive
Cd... – move one level up
We enter the name of the file with the firmware, but before that we enter the dir command, since in DOS file names cannot be long, some of the text is replaced with the tilde ~. Therefore, we enter the name of the file as it appears in DOS \ Enter and the firmware process begins. It is advisable that the computer be connected via a source uninterruptible power supply, in case there is a power surge during the flashing process and the computer turns off without finishing the flashing.
My flashing looked like this, with OK and Done next to all the items, which means everything went well. We reboot and see that the firmware version P1.80 appeared in the boot information, as well as in the BIOS itself.
BIOS is the firmware responsible for bootstrap Windows. It checks the functionality of components and add-ons. The correct loading of the computer and its normal operation(hardware components).
It is written on the motherboard, not on the hard drive like the OS. In new devices, the BIOS has been replaced by UEFI, which performs the same functions, but has been improved. Both programs sometimes need to be updated.

BIOS can be updated in several ways
DO I NEED TO UPDATE THE BIOS?
Manufacturers regularly release updates for laptops. It is downloaded from the official website of the company that produced the laptop. It’s more difficult for owners of PCs with their own build. To find files to update, they will have to rely on the motherboard chip data. Any update is also written to the chip, replacing the old version.
It is not difficult to update the bios correctly, but only materials designed for a certain model PC or boards. Each motherboard has a strictly defined type of firmware, and installing the wrong version can lead to malfunctions of the computer or its complete inoperability.
BIOS – fine program, and therefore it is better to update it only in extreme cases. On a normally functioning PC there is no need to update it. This is due to several factors:
- Flashing bios on an asus or any other motherboard is difficult, the process requires some skills, the process is done through DOS;
- The improvements will not be noticeable, since the differences between the versions are minimal and highly specialized;
- Malfunctions and malfunctions may occur because... old version tested more thoroughly than new;
- When carrying out work, the power must not be turned off, otherwise the device will stop loading.
But sometimes the BIOS needs to be updated. If you regularly encounter one or another error in operation, go to the device manufacturer’s website and check if such an error has been resolved in new version microprograms More often, such a list is available on manufacturers’ websites. If such a problem is really solved in the new version, it makes sense to update the bios on the laptop.

Another good reason to flash the BIOS is the installation of new equipment. If you purchased new processor, which appeared after the release of your motherboard, then it will not be supported by your BIOS. In new firmware versions, manufacturers add support for new types of processors, and therefore you will have to download such a file and flash the firmware.
You should update the BIOS as a last resort. But even then, before upgrading, study the characteristics of the new version and find out whether the problems are solved. Based on this, decide whether you need to update the bios.
Find out the current version by pressing Win+R on your keyboard. In the window that opens you see msinfo32 for 32-bit OS. Click Run. A window will open listing the hardware and OS characteristics of the device. Find the one you need among them.
Sometimes a notification appears that the mode outdated bios. This means that the BIOS operating mode is outdated; it still works in real mode, not protected mode. Firmware may not help solve the problem, but it is not serious and does not need to be fixed.

UPDATE METHODS
The update method depends on the computer manufacturer, motherboard model, etc. Most often, each manufacturer has its own instructions for flashing. You can get acquainted with it on the official website of the company.

On all modern motherboards or you can update the bios on your computer with any of the above methods. But it is better to choose the latter, as it guarantees a minimum number of errors.
UPDATE ALGORITHM
Update bios asus or any other modern laptop, you can use any of the three described methods. They have their own nuances, but when carrying out the process using utilities, they are still not complicated.
FROM DOS
A difficult option with high risks. To update bios to windows computer 7 do the following:
- Find out the model of your motherboard;
- Download from the manufacturer's official website required version firmware;
- Sometimes there are several of them. In this case, choose the one that is designed for installation in DOS mode;
- Create a bootable USB flash drive with BIOS, DOS and additional utility(it is downloaded from the manufacturer’s website or included in the archive along with the firmware);
- Install the USB flash drive and restart the computer;
- Specify the media on which the firmware is installed bios motherboard boards;
- After the flashing is completed, reboot your PC.
There are no more precise instructions, since they vary for different PCs and boards. Detailed instructions find on the manufacturer's website. But using this method is not recommended.

FROM WINDOWS
It's easy to flash the bios on a laptop this way. Errors rarely occur. Popular method.
- Download the firmware utility. It is different for each manufacturer. Program for updating bios asus – Asus Update, MSI – Live Update etc.;
- Install the program;
- Run;
- Find the online function to search for new firmware. IN different programs she in different groups commands;
- From the list of firmwares, select the required one;
- Activate download;
- After downloading, run the flashing and follow the instructions of the program.
Bios firmware asus, MSI and others in this way is also safe because the program itself selects suitable version firmware. Moreover, intuitively clear interface will help even a non-advanced user to install the firmware.
FROM BIOS
It is possible to reflash the bios on a laptop from the firmware using pre-installed utilities. This the hard way, as it differs depending on the motherboard chip model, manufacturer, etc. To update the bios on the motherboard gigabyte board, run the pre-installed @BIOS utility; other manufacturers have other programs. Such programs are similar to the utilities involved in previous method, but not so convenient. They also work with them - they find required file online and launched.
More often, this method is used when the computer breaks down, when it is impossible to log into the OS, because... PC won't boot.
Hello, dear readers of the site! My name is Roman Nakhvat and I present to your attention the third and final part of the article about restoring damaged BIOS firmware (using the example Acer laptop Aspire E1-532). Before reading this part of the article, it is recommended that you familiarize yourself with and in which we disassembled the laptop Acer Aspire E1-532, removed the motherboard from it, connected it to BIOS chip CH341A programmer and saved the damaged BIOS firmware in separate file. Let's continue our work by preparing a new BIOS firmware file and then write it to the BIOS chip.
Let's go to the Acer company website to the support page for the Acer Aspire E1-532 laptop.
And we will download all available firmware BIOS.

For example, let's open the folder with firmware version 2.10.

In this folder we see a regular exe file, let's run it.

After running the V5WE2210.exe file, we get this error window, which says that this firmware BIOS is not suitable for this laptop or computer. We don’t press the OK button yet, since we need to extract the BIOS firmware file for our Acer Aspire E1-532 laptop from the V5WE2210.exe file. 
Go to section C: along the way
C:\Users\Username\AppData\Local\Temp (the username can be anything depending on what name it was created with Account). IN Temp folder we see the temporary folder 7zS2C4E.tmp, which appeared after running the V5WE2210.exe file. 
Let's open the 7zS2C4E.tmp folder and see the isflash.bin file in it, which is the BIOS chip firmware file. Let's copy this file to a flash drive.

The isflash.bin file copied to the flash drive.

The size of this BIOS firmware file is 9.45 MB.

When we try to open this firmware file in the CH341A-USB program, we receive a message that the file size is larger than necessary, that is, this firmware file is too large to be used for flashing the Winbond W25Q64FV microcircuit (namely this microcircuit installed on the motherboard of the Acer Aspire E1-532 laptop).

Microcircuits can be of different sizes; let’s look at this using Winbond microcircuits as an example. As can be seen from the table, the capacity of the microcircuit can be 512, 256, 128, 64, 32 Mbit and so on.

The W25Q64FV chip has a capacity of 64 Mbit (or 8 MB).

Since our BIOS firmware file isflash.bin, extracted above from exe file weighs 9.45 MB, and the volume of the BIOS chip on the motherboard of the Acer Aspire E1-532 laptop is 8 MB, then to successfully restore the BIOS firmware we need to reduce the isflash.bin file from 9.45 MB to 8 MB. For these purposes, we will use a hex editor, for example HxD. Let's go to the address
https://mh-nexus.de/en/downloads.php?product=HxD20
and download the installation hex file HxD editor

Click on the downloaded file and start the installation.


Install.

Installation completed.

Click on the shortcut hex editor HxD and launch it.

HxD main window.

Click on File-Open.

Select the isflash.bin file and click "Open"

We get the following.

In the same way, open the file of the damaged BIOS firmware isflash01.bin (which we saved in the second part of the article).

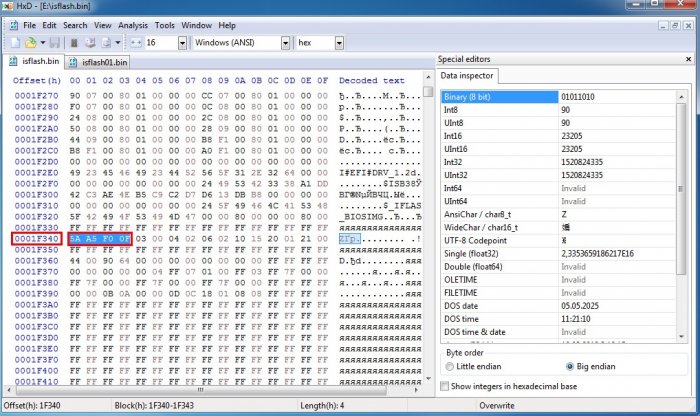
Let's take a closer look at the structure of the isflash01.bin file. As you can see, the firmware file isflash01.bin starts with the values FF (line 00000000), and line 00000010 contains the values 5A A5 F0 0F.

Now let's look at the structure of the isflash.bin file. We see that this firmware file starts with the values 4D 5A 00 00 (line 00000000). We need to make sure that the isflash.bin file begins in exactly the same way as the isflash01.bin file, that is, that the beginning of the isflash.bin file is FF (line 00000000).

IN open file isflash.bin click Search-Find.

And we search for the value 5A A5 F0 0F.

We see that the value 5A A5 F0 0F in the isflash.bin file is located in line 0001F340, and we also see the FF values higher in line 0001F330.
In the isflash.bin file, select the range of lines 00000000-0001F320. To do this, select Edit-Select block.
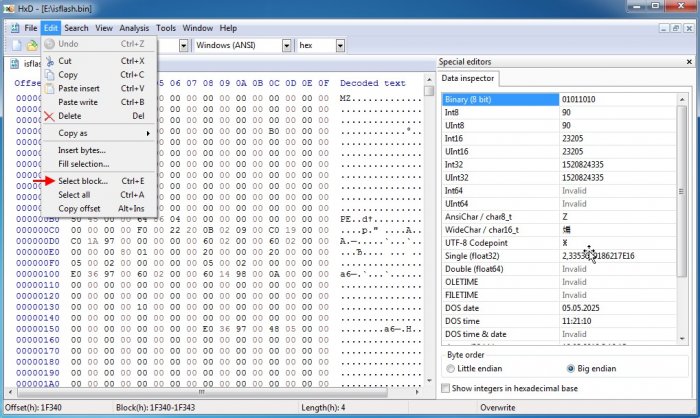
We indicate the starting (00000000) and ending (1F320) lines of the allocated range.

The selected row range is 00000000-1F320.

Delete the selected range of lines from the isflash.bin file by clicking Delete.

As you can see, after deleting the selected lines, the isflash.bin firmware file now begins in exactly the same way as the isflash01.bin file, namely, line 00000000 contains the values FF, and line 00000010 contains the values 5A A5 F0 0F.

Let's return to the firmware file isflash01.bin. Let's scroll to the end and see that it ends with line 007FFFF0.

If we scroll to the end of the isflash.bin file, we see that it ends with the line 009548F0.

Let's remove all lines from the isflash.bin file that are in the range 00800000-9548F0, that is, we'll make the isflash.bin file end with the line 007FFFF0. Click Edit-Select block.

Specify the range of selected rows.

The selected row range is 00800000-9548F0.

Delete the selected period range 00800000-9548F0 by clicking Delete.

As you can see, the isflash.bin firmware file now ends with line 007FFFF0.

Save the BIOS firmware file under a new name by selecting Save as...

Specify a name, for example isflash_new and click Save.

New BIOS firmware file isflash_new.bin.

It should be noted that the isflash_new.bin file weighs the same as the isflash01.bin file that we saved in the second part, namely 8 MB.

Since the W25Q64FV chip, as mentioned above, has a capacity of 64 Mbit (or 8 MB), and our edited firmware file isflash_new.bin weighs 8 MB, then we can start flashing. We connect the CH341A programmer to the BIOS chip in the same way as we did in the second part of the article. 
If you are on this page, most likely, you know why you needed to reflash the BIOS. But still, I will give a couple of examples in which cases this can help us.
BIOS- This software, which is responsible for setting up the computer’s hardware and is stored on a small storage device, which in turn is located on the motherboard. And like any program, it requires periodic updates.
In what cases is a BIOS update necessary? The most common problem is the failure of the motherboard to work with a newer processor. The reasons for replacing the processor can be different: it has failed, the computer freezes, or they simply decided to improve the PC.
Having bought a brand new processor and inserted it into the motherboard, when turned on, nothing appears on the screen, and the computer itself does not make any sounds, except for the noise of the cooler. Many people immediately run to the store to return the product due to its malfunction. But often the problem is that the BIOS does not know about the new type of processor.
There are also such malfunctions as: lack of sound or when installing a new, powerful video card, it is simply not recognized in the system as a device. But with all this, it often helps to cope with Bios flashing, updating it to a newer version.
What you need to flash the BIOS
So, the first thing we need is the firmware itself, which you can download from the motherboard manufacturer’s website.
Here are some main sites:
- Asus- www.Asus.com
- ASRock- www.asrock.com
- Toshiba- www.toshiba.com
- Acer- www.acer.com
- Gigabyte- www.gigabyte.ru
The next thing is a flash drive on which we will put the downloaded file for further updating. As for the size of the flash drive, it can be minimal, since the space taken up by the file ranges from several “KB” to a couple of “MB”.
How to flash Bios
Step one: Preparing the flash drive
After inserting the USB drive, go to “My Computer”. Clicking on the flash drive right click bears, select “Format”
Compulsory a condition for successful BIOS flashing is a flash drive with file system FAT32
Having selected FAT32, click on “Format” and wait for the process to complete
Step two: download the new firmware.
Go to the manufacturer's support site. In my case this is: www.asus.com.ua/ru/support/, since the example will be on the motherboard Asus board. In the search bar, enter the name of your motherboard. And we already download the drivers latest version BIOS.

Have you downloaded it? Great. Now we extract everything from the archive and transfer the files to the USB flash drive, after which we reboot the computer.
Step three: BIOS firmware
To enter Bios, press the “Del” or “F2” key several times.


In the program that opens, we need to select the device on which the file for flashing the BIOS is located. My flash drive was displayed with the letter “C:”, and the name of the file itself appeared on the right side of the window. If your flash drive or floppy disk is displayed and you see the firmware, then you can proceed to BIOS update by pressing "Enter".

After pressing “Enter”, a notification will appear asking you to confirm that you really want to update the BIOS. By choosing the affirmative option, the file version will be checked and the update itself will begin.

After the process is completed, the computer will notify us that the BIOS firmware is completed, and that in a few seconds the computer will reboot.

That's all. After reboot, PC will load as always. In case you have You had some kind of problem, then after the same reboot, you can check whether updating the BIOS helped.


