How to change the orientation of several pages in Word. Portrait and landscape orientation
When working in the Word text editor, portrait page orientation is not always suitable. Sometimes it is necessary for the pages to be like in an album, i.e. located horizontally. This is not at all difficult to do. It is much more difficult to create a landscape page in Word in the middle of a document. This is where you have to work hard.
Default O The page orientation in Word is portrait, but it can be changed to landscape if necessary. How to do it?
This may be necessary when creating reports from or for an album.
- Select a team – File – Page settings…
2. In the window that opens “ Page settings » select the tab « Fields" In chapter " Orientation» click on « Landscape" and save by clicking the " OK ».

If you want your document to have only one or more sheets in the middle of the document in landscape orientation,

then place the cursor on the page that should be landscape and select from the menu – File – Page settings . In the window that opens " Page settings " on the " tab Fields" In chapter " Orientation» install « Landscape" Below in the section " Sample" in the window " Apply" in the drop-down list, select " until the end of the document " and click the button " OK ».

Next, place the cursor on the page from which the book format, and do the same. Just select " Orientation » — « TOlower " And in the section " Sample" in the window " Apply" set also "to the end of the document".
As you can see, nothing complicated.
The same can be done in a text editor Word 2007/2010. To do this, open the menu Page layout and to the right of the block name Page settings Click on the little black arrow. A window will open Page settings .

Do everything else in the same way as described above.
This is how you can make a landscape page in Word in the middle of a document .
If you have Word 2007 or 2010 installed, you can watch a video tutorial on changing the page orientation:
Typically, when creating text file The page is in portrait or portrait orientation. Sometimes when working with a document, you may encounter a problem when the information you need in the form of a table or chart is stretched and simply does not fit. The ideal solution to this problem would be to convert the individual page format.
The user has the opportunity to choose between portrait and landscape spread
The most obvious action may be to change the rotation of the sheet when setting print options. However, if you need to save the document and forward it to another person, this option is not suitable, since the formatting will have to be done anew.
Adjusting position throughout the document
It is not difficult to guess that the least labor-intensive process would be to flip all the sheets in the document. To do this, you need to find the “Page Layout” area and select there required format from the drop-down menu, which contains 2 options - “Landscape” and “Portrait” scans. It is worth paying attention to the fact that once a provision is adopted, it will be applied to subsequent pages of the document, which indicates their strong relationship with each other.

Changing the position of one sheet
Obviously, various tables or informative pictures high resolution can take up a lot of space. Moreover, they need to be organically inserted into the text.
To achieve this goal, select all the text on the page whose position you want to change. It is worth noting that if you do not select all the information, the remaining information will be moved to the next or previous page. You can also designate an orientation transition location by placing the cursor in front of the text you want to leave unchanged. Thus, the sheet will be torn, and the necessary information will appear on the next one.
Then go to the “Page Layout” tab and select the “Margins” option, “Custom Margins” item. In the menu that opens, we find the desired position and below we determine to which part of the document the selected parameters will be applied. In our case, select the “To selected text” item.

If you preferred the method of breaking the sheet, you need to go to the “Page Layout” tab in the same way, but there select the “Breaks” item, and in it - “ Next page" After this, you need to designate the end location of the formatted sheet by placing the cursor at the position behind the last word, and perform the above procedure, specifying a different type of orientation.

Changing the spread in Word 2003
If in relatively modern versions Word programs, released from 2007 to 2016, the settings of the parameters in question are not much different, but more earlier versions, for example, 2003, there are some nuances. The point is that there is no usual latest versions program area, which may cause you some confusion. It's actually simple. You need to select the “File” option and select your preferred spread in the list that appears. If you only need to change the orientation of one sheet, you should select all of its contents before following the steps above.

Considering that many materials can be quite wide or long, using the methods listed above and changing the text or image in this way can greatly facilitate the work and organize your document. Now you know exactly how to do this.
Typically, when creating a text file, the page is in portrait or portrait orientation. Sometimes when working with a document, you may encounter a problem when the information you need in the form of a table or chart is stretched and simply does not fit. The ideal solution to this problem would be to convert the individual page format.
How do I know where my image will be cut on paper?
More detailed information How to use the tracking function can be found in the User Guide. Images will be cropped on paper to match the image on screen and will also depend on the orientation selected by the page tool options. In landscape mode, the top left corner of the screen will correspond to the top right corner of the actual cut material sheet. In Portrait mode, the top right corner of the screen corresponds to the actual top right corner of your footage.
The user has the opportunity to choose between portrait and landscape spread
The most obvious action may be to change the rotation of the sheet when setting print options. However, if you need to save the document and forward it to another person, this option is not suitable, since the formatting will have to be done anew.
If you want, you can choose to always have this displayed by doing the following actions. Select Always Show for When Using a Conveyor Belt. You can click and drag the circle to achieve the desired rotation angle.
To mirror images you can click right click mouse over any selected image and select “Mirror Horizontal” or “Mirror Vertical”. The placement of small documents will depend on the orientation selected in the Page tool. Scenery. When a document is in landscape orientation, it is sent to the Silhouette in the top left corner of the screen, corresponding to the top right side of your footage. If the media is smaller than the width of the media sheet, you will need to place your media in the upper right corner of the media sheet.
Adjusting position throughout the document
It is not difficult to guess that the least labor-intensive process would be to flip all the sheets in the document. To do this, you need to find the “Page Layout” area and select the desired format there from the drop-down menu, which contains 2 options - “Landscape” and “Portrait” layout. It is worth paying attention to the fact that once a provision is adopted, it will be applied to subsequent pages of the document, which indicates their strong relationship with each other.
Portrait. When a document is in portrait orientation, it is sent to the Silhouette in the top right corner of the screen, corresponding to the top right side of your footage. If the media is smaller than the width of the media sheet, you need to place the media in the upper left corner of the media sheet.
A beautiful layout captivates the reader's interest and adds value to your content. It also provides access to other important functions which we will look at in this module. The features presented in this training are important. Therefore, it is recommended not to skip chapters.
Changing the position of one sheet
Obviously, various tables or high-resolution informative pictures can take up a lot of space. Moreover, they need to be organically inserted into the text.

These readings are not printed. It is very useful to know how to adjust the size of margins in a document. This allows you, for example, to print a document on one page when it is a little overflowing on the second page.

To adjust the margin size, open the Page Setup tab and click the Margins button. In the menu that appears, click on required template: Normal, Narrow, Moderate, Wide, Mirror. latest model should be reserved for documents that need to be linked.
To achieve this goal, select all the text on the page whose position you want to change. It is worth noting that if you do not select all the information, the remaining information will be moved to the next or previous page. You can also designate an orientation transition location by placing the cursor in front of the text you want to leave unchanged. This way the sheet will be torn and necessary information will be on the next one.
Adjust page orientation
To manually set the margin size, click " Custom fields" Once you click on Custom Fields, the following window will appear. 
To change the orientation of your document, first open the Layout tab. Then click the Orientation button and click the orientation you want.

In this chapter, we will discuss two very important concepts: page break and section break. A section break performs the same function as a page break, but introduces new section into the document. A page break allows you to move to the next page while avoiding lines. . A page break allows you to move to the next page without having to use line breaks.
Then go to the “Page Layout” tab and select the “Margins” option, “Custom Margins” item. In the menu that opens, we find the desired position and below we determine to which part of the document the selected parameters will be applied. In our case, select the “To selected text” item.


In this case, you won't see a page break like in the picture above. Then click the icon and then click Page.

Section breaks are useful in the following situations. Partial page numbering of a document, multiple columns in part of a document, use of multiple headers and footers in a single document. And in more in general terms: in all cases where the document must be divided into several blocks with different layout characteristics.
If you preferred the method of breaking the sheet, you need to go to the “Page Layout” tab in the same way, but there select the “Breaks” item, and in it - “Next Page”. After this, you need to designate the end location of the sheet to be formatted by placing the cursor at the position after the last word, and follow the procedure described above, specifying a different type of orientation.
Then click the Page and Sections icon and click Next Page.

To illustrate this concept, let's imagine the following example: You have to make a three-page document. The problem is that pages 1 and 3 should be oriented in portrait mode and page 2 should be oriented in landscape mode.
To achieve this goal, we will create an isolated section in the document to orient page 2 in landscape mode. To do this, we'll insert two section breaks: one at the end of page 1 and one at the end of the page. Do the exercise yourself.

Changing the spread in Word 2003
If in relatively modern versions of Word, released from 2007 to 2016, the settings of the parameters in question are not much different, then in earlier versions, for example, 2003, there are some nuances. The bottom line is that there are no areas familiar in the latest versions of the program, which may cause you some confusion. It's actually simple. You need to select the “File” option and in
Then place the insertion point on page 2 of the document and then change it. Page orientation in landscape mode.
- In the new document, insert section breaks on page 1.
- On page 2 of the document, reinsert the section breaks.
It all depends on us and our habits. We tend to hold our smartphones naturally. Thus, the video format adapts to vertical position lens and the resolution offered by the phone for this format, so you cannot place The best video online. reads it on your smartphone so that it fits well into the edges.
Let's say that in our portrait document we want to create a page (or several pages) in landscape orientation.
Solution to the problem:
1) Create text with pages in portrait orientation. For example, this will be one page. At the end of the text, go to the ribbon Page layout and click on the button Breaks. In chapter Section breaks run the command Next page. After this, the cursor is positioned at the beginning of the page.
Fortunately, there is a way to solve this problem. Your video can adapt to any screen and can be best quality without any compromise. In fact, the way you shoot your videos doesn't matter because our smartphones automatically shoot them in the wrong direction.
Here is a list of the best video editors that can solve this problem. Here are the best video editors you can download and use today. You want to change the orientation of your video using the best software. Recommended Product: It allows you to edit videos, photos and audio files. But it can do even more - it is a program with functions such as cutting, trimming and much more.
2) Without creating the table, create a new partition again using the above instructions. The result was 3 sections. The second section will be in landscape orientation, while the first and third sections will be in portrait orientation. Please note: in the second section, in which it was necessary to create landscape orientation, we left portrait and created a third section. I’ll explain why we went this route: if we had created landscape orientation in the second section, then in the third section we would have had to change the landscape orientation to portrait, that is, do an extra operation.
You can finally control the action and even speed up or slow down the effects you want to change! By using simple drag and drop and a few clicks, you can become an expert when you need to change the video orientation of your videos. This software allows you to change the orientation of the video easily, it will help you rotate the video according to the predefined angles to get a horizontal format. Your video can even be rotated 90 or 180 degrees in every direction!
This can be especially useful for fixing the original video and changing the orientation of the video, the only downside of this program is that it prompts you to install a browser toolbar, but you can disable this option when installing. The most big advantage This program has a simple interface that allows everyone to understand every function.
3) Go to the second section and on the ribbon Page layout and on the panel Page settings Click on the miniature arrow button. In the window that opens Page settings on the tab Fields click the button Landscape. Click on the button OK.
Each section is independent from the others. Therefore, each section can have any number of pages. Therefore, if the table is large and consists of several pages, then there is no need to create new sections for each page.
You just need to go to the "Tools Menu", then select "Effects & Filters", then "Video Effects" and select "Geometry". Here you have to check the "Rotation" option to activate new format, since this is disabled by default. The most big advantage of this player is that it allows you to return the video as you wish without attaching an angle to it, and you don't need to install additional software, on the other side. may be too complex for the least informed users.
The main advantage is that it is not a program, but just a link! Portrait mode means that the author of the page more width. Portrait mode is used in most documents, but sometimes when the page is wider, you can set it to landscape. Its orientation is landscape and there is no problem creating the first two columns of the page, one of which changes the margins of the page.
- Click on the Layout tab on the ribbon.
- Click the Orientation button.
- This will give you two options: portrait or landscape.
- Choose the appropriate orientation for your document.
Select landscape or portrait orientation pages usually changes the position of the pages of the entire document. Let's figure out how to make selective orientation for one or several pages.
Most often, when working with text, the vertical page orientation is used, which in the MS Word editor is called portrait. However, it is often necessary to add illustrations or large tables, which are more convenient to place horizontally, that is, in landscape orientation.
To achieve this within one file, and not create additional ones for applications, it is necessary to create sections, that is, break the document into logical parts. This can be done manually or automatically.
Automatic partition creation
The easiest way to set a table or illustration in Word to landscape orientation within a portrait format is to select the corresponding part of the document with the mouse, and then go to the page settings settings. The corresponding icon is located in the Layout menu tab (or Page Layout in earlier versions of Word).
In the “Orientation” area, select a landscape position, then in the “Apply” area, from the drop-down list, instead of “to the entire document,” specify “to the selected text.” After clicking OK, sections will be automatically created in your document before and after the selected area, and the selection itself will appear on a separate page in horizontal orientation.

Similarly, you can add inserts not only at the end of the document, like appendices, but anywhere, and in any quantity. Let's say when writing a book, you can periodically insert sections with illustrations. However, you need to remember that if you use headers and footers and page numbering, they can be removed or changed in sections with landscape orientation, which will first require unlinking the sections.
Manually adding partitions
Automatically creating sections in Word to change page orientation is not always convenient. Therefore, it is important to be able to independently add partitioning into sections. To do this, in the “Layout” menu tab (aka “Page Layout”) there is a “Breaks” button. When you click it, seven options for breaks are offered in a drop-down window. Of these, the last four are grouped into “Section Breaks”. They are what we need.

The most commonly used option is “Next Page” breaks. In the case of placing part of the document in landscape orientation, this is exactly what you need to select. If this is an application area at the end of the text, then it will be enough to create just one break with the section, if this is the middle of the document, after which it is again necessary to use portrait orientation, then there should be two page breaks with the creation of a new section - at the beginning of the area for horizontal pages and at its end.

Having created the sections, we also go to the “Page Options” menu, where we select the desired orientation, and from the “Apply” drop-down list we select the value “to current section", which did not exist previously, since the sections were not created.
While creating multi-page documents in the Word text editor, a number of users may be faced with the need to present a number of document pages in portrait orientation, and another row in landscape orientation (especially if this concerns materials that include various charts, graphs, and so on). At the same time, an attempt to change orientation desired page completely changes the orientation of all pages in the document, which the user does not need at all. In this article I will tell you how to make one page portrait and another landscape in Word, and what methods exist for this.
How to make one page portrait and another landscape in Word - methods
If you need to create one portrait page in Word and another landscape page, then I recommend using a number of methods, which I will outline below. At the same time, I note that these methods work with versions of MS Word 2007 and higher, and if someone has older versions text editor, then I recommend abandoning the mastodon programs and installing a more modern version of MS Word. So, let's move on to listing the necessary tools.
Method 1. Select the desired text
So how to make landscape orientation on one page in Word? If you have several pages of a document in portrait orientation, but want to present some text from of this document in landscape form, then follow these steps:


The required text will be transferred to separate page V landscape format, and you will get a visual example of how to make one page portrait and the other landscape in Word. If you need to reduce the font on your computer, the instructions have been described by me.
Method 2. Page markup
An alternative to the first method is the page markup of the document you need. So, if you were unable to make one page landscape and the other portrait in Word using the first method, then do the following.
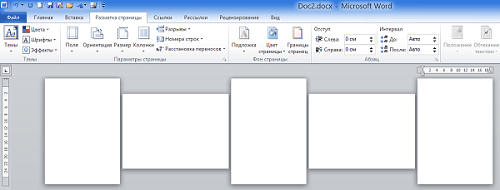
Let's say you have five pages of text in book layout, and you need to make the second and fourth sheets in landscape format. Proceed as follows:

Starting from the second page, all pages became landscape.

- Now we need to make the third page a book page in Word. Place the cursor on the upper left edge of the third page, again enter the page settings, but there select “Landscape” and “To the end of the document”.
- The third and subsequent pages will become landscape. Now we go again to the fourth page and use the same algorithm to make it book-ready.
- Then we move to the fifth and make it landscape. I think the essence of the actions is clear to the reader.
- As a result, we get this result.
How to make one page landscape in a Word document and another portrait page [video]
You can see how these methods visually look in the video below.
The methods I have listed will help the reader answer the question “How to make one page portrait and the other landscape in Word.” In most cases, the first method is sufficient, which effectively places the text you need on the page with the orientation you need. If you want to mark up your document in advance, then create required quantity pages ("Insert" tab - " Empty page"), and then use method No. 2, and your idea will be effectively implemented.
In contact with


