How to download the program correctly. How to install the program on a "teapot" computer? Easily
The time that the user spends searching and installing the necessary programs, for example, when changing operating system, can be calculated in hours. And if this the local network with a dozen computers, these procedures can take all day. Fortunately, there are programs in nature that can significantly reduce the duration of this process.
Such software is divided into two categories: programs for automatic installation ready-made distributions and application catalogs downloaded from the Internet.
MultiSet falls into the first category. Program using step-by-step recording user actions creates an application installation script. Then, upon request or automatic mode, installs it on the computer.

The software's arsenal also includes functions for creating bootable media with assemblies recorded on them, including the operating system included.
Maestro AutoInstaller
The software is very similar to the previous representative. Maestro AutoInstaller also records the installation and then plays it back, but has a more user-friendly and clear interface, as well as a smaller set additional functions. The program can create distributions with application packages, but is not able to write them to disks and flash drives.

Npackd
Npackd is a powerful catalog program. With its help, you can download and install applications presented in the list, update and delete already installed ones, and add your own programs. Software added to the Npackd repository has every chance of becoming popular, since it falls into general directory and can be used by all its users.

DDownloads
DDownloads is another representative of application directories, but with slightly different functions. The operating principle of the program is based on the use of a database containing a huge list of software with detailed description properties and features.

Essentially, DDownloads is an information platform with the ability to download installers from official sites. True, here it is also possible to add your own applications to the database, but they will not end up in the general catalog, but will only be contained in local file DB.
A large number of functions and settings allow you to use the program as a repository of information and links and as a general directory for users of your local network.
We looked at several programs that allow you to find, download and install automatically a large number of applications. You should not neglect this knowledge, since at any moment you may need to reinstall the system, and with it the entire necessary software. To do this, it is not at all necessary to collect a collection of installers: using MultiSet you can write them to boot disk along with Windows or create information base DDownloads data in the local area for quick search necessary links.
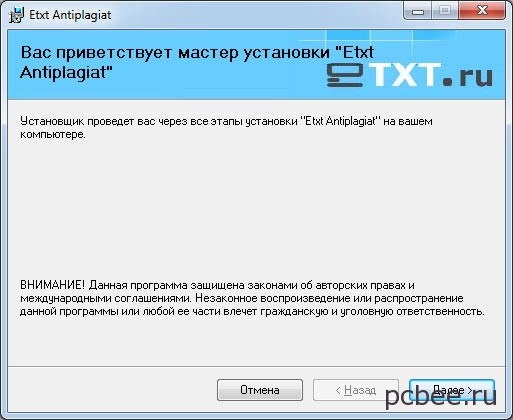
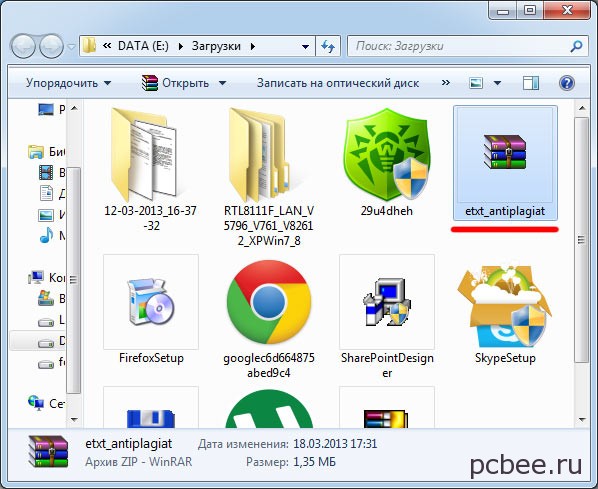
Many programs we download from the Internet are zipped (packaged) to reduce their size. Those. programs are in the archive. Before installing a program from an archive, it must be unpacked (there are exceptions to this rule). Here is an example of installing a program for checking texts for plagiarism, which after downloading is in the archive.
Option 1. Only the ZIP archiver is installed on the computer
So, after downloading, a ZIP archive appears in the downloads folder.

Please note that an archived file appears differently than a regular folder. There is a lightning bolt on the archived folder. We can easily look into the archive folder and see in it the files necessary to install the program.

Alas, if we try to start the installation by clicking on the setup icon, the installation of the program will not begin, but a message will appear "This application may be used by others compressed files, stored in this folder. For proper launch applications should extract all files first."

In a specific case, to install the program, you can run not the setup file (setup.exe), but the EtxtAntiplagiat file ( EtxtAntiplagiat.msi). However, in some cases it is necessary to extract all files from the archive, and only then proceed with installing the program. To extract files use the button Extract all(see previous picture).
Pressing the button Review, you can select the location where the archive will be unpacked. As an example, let's unpack the archive into the Program folder, which we will create on the desktop.


Now you can safely begin installing the program. After double clicking on the icon setup The installation process of the program will begin.
After double clicking on the setup icon, the installation process of the program will begin
If installed on your computer WinRAR archiver, then the actions will be slightly different.
Option 2. WinRAR archiver is installed on the computer
As a rule, after installing the WinRAR archiver on your computer, it becomes the default archiver, i.e. All archive files will open when WinRAR help. If the WinRAR archiver is installed on your computer, the archive files look like a stack of books tied with a belt.
The WinRAR archiver is a much more advanced program than ZIP archiver included with Windows. In a specific case, WinRAR allows you to install the program by running the setup.exe file, even without unpacking the archive into separate folder. If you still need to unpack the archive, then in the context menu (called right click mouse) you can select a location to unpack the archive.

For example, if you select the Extract to etxt_antiplagiat\ option, then a folder matching the name of the archive will be created in the downloads folder, into which the files extracted from the archive will be placed.
If you still have questions about installing programs from the archive, ask them in the comments.
Evgeny Mukhutdinov
Gaining new knowledge and expanding the horizons of our interests when working with a computer, we can no longer make do with only those basic programs, preinstalled by the manufacturers themselves. Therefore, every user, even the most inexperienced, is faced with the need to install new programs on their computer.
Installation for beginners new program It often seems like something complicated and impossible, but in reality it is not so - installing most of the programs we use to work on a computer does not require any special knowledge and skills, and is accessible even to the most “green” users.
The very first and most understandable assistant in installing any program is always the instructions, which guide the user step by step. All you have to do is press the “ok” and “next” buttons. But we know that it is better to see once than to hear a hundred times, so we present clear example to install a new program on your computer.
So, you have downloaded the program you need onto your computer. Find the downloaded file and run it double click mice.

The first window that will open immediately after launch will be the “Installation Wizard”, which will greet you and offer to continue the installation by clicking the “Next” button. By the way, at this stage we recommend that you stop other applications, that is, close them so that they do not slow down the process of installing a new program.

The text of the license agreement for using the program appears in the next window. Read the text and, if you are satisfied with everything, then feel free to check the “Accept the terms of the license agreement” checkbox and click the “Next” button.

In the next window, the Installation Wizard will prompt you to select a folder to install the program. Usually, the Installation Wizard itself automatically selects a location on the “C” drive in the “Program Files” folder, but if you wish, you can change this setting and select another folder by clicking on the “Browse” button and selecting from the list the desired folder. The easiest way is to trust the Installation Wizard and leave the default folder selected - this way you will know that all programs are in one place and you won’t need to search for them all over your computer later.

When we download from the Internet free programs, we very often try to install additional, often completely unnecessary, applications along with the downloaded program. Carefully read the text that appears in the Installation Wizard windows and when it prompts you to install something else, uncheck all the unnecessary boxes and click the “Next” button.

The Installation Wizard will also prompt you to create a shortcut for the new program on the Desktop or pin the shortcut to the Start menu. If you need such labels, then check the boxes next to these positions; if not, remove the check boxes.

The installation wizard has received the basic conditions from you, so now it offers you to go directly to the installation itself. Click the “Install” button.
Tracks appear in the new window and are gradually filled with color - this is the process of installing the program. Required files copied and placed in folders on your computer.

As soon as everything you need is installed on your computer, a new window appears notifying you that the installation is complete. In this window there is a checkbox “Run…” - if you need to launch a new program immediately, then leave this checkbox. Next, click the “Finish” or “Done” button.

A shortcut to your new program appears on the Desktop (if you did not uncheck the “Create a shortcut on the Desktop” checkbox in one of the previous steps).

Here we have described the basic steps for installing a new program, which are present in most similar cases. But there are times when the Installation Wizard may ask Additional information, such as selecting a language or entering license keys. These additional windows should not scare you, since carefully reading the text in the windows that appear will allow you to intuitively understand the meaning of these requests and make the right decision.
Hello. I was sitting today, thinking about what would be so interesting and useful to write in my . I went to Yandex Wordstat, this is a service from Yandex for viewing keywords, more precisely to view the number of a specific request per month. I wrote “how to install” and started looking through requests.
I saw an interesting request “how to install the program” impressions per month are 36226, this is not a lot, but still people are searching, which means this article will be useful.

So I decided to write a short post on this topic. Why small? Yes, because essentially there is nothing to write here :).
Before writing about how to install a program downloaded from the Internet. I would like to clarify something and advise. I wanted to clarify that I will consider an example on the Windows operating system. It doesn’t matter what version, it’s just that in Linux the installation of programs is slightly different.
And I would like to advise the following: If you need any program. For example Mozilla or QIP, then try to download from official sites. All this is for safety reasons, so as not to pick up some kind of infection in the form. Windows 8 seems to promise its own application store, and that would be very cool. Well, of course, on one condition, that it will be done properly. It’s just that when you download a program from some “fraudulent” site or torrent, a virus can easily be hidden in it, which, when installed, will definitely settle on your computer. That seems to be all, now to the main part of the article.
How to install the program?
Programs for the operating room Windows systems Mostly they come with the .exe extension, for example WinRAR.exe. All you need to do is just run this installation file and act according to instructions. When I started writing this article, I thought of giving an example of installing the program with screenshots. And then I thought that almost all programs differ in the installation process, and such instructions would be of very little use.
Typically, the program is installed in the following order:
- Run the installation file. The installation file itself can be hidden in a .rar or .zip archive. Therefore, first we open the archive and then run the installation file.
- We accept the license agreement and click “Next”.
- Let's select the components that need to be installed (not in all programs).
- Let's choose a location on the computer where to install the program. By default, in most cases it is installed in C:\Program Files\ . If you install big game, then I advise you not to install it on drive C, it is advisable to replace it with drive D or E. Click “Next” or “Install”.
- It is also possible that the installation manager will offer to choose whether to create shortcuts on the desktop and a folder in the start menu, then check the boxes as you wish.
- Then you will have to wait a little (depending on the size of the program) and everything will be installed. But still different programs are installed in different ways, but the scheme is usually similar to the one I described.
The installed program, or rather the shortcut to launch it, must be looked for on the desktop or in “Start”, "All programs".
For those who have been using a computer for a long time, this topic may seem simple and uninteresting, because every user, in any case, has to do this (and learn along the way). Although, despite its apparent simplicity, not everyone installs applications (games or programs) correctly, much less uninstalls them.
And even more so for beginners, this topic will be very useful, if only for the reason that a huge part of the problems with the computer (braking, freezing, etc.) arise due to incorrect actions during installation and removal of applications.
I have already mentioned several times in my newsletter that even after proper removal, in Windows registry“tails” remain from those programs that we delete. And if, moreover, the removal process went wrong, then these same “tails” in the future can cause big troubles in the system.
Therefore, I want to tell beginners and remind more advanced users about these simple procedures in order to avoid unnecessary computer failures (due to ignorance or stupidity).
Let's start, of course, with installation (in the pictures this is the Light Alloy program).
The installation process is started using special installation programs, which are either loaded automatically (for example, after inserting a disk into the drive) or using manual start necessary files, which are usually called setup.exe or .
The process of installing most applications is simple and consists of you answering questions from the installer and clicking a button Further. Usually during installation there is a welcome window first, then a window with license agreement, and then selecting a location to install the program.
Here (based on my experience) lies the most common problem for a beginner. The fact is that by default the computer offers to install the application in the folder C:Program Files,
which can be used without problems (and even sometimes desirable), but not always.
For most users HDD divided into several logical drives (C, D, etc.). In this case, drive C does not always have enough space to accommodate all the programs that you want to install. Inexperienced user often does not pay attention to this and installs everything in this folder, which over time leads to disk C becoming full and, accordingly, slowing down the computer (the system should always have free place on drive C) and the inability to install other programs.
The second undesirable consequence of installing some programs in the above folder is that in case of complete Windows reinstallation, drive C is completely cleared and, naturally, all programs located on it are deleted. After reinstalling Windows, all these programs must be installed first. However, if they were located, say, on drive D, then this would not have to be done.
This, it should be noted, does not apply to all programs, because some “serious” programs register themselves in the registry (on drive C) and will still need to be reinstalled. However, simple programs can be installed without problems, and even need to be installed on a disk that is not a system one.
To install an application on drive D (or any other), you just need to press the button Review(see picture) and select another installation location (or type it manually):
This way you will get rid of system overflow logical drive, which will have a good effect on its performance.
But this is not a very bad problem. The main cause of computer failures is due to incorrect installation is an unfinished installation.
This may happen during sudden shutdown power supply of the computer or if you suddenly decide to interrupt the installation process in some way in an extraordinary way. One of the reasons for an incomplete installation may also be the situation described on this page (see July 2008).
After an incomplete installation, “tails” remain on the hard drive that need to be removed using standard methods It's simply impossible. Therefore, you should try to complete the installation without failures or interruptions. It's better to delete the app after in standard ways than to interrupt the installation process!
Now let's talk about correct removal programs.
Many beginners believe that simply moving a folder from unnecessary application V Cart they thereby removed it. This is the most blunder! You can only remove programs in this way that you installed on your hard drive in the same way, i.e. way regular copying(for example, from a disk onto which the program was copied from a friend’s computer). If you installed the application using the installation program, then you must uninstall it using a program designed for uninstallation (removal).
Such a program (usually called or uninst) can be found in the same folder where the application to be removed is located. If you don't remember where it is, you can right-click on the application icon and select Properties. In the window that appears, you will see the path to the folder with necessary program:

To quickly get to this folder you just need to press the button Find object.... In this folder we find the desired program(uninstall.exe) and clicking it will activate the process of uninstalling this application.
Often such a program is located in the Start menu ( Start - All Programs - Application Name - uninstall).
There are applications that do not include uninstallation programs. In this case, the most the right way Removing such applications will launch a special program from the Windows system itself.
This is done like this: Start – Control Panel – Add or Remove Programs.
In the window that opens, find the application to be deleted, select it with a mouse click and press the button Delete:

After that, having agreed that you really want to remove the application with all its components, start the uninstallation process and wait for it to complete.
The methods described in this lesson are the simplest (but perhaps the most reliable) ways to install and remove programs. By correctly installing and uninstalling programs and sometimes cleaning the system from unnecessary application remnants (I described how this can be done in the free newsletter), you will save yourself from most unnecessary Windows crashes.
It should be noted that there are special programs uninstallers that monitor the installation process (while saving all data about each installed program) and, when uninstalling applications, very effectively remove all “tails” (although not a fact). But for a beginner, these programs will not always be clear (especially if they are English language), and they take up a lot of space. Incorrect handling of such programs, on the contrary, can “litter” your computer. Therefore, I leave the advisability of their use and development to your discretion.


