Enlarge disk c using disk d windows 7 acronis. EaseUS Partition Master to increase disk size. How to clean a disk from garbage
This article answers the question: “How to increase space on drive C?” It provides instructions for working in third party utilities, and in the built-in program. It should be noted that increasing the size system partition is performed by reducing the volume of one of the neighboring ones. Moreover, it is necessary that they be located on the same physical storage. Of course, the attached space of the adjacent partition should not be occupied by files. The instructions are suitable for any version of Windows OS.
Aomei Partition Assistant
Aomei- free utility, which allows you to perform any manipulations with hard drives. During installation, it does not install advertising applications along with it. The interface is completely translated into Russian. The utility supports any version of Windows OS starting from 7.
Be careful! Any actions in programs of this type may lead to data loss. Make a backup of important documents in case of an unexpected failure or unexpected power outage.
Step-by-step instruction
After installing the program, run it.
The main window will show hard disks and their sections.How to increase space on drive C at the expense of drive Dusing the Aomei app?

Click right click mouse over section D. A menu will open in which you need to select “Resize”.
In the window that appears, you can edit by dragging the borders on the right and left or by entering digital values in the input lines. You need to move the borders so that the unallocated space is located after section C. When you are done with the settings, click OK.

Increase the size of partition C using the new unallocated volume. Click OK.
Now click on the "Apply" button in the main window of the Aomei utility.
Before that how to increase space on drive C
In the same utility you can create bootable USB flash drive. With its help, partition editing is performed outside the OS. With this approach, restarting the PC is not required while performing operations.
The utility can be downloaded at official resource developer.
MiniTool Partition Wizard Free
Partition Wizard - free application, which will help you perform any actions with partitions hard drive. Its only drawback is the lack of Russian translation.

Once loaded, the utility will display a window with almost the same interface as Aomei. The steps that need to be taken before increasing the space on drive C are also completely similar.
- expand the context menu by right-clicking on the image of section D;
- click on Resize Partition and edit the space so that the area with unallocated space is to the right of system disk;
- now do the same actions with section C, but do not reduce its volume, but increase it;
- click on OK and then on “Apply”;
- After the program has completed all operations, open Explorer to make sure the space is allocated correctly.
To download Partition Wizard, go to the official website of the utility.
Tools built into the OS
There is a way that will helpeven when the installation third party software impossible. It must be said that the built-in utilities do not allow you to perform the necessary operation without losing data recorded on the partition adjacent to the system one. Therefore all important information should be saved on a separate drive.
So:
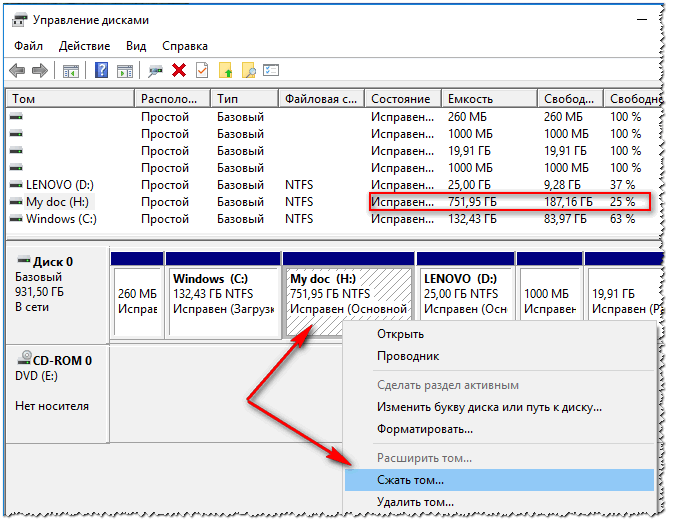
- Open the Run dialog. Enter the text diskmgmt.msc into the line. Click OK.
- The main window of the Disk Management application appears on the display. It will show all drives installed in system unit, and the diagram of their sections. Do not take any action with hidden drives, if you don’t understand why they are needed.
- Open the dialog menu for drive D by clicking on its rectangle in the diagram. Click on the inscription "Delete". After this operation, free space will appear to the right of partition C.
- How to increase space on drive C? Expand the context menu of section C. Click on the “Expand” inscription.
- In the window that appears, enter the volume (in MB) by which you want to increase the disk. If you do not make any changes here, the system will automatically take all available space.
When you need to slightly enlarge the system partition, and then create an additional one again, click on the rectangle indicating the remaining unallocated space. Click the "Create Volume" text and set its size.
Conclusion
In addition to the tools described, there are many utilities that will helpincrease space on drive C.Windows 7 and older versions boast a built-in tool, but its functionality does not reach the level of third-party products.
Always remember that performing low-level operations on any drive is risky. Before each action, it is advisable to make backups of at least important data, and if possible, then full copies hard drives.
Every time there is less and less space on the C drive free space. The problem of memory exhaustion is common to all computers, even those with a HDD or SSD with a large amount of free space. At the same time, Windows cannot work normally when there is a shortage of memory, so it is imperative to ensure sufficient space for the system. There are two ways to achieve your goal: remove existing files or increase the disk size. IN this moment I'm more interested in the second direction - increasing disk space.
The problem comes from one Windows features– gradual increase in system size and constant addition of temporary files. Over time, systemic, as well as temporary files, tend to increase the space taken up. Everyone is guilty of this Windows versions, with no exceptions.
Initially, lack of space can be corrected by deleting useless programs, temporary files, downloads, etc. Anyway, the inevitable situation is when only important applications, but, alas, there is not enough space. Some users give up, but this is not worth doing, since the system begins to process requests very slowly, programs often crash, and errors become the norm.
To continue using normally local applications, you need to provide enough free space on drive C. So, how to increase the capacity of the C drive? We'll tell you in our article.
How to clean a disk from garbage?
The easiest way to free up space is to remove all junk. If the problem of lack of space has appeared recently, it is still possible to get by only by deleting useless data. For some time this will be enough for normal operation systems. You need to clean out the garbage in several stages.
Algorithm of actions is given below.
- We clean temporary files (they inevitably accumulate when all applications are running). The CCleaner program copes with the task efficiently and quickly. Just download the utility from the link, on the first tab click on the “Analysis” button, and then click on “Cleaning”.
- Removing useless files. By default, Windows browsers download all files to the “Downloads” section located on drive C. There may be a lot of unnecessary stuff here: software distribution kits for installation, outdated files, torrents, etc. It’s worth checking the sections where files are downloaded and deleting everything useless.
- Uninstalling programs. Many users go through 2, 5 or 10 applications in search of suitable ones. Having found good utility the search stops, but earlier installed programs remain in the system. They should be removed by going to the “Programs and Features” section, menu - “Control Panel”.
- Transfer media files to another drive. It is better to store photos, movies, music, games, etc. on drive D. Such files should be cut from drive C and moved to D.
How to increase the size of drive C at the expense of drive D?
Add free space to logical drive With really standard using Windows or through applications. Main disadvantage The first method is forced formatting of the partition. The programs cope with the same task, but without deleting files, so this option priority.
Using Aomei Partition Assistant
A free utility with a good reputation successfully copes with transferring space and saving data.
Its advantages include:
- easy setup;
- the ability to launch several actions at once;
- reliable operation;
- Russian interface.
The entire procedure is absolutely safe for your computer and hard drive.
Main functions of the program:
- creating and deleting logical drives;
- transferring free space between disks;
- formatting;
- merging, splitting, copying sections.
Of greatest interest to us is the transfer of free space.
To perform it, you should use the instructions:
- download the application from website;
- install and run the program;
- right-click on the disk where there is free space intended for transfer and click on “Resize partition”;
- Reduce space on drive D to create unallocated space.
Important! The slider should be moved from left to right, the freed volume should appear before the other data on the disk.
- repeat step 3, but for drive C, and expand its space using the space on the right;
- In the main window, click on the “Apply” button.
Healthy! The program supports deferred action, which means that no changes occur until you click “Apply”. Before starting the procedure, all changes can be corrected.
Using MiniTool Partition Wizard Free
This is another one similar program, which is not inferior to the previous one. Has the ability to move space without formatting disks. The only drawback is the English-language interface, but it is intuitive, so it’s quite difficult to get confused.
The method for adding free space to drive C is no different from the previous program. The instructions from the last section also apply to the MiniTool Partition Wizard. By using control points, initially you need to reduce one disk, and then increase the other. If you need to allocate precise space, you can specify the desired volume in numbers (indicated in megabytes).
All listed methods create free space on drive C, so the reader can independently choose the method he likes. Typically, after the procedure, the system begins to work much faster and failures occur less frequently.
Question from a user
Hello. Not long ago I ran out of space on my Windows disk - and the error “Insufficient space on the system partition of the disk, this may be the reason” began to appear in the tray next to the clock. The fact is that the C:\ drive actually has little space - only 30 GB, but the other D:\ drive has 420 GB (about 200 GB free). Is it possible to increase the size of drive C at the expense of drive D without losing data?
PS Acer laptop Aspire 5550, Windows 8 system, HDD 500 GB (Seagate, if I'm not confused).
Hello.
Most often, you have to change the disk size when, when installing Windows OS, you incorrectly calculated the required size of the system disk (also when buying a PC - often the disk is not very conveniently divided: either there is only one partition with Windows, or the size of the system partition is very small).
In general, a similar operation to resize partitions can be done even without installing additional programs, if you have Windows 7, 8, 10 installed (if XP, use the link to special software for formatting and partitioning hard drives, link below).
I'll show you on specific example, where and how to press ☺.
Programs for working with hard drives (partitioning, formatting, defragmentation, etc.) -
Increasing the capacity of the C:\ drive
(Relevant for Windows 7,8, 10. Without loss of data and additional programs)
Important: To increase the size of the C:\ drive - you must have free space
on some other partition of the disk (part of which we will take)
♣
1) Disk management
Modern Windows operating systems have a built-in service program for formatting and partitioning disks. It's called - disk management . Of course, the first thing you need to do is open it.
To do this, press the button combination Win+R.


Then the required utility should start...

Disk Management
♣
2) Separate part of the free space
Now we need to select a disk partition that has free space and “take away” it to subsequently attach the taken space to the “C:\” drive.
To do this, right-click on the selected partition and select the option (in my example below, I decided to shrink volume H:).

Now you need to specify how much free space you want to take on the disk. In my example below, I took the figure to be 5000 MB (i.e. 5 GB).

After the partition is compressed, you should see unallocated disk space appear (a rectangle with a black stripe on top, see screenshot below). This is the place that can now be attached to another disk partition.

Unallocated area
♣
3) Attach unallocated space to the “C:\” drive
We right-click on the drive to which we want to attach unallocated disk space (in the current example, we attach it to the “C:\” drive), and select the option from the menu "Expand volume" .
Note! If your "Extend volume" option is not active and is lit gray(you can’t click it) - read a couple of proposed solutions at the bottom of the article.


Generally, last step- agree to the operation by clicking on the “Done” button.

All! Your system disk is now 5000 MB larger. This is Good!
♣
4) What if the expand volume tab on the “C:\” drive is not active?
In some cases, when trying to expand a volume, this option in disk management may not be active (it is simply grayed out and cannot be clicked, example below).

There are two solutions:
- Try removing unnecessary partitions used for recovery. As a rule, this is observed more often on laptops where there are special sections from the manufacturer. In my example below, I'll show you how to remove them so that the Extend Volume feature becomes active. Important! In this case, you will disable the ability to restore on your laptop (however, this function is not all that effective and reliable, and rarely helps, but still...).
- Another option is to use special. resizing programs HDD partitions from this article:
So, let me consider the first case...
You must first run command line from the administrator: to do this, open the task manager (button combination Ctrl+Shift+Esc), then click File/new task , enter CMD and press Enter (example below).

- enter the command and press Enter ;
- next command list disk (all disks in the system will appear, in the example below there is one disk in the system with the identifier "0");
- select disk 0- indicate which disk you need to select. In your case, perhaps instead of “0” you need to indicate the disk identifier that you need (screen with an example below).
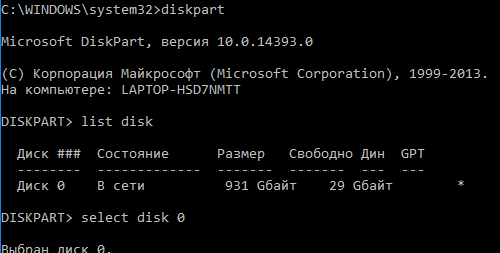
Next steps:
- - look at all the partitions that are on this disk;
- select partition 6- select a specific partition on the disk. Please note that instead of “6” you need to indicate your number (make sure that the message “Section X is selected” appears).

List partition (in my case, it was necessary to delete partitions 6 and 8 (used for recovery) in order for the "Extend volume" tab to become active).
And the last command to delete the selected partition is delete partition override. Important! Be careful, this command will delete the selected section, all information from it will be lost!

To delete the next partition, you need to select it again (for example, select partition 8 and then use the command again to remove delete partition overrid ).
Actually, that's all - the problem is solved.
Sometimes there is a need to increase the size of drive C at the expense of another partition. Most likely you need this because there is almost no space on it, but you need to expand it. In this article I will analyze two programs that will help you do this and some instructions.
We will talk specifically about increasing drive C at the expense of another partition, for example, drive D, and they must be on the same hard drive or SSD. If you have Windows 7, 8 or 10, then these instructions will suit you.
How to increase the capacity of C drive using Aomei Partition Assistant
A wonderful program that will allow you to expand partition C: of your hard drive or solid state drive, called Aomei Partition Assistant. This program It does not install various garbage along with it, which some programs are famous for. Also, the program is in Russian with complete clear interface. Works on all operating systems starting from Windows 7.
The most important thing to pay attention to: do not correct work with partitions can lead to data loss. If they are important to you, I recommend keeping them in a safe place.
Download and install the program, I think there will be no problems with this. After launch, you will see a nice interface, although it depends on who you are. All your disks and partitions are displayed there.
In our case, as I said, we will increase section C at the expense of section D. Now let's do this.
Right-click on drive D and select "Resize partition".
A window will open where we can use the slider and thereby change the size, or enter it manually. You need to make sure that the unallocated space of the partition after selecting the size is in front of it, as shown in the screenshot. Then click OK.

Now, in the same way, we change section C, only now we increase the size on the right. It will increase due to the free space that we took from drive D. Click OK again.

After the work has been done, at the top of the program, on the left, there is a button "Apply", press it.

Now the computer should be restarted, usually you need to do two of them. As a result, the size of the C drive will increase.
This is not the only function of the program. With her help we can. Also, bootable flash drive You can create it in the program and resize partitions there.
How to Enlarge C Drive Using MiniTool Partition Wizard Free
So there's another one bad program called MiniTool Partition Wizard Free. It is free, does not install third-party software, but its disadvantage is that it is not in Russian, it may be difficult for some, but thanks to this article you will understand everything.
The program interface is somewhat similar to the previous one. In principle, there are almost no differences from the first option. We will enlarge the system disk in the same way.

First, click on drive D, and then click "Move/Resize Partition" up. Now let's take right size drive D, highlight it on the left and click OK.


That's all, after the completed operation in Explorer you can already see the increased size of the system partition. Now you know how to do it.
You can download the program from here.
How to increase the size of the system disk as standard
Standard means using standard means Windows. You can do this, fortunately, like Windows 7, Windows 8 and Windows 10, there is such a function. But there is this method disadvantage: the data on drive D will be erased, so you will need to first transfer it somewhere. Perhaps you have decided to use this method, then first press the combination Win+R, a window will open in which you need to enter the command:
| diskmgmt.msc |
This will open the tool "Disk Management". There you will see all connected disks and partitions. If present additional sections, they are also called hidden, I don’t recommend touching them.
So, right click on partition D and select "Delete Volume". Subsequently, the data on the disk will be deleted, and free, unpartitioned space will be created to the right of the C drive.

To increase the volume of the system disk, right-click on it and select "Extend volume". Next, the volume expansion wizard will open, where we need to specify the volume by which we will expand the disk. You shouldn't choose too much if you still need section D.

We have enlarged the system disk, now we need to use the unoccupied space that we have left. To do this, click on what is not distributed with the right mouse button and click "Create Simple Volume". The drive will be assigned the letter you selected and will be formatted. That's all.

Now you can return all your important data back to the D drive.
Good day. Today we'll look at quite popular topic for beginners, this is working with already created sections of hard disk (you already bought a new hard drive? :) and we will consider such operations as reducing the volume (compression) of the hard drive and expanding it using unallocated area. For this we will not use any third party programs, but let’s use the built-in operating system Windows, Disk Management utility. So, why might we need this knowledge? Suppose you initially had it on your hard drive, but over time you decided that one is enough to store movies, music and photos, it’s easier to search :) Or another case, you have two local drives on your hard drive (let’s assume 2Tb), one for system (local drive C), the second for personal data (drive D), but when you partitioned them, you left too little space for drive C and this constantly creates discomfort for you. It is to solve such situations that this article was written.
In this article I will do, sequentially:
— Compression (reduction) local disk,
— Expansion (increase) of the local disk due to a new unallocated area.
This is what we need.
1) The first thing we need is to open the Disk Management utility. For happy owners of Windows 8.1 and 8, just click right key Click the "Start" button (or in the lower left corner of the desktop for Windows 8) and select "Disk Management". Everyone else needs to go to “Control Panel → System and Security → Administrative Tools → Computer Management → Storage Devices → Disk Management.”

3) Right-click on the partition on the right side of the window and select “Shrink Volume”.

4) A dialog box will open asking you to select the volume to compress. This window shows the current partition size, available (unused) space for compression, and the size of the local disk after compression, in megabytes. To maximize disk compression, you must defragment the partition before this operation. I'm using an empty disk, so I have almost all of its capacity available for compression. Enter required amount megabytes in the line “Size of compressed space” and click “Compress”.


6) Now we will expand the partition using this unallocated area. To do this, right-click on the partition and select “Extend volume”.

7) The “Volume Expansion Wizard” will open, click next.

This page shows the available and selected unallocated areas, and you can also specify how much of the unallocated area should be used to expand the local disk (item “Select the size of the allocated space”). I use the entire volume, you look at your circumstances.


