How to find out the number of cores and use them all in Windows 10
Most modern processors have more than one core. But not all computers take this fact into account by default. That is why it is worth checking for yourself whether all cores are used and, if necessary, enabling the use of deactivated ones.
What does the number of cores affect?
Any action on a computer (launching programs, expanding a window, creating an animation) is a command sent to the processor for execution. The more steps the user performs simultaneously, the more requests the processor receives at that moment. Moreover, the number of commands, even with little user activity, is considered to be hundreds and thousands, not just units, but the processor also executes them at a tremendous speed, measured in milliseconds.
Each processor has its own load limit - more productive ones can perform a greater number of tasks per unit of time. Being overloaded means you start to see screen freezes, some programs stop responding or crash.
As today's applications become more demanding, processors cannot keep up. It is impossible to develop one core indefinitely, so the decision was made to use several cores in one processor. They interact like this: let’s say the user clicked 100 actions, then 50 of them will be solved by the first core, and the rest by the second. Of course, in reality the procedure for distributing tasks is more complicated, but for a general understanding of the principle this is enough. By increasing the number of cores, the time required to fulfill all user requirements is reduced. The more cores, the more “workers” processing data.
But you should understand: whether the program you use will load all the cores or use only one depends only on how it was written. The developer is responsible for implementing multi-threading support.
Video: what are “cores, threads, processor frequency”
Find out the number of cores
Before you start activating unused cores, it's worth finding out how many of them your processor has. Of course, this can be found out by finding the official documentation for the name and model of the processor. But Windows 10 has built-in methods that allow you to do this without knowing any information about the OS.
Using Device Manager
All versions of the operating system have a built-in utility that allows you to view a complete list of devices connected to the computer (including those that make the computer work):
Using parameters
All the main settings that the average user most often encounters are located in the built-in Settings application. It also contains detailed information about the system:
- Using the system search bar, find the “Settings” utility and open it.
 Open the Settings application
 - Go to the "System" block.
 Open the “System” section
 - Expand the “About System” sub-item using the section tree on the left side of the window, and pay attention to the “Processor” line. Once you have the name of the processor, use any search engine to find information and find out how many cores the processor has.
 In the “About the system” section there is the name of the processor
Via CPU-Z
If for some reason you don’t like the built-in methods, you can use third-party programs to obtain the necessary information. For example, you can download and run the free CPU-Z application. It provides a detailed list of information about the system and components used in the computer. Official website - https://www.cpuid.com/softwares/cpu-z.html. In the main “CPU” tab, you can select a processor (if there are several of them) and find out how many cores it has.
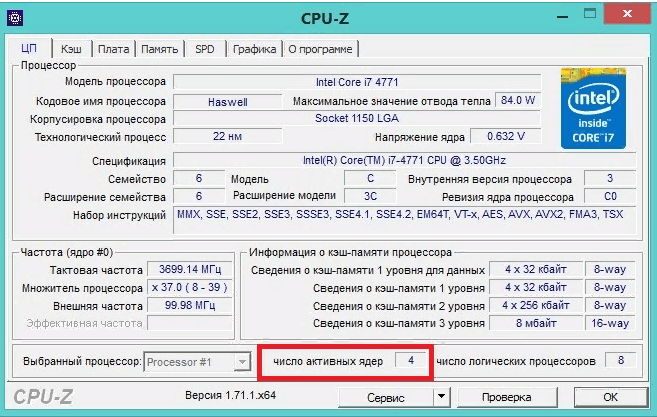 CPU-Z shows the number of processor cores
 Via AIDA64
Another application with detailed information about the system and computer is AIDA64. You can download it for free from the official website - http://www.aida64.ru/. After launching the utility, go to the “System board” - “CPU” block. Find the Multi CP line and count how many cores your processor has.
 AIDA64 in the “CPU” tab shows the number of cores
 How many cores are enabled by default?
By default, any system will use all available cores. If the processor has 4 of them, then all 4 will be used. But they will work only after the system starts, but will not participate in Windows loading. To change this, you must enable the use of all cores to start the operating system manually. It is worth doing this so that the system recovers from a shutdown state faster.
Core activation
There are several built-in ways to change the number of cores that are activated during Windows startup. No matter which one you use, the result will be the same, so choose the one that suits you best.
By changing the system configuration
Windows has a built-in program that allows you to configure system operation and recovery settings:
- Press the Win + R combination on your keyboard to open the Run window. Write the word msconfig in the window that opens and run the request.
 Execute the msconfig request


