How to copy photos from iPhone. How to copy photos
Hello! I'm sure each of you takes pictures on your phone and takes them often and in large quantities. Well at least I use my iPhone as a camera every day. After all, the phone is always at hand, and the built-in camera has long learned to take decent pictures. And no matter what you photograph, sooner or later it all needs to go somewhere. If the free space on your iPhone is approaching zero, and the folder with photos has swelled to indecent sizes, I suggest copy photos from iPhone to computer. Let's talk about this today!
Again, there is simply NO SINGLE METHOD for copying photos from an iPhone. There are quite a few ways to get your photos onto HDD computer. It would probably be nice to set up automatic synchronization between iPhone and your computer via iCloud. But as life experience shows, for many users these concepts are still the highest matter. Therefore, we will look at synchronizing a photo album via iCloud in another article, and today we will figure out how to SIMPLY take and transfer photos from iPhone to computer. Well, so as not to configure anything and not wait for half a day... We decided - we did it!
- How to retrieve data from a locked iPhone? —
- How to free up space on iCloud? —
- What do you have to do before selling iPhone or iPad -
- How to restore iPhone to factory settings -
As usual, I provide several for you to choose from. various methods, which from my point of view are the most normal and working. Here are the main ways to copy photos from iPhone to computer, which I myself regularly use.
Send photo to your email
Everything is clear here. You can send it to your email box photos, and then save them on your computer by opening the sent letter. This method I really like it, but there are a couple of BUTs. Firstly, you need an Internet connection. Secondly, it’s inconvenient to send a lot of photos this way... Although it depends on who. Well, in general, you understand. If you don't know how to do this, here's a little guide:
STEP 1 Go to photographic film and press the Select button
STEP 2 Select the photos that need to be sent by mail. ATTENTION!!! You can only attach 5 photos at a time (to one email).
STEP 3 Press the button in the lower left corner (square and up arrow) and select Mail from the menu that opens. Now all you have to do is enter your email address and send the letter. 
Next we go to our Mailbox and save the photos from there to your computer. This method is very helpful when you don’t have a cable in your hands, but you have the Internet. The downside is that you can only attach 5 photos to one letter. If there are too many photos, you will have to send a lot of letters. And one more small nuance - email must be configured on your iPhone. In general, in this way you can transfer photos to any device on which you can open mail and view photos.
iPhone as a USB drive (PC users)
If you are the happy owner of a Windows PC, then you should not have any problems copying photos from your iPhone to your hard drive. In the majority Windows cases recognizes the iPhone as a flash drive and adds a device to Explorer, the contents of which can be viewed. Here's a good example.
STEP 1 Connect iPhone using USB cable to the computer. Your device will be recognized and your choice will be presented standard set actions 
STEP 2 From this list, only the first two points are suitable for us “ Importing photos and videos" And " Open device to view files" If you chose the second point, don’t flatter yourself too much. No one will take you to system files won't let him in, but on the inside iPhone storage you will only find folders with photos. As you can see in the picture below, there are really a lot of folders there. I don’t understand why Apple coded everything this way, because now to find one single photo you need to go through a bunch of folders. Try sorting by date and time of creation to at least somehow navigate the space. 
STEP 3 If you still select the “ Importing photos and videos", then such a window will appear in front of you. Everything should be clear here without my blah-blah-blah... Select the folder into which we want to copy the photos and click OK. All photos and videos from the phone are copied. They don't let us choose just one or two. 
Image Capture (MAC Users)
 Once again, I'm amazed at how Apple thought through their OS X operating system. They knew (and it's fucking obvious) that people would connect all sorts of image and video capture devices to the MAC. That is why OS X has a built-in utility called Image Capture, with which you can access photos even if the device where they are stored is not recognized by the computer as storage media. Using this program I'm transcribing the footage and photos from GoPro cameras and sometimes from iPhone.
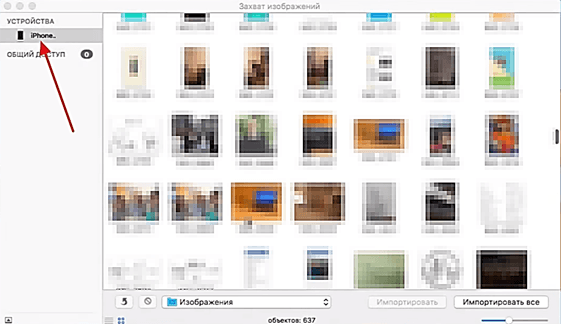
STEP 1 Connect iPhone to MAC with USB help cable and launch the application " Image Capture» 
STEP 2 Select the photos needed for import and click Import. To select multiple photos, hold down the Command button.
E-may! Everything is always so complicated at Apple!
iFunBox File Manager (PC and MAC users)
![]() What? None of the methods above worked??? ... Well, you are harmful!... And disgusting! Then try it iFunBox(DOWNLOAD). This file manager for Windows and MAC, which allows you to copy documents, videos, photos and other files to and from your computer iOS device. Using iFunBox, you access folders and files on iPhone as if it were regular USB storage device.
What? None of the methods above worked??? ... Well, you are harmful!... And disgusting! Then try it iFunBox(DOWNLOAD). This file manager for Windows and MAC, which allows you to copy documents, videos, photos and other files to and from your computer iOS device. Using iFunBox, you access folders and files on iPhone as if it were regular USB storage device.
I repeat once again - the program is absolutely free. By installing it on your computer, you can forever get rid of the headache of copying photos from your iPhone to your computer. The interface is very simple: a directory tree on the left, files on the right, and action buttons at the top. Screenshot below. 
For experienced users all these operations are not a problem, but for the owners popular brand Apple Iphone Sharing photos is a little more difficult than others. The computer does not perceive this phone as a regular flash drive, but you shouldn’t be upset. There are several ways to easily and quickly transfer photos from iPhone to computer.
 To transfer images to PC from Windows latest versions, several proven methods are used:
Use the iTunes program. First you need to install iTunes program on your own Windows computer. The program distribution is free and can be found on the Apple website.
Import images as from physical media. The phone cannot be used as a full-fledged flash drive, but it is possible to import materials. All you need to do is connect the device to your PC via USB. The My Computer program in Windows displays connected devices, one of them will be the iPhone. You can open the device and copy photos from it to any directory on your computer.
How to copy photos from iPhone to computer with iOS (Mac)
To copy data to, for example, a MacBook, you need to connect these two devices via USB cable. After connecting, the “Image Capture” program window will appear on the computer screen. The program window displays all photographs taken by the device. In addition, in the program window you can see useful data about the date and size of each image. In the bottom corner of the Image Capture program there are “import” and “import all” buttons. When you activate the “import all” command, all images and videos will be downloaded to your computer. The “Import” button is intended for downloading separate files. Before activating this command, you need to select the images needed for copying.
How to transfer photos from iPhone to computer via iTunes
The iTunes program itself is not designed for working with photos. However, it is possible to synchronize images using the Photos program.
The algorithm of actions is as follows:
- Launch the iTunes program. Connect iPhone.
- Click on the icon of the connected device in the iTunes program.
- In the panel on the left side of the iTunes program window, click “Photo”.
- Check the “Synchronize” option.
- Select the directory to synchronize.
- Run the “apply” command.
How to transfer photos from iPhone to computer using WiFi
It is possible to transfer images using usb interface, and by wireless channel Wifi connection. The process itself is not fundamentally different from traditional copying via usb.
The operation consists of several steps:
- Connect the device using a cable.
- Launch the iTunes program.
- In the program window, find the “device” block.
- Select the desired device.
- Go to the “parameters” block.
- Find the “review” tab.
- Check the box next to the “sync via Wifi” command.
If all commands are completed, the smartphone will automatically synchronize with a computer on this network and, accordingly, the photos will appear on the PC on their own.
Copy photos from iPhone to PC using social networks (VK, OK, FB)
Before you figure out how to transfer photos from your iPhone to your computer via social networks, you must first install applications on your smartphone. For each social network The method is approximately the same, so it is enough to clearly explain the process using the example of one social media - “VKontakte”.
To copy photos to your computer via VKontakte, you need to adhere to next sequence actions:
- Download and install the “VKontakte” application on your iPhone via the App Store.
- Register the application on your smartphone.
- Go to the application and open photo albums.
- In the photo album window, click on the “add photos” button.
- Tag photos from your smartphone's library and upload to social networks.
- Log into your VKontakte albums via PC.
- Select the desired photo and click on it.
- From the list of commands that open, select “save as” and save the photo.
 There are several cloud services, using in great demand. This is Icloud Google Photos, Cloud Mail, Yandex Disk and some others. Apple users Icloud is used more often than others, but not everyone knows how to copy photos from iPhone to computer. To start the process, use the function on the iPhone - “My Photo Stream”. Also, you must have Icloud installed on your computer.
Taking photographs is one of the main tasks of a smartphone, along with making calls and sending messages. Therefore, novice users are very often interested in issues related to the camera and photographs. For example, users often ask how to copy photos from iPhone to computer. This article We will devote our attention to this issue. Here you can learn how to copy photos from iPhone to computer with operating system Windows and Mac OS X.
How to copy photos from iPhone to Windows computer
If you are using a computer with a Windows operating system (for example, Windows 7, Windows 8 or Windows 10), then you can say that you are in luck. Because the process of copying photos in this case will be quite simple. And now we will analyze this whole process in as much detail as possible.
Firstly, to copy photos from iPhone to a computer running Windows operating system, you need to connect your iPhone to the computer using a cable. To do this, take the cable you use for charging and plug it into your computer and your iPhone. After this the operating room Windows system will detect your iPhone as a storage device and display it in the My Computer window (where all your drives are located). It looks something like the screenshot below.
Now you need to open the iPhone that appeared in the “My Computer” window. After this, you will see a drive called “Internal Storage”. This disc also open.


And then open the “100APPLE” folder.

That's it, you've reached the photo folder on your iPhone. Now you can copy photos from iPhone to computer simple drag and drop using the mouse.
How to copy photos from iPhone to MAC
If you are using a computer with an operating system Mac system OS X (for example, you have a MacBook or iMac), then the process of copying photos from iPhone to computer will be a little more complicated. In this case, you will have to use a program called Image Capture.
As a rule, the Image Capture program launches itself after connecting an iPhone or other device with which it can work. But if automatic start did not work, then you can run this program manually. The easiest way to do this is to resort to Spotlight search. To do this, click on the search icon in the upper right corner of the screen and enter “Image capture” in the search bar that appears. After which the system will offer to launch this application.

So, in order to copy photos from an iPhone to a computer running Mac OS X, connect your iPhone to the computer using a cable. This should open the Image Capture program. If this does not happen, then open it manually, as described above.

After opening Image Capture, look at the left sidebar this program. Here you can see a list of all devices that are on this moment connected to your computer. Select with your mouse the device from which you want to copy photos.
The next step is to select the location where you want to copy photos from your iPhone. To do this, open the drop-down list at the bottom of the “Image Capture” window and select one of the proposed options there. For example, you can copy photos to your Pictures folder or simply to your computer desktop.

At this point, the setup is complete and you can proceed directly to copying photos. If you want to copy all the photos from your iPhone to your computer at once, then just click on the “Import all” button. If you want to copy only part of the photos, then select the desired photos with the mouse and click on the “Import” button.

By the way, if the photos are not in a row, you can select them with the mouse by holding down CTRL key on keyboard. This will copy them all in one go.
In addition, the Image Capture program allows you to use drag and drop. So you can just highlight necessary photos and drag them using Drag&Drop to the desired folder.
I think many people have encountered the fact that a photo they like cannot be copied from a website. And all because it is protected from copying. Because of this, you have to struggle with thumbnails or pass by in search of a more accessible and less harmful site.
There is an exit!
1. We will need a photo editor (I use Paint- quick and easy) and a magic button Print Screen.
Open the image and press the button Print Screen. Next we open Paint and in the white window that opens, press the combination Ctrl+V or simply right click mouse and select " Insert"Next, save the photo to your computer (or edit it).
2. More tricky way(used on Opera browser.
I'll show you in more detail. Here is a site from which it is simply impossible to save large photos (preview only)
First, let's select the image we want to get in high resolution 
As we see in photo 2, there’s no way to copy it (what a pity!). Let's do it simply. If there is more than one photo that we want to get, we look through each one. Then open new tab and in the very top line ( command line, where the addresses of the pages are entered) enter the command opera:cache .
We present to your attention a list of all the addresses you have been to. Among them we look for the address of the desired site 
When found, click on the link " Preview". And this is what we get  Please pay attention to the required photo. As you can see, it weighs more than the others (those that we did not open), and the format is larger. Next, click on the link on the left side opposite the photo (with permission .raw) And....
  VOILA! our photo is in large format and can now be saved without any obstacles!
I hope it will be useful to someone


