How to make the font normal. Changing the font on a web page. Setting up system fonts
In this short article I will tell you and show you how to install windows font 7 and how to change the font. On the Windows operating system there are two ways to install a font.
In order to install the font, go to “start” “control panel” then “design and personalization” and in the window that opens click on the “fonts” section
Now go to the folder where you have new font which you want to install, press the left mouse button and hold it and drag it to the “fonts” section

Second way to install the font:
Open the folder where the font is located, hover the mouse cursor and right-click and click “Install”, after that it will start quick installation font.
How to install windows 7 font
To install a windows font, you first need to download the font. To do this, enter in search query in Yandex or Google “font for widows 7”
download this file and unpack if the font is archived. Please be careful when downloading the font.
Do not download fonts from sites infected with viruses. Install. Next, simply double-right-click on the font and click “install”
Installing a font in the Windows 7 operating system is as simple as,
It even occurs to me why I wrote something like this a simple article. But, however, given the cases when the user is puzzled not knowing what the reason is,
but it turns out it was turned on silent mode There are also cases where you simply have no idea how to install a new font.
At least I'm at the newbie stage computer topics I came across this question.
How to change the font in windows 7
In the Windows operating system, you can change the font of certain elements. Default interface font operating system costs Segoe UI.
But you can change the font of some system elements:
Choosing specific element and by changing the font, you can also change the font size, you can select a color and specify a bold or italic font.
To change the font to your taste, right-click on the desktop and select “personalization” from the menu that opens.

Or go to “start”, open the “control panel”, open the “design and personalization” section

And in this window, click “additional design options”


If for some reason it does not open this section, maybe some component or some system error.
Then in this case we will use command line. Open “start” and enter the following combination in the search line: rundll32.exe shell32.dll,Control_RunDLL desk.cpl @0.5
There is also an option to remove the font from windows list. To do this, in the list of fonts, right-click on the font and click “delete”.
I hasten to warn you that when deleting fonts, be careful. Optimal performance The Windows operating system also depends on fonts.
What is a font?
Font is graphic symbols enclosing different styles and sizes.
In this post I talked about that how to install the font and how to change the font. I hope that the information will help you customize the interface of your computer to suit your wishes. If you have questions and opinions, write comments.
If you have a font on your computer that you want to use, then all you need to do is install the font in Windows. After that it will be available in any program, be it Photoshop, Sony Vegas or any other program that uses fonts.
To install the font, click “Start/Control Panel”. If you entered the control panel for the first time, the window will look like this (Fig. 1):
Figure 1. Panel Windows management XP.
Now in the Control Panel window ( classic look), find the “Fonts” icon (Fig. 2) and click on it. A window will open containing all the fonts installed in Windows.
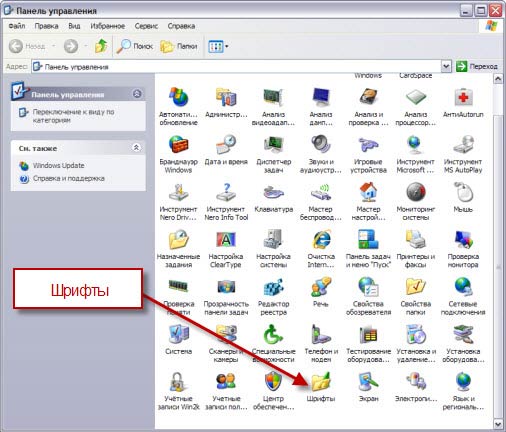
Figure 2. Fonts in the Control Panel Windows XP Control Panel.
However, an easier way is to simply copy the desired fonts to the “Fonts” folder using Explorer (Figure 3).

Figure 3. Installing a new font in Windows XP.
Installing fonts in Windows 7.
Installing fonts in Windows 7 is almost no different from installing in Windows XP, except that appearance. As in the first case, we need to click “Start/Control Panel”. In the window that opens, you need to click “Category” (Fig. 4) and select “Large icons”.

Figure 4. Windows 7 Control Panel.
Then find the “Fonts” icon (Fig. 5), open it, and use simple copying fonts in this folder- install new fonts in Windows 7.

Figure 5. Installing a new font in Windows 7.
How to download Russian fonts
And so, in order to install new fonts on your computer, you first need to get them somewhere. There are many fonts on the Internet, but to find those that support the Russian language, the query should look like this: “Russian fonts” (you can add the word download), or “Cyrillic fonts”.
When searching for fonts, you may find sites where you can see what it looks like before downloading a font. I consider this option the most convenient and I advise you to look for just such sites (Fig. 6).

Figure 6. Preview the font before downloading
But there is another option, which is to download fonts in entire collections, for example “2000 Russian fonts in one archive.” It seems that this option is much more convenient since you do not need to search for fonts one by one. However, as practice shows, after downloading such a package of fonts, most users “don’t bother” and install all these fonts into the system.
Thus, firstly, they create additional load on the system, which can significantly affect overall performance.
Secondly, look desired font, among such a number, it becomes much more difficult.
And thirdly, I personally doubt that anyone will use all these fonts in their work.
Therefore, if you download so many fonts, it is better to install only those that you definitely need.
To see what the font looks like before installing it, you need to open it using Notepad, which takes a lot of time. That is why I once again advise you to download fonts one at a time, carefully selecting only the ones you need.
And most importantly, do not forget that the font, first of all, should be “readable”, and then beautiful.
If you often have to look closely and squint to read something on the computer, it makes sense to try changing the size of the letters. They can be either reduced or increased.
There are two options. The first one changes the font size partially, in certain programs. For example, in a program for the Internet (browser) or in a program for printing text ( Microsoft Word).
The second option is more significant - it will change the size everywhere. On the computer screen, in all programs, in the Start button, in folders and in many other places.
How to change letter size in certain programs (partially)
In many computer programs in which you can open and read some text, you can increase or decrease its size. In fact, this is a change in scale, and not an edit of the file itself. Roughly speaking, you can simply zoom in or, conversely, move away the text without changing it.
How to do it . The most common way is to find this function in a separate program. But this is not very convenient and not always easy. Therefore, there is an alternative "fast" option that works in most computer programs.
Press one of the CTRL keys on the keyboard and, without releasing it, scroll the wheel on the mouse. Each such scroll increases or decreases the text by 10-15%. If you turn the wheel towards you, the font size will decrease, and if you turn it away from you, it will increase.
Once you are happy with the size, release the CTRL button. Thus, you will consolidate the result and return the wheel on the mouse to its previous functions.
By the way, instead of the wheel, you can use the + button to increase and - to decrease. That is, hold down CTRL, then press and then release the + or - key on the keyboard. One such click changes the size by 10-15%.

A few examples. Let's say I often use the Internet to search for information - I read news and articles. On different resources The text size is different - it depends only on the site itself.
For the most part, I'm happy with the size of the letters and I don't feel uncomfortable reading them. But sometimes I come across sites where the font is too small for me - I have to lean close to the screen and squint. It's inconvenient and unhelpful.

In such cases, you can quickly increase the font. I hold down the Ctrl button on the keyboard and scroll the mouse wheel several times, thereby changing the text size.

This works in 90% of cases: on websites, in mail, in in social networks. You can check for yourself by increasing the font size in the article you are currently reading.
By the way, to return to the original size, you need to hold down the Ctrl button on the keyboard and then press the key with the number 0 once. However, this “return” does not work in all programs, but only in browsers.
Another example. Let's say I'm printing a document in Microsoft program Word. The text in it should be a certain size, but for me it is too small. I can’t simply increase the font in the program itself - it would violate the design rules, and working with such small text is a pain.

By holding down the Ctrl button and turning the mouse wheel, I can zoom in on the document. By doing this, I will simply bring him closer to me, but NOT change him. The text will remain the same size, but I will see it enlarged.
The same applies to photographs and pictures that we open on the computer. In exactly the same way they can be “brought closer” or “farther away”.

Important! Some programs remember the size that was configured. That is, having opened something else in such a program, it will immediately be shown in a changed size.
So don't be alarmed if a document, book, or Internet page opens in non-standard size- too big or too small. Just change it in the same way (CTRL and mouse wheel).
How to change font size on computer (everywhere)
You can increase or decrease the font not only in individual programs, but also throughout the entire computer at once. In this case, all inscriptions, icons, menus and much more will also change.
I'll show you with an example. Here standard screen computer:

And this is the same screen, but with an increased font size:

To achieve this look, you just need to change one setting in the system. If suddenly you don’t like the result, you can always return everything as it was in the same way.
IN different versions Windows performs this procedure differently. Therefore, I will give three instructions for popular systems: Windows 7, Windows 8 and XP.

- Click on the Start button and open Control Panel.
- Click on "Appearance and Personalization".
- Click on the “Screen” inscription.
- Specify right size font (small, medium or large) and click on the “Apply” button.
- In the window that appears, click “Log out now.” Don't forget to save everything before doing this open files and close all open programs.
The system will restart, and after that the font will change everywhere on the computer.

- Open Start and select Control Panel.
- Find the Screen icon (usually at the bottom) and open it.
- Select the size you want (small, medium or large) and click the “Apply” button at the bottom right.
- In the small window, click “Log out now.” Don't forget to save all open files and close all programs before doing this.
The system will restart and the font will change everywhere on the computer.

- Click right click mice by empty space Desktop.
- From the list, select “Properties”.
- Open the Appearance tab (top).
- At the bottom, in the part called “Font Size”, from the drop-down list, select the desired size - regular, large font or a huge font.
- Click on the “Apply” button and after a few seconds the system settings will change.
- Click on the “OK” button to close the window.
Often, for one reason or another, we don't like the default font.
This applies to the operating system of a computer, website, word, browser, or even a simple text document. Read below to learn how to change the font size on these systems.
How to change the font in windows 7
In Windows 7, as in all other Microsoft operating systems, changing the font size and color is quite simple.
To do this, on the desktop of your computer, click on left key mouse, then at the very bottom of the right - personalization.
Change the font on your computer desktop
Next, select the window color and click on “ additional parameters registration". After this, you will be able to change not only the font on your desktop computer, but many other personal settings. Everything there is quite simple and does not require additional explanation.
How to change the font on a website
On the site you can change the font size and color in general and for each article separately. In the first case, you will need to log in css styles. The “color” option is responsible for the color, “size” for the size, and “face” for the type. These are the ones you need to look for and change.
The font color on the website is determined by codes. They can be found by writing in the search engine “ html color" The size is given by "px" and the type can be defined in a simple text document.
To do this, open Text Document, click “format” at the top and “font” at the bottom. Everything will be very clearly visible there.
You can change the color and font of a specific article by specifying the following parameters: your article
How to change the font in the browser
Changing fonts in browsers is a little different, but not much. How to change the font in mastic: tools=>>, settings=>>, contents=>>, “fonts and colors”.
How to change font and color in Internet Explorer: service=>>, browser properties=>>, general=>>, “View”. How to change the font color and size in Opera: service=>>, settings=>>, additional=>>, contents=>>, “customize styles”.
How to change the VKontakte font
If you feel bad using installed font contact, then simply hold down the “ctrl” key and scroll the wheel of your mouse. In this way you can increase or decrease it hundreds of times.
How to change the font in Paint
To change the font size in paint, click the letter “A” at the top, then click on the place where you need the text. As a result, the font size and type will appear at the top; use these options.
To change the Paint font color - at the top with right side There is an option: change colors, install there.
How to change word font
Changing the font in Word is very easy. Select the text and use the settings in the panel at the top. It's so simple that it doesn't require any explanation.
Many of you, having come to this page, decided for one reason or another to change the font on their favorite Windows. Perhaps you are doing this for the sake of fine tuning your computer, but that doesn't matter. Now we will tell you how you can do a similar procedure on your computer, on which, most likely, Windows 7 has been installed for a long time, and perhaps even version 10 of the operating system pleases with its functionality.
There are several options that help change this setting on Windows 7 (and 10 series, because often users want to switch to a new system):
- Change the default font to seven.
- Hints from the official website.
- Changing the font at ten.
By default on seven
Default procedures mean conducting transactions through standard means systems. After all, you can change the font on Windows 7 without any additional utilities, downloaded from the network. For this it is enough:
- Open the control panel and go to “Appearance and Personalization”.
- In the window that opens, you need to go to “Screen”.
- Next, open the “Personalization” item.
- There you will need to click on the “Window Color” button and now it will lead to your cherished desire - to change the font on the computer. To do this, just explore the “Element” and “Font” menus, and then everything will be ready in no time.

Tips from the official website
All system updates always take effect at specified intervals. To know exactly what each function is responsible for, you can safely use the official website Microsoft. Even if some changes harm the operation of the computer, then tips from this resource will help you understand the situation. Unfortunately, there are few graphic images on the Microsoft website.

On a computer with ten
This is where you really need help, even experienced users- this is Windows 10. After such global changes, every person realized that even getting used to 8 was much less painful than he does to version 10 of Windows.
The easiest way to find what we need is to enter the word “Font” into the search bar and generally try not to spend a lot of time on this matter. After a few seconds, the search will display solution options, including a menu in the “Control Panel”. Here you can immediately notice that special button, at least as a separate option, is simply not provided.
But, nevertheless, the procedure for changing fonts is still simplified and many will find it even easier than the “classic” version. You only need a file with absolutely any True-Type font, which should be copied to the system folder where all fonts are stored (this is provided on Windows 10), and after a simple “Apply” button, the changes take effect. This is how you can easily customize and change the font that is also on your computer on Windows 10.


