How to make correct navigation on the resource. Using the Navigation Pane in MS Word
There is a lot of competition on the Internet. For one request, the user is offered billions of sites. And most of them have very high quality content. To win this race, you need to plan for absolutely everything and do it perfectly.
In this article we will look at such an important aspect as navigation. You will learn how to do convenient navigation site, improve usability and behavioral factors. All this will have a positive impact on the sympathy of visitors and search engines.
The main menu is the main navigation element of the site. It appears on the first screen, that is, it is visible without scrolling the page. The traditional place for it is above or below the hat, and it is better to stick to tradition. The main menu is made horizontal.
- Product catalog or portfolio page.
- Delivery and payment methods.
- Page about the company or about the author.
- Information about refunds and guarantees.
- Reviews page.
- Discounts and promotions.
- Feedback.
- Blog.
- Map of site.
Each site can have its own list of pages in navigation menu. It is recommended to do 5-7 pages. If there are more of them, then it is better to add a second row for the menu. Menu items can have sub-items. It’s also better not to do too many of them - the list of sub-items should fit on one screen, without scrolling.
Sometimes it is useful to highlight one of the menu items. For example, you can mark it with color or font. This helps to attract attention.
You can learn how to work with menus in WordPress.
Search form
It is necessary, especially if the project is large, especially for an online store. It is better to place the search form somewhere near the main menu. Sometimes it is practical to embed a form within the menu itself.
IN WordPress search present as standard. But its functions are far from ideal. Therefore, it is better to use some additional plugins to improve it, for example, .
Using the Basement
Many webmasters ignore this space, thinking that since it is below, no one will look there. However, the footer helps visitors who have already scrolled to the bottom of the page. After familiarizing yourself with the material, you can easily go to the desired place on the site.
To make site navigation convenient, you need to use the basement space. Here's what useful elements you can install there:
- Links to all sections and pages. If in the main menu you were limited to 5-7 pages, then in the basement you don’t have to be limited.
- All contact details - emails, messenger addresses, phone numbers, links to feedback and other.
- Links to accounts on social networks.
- You can also add a logo and the name of the site or brand.
bread crumbs
Breadcrumbs are an additional navigation element that helps users navigate. It is a chain of links that leads from current page to the main one. That is, no matter where the site visitor is, he can always return to the main page.
The element received this name from the fairy tale “Genesel and Gretel”. The kidnapped Hansel threw bread crumbs to help Gretel find him.
- Their traditional and familiar place is at the top left.
- The font should be inexpressive, and be in the background relative to the rest of the text.
- Each section in the breadcrumbs should be a clickable link, but not the last one. The last section should have the same name as the current page.
- Breadcrumbs should be on all pages of the site except the main one.
For creating bread crumbs You can use special plugins in WordPress. For example, .
Sidebar
To make easy navigation on a site with an extensive structure, you need to create an additional sidebar. It needs to show subsections of sections. In this case, it is better to make sure that this menu is not displayed on all pages, but only on sections whose subsections are shown in it.
Button to return to top
So that the visitor does not have to scroll for a long time while in the middle of the page, you need to organize a button, clicking on which will quickly take you to the site header. This simple element can also be implemented using the plugins that were discussed.
Site Map
A map is a page that contains links to all other pages. Something like a table of contents in a book, but much more convenient, since clicking on one or another item on the map takes you to the desired part of the site. This navigation element also helps provide orientation and structure.
You can make a sitemap in WordPress.
Article publication date: March 20, 2016
You can ask any question to the authors of the articles by e-mail
1. Site navigation should be consistent throughout the site. Coming to your resource, the visitor remembers and gets used to the location of menu items and controls. These elements should remain the same throughout the user's visit.
2. The link in the navigation menu to the user's current location page should not be clickable (that is, clicking on it should not lead to the same page) and should be marked as the user's current location. For example, if the user is on the “Photo Gallery” page, then the “Photo Gallery” link in the menu is not clickable and is marked in a different color from the color of the rest of the menu. Unfortunately, a significant part modern systems site management does not provide for compliance with this rule, so this recommendation refers to a certain ideal to which one should strive.
3. Company logo or website name on the left top corner when clicked, it should lead to the main page of the site. On the most home page this element should not be clickable.
4. The name of the menu item should clearly indicate what is inside. And it is precisely in this matter that we need to pay maximum attention to existing stereotypes. For example, we are all accustomed to online stores having menu items “Delivery”, “Payment” or “Payment and Delivery”. But I came across one online store, so as not to reveal the real names, let’s call it “Chipmunk”. So, for this store, information about methods of payment, delivery, and at the same time about the advantages of products over competitors was in the “Secrets of the Chipmunk” section. It is clear that this was some kind of idea with some meaning, but this arrangement of this information violates two usability rules at once: firstly, it breaks the established user patterns, and secondly, it makes the contents of the section completely unpredictable based on its link in the navigation menu. Original? Yes. Convenient and has a positive effect on conversion? No.
5. It is advisable to mark links that open in a new window somehow, for example with the generally accepted icon. The fact is that in a new window or tab, the user’s usual browser “Back” button will no longer work, and in order to return back to the page from which he clicked the link, he will need to switch the window or tab. For ease of perception of the site, it is advisable to warn the visitor in advance to open the link in a new window or tab. In general, you should only open links in a new window if they lead to another site or to some logically separate part of the current site.
The idea of writing this article was born during the New Year holidays, when I was explaining how to make navigation maps based satellite images. Then the bulk of the screenshots were taken, but the original article was left gathering dust in the back of the hard drive. And now the sun is shining outside and the snow is melting, a new hiking season is approaching, and I finally overcame laziness and finished writing the text.
Now many people have devices equipped in one way or another satellite GPS navigation. It could be a smartphone pocket computer, a communicator or just a navigator. In many cases the quality preinstalled maps leaves much to be desired, especially for hiking. Online sources of satellite images and maps can help here. It is enough to compare two images of the same area:
On the left is a satellite image. Google maps, on the right - the same area on the map. Which one looks more detailed?
To create a full-fledged raster map, we will need a set of two programs, a certain amount of time and Internet traffic. The resulting maps can be used on any device that has the OziExplorer program or its analogues.
The instructions are step-by-step, thoroughly illustrated and should be understandable to any beginner.
Obtaining a satellite image or map of the area
At this stage we will need the SAS.Planet program, which can be downloaded from the official website sasgis.ru

The first step is to specify the Internet and cache as the data source:
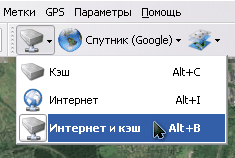
And also select the desired type of card. What it will be - a satellite or a Google map, Yandex maps or satellite images from the Roscosmos geoportal, or even General Staff maps - depends only on your personal preferences and the quality of the source in the required area.

So, we find the desired area visually, using coordinates or built-in search. We determine the required detail by increasing the image scale. The current scale is indicated on the left, under the zoom bar, in relative levels (z14, z16, and so on). It will be useful to us in the next step. Focus on necessary objects were clearly visible and not blurred. But don’t forget that each level of detail increases the size of the resulting map.

We reduce the scale until the entire desired area of the map fits into the screen. Select the tool " rectangular selection"(the second button from the left on the toolbar or the combination Ctrl + R on the keyboard), and select the boundaries of our future map.

When the selection is complete, the Selection Operations dialog box appears. Now we are interested in the “Download” tab. Required type the map has already been selected, and the required level of detail must be selected in the drop-down list (we clarified it a little earlier). All that remains is to click the “Start” button.


After some time (depending on the detail and area of the map), its sections will be loaded, and the message “File processing complete” will appear in the window. You can close the download window and move on to the next step - merging images.

We select the “Previous selection” item in the selection menu, or press Ctrl + B on the keyboard so as not to re-select the same area, and a familiar window will appear.

This time we are interested in the “Glue” tab. Here you will need to configure more parameters:
- Resulting Format— the image format in which our map will be saved. For further processing, it is advisable to choose BMP, although it takes up more space, it is understood by all programs and has no encoding losses.
- Where to save— here you need to specify the folder and file name in which the map will be saved.
- Card type— the current source will be automatically substituted.
- Scale — do not forget set the desired level of detail. By default, the program set low detail, which is now displayed on the screen.
- Apply— here you can add additional layers to the map. Such as Hybrid for Google maps, which displays the main roads and symbols. Sometimes it can be useful for clarifying satellite images or putting names on them settlements. To do this, do not forget to download additional layer to the desired level of detail using the method described above.
- Create a binding file— check the “.map” box, it will be useful to us in the next step. The file will be saved geographical coordinates angles of the resulting image.
We click the “Start” button and after a while we get two files in the specified folder - an image with a map and a .map file for binding to coordinates. Some navigation programs can directly use such images. But for handheld devices with limited resources, it is still better to save the map in a special format.
Processing a photo in a graphics editor
Often, due to not entirely favorable lighting conditions, or disturbing haze, or for some other reason, satellite images are “blind,” especially when displayed on the screen of a mobile device on a bright sunny day. To improve, you can make a small correction in any graphic editor. I will show this using the free XnView as an example, but you can use any other suitable one (from IrfanView to Photoshop), this procedure is similar everywhere.
But if you are completely satisfied with the quality and contrast of the image obtained at the previous stage, you can skip this stage.

The picture above shows the original image and the location of the "Auto Levels Correction" menu item, which can be used to automatic adjustment contrast. The picture below shows the result of this operation. As you can see, the color and contrast of the image have increased, and the visibility of roads and water bodies has also improved slightly.

Can also be used manual mode— editing contrast and gamma correction (increase both):

or Hue/Saturation/Lightness. Focus on the option that is more suitable for your conditions.

Converting an image to OziExplorer format
To further convert the image into more compact format, understood by OziExplorer, we will need the img2ozf utility. You can download it for free on the official OziExplorer website: oziexplorer3.com/img2ozf/img2ozf.html. Link - latest version utilities that save in ozfx3 format. For ozf2 files (used in older versions of OziExplorer), you will need to find an older version of the utility. Search will help you with this.
Install and launch the program. In the Source Image Folder field, indicate the path where the prepared images and the corresponding map files are located. In the Destination Folder field we indicate where to put the converted cards (if you click the blue arrow on the left, the folder with source files). You can play with the number of colors (the Number Colors field on the left side). How more quantity colors, the smoother the picture, but the larger size the resulting file.

Check the boxes for the images you want to convert and click big button Process Image Files to OZF Files.

The program will rustle for a while, processing files. At the same time, the current operations are displayed in the status line. The program creates several levels of detail for different magnifications, so as not to waste mobile device resources for recalculating large images. Therefore, encoding occurs in several passes.

As soon as Completed appears in the status line, the conversion is complete. Two files will appear in the folder specified in the Destination Folder - .ozfx3 (or .ozf2 for old version) and the corresponding .map file (which, unlike the original one, will have a type name original_name _ozf.map).
Now all that remains is to upload both of these files to mobile device, and indicate to OziExplorer the place where they are located.
For example, this is what the OziExplorer window looks like: satellite images on Windows Mobile:


That's it, the cards are ready.
If something remains unclear, ask in the comments and I will try to answer.
Hello, dear subscribers!
I just finished working on my next project. In addition to the main menu, it also included navigation. And I decided that it would be nice to show you how such things are done in just a few lines of code. And this is done exclusively using html and css.

This navigation is usually placed on the left side of the site. There is nothing complicated in its development. We enclose each navigation item in a tag
…
. A link is placed in it.PSD mockup You can download this item for training.
Also this lesson available in video version, which can be downloaded here:
Well, that's all! Let's look at the code and everything will become clear.
ABOUT THE CENTER
PHOTO GALLERY
PRICE LIST
CONTACTS
We will do everything else using styles.
For the class.bar-menu, styles are assigned that are needed based on the location of adjacent blocks. In my example, I don’t have anything other than this navigation on the page, so I’ll just give it a width.
Since the text is centered, the easiest way to center it is to set the tag to
center text alignment.


The pictures are cut out, let's start writing css code for navigation. More precisely for navigation links! We already have the rest of the styles.
font-family:Tahoma;
font-weight:bold;
So what will we see?

Why is that? The fact is that background picture located in the link exactly as much as the text allows it to do so. That is, the width and height of the link are determined by the text contained in it. This is by the way a clear sign line tags. Let's specify the width and height:
background:url(images/bg-menu-main.jpg) center center;
font-family:Tahoma;
font-weight:bold;
width:190px;
height:27px;
Still nothing has changed.
background:url(images/bg-menu-main.jpg) center center;
font-family:Tahoma;
font-weight:bold;
display:block;
It seems that the navigation is starting to take the form we need:

Add a space at the bottom of each link. We also add padding-top for each of the links and don’t forget to subtract it from the height:
background:url(images/bg-menu-main.jpg) center center;
font-family:Tahoma;
font-size:10px; color:#056e04;
font-weight:bold;
height:21px;
margin-bottom:10px;
padding-top:6px;
We get what we need:

Bar-menu h2 a :hover{
background:url(images/bg-menu.jpg) center center;
font-family:Tahoma;
color:#ffffff;
font-weight:bold;
margin-bottom:10px;
padding-top:6px;
text-decoration:none;
This is our navigation menu:

I hope the lesson will be useful. Andrey was with you. Thank you for your attention. See you in the next lessons!
List
Like most modern panels navigation, ours will be based on the unordered list tag (
- ). This name has a semantic meaning; the navigation bar is actually just a list of links leading to your site. Traditional horizontal orientation- it's simple convenient tool in order to get all the most important list items visible without scrolling.
Here's ours HTML example:
That's all you need for this! Note that I used a single identifier so we can differentiate our navigation bar from all other unordered lists on the page. But if it were placed in a div with its own id (such as a “banner” or “header” div), perhaps the id wouldn't be needed. And yes, I could add even more identifiers and classes if I wanted to complicate the example, but today's lesson is all about simplicity.
How to make it horizontal
By default our list is vertical. So let's make it horizontal:
#nav (
width: 100%;
float: left;
margin: 0 0 3em 0;
padding: 0;
list-style: none; )
#navli (
float: left; )
Here we move our list and list items to the left. Moving list items to the left stretches them into a horizontal row, placing items from left to right. However, due to the nature of the move, our list, unless it is also moved to the left, will collapse to zero height.
And this won't be a major problem, except that I plan to set the background color of my list later because I want the list items to stand out against the background, and if my list collapses, that won't happen. Here's another reason why I set the list width to 100%: this way, it will fill the entire width of the page (or its container, if it is in a container with the specified width).
I also remove most of the margins and padding so that the list displays nicely (I leave small margins at the bottom, just for aesthetic purposes), and set the list style to “none,” which removes the paragraph bullets from my list.
On this moment our navigation bar looks like this:
Sure, it doesn't have any style (and is probably a pain to use and load), but believe it or not, the hardest part is over! From this basic structure, you can create any number of unique navigation bars. But let's improve our panel a little.
First, we'll set the background and borders for our navigation bar by changing our #nav in CSS to look like this:
#nav (
width: 100%;
float: left;
margin: 0 0 3em 0;
padding: 0;
list-style: none;
background-color: #f2f2f2;
border-top: 1px solid #ccc; )
Now let's define the “anchor” tag a little free space and set the style:
#nav li a (
display: block;
padding: 8px 15px;
text-decoration: none;
font-weight: bold;
color: #069;
border-right: 1px solid #ccc; )
Here I give the anchors a display type of “block” to make sure they fill the entire list item and make the entire area active. Then I add padding to stretch them out a bit. I also remove the underline, make the font bold, give it a nice blue color, and add a border with right side from this element, equal to what we added to the top and bottom of our unordered list.
And finally, let's give the navigation elements colors that will differ when you hover over them:
#nav li a:hover (
color: #c00;
background-color: #fff; )
So, we get a fully functional, practical and useful panel navigation.
And here all the CSS is collected in one place:
#nav (
width: 100%;
float: left;
margin: 0 0 3em 0;
padding: 0;
list-style: none;
background-color: #f2f2f2;
border-bottom: 1px solid #ccc;
border-top: 1px solid #ccc; )
#navli (
float: left; )
#nav li a (
display: block;
padding: 8px 15px;
text-decoration: none;
font-weight: bold;
color: #069;
border-right: 1px solid #ccc; )
#nav li a:hover (
color: #c00;
background-color: #fff; )
This is a useful basis for further work. 90% of navigation bars start out almost exactly like this one. The desired view panels are just a matter of design.
Thank you for your attention. There are still many lessons ahead different topics! Stay with us! :)
P.S. Compared to other menus, this menu looks very simple, but don't shout about it in the comments :). This is the basis, using which you can do something more.


