How to configure teamviewer to start your computer remotely. TeamViewer. Connecting to a remote computer
In this article we will look at how TeamViewer works. If suddenly, someone has never heard of it, then this is quite powerful tool to implement remote technical support, using remote desktop. Let's try to cover it interesting opportunities, of which there are quite a lot.
Installing TeamViewer.
First, download full version from the official website (it can be viewed on the program page). On this moment TeamViewer 11 is available. At the first installation step, select Install to manage this computer remotely. If you plan to use remote printing or VPN, then click show additional options(although they can be configured after installation). It is important to note that it is unlikely that you will be able to use this program for commercial purposes for free, since it is tracked quite quickly. Also, if you plan to use TeamViewer on a server OS, then this is also not allowed free license, but it is possible to install TeamViewer Host on the server.
At the end of the installation, write a name for the computer and come up with a password, then register a TeamViewer account.
Setting up a remote desktop connection.
After registration, your contacts in TeamViewer will appear to the right of the main window.
To add a remote computer to your contacts, click on the + icon in the contacts window.
We enter here the computer ID, its name and password; in additional settings you can set individual connection parameters. To connect to remote computer double-click on it in the contact list, or right-click and select the connection option.
To go to settings in top menu Click additional, then options. In the main settings, you can configure the connection mode to this computer, the Wake-on-Lan function, and also link the computer to your account.
To connect to a computer via local network There are three modes:
- Deactivated - connections occur only via the Internet, through TeamViewer servers.
- Accept - connections are accepted both over the local network and over the Internet, that is, to connect you can use both the computer ID and IP address on the local network.
- Accept exclusively - means that connections to the computer are allowed only from the local network; instead of ID, you must use the IP address on the local network.
The Wake on Lan feature allows you to turn on your computer remotely. For use Wake-on-Lan functions Account linking is required. To enable Wake on Lan you must specify an IP address or Domain name, as well as the port to which the “magic” packet will be sent. Read more about Wake setting on Lan can be read in this article.
Once you have configured everything correctly, you can check the operation of Wake on Lan from another computer. To do this, you must also install the full TeamViewer version and link it to the same account to which the computer that needs to be turned on is linked. In the contacts window we find the right computer and right-click on it, there we will see the wake button.
Remote control of a computer from Android.
To control your computer from an Android device, you need to install it from Google Play program TeamViewer-remote access (not to be confused with TeamViewer QuickSupport). In the program, enter your username and password for your account and a list of your devices appears.
Opposite computers there is a button for connecting; mobile devices do not have this button. Currently management mobile device from a mobile device is not supported. For ease of use, if the Internet connection is not stable and often breaks, it is worth disabling the computer lock at the end of the session so as not to enter the password again each time. To do this, click on the gear button and select the option to enable blocking, then click disable.
Managing Android from a computer.
To remotely control an Android device from a computer, you must install from Google Play TeamViewer host program.
After installation, you need to link the device to your account, enter your username and password. Then, on the computer linked to the same account, this Android device will appear in the TeamViewer contact list. Having connected to it, we immediately find ourselves in the remote control section. If we see a black screen, then you need to press left button mouse over it to turn on the display and unlock it.
If suddenly the desktop is not displayed, then perhaps you need to install an add-on from Google Play for your device. For devices on the MKT platform from less common brands, an add-on from Lenovo is suitable, and super-user privileges may also be required.
UPD: IN new version Mobile device control from a mobile device is available.
Function remote activation A computer is a useful thing. This is especially true if the user has to leave home for a long time and needs to use his desktop PC. In this guide, we will tell you how to turn on your computer remotely via and the requirements that a Windows PC must meet to be able to use this technology.
To remotely turn on a PC, its motherboard or a separate network card, must support the “Wake on Lan” mode. This will allow you to turn on the PC by sending a data packet to it, which will signal the need to turn on.

Sometimes the function needs to be activated via Computer BIOS. Do the following:

Please note that this method may not work for everyone. motherboards, because the BIOS settings may vary. To activate remote switching, it is recommended to use the board's user manual. In the “manual” the manufacturer indicates the procedure for changing settings and unlocking options.
How to turn on a remote computer via TeamWeaver
If the technology is supported, you can safely start setting up:

Important! If you have a dynamic IP or the modem you are using is set to router mode, you need to forward the 9th port on the modem. When using dynamic ip, you should check DdNS.
What to do if Wake-On-Lan is not supported
If the mode does not work, the only way out is to buy a new one. network card, which has its support. Now you can find many inexpensive options for PCI-compatible cards. Also available comprehensive solutions operating via a USB interface.
Conclusion
When the setup is complete, the computer will be available to turn on directly from sleep mode. This is very useful in cases where there is a need to organize access to your home PC while traveling.
TeamViewer provides its users with the ability to establish a connection with another computer. This will open up the possibility of managing it. This function is often used for remote administration or server PC settings.
There are two ways to connect to another computer in TeamViewer. The first is directly related to remote control. And the second one is used only for sending files. Let's consider all these options separately.
Option 1: Remote access
The most requested feature of TeamViewer is remote control. To use it, you need to open the program on both computers. Find out your login details (ID and secret code), and then enter them on the main machine. Check "Remote control", and then click on "Connect".
After this, all that remains is to enter the password in the appropriate field. Then you will have the opportunity to work remotely on a computer. If you close, the communication session will be interrupted. Accordingly, there is no need to touch the program.
Option 2: Transfer files
You can also connect to someone else’s computer in Teamviewer to transfer files. In this case, direct remote control will not be available. First, you need to run the software on both devices and find out the ID of the one you plan to connect with. Don't forget to look at your password. Nothing will work without him.
On the main machine in the field «
Partner ID" Type in the number, which consists of nine digits. Next, check the option "File Transfer". And then click LMB on "Connect". In the window that appears, you need to enter an access password and click "OK".
The file transfer form will now open.  Everything is quite simple here. From the block "Local computer" you need to drag the document or directory with the mouse to the destination folder in "Remote computer". The submission status will be displayed in a horizontal form at the bottom. It was originally written there "There are no tasks in the queue".
Time Weaver (eng. team viewer) is a unique software, allowing you to remotely control any computer or server in the world. This is very useful if, for example, you need to change some settings or instruct someone, but you are not able or willing to go to the site in person. Next we will briefly describe basic principles work with this program.
How to download and install Time Weaver?
You can download the program absolutely free on the official website of the developer www.teamviewer.com/ by clicking on big button loading in the middle of the screen. Current version- Time Weaver 9, however, on many computers the older Time Weaver 8 may still be installed.

It will be downloaded to your computer installation file programs. Opening it will bring up the installation settings window. Here you must select two parameters - the installation type, as well as how the program will be used. In addition, it is advisable to check the box in the additional settings window. This way you can choose the folder to install the program and several other parameters.

Now a few words about them:
· Remote Printing - Allows you to control printing to a remote device
· TeamViewer VPN - with this extension you can access and work on local networks as if you were in their zone.
· Microsoft Outlook Meeting Tool - Allows you to quickly and easily schedule meetings in Microsoft Outlook without having to launch TeamViewer.

Immediately after installation the program will be launched. Using it to control a remote computer is incredibly simple. You will see a window in front of you, on the left side of which the key data of your machine in Team Viewer is indicated - ID and password. Let us immediately note that it is not necessary to fill out the registration window on the right side. Registration only gives access to some additional features.
How to use a time weaver to work on a remote computer
To do this, you just need to perform a number of simple steps:
· Make sure that TeamViewer is installed on the remote computer (preferably the same version as yours);
· Find out the key data (ID, password) of the remote computer;
· Fill in the "Partner ID" field;
· Select the purpose of the connection - management or file transfer;
· Click the "Connect to partner" button;
· Enter the TeamViewer password of the remote computer.
After this, a new window will open in which information from the monitor of the remote computer will be displayed, and you will have access to control it as if you were at its keyboard.

×
Attention!
Log in to your website account or Create one to receive full access to our site. Registration will give you the opportunity to add news, comment on articles, communicate with other users and much more.
Other materials
TeamViewer is designed for remote access to a remote computer. When using the program, the user remotely controls another computer via the Internet.
Using TeamViewer will help in solving any problems with another computer located in any other location. You will be able to provide assistance in setting up a remote computer, and you will also be able to control your computer from another location.
To do this, only two conditions will need to be met: the partners’ computers must be connected to the Internet and the TeamViewer program must be running on them at the same time. When using the program, data is encrypted and a secure connection will be established between computers.
After launching the program on the local and remote computers and establishing a connection between them, the user can proceed to manage the remote computer. Thus, it will be possible to configure the remote computer, provide assistance in solving problems, provide support, show work in programs, etc.
TeamViewer is free for non-commercial use. This program does not even need to be installed on your computer. It will be enough just to run the executable EXE file, and then you should choose how to launch the program.
Naturally, if necessary, the TeamViewer program can be installed on your computer. After registering with TeamViewer, the user will have administrative rights.
On the official website of the German company, the developer of TeamViewer, versions of the program designed for operating systems are available for download: Windows, Mac OS, Linux, Android, iPhone, iPad, Windows Phone. A Russian version of the program is offered for download.
The popularity of the program is evidenced by the fact that TeamViewer has already been downloaded more than 200,000,000 times.
download teamviewer russian version
After downloading, the program can be installed on your computer. At the same time, TeamViewer is ready to use without installation on your computer.
Installing TeamViewer
To start installing or launching the program, you will need to click on the executive file in the “.exe” format.
To run the program without installation, select the “Launch only” option.
In all cases of using the program, you will need to check the “personal/non-commercial use” box.
If you check the box next to “Show additional settings", then when installing the program on your computer, several additional windows will open.
After selecting settings TeamViewer installations, click on the “Accept – Complete” button.

First a window will open with background information, about how to use TeamViewer.

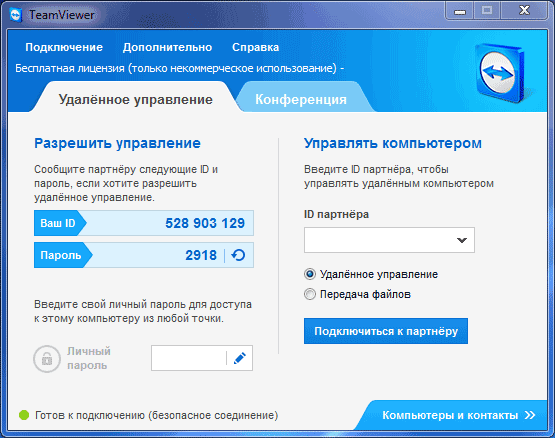
Then the main TeamViewer program window opens in the “Remote Control” tab. In the central part of the program window there are two panels: “Allow management” and “Manage the computer”.
At the top of the window there are program menu items: “Connection”, “Advanced” and “Help”.
If you click on the "Computers and Contacts" button it will open additional window, from where, after registering with TeamViewer, you can manage computers and contacts, without having to remember IDs and passwords.

TeamViewer settings
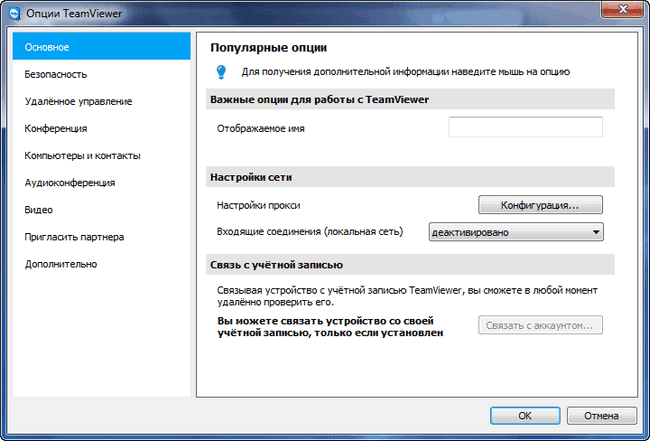
You can enter the program settings by following the menu path “Advanced” => “Options”. By default, TeamViewer is already configured and ready to use. If necessary, you can customize the program to suit your needs.
In the “Basic” tab, you can select the display name, network settings, connect the device (computer) with account TeamViewer.
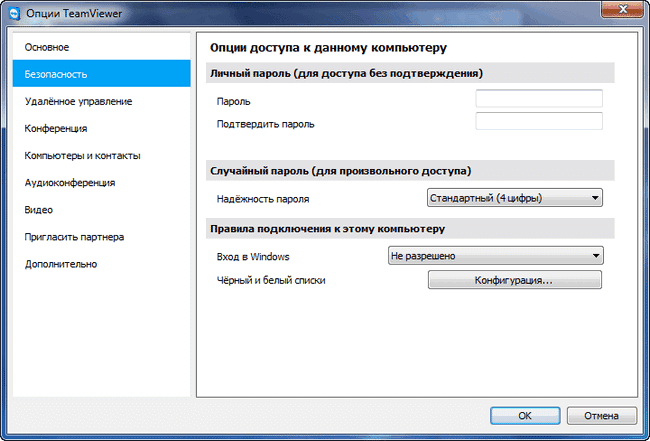
In the “Security” tab, you can add a personal password for access without confirmation. For random password reliability can be established. Enabled by default standard mode(4 digits). You can increase the strength to 10 characters, or disable the random password altogether.
You can also change the rules for connecting to your computer.
By entering the “Remote Control” tab, you can change the display settings. Here you can select the display quality of the remote computer’s screen and display of wallpaper on the remote computer in the program window.
If the Internet connection speed is low, displaying wallpaper will slow down the session, so by default the “Hide wallpaper on the remote machine” option is activated.
IN TeamViewer program You can record a remote session.

WITH using TeamViewer it will be possible to hold conferences among several participants.
Remote control of your computer
The Allow Control panel is used to display information for remote control of your computer. ID information available here of this computer in the TeamViewer system, and also displays a password that can be changed if necessary.
In field " Personal password» You can enter your password to access a specific computer from anywhere.
You will need to transfer your ID and password to your remote partner, who will remotely control your computer.

After connecting to your computer and entering the data received from you, your remote partner will control your computer.
Remote access to a remote computer
In the main program window, on the right side, there is the “Manage Computer” panel, which is intended for entering data from another computer.
In the “Partner ID” field, you will need to enter the partner ID. You will first need to obtain this data (ID and password) from the user of the remote computer that you are going to manage.
In this case, the “Remote control” item must be activated. After that, click on the “Connect to partner” button.
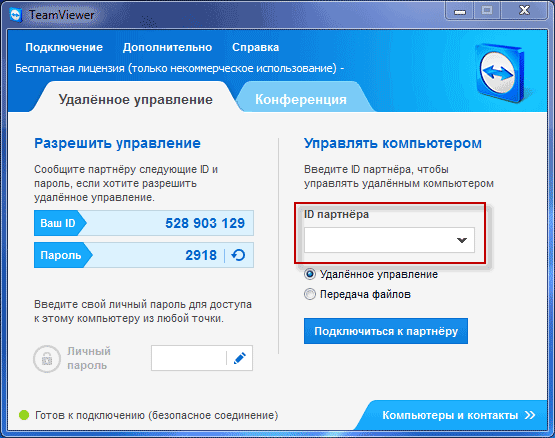
This will open the TeamViewer Identification window. In this window, in the “Password” field, you will need to enter the received password, and then click on the “Login” button.

On your monitor screen you will see a window that displays the Desktop of your partner’s remote computer. By default, the display of wallpaper will be disabled on the Desktop.

At the top there is a “toolbar”. Using the toolbar menu commands, you can manage and customize the program without going directly into the settings.
The Actions menu has the following commands:
- “Switching sides with a partner” - in this case you will exchange control with your partner. Your partner will now control your computer.
- “Ctrl + Alt + Del” - transferring control of keyboard shortcuts to the partner’s computer.
- “Enable computer blocking” - the partner’s computer will be blocked.
- “Remote reboot” - “End session”, “Reboot”, “Reboot to safe mode" You can end the session or restart the remote computer in the desired mode.
- “Transfer keyboard shortcuts” - the keyboard shortcuts that you press on your computer will be transmitted to the remote computer.
- “Block remote machine input means” - the mouse and keyboard will be blocked on the remote computer.
- “Show black screen” - a black screen will be displayed on your partner's computer and he will not be able to see what you are doing on his computer. In this case, the “Block remote machine input means” function must be active.
From the Windows menu, you can customize the display of commands and buttons for operating system Windows.
The View menu controls viewing settings.
Using the Audio/Video menu, you can control computer sounds, video, voice, and chat.
The “File Transfer” menu is responsible for transferring files using the TeamViewer program.
The “Advanced” menu contains other program settings. You can switch to full screen mode or collapse the toolbar.
After connecting, you can proceed to manage the remote computer. You will be able to install or remove programs, view documents, and perform various actions to configure the operating system or programs.

Through TeamViewer you can not only directly control a remote computer, but also exchange files.
Transferring files to TeamViewer
To do this, on the toolbar you can click on the “File Transfer” menu button, and in context menu select "File Transfer". After this, the “File Transfer” window will open, divided into two windows. The left window contains files from the local computer, and the right window contains files from the remote computer.
To send a file or folder, you will need to select the required object on the computer from which the transfer will be made using the “Address” field. After selecting the object, you will need to click on the “Submit” button. First, on the receiving computer, using the “Address” field, you should select the location where the file or folder will be transferred.

You can also move files using File Storage. You can open the file storage window from the “file transfer” menu or from the side window of the program by clicking on the corresponding icon.
You will need to drag the file on the computer from where you will be moving files to the storage into the “File Storage” window.
In this image you can see that the file has been placed in file storage on the remote computer (dark window). After moving, the file became available on local computer(bright window).

Communication via TeamViewer
In TeamViewer you can exchange messages in chat, negotiate voice communication, conduct telephone conferences, and also record video when communicating.
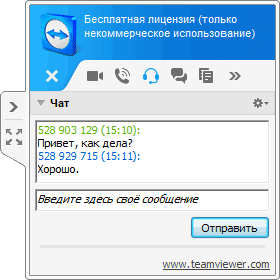
The program allows you to take screenshots of a remote computer window.
Recording video in TeamViewer
In order to record a video session, you need to enter the “Advanced” menu and go to the “Record” item in the context menu. Here you will find options for controlling video recording: “Start”, “Pause” and “Stop”.
Using these commands, you can record a video file that will display your actions in the window of a remote computer. After finishing recording, the video file will be saved in “.tvs” format. This file can be converted to the “.avi” format so that it can be viewed on any computer.
To do this, you need to enter the main program window, open the “Advanced” menu, and select “Play or convert a recorded session...” in the context menu. After this, the “Open” window will open, in which you should select a video file with the extension “.tvs”.
In the “Convert session recording” window that opens, click on the “Convert” button. If necessary, you can change the conversion settings before starting the video file conversion process. To do this, you will need to click on the “Configuration...” button, and then in the window that opens, change the settings.
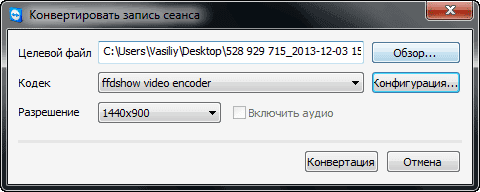
After the conversion is complete, you can play the recorded video session using a regular player.
Conclusions of the article
TeamViewer allows you to remote access to your computer, you can use it to exchange files and control a remote computer to help your partner.
TeamViewer - remote computer control (video)


