What is a router in repeater mode? How to set it up? Detailed guide. How to set a VIP flag and how to view VIP messages in Mail on iOS. Place punctuation marks
A Wi-Fi repeater (or repeater) is a device whose task is to relay the signal from wireless router or access points. Used to expand coverage wired network. Many modern models equipment can operate in different modes:
- access point (AP=Access Point);
- repeater;
- universal repeater;
- wireless network client;
- bridge with access point function.
Operating modes of wireless equipment
If you want to take advantage of the wireless repeater feature today, you need to look for equipment that is referred to in manufacturers' catalogs as:
- Access point (in English terminology Wireless Access Point) ;
- Wireless repeater or wireless signal booster(in English terminology Range Extender) ;
Attention! Routers (i.e. routers) rarely have wireless repeater functionality these days. Some router models can be used as a repeater by installing an alternative DD-WRT firmware. However, on alternative firmware The device may be unstable.
Let's take a low-cost access point as an example. TP-Link TL-WA701ND. But the instructions are also suitable for other models like TL-WA730RE, TL-WA801ND and similar ones.
The device can operate in several modes:
Access Point Mode
Convert your existing wired network to wireless.
Repeater mode
Expanding coverage of existing Wi-Fi networks by relaying a wireless signal.
Wireless Client Mode
The device performs the function wireless adapter to connect wired devices to a wireless network.
Bridge+Access Point mode
Connecting two local networks using a wireless channel.
What is the difference between a repeater and an access point?
A wireless access point connects to the network using a cable and creates a wireless network around itself. And the repeater mode implies both connecting to the network and relaying it exclusively via a radio channel.
Setting up a Wi-Fi repeater
Before setting up the repeater, set the main router to some specific channel broadcasting If auto channel selection is set on the main router, the repeater will lose connection with it more often:

U different manufacturers The web interfaces of the equipment differ, but the essence of setting up a wireless repeater is the same: in the device settings you need to specify the MAC address (BSSID) of the main access point and its security parameters. We will tell you how to set up network relay using the example of the same budget point TP-Link access TL-WA701ND, which can work in repeater mode.
Before setting up, place the signal repeater in the area of reliable reception of the wireless network whose coverage you are going to expand. Later, once the relay setup is complete, you can experiment by moving the repeater and observing the quality of the relay.
To connect the repeater with the head router or access point, you need to perform the following steps:
1 Connect the repeater using Ethernet cable(patch cord) in LAN-port of your existing router or access points:

You cannot connect via a wireless network to an unconfigured repeater, because... it itself does not broadcast the wireless network and does not issue an IP address. An exception may be if your repeater defaults to access points and you will configure it from a device equipped with a Wi-Fi module. But we still recommend using a patch cord.
2 Connect to your main router's network from any computer, as you did before.
Go to the properties of the network adapter on your computer and manually assign an IP address from same address range, which your new one is set to wireless repeater(or access point with repeater function) (). Read the instructions for the device and you will find out exactly what its default IP address is. Often the IP address is also indicated on the bottom of the device:
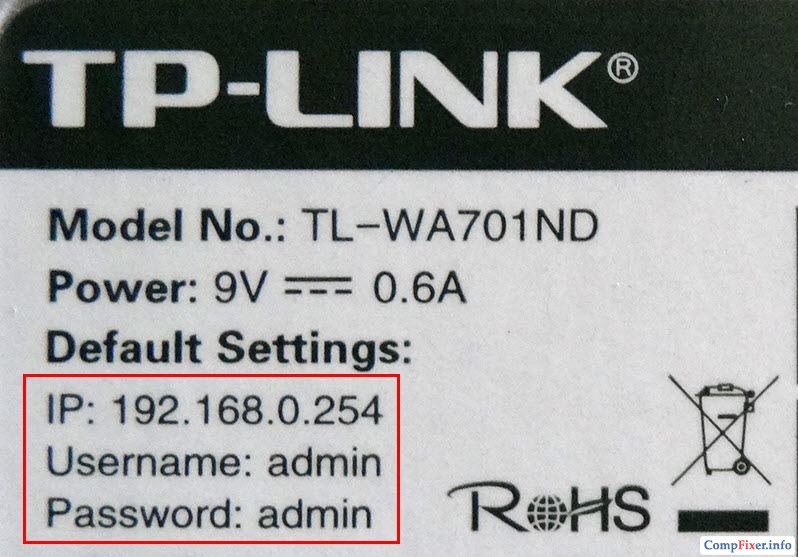
If we talk about TP-Link equipment, then usually their routers have a default IP address of 192.168.0.1, and access points with a repeater function have IP 192.168.0.254.
Let's say the default IP address for the new extender is 192.168.0.254. This means that to configure it you can temporarily assign network adapter computer IP address 192.168.0.20:

3 Go to the repeater web interface ().
By default, TP-Link equipment has the following credentials:
IP address: 192.168.0.254;
Login: admin;
Password admin.

4 Click EXIT to exit the setup wizard.

5 Go to the section Network. The only setting in this section will open LAN.
As we said above, by default the device uses the IP address 192.168.0.254. If you are using a different address range on your network, set a new IP address from the same range. For example, if your router, whose signal you are going to relay, operates in the 192.168.1.1-192.168.1.254 subnet, change the repeater address to 192.168.1.254 or any free one from the 192.168.1.* subnet.
When setting up a repeater, you need to make sure that:
- The IP address of the signal repeater belongs to the same subnet as the IP address of the main router;
- there is no conflict between the addresses of the router, signal repeater and other devices on the network.
If your network uses addresses in the range 192.168.0.1-254 with a mask of 255.255.255.0, do not change the setting LAN on the repeater.
In this case, continue reading this manual with paragraph 8 with the words “Select mode Repeater(Range Extender)«
In our example, we are using the subnet 192.168.95.0.1-192.168.95.254. Therefore, let's change the IP address from 192.168.0.254 on 192.168.95.254.
If you have changed the access point's IP address, click Save

Then click OK in the following window to reboot the device:

Wait for the reboot to complete:

6 Because now the repeater will be in the working range of your IP addresses existing network, return automatic receipt parameters in properties network card computer:

7 Log in to the repeater web interface using the new IP address:
(if you did not change the IP address, then go to http://192.168.0.254 again)

8 Select a mode Repeater(Range Extender).
Click the button Save:

After changing the operating mode of the device, you must reboot it again. Click OK to reboot the device:

Wait for the device to boot:
9 Go to section Wireless. This will open the setting Wireless Settings.
Repeater mode has two subtypes: WDS Repeater And Universal Repeater. The easiest way is to use the mode Universal repeater. It will work in most cases. Use WDS repeater only if you know for sure that the root access point supports WDS.
After selecting the operating mode, you must specify the details of the main access point whose signal the repeater should relay. In field Wireless Name of Root AP enter the wireless network name (SSID) of the main access point, and in the field MAC Address of Root AP Enter the MAC address of the main access point.
In the web interface TP-Link devices there is a button for this purpose Survey.

It is used to search for available wireless networks. By clicking on it, you can select any available wireless network and add it to the repeater with one click on the link Connect. In this case, you do not need to enter either the SSID or the MAC address of the access point (BSSID). These details will be entered automatically.
After pressing the button Survey wait about 10-15 seconds until a window appears with a list of available wireless networks, and then click Connect in the line with your network:

Click Save to save settings:

10 Go to settings Wireless Security.
Select the security mode that is used on the root access point (WPA2-Personal is recommended).
Enter the appropriate security key.
Click Save:

In the pop-up window, click OK:

11 Go to section DHCP. This will open the setting DHCP Settings.
Set the switch DHCP Server to position Disabled and press the button Save:

If you leave the DHCP server enabled, the Internet will not work on devices that will connect to the repeater.
12 Go to section System Tools.
Click the button Reboot:

In the window with a question Are you sure to reboot the Device click the button OK:

Wait for the device to reboot:

13 Disconnect the patch cord from the device’s LAN port.
After rebooting for 1-2 minutes, the device should connect to the root access point (or main router) and start relaying the signal. In this case, the first indicator on the right should light up:
Your devices, such as a smartphone, tablet, laptop, will see the same network as before, only the signal should become several notches stronger. There is no need to do any reconnections on client devices, because The repeater relays a network with the same name and the same security settings.
How to check the repeater operation
Question: Why check? After all, if devices connect to the network, then everything is fine?
Answer: This statement is incorrect. Devices may connect to a more distant access point or router, but the repeater may not function. Therefore, the verification needs to be approached more scrupulously.
Method 1: Try to access the web interface of the access point after disconnecting the patch cord from its LAN port.
Go to page Status. If in the area Wireless you see the SSID of the relayed network and the signal strength of the root access point, and in the area Traffic Statistics— the number of sent and received packets, then the signal repeater functions correctly:

Method 2: Launch the application Wi-Fi Analyzer on Android device ().
You should see two access points with the same SSID running on the same channel:

Since many beginners have many questions related to mechanisms, I decided to make a guide that will help noobs and beginners. In this small redstone guide I will explain to you how to use repeaters and comparators.
We'll start with comparators. The comparator has two signal receivers, A and B. Signal A is supplied from the back of the comparator and signal B is supplied from the side of the comparator. The comparator compares two signals and produces the strongest one. Interesting feature The comparator is that the signal passes through it only in one direction, that is, it will not be possible to send a signal back.
The comparator can also find out how many items are in a chest or oven. If there are a lot of objects, then the comparator sends a signal, and if there are few, it will not be active. So that the comparator gives good signal from the chest, then there must be at least 8 stacks of items. If you use a stove, you can get by with one stack of items. With the help of comparators you can create very complex and exciting redstone puzzles.

Now let's talk about repeaters. Well, with this mechanism it will be much easier. A repeater simply amplifies a weak signal. For example, in the previous update 0.13.X there were no repeaters, which is why the signal only traveled up to 15 blocks. But thanks to the repeater, the signal can be strengthened. You can run a redstone chain over a very long distance and are not afraid that the signal will end immediately after 15 blocks. Just place repeaters on this circuit and then the signal will be strong and will last a long distance.


That's all! In this guide, we looked at how two mechanisms work, a repeater and a comparator.
I think that you liked this guide and helped you understand the principle of operation of these mechanisms.
Beginner players may not realize this, but Minecraft has a large number of various mechanisms, each of which is unique and has its own function. Moreover, many mechanisms are used for other purposes, that is, they provide benefits in ways that were not initially suspected by the developers. For example, we can take one of the most common mechanisms in the game - the repeater. Everyone must be able to do it, otherwise you will greatly reduce your ability to use mechanisms and electrical networks. Repeaters in Minecraft will bring you a lot of benefits; to get it, you need to study all the details and aspects of both the manufacture and use of these items.
Specifics of networks in Minecraft
The place to start is not with the mechanisms themselves, but with the networks to which they will be applied. Repeaters in Minecraft are elements of an electrical network, which, in turn, consists of two objects connected by red dust that transmits a signal. One of the objects must send a signal, and the other must receive it and react accordingly. The simplest example- automatic door. If you connect the door to some kind of switch, for example, with a button, then when you press the button, the signal will travel through the red dust, reach the door, and it will open. But it is worth noting one thing important point- the signal is transmitted only over a distance of fifteen blocks. If the object will be located on greater distance, then the signal will simply be lost and nothing will happen. Do all objects really need to be placed at such a small distance in order for them to interact with each other? Naturally, no, because this is precisely what repeaters in Minecraft are for. With their help, you can significantly expand the range of any of your circuits or networks.
How does a repeater work?

Repeaters in Minecraft are blocks that are placed in the path of a signal to extend the distance over which it travels. You can understand the principle of the process if you think about the name. It turns out that this device repeats the signal, resetting the count of blocks it can move to, and starting all over again. As a result, a long network will look like this: switch, red sand (up to fifteen blocks), repeater, red sand, object. There can be any number of repeaters on the network, so you can get creative and come up with intricate mechanisms. But to use this device, you must first obtain it. Since it is impossible to find it, we need to consider in detail how to make a repeater in Minecraft.
Repeater manufacturing

It's no secret that most items in the game are created according to certain recipes. If you want to learn how to make a repeater in Minecraft, then you will need to learn one more recipe. But don’t be discouraged - it’s quite simple and doesn’t require any special expenses or rare materials. You will need three stone blocks, two torches and one red dust block. Place the last ingredient in the central cell of the workbench, place torches on the sides of it, and completely fill the bottom row with stone blocks. Now you are ready to craft your first repeater. You can make several at once so you don’t have to go back to this process and use them immediately when needed. The repeater in Minecraft 1 5 2, 1 7 2 and other versions is made the same way, so you don’t need to remember different recipes - make this device for your own pleasure.
Main property

As mentioned earlier, this mechanism has several uses. You know how to craft a repeater in Minecraft, so it’s time to experiment - you can try it in different roles. Naturally, first of all, use it for its intended purpose - to reset and update the signal in electrical networks. But don’t forget that it can be applied in other, completely unexpected areas. You can try to combine its effect with other items, because that’s what Minecraft recipes are for. The Repeater will become one of your most used units, especially if you unlock at least a couple of its additional features.
Insulated wire

When you make a path of red dust, you can always make various branches, remove unnecessary sections, and so on. A redstone path is a kind of analogue of a wire in Minecraft. But at the same time, you can use the repeater as an insulated wire, which is what red dust sometimes lacks. The secret here is that the repeater only receives the signal from one specific side, and releases it exclusively from the opposite side, that is, it is very important that you position it correctly, since any deviation will not allow the system to work as required. This feature prevents current from flowing into reverse direction, but more importantly, the wire is protected from external influences, since current cannot be supplied from the sides. This is how the repeater turns into an insulated wire.
Signal delay
Another interesting point when using a repeater, these are its operating modes. Total of this device There are four modes, each of which gives a specific signal delay. In the minimum mode this figure is one tenth of a second, and in the maximum mode it is four tenths. You can install several repeaters in a row to achieve longer delay for your own purposes.
Having developed into virtual reality before sufficient degree and having access to redstone energy, which in the original Minecraft is emitted by a red torch or a block of red stone, you will be able to create not only static objects or simple tools, but also very complex mechanisms. The variety of their designs and purposes depends on the breadth of your imagination and its creative power.
When creating redstone circuits, you will need a repeater. It has several purposes, and the main one is the continuation of the energy signal. A red lantern and a redstone block transmit energy through red dust wires over a distance of 15 blocks. When you need to achieve a longer chain length, just install a repeater at the end of the wire, and it will increase the signal by another 15 blocks. For example, if you want to illuminate city streets with lanterns, then several repeaters will help you connect many lamps to one energy source at once.
While creating complex circuits The repeater performs the functions of a diode. It is used if the task is to prevent the energy of different wire flows from mixing at the points of their contact. This is achieved thanks to the repeater’s peculiarity when processing the signal - it receives it from only one side and transmits it only in one direction.
Repeaters are also used as timers to delay the signal. One repeater creates a break in energy transmission lasting from 0.1 to 0.4 seconds. When you need to achieve higher latency, install several repeaters one after another. The resulting timer will be useful in creating impressive illumination: with due diligence, you can equip your house with flickering lighting, and city streets with festive garlands. A more practical use of delay is to build mob traps. First, the monster walks along the pressure plate, and the kill mechanism activation signal is triggered when the mob is in a suitable position.
How to make a repeater in Minecraft
If you have approached the process of creating a repeater, it means that you already have valuable material in stock - red dust. It crafts two red torches. And by firing cobblestones, three stone blocks are made. This is what the repeater recipe looks like in the picture:

We will continue our review of the possibilities for creating other devices in the next article. It will talk about the distributor block.
Router in repeater mode - quite useful device, which aims to extend Wi-Fi range.
You can find quite a lot of articles on the Internet about how such a device works and where you can get it.
But most of these do not really answer the question, but only confuse users even more. We, in turn, will try to explain complex things as much as possible. in simple language. Let's start with what a repeater is and how it works.
What is a repeater
The repeater is transferred from in English as a “repeater”. To put it simply, this is a device that catches wifi signal and distributes it further. Thanks to this, the coverage area of the router increases. As for how much it increases, this figure depends on the characteristics of the repeater and router.
Visually, all this looks as shown in Figure 1.
Rice. 1. Visual diagram of the repeater operation
On the left is the router from which the Wi-Fi signal originates. This signal reaches the repeater, which is located in the middle and also emits the signal received from the router. Thus, it is achieved desired effect– the signal coverage area increases.
Available on the market great amount both routers and repeaters. One of the most popular models the latest TP-LINK RE200, which costs approximately $400. He's different the following characteristics:
- maximum speed connections – 733 Mbit/s;
- transmitter power – 20 dBM;
- supports the following encryption types: WEP, WPA, WPA2;
- port speed – 100 Mbit/s;
- 3 antennas;
- antenna type – internal;
- dimensions – 1.1×6.6×7.2 cm.
Rice. 2.TP-LINK RE200
It is important that this model is dual-band. This means that if you are using the same router (2.4 GHz and 5 GHz frequencies are used), the repeater can easily repeat its signal.
As you can see, the repeater is plugged into a socket and has a connector for an RJ45 tip. A WEB interface is used for configuration. It is worth saying that everything is done very conveniently and well. Any user can easily configure this device.
So, we figured out what a repeater is. Now let's get back to where we started. The fact is that the router can also be used as a repeater.
Important! There is only one criterion for determining whether it is possible to use a particular router model as a repeater and it lies in whether the manufacturer has provided such a possibility. If the developers specific device it was initially assumed that it could be a repeater, which means it could be used that way. And if they did not expect such a possibility, it is impossible to remake the router to make it appear. If you try to do this, you may simply break the device.
If you show this in the same diagram as shown in Figure 1, then on the right, instead of a repeater, there will be another similar router. That's all!
Rice. 3. Scheme of using a repeater with a router as a repeater.
As you can see, everything is quite simple to understand. But there are a few more points that need to be clarified. It's about here's what it's about:
- Even though two devices are used, the network still remains one. This is also true for cases when the router is used as a repeater. The functions of the repeater, among other things, include copying information from the router.
- All devices that you connect to Wi-Fi will connect to the device whose signal is stronger. But you won't notice it. However, from the user’s point of view, it does not matter whether the same smartphone is connected to a router or to a repeater. The main thing is that the signal will be sufficient for full use Wi-Fi.
- A repeater (as well as a router in repeater mode) allows you to organize a local network, which will include all devices connected to Wi-Fi.
Rice. 4. Repeater and router
Benefits of using a repeater
The main advantage of the repeater is that it can provide a Wi-Fi signal to a large area of the room. In addition, using a repeater has the following advantages:
- the above-mentioned possibility of organizing local network with all devices that are connected to Wi-Fi;
- Regardless of the number of repeaters, all devices that will connect to the signal will use the same verification (same password);
- in some cases, the repeater can even amplify the router’s signal (but usually only individual models and you need to find out about this from the manufacturer or a consultant at a hardware store).
But, basically, the repeater is used to solve the problem with weak signal Wi-Fi. A simple everyday situation, when there is no Internet connection in the bedroom or kitchen, can be easily solved with the help of a repeater or a second router that can be used as a repeater. Now it makes sense to talk about how to configure a second router so that it can repeat the Wi-Fi signal from the first. But before that, it’s worth clarifying a few points regarding in what cases you can use a router as a repeater.
In what cases is a router suitable for use as a repeater?
Experts agree that using it in this way only makes sense when you have an unnecessary router. In other cases, it is better to purchase a full-fledged repeater. And there are several reasons for this, specifically:
- It is not always possible to provide a signal of the same quality as that coming from the main router;
- Signal stability can also often suffer;
- It is also not always possible to successfully complete all the manipulations to set up such a connection the first time.
The problem is that each router is configured in a completely special way, although there is a certain general algorithm performing such actions.
Tip: Use two routers from the same manufacturer. Then both will work much better.
Then let's go!
Setting up a router for use in repeater mode
This process consists of two stages (depending on the number of routers used). The first of these is to perform the following actions:
1. Go to the settings of the router that initially distributes Wi-Fi (we will call it first). This is usually done by entering address bar browser to one of two addresses: 192.168.0.1 or 192.168.1.1. Next you will need to enter your username and password, which are usually specified on the device itself. If you changed anything in these settings, then you know how to enter this menu.
2. Next go to the “Wireless” or “ Wireless network" There, find the line “Channel”, that is, “Channel”. All we need to know in this case is that on both routers the value of this parameter should be the same. For example, let’s set it to “6”.
Rice. 5. Configure wireless network settings
3. This completes the setup of the first device. Next, connect the second one to the computer using a cable, go to the settings (the same way as we said above) and open the “WPS” menu. In it, click on the “Disable WPS” button. We won't go into detail about what it is.
4. Reboot the second router, that is, unplug it and plug it in again. The same can be done by clicking on the “click here” inscription that appears after completing the previous step.
5. After that, go to the “Network” menu and the “LAN” submenu. In the IP Address field, enter a new IP address. He must be Furthermore, which was, by one. That is, initially it was 192.168.0.1, and now you need to enter 192.168.0.2, as shown in Figure 6. Click the “Save” button to save the settings.
6. Now enter the address that was specified in the previous step in the address bar.
Rice. 6. The first stages of setting up a router in repeater mode
7. The previous step will allow you to go back to the settings of the second router. Go again to the “Wireless” section and to the “Wireless Settings” subsection. There we will be interested in the following parameters:
- “Wireless Network Name” - the name of the network that the second router will distribute;
- “Region” - region (the country in which you live);
- “Channel” - channel (we said above that for example we’ll take its value 6);
- “Enable WDS Bridging” - just check the box, this is the item that enables WDS.
8. Click on the “Survey” button to continue.
Rice. 7. Setting up a second router and connecting to the first
10. After this, all that remains is to enter the password for the network to which we are trying to connect. To do this, enter the encryption type used in the first router (this is done in the “Key type” field). Next, enter the password in the “Password” field and click the “Save” button to save the changes made.
Rice. 8. Completing the connection of the second router to the first
That's all! The network should now work fine.
Hint: WDS is a repeater mode.
Hard enough.
But from the entire procedure described above, you can extract the same algorithm that is suitable for connecting any two routers and using the second one as a repeater. It looks like this:
- On the first one, we enable the possibility of using its signal by the repeater;
- set the same channel on both (although this is not always necessary, but if there is a corresponding item in the settings, indicate its value);
- connect the second to the first in repeater mode;
- we use it.
The procedure outlined above is illustrated with an example TP-LINK routers. In some cases, there is an item called “Repeater” (not “WDS”) if the device settings have a Russian interface. It can be in many different sections, so you will have to look for it. But be that as it may, if this item is there, you will definitely be able to find it.
What if nothing works out for me?
If something doesn't work out for you, there are several options:
- Try performing all the above procedures again, from the very beginning.
- Write in the comments under this article at what stage you are having problems, we will definitely help you.
- Contact the manufacturer of the devices (at least one of the two) you are using for assistance.
- Call a specialist from your provider to your home. These people should help their clients use the Internet in a way that suits them.
But there are not as many manipulations there as it might seem at first glance, so even a novice user can perform them all. The main thing is to follow the algorithm described above and adhere (at least approximately) to the procedure that we also talked about earlier. Good luck with the setup!


