Yoast SEO WordPress plugin. Setting up titles and metadata. Headers and metadata: “Post types”
Plugin WordPress SEO(full title - WordPress SEO by Yoast) is a real find for those who want to expand the capabilities of the standard WordPress set. Its main function is technical SEO, a set of measures to increase the site’s position in search engine results.
In other words, under equal conditions, your site with WordPress SEO will be higher in the positions of Google or Yandex than a competitor’s site that does not use either this plugin or another similar SEO.
Download and install:
- Administrator's turn part of the VP itself:Plugins -> Add New: WordPress SEO by Yoast(install, activate);
- Or from the office. website: WordPress SEO by Yoast (move and unzip to Your_site/wp-content/plugins)
- You need to keep your eyes open with this plugin! Incorrect settings may reverse order not to improve the “SERP positions”, but on the contrary – to also “help” to throw out part of your site from the search, reduce the text, etc., create a conflict with other plugins...
- Think seven times (check), and “Save changes” once
All about the WordPress SEO by Yoast plugin. Settings
- It’s impossible to tell “everything” about this plugin. Because it affects changes in important promotional attributes. To understand why one way or another, you will have to make appropriate digressions into SEO basics, and not only. And then this article will turn into a whole talk.
- Therefore, only the settings are given below, and why exactly this is so - Google to help, we study the corresponding mat. Part.
- But here, below, are all the important and not so important settings. And therefore, the loud name “All about the plugin...”
So, after activation, another menu appears in your VP admin panel: “ SEO“, responsible for the settings of this SEO plugin.
In addition, all sorts of windows will flash: “Allow...”, “Subscribe...”. Click “No” everywhere. Although, it doesn’t matter (I just don’t like intrusiveness or an overabundance of information...)
Let's go through each submenu, top to bottom, left to right...
- — It doesn’t matter, it’s recommended, but not essential...
- - Very, very important settings.
1. SEO -> Admin Panel
You can leave everything as is, or at your own discretion, the only thing you may need over time is to fill out two fields (I underlined them). These fields are identifiers that are needed to confirm that this miracle site belongs to you.
Confirmed via special code, which is assigned to you when you register a new site with Webmaster from Google or Yandex.
However, I immediately install Google Analytics; you don’t need to enter the code from Google.
There are no special settings here. We can move on...
2. SEO -> Headings and metadata
2.1 SEO -> Headings and metadata: " Are common«
No comments, I already indicated why above...

2.2 SEO -> Headings and metadata: " Main menu«*
*Some VI templates do not have the ability to edit here. It's OK …

You can leave everything as is, or come up with your own template. But it is recommended to write your own meta data for each post or page (title template - also known as “title”, meta template ... - “description” ...) I’ll say more about this at the end.
Where %%page%% - corresponds to the variable - page name, %%sitename%% - site name, %%sep%% - "-" symbol, %%term_title%% - category, %%date%% - date.
2.3 SEO -> Headings and metadata: " Post types«
Post, Pages:
Media files
If you have these original media files (pictures, videos), then uncheck all the fields. Otherwise (if “borrowed” on the Internet):

2.4 SEO -> Headings and metadata: " Taxonomy«
Usually like this:
 But it can also be the other way around. Those. at the top Prohibited - with a tick, at the bottom Allowed - without a tick. But no way: both are allowed (without a checkmark), but both can be closed from being included in the search engine results (i.e., both have checkmarks).
2.4 SEO -> Headings and metadata: " Rest«

"Special Pages" at discretion.
3. SEO -> Social networks
Uncheck " "

You may eventually need the “Google+” tab; in “Owner’s page on Google:” the address of the page from Google+ is written (obviously, we can do without a picture).
4. SEO -> XML Sitemap
This CML sitemap is a map (a list of all pages and posts on the site) created specifically for search engines. It speeds up the entry of new pages/posts into search results.
You can leave everything as is. Or …
 Remove (do not exclude from the map) - if your media files are unique, otherwise - leave as is.
Exclude tags and format if your categories are open to search engines (however, it doesn’t matter).
BUT! On some templates, this built-in CML generator in the plugin conflicts with the template itself. Or conflicts with other plugins. It is recommended to turn it off until everything is installed and configured. And then turn it on, see - if everything works, then so be it.If something doesn’t work, and the map looks unclear at your_site/sitemap.xml, it’s better to install another plugin (for example, the best is considered to be: Google XML Sitemaps).
5. SEO -> Permanent links
 Don't remove categories, many plugins and other WordPress settings use them. By the way, for some templates this is impossible to do. Those. one day you will bet new template- and all internal links will refer to non-existent addresses...
6. SEO -> Breadcrumbs
There is nothing remarkable here, except that this built-in utility often conflicts with templates. If you installed the template, there were “crumbs” there, but after installing this SEO plugin, they disappeared, alas, this plugin’s fault. To be treated - enable the corresponding setting here (in red).
Yes, also, as a rule... In general, see for yourself (second red line)...

6. SEO -> RSS
At your discretion, you can leave everything as is...
7. SEO -> Everything before “Edit Files”
Utilities: “Import and export” - allows you to save settings or take them from other SEO plugins. The experts will figure it out themselves, there is nothing for beginners to do here yet.
“Mass editors” - allow you to edit the same meta data (title and description) in bulk. In my opinion, it is a useless and inconvenient thing. Better pens in each article.
8. SEO -> Edit files
Allows important files( and .htaccess) edit on the fly. I had a couple of incidents because of this (half the site was removed from the index, traffic dropped, and I didn’t know why. It turned out that the file was saved incorrectly thanks to this editor in the plugin).
How to work with WordPress SEO by Yoast
After activation and all settings, the following field will appear in the editor of pages, posts and other things (depending on the “WordPress SEO Meta Box: Hide” settings):
 (1) - hmm, how can I put it briefly... For example, you have a request to Google: “Buy a Bathtub.” The whole article is about this. So the plugin will calculate how suitable this article is for “Buy a Bathtub”.
Since we started about Baths:
 What you enter in (2) will appear in the search results in place (2).
What you quote from your given article in (3) will appear in the search results in place (3). This is true for Google, but not for Yandex.
Pay attention to “buy a bathtub” in both field (2) and field (3) - the request is present in both, highlighted in bold. Try to do the same.
Flaws WordPress SEO by Yoast
- Lots of settings, easy to get confused, forget...
- The plugin significantly loads the hosting processor. But he also does a lot of work.
Yoast SEO is the #1 plugin among other WordPress SEO plugins.
Need some help with your search engine optimization? Need an SEO plugin that helps you reach for the stars? Yoast SEO is the original WordPress SEO plugin since 2008. It is the favorite tool of millions of users, ranging from the bakery around the corner to some of the most popular sites on the planet. With Yoast SEO, you get a solid toolset that helps you aim for that number one spot in the search results. Yoast: SEO for everyone.
Yoast SEO does everything in its power to please both visitors and search engine spiders. How? Below you’ll find a small sampling of the powers of Yoast SEO:
Taking care of your WordPress SEO
- The most advanced XML Sitemaps functionality at the push of a button.
- Full control over site breadcrumbs: add a piece of code and you’re good to go.
- Set canonical URLs to avoid duplicate content. Never have to worry about Google penalties again.
- Title and meta description templating for better branding and consistent snippets in the search results.
- Expand Yoast SEO with the News SEO, Video SEO, Local SEO and WooCommerce SEO extensions.
- Need help? Yoast SEO Premium users get 1 year free access to our awesome support team.
Write better content with Yoast SEO
- Content & SEO analysis: Invaluable tools to write SEO-friendly texts.
- The snippet preview shows you how your post or page will look in the search results - even on mobile. Yoast SEO Premium even has social media previews!
- The Insights tool focuses on shows you what your text on so you can keep your article in line with your keyphrases.
- Synonyms & related keyphrases: Optimize your article for synonyms and related keyphrases.
- Automatic internal linking suggestions: write your article and get automatic suggested posts to link to.
Keep your site in perfect shape
Premium support
The Yoast team does not always provide active support for the Yoast SEO plugin on the WordPress.org forums, as we prioritize our email support. One-on-one email support is available to people who bought Yoast SEO Premium only.
Note that the Yoast SEO Premium also has several extra features too, including the option to have synonyms and related keyphrases, internal linking suggestions, cornerstone content checks and a redirect manager, so it is well worth your investment!
You should also check out the Yoast Local SEO, Yoast News SEO and Yoast Video SEO extends to Yoast SEO. They work with the free version of Yoast SEO already, and these premium extensions of course come with support too.
Error messages
Bug reports for Yoast SEO are welcomed on GitHub. Please note GitHub is not a support forum, and issues that aren’t properly qualified as bugs will be closed.
Further reading
For more info on search engine optimization, check out the following:
= While in WordPress
- Visit "Plugins &"; Add new'
- Search ‘Yoast SEO’
- Activate Yoast SEO on the plugins page.
Manually
- Upload the wordpress-seo folder to the /wp-content/plugins/ directory
- Activate the Yoast SEO plugin from the Plugins menu in WordPress
- Follow the "after activation" link below.
= After activation
- You should see a notification that the Yoast SEO Setup Wizard will start.
- Use the setup wizard to configure the plugin for your site.
- Done!
Website optimization for search engines must start with the right setup meta tags And headers in all articles, pages and sections of the blog, special SEO plugins such as WordPress SEO by Yoast are suitable for solving this problem. In this article, let's take a look under the hood of this powerful machine, whose name is WordPress SEO by Yoast, and talk about its correct setting and some useful tricks.

Figure 2. WordPress SEO by Yoast plugin tab in the WP Admin Panel
After the plugin is installed, it must be activated. To do this, go to the page of installed plugins:

Figure 3. Activating the WordPress SEO plugin
Click on the Activate button, now the plugin is activated, and a menu item will appear in the Admin panel SEO.
Note! If you don’t, then the WordPress SEO by Yoast plugin will complain!
To check if everything is in order, go to the menu item SEO >>> Are common. If you see something like this, you need to set up permalinks for your blog:

Figure 4. URL error
The plugin complains that the WordPress settings do not contain the postname variable in the URL. This variable indicates that the post title will be included.
You can click the Fix button, you will be taken to setting up permalinks in WP. Here you need to set everything as in the screenshot:

Figure 5. Setting the appearance of permalinks
But this won't be enough. I talked in more detail about setting up permalinks on the WP engine in the article. Follow the instructions in this article and the WordPress SEO plugin will not be angry with your blog settings.
That's all, the plugin is fully functional, let's move on to the next chapter.
I’ll add on my own behalf: before switching to the WordPress SEO by Yoast plugin, I recommend testing it on an experimental blog.
Benefits of the WordPress SEO by Yoast Plugin
WordPress SEO by Yoast is an SEO plugin comprehensive solution. The functionality of its capabilities is comparable to at least 4 separate plugins.
Let's see what useful functions the SEO by Yoast plugin can perform:
- Import all settings from other popular SEO plugins. If you previously used plugins such as All in One SEO Pack or Platinum SEO Pack, all title and meta data can be transferred automatically;
- High level of security;
- Wide range of metadata and header settings. Everyone will be able to customize WordPress SEO by Yoast with metadata for their site. There is a separate editor for Titles and Descriptions of articles, which allows you to speed up the work of filling them out;
- Setting up SEO in various types records, including taxonomy;
- Page analysis on ;
- Creating an XML sitemap for search engines;
- Creation ;
- Removing links from the site code that create duplicates.
These are the main advantages of this plugin.
Import data from other SEO plugins
Tool data import allows you to transfer all headings and meta tags from the old SEO plugin to WordPress SEO automatically, meaning you don’t have to do it lying.
If your blog has good traffic, then switching to the WordPress SEO by Yoast plugin, for example, from the All in One SEO Pack module, at first may negatively affect the position in the search results of both Yandex and Google. Therefore, in this case, I do not recommend sudden changes.
If you have just started creating a blog or created it not so long ago, and your blog does not have high indicators, then feel free to switch to WordPress SEO.
After installation and activation, if you have articles with completed meta data, you need to import the data.
To do this, go to the tab SEO >>> Tools >>> Import and Export:

Figure 6. Importing data into WordPress SEO by Yoast
In Figure 6 we see the settings import and export page. I used arrows to show 4 tabs:
- Import. In this section you can download SEO settings as a file in .ZIP format;
- Export. Export WordPress SEO settings to back up data or import it to another site;
- Import from other SEO plugins. If you have used SEO plugins such as HeadSpace2, All-in-One SEO or WooThemes SEO framework, then in this section you can transfer all settings to WordPress SEO by Yoast;
- Import from other plugins. Import data from other plugins;
Let's look at the Import from other SEO plugins tool in detail. This tool allows you to transfer all the titles and meta data that are filled in for each article in one click.
Let's look at the transfer of SEO data using the All-in-One SEO Pack plugin as an example:

Figure 7. Importing data from the All-in-One SEO Pack plugin
Figure 7 shows the data transfer settings. To do this, simply check the box next to Import from All-in-One SEO. And click on the Import button.
Important: both plugins must be activated when importing.
About the item Delete old data after import, I would not recommend checking this box. For two reasons:
- the risk of losing all data in case of a plugin conflict;
- After transferring the data, you will need to deactivate and delete the old SEO plugin, which will most likely be accompanied by the deletion of all data.
In a separate article, I’ll tell you how to transfer settings from various SEO plugins using the SEO Data Transporter plugin.
General settings of the WordPress SEO by Yoast plugin
Let's take a look at the WordPress SEO by Yoast plugin management menu:

Figure 8. WordPress SEO by Yoast plugin menu
All plugin settings are distributed in 6 menu items:
- Are common;
- Headings and metadata;
- Social media;
- XML Map website;
- Extended;
- Tools.
In this chapter we will focus on general settings. After going to the General menu item, you will see settings divided into 4 tabs:

Figure 9. General settings WordPress SEO by Yoast. Tab: general
In the General tab we can manage three tools:
- Tracking. Enabling this feature will allow plugins to send some data to the plugin developers for updating it;
- Presentation. If you missed the introductory presentation after activating the plugin, you can watch it here at any time;
- Restore default settings. Factory reset button.
Personally, I did not allow anonymous tracking of my site parameters, this is up to each person, but I personally do not recommend enabling this option.
The presentation would be a very useful tool for beginners if it were fully translated into Russian, but as it was, I was able to view only 2 steps and closed it.
Tab: Your Info
The following general settings tab of the WordPress SEO by Yoast plugin is responsible for editing personal settings:

Figure 10. General WordPress SEO by Yoast settings. Tab: Your Info
As we see in Figure 10, in this tab you can specify the name of the site, as well as its alternative name. I did not notice the particular importance of this function, so I recommend not filling it out.
Here you can select the site owner. It could be a Company or a Person.
These settings are mostly for the Google search engine.
Webmaster Tools tab
This tool allows you to confirm rights to own a website in services for webmasters.

Figure 11. General WordPress SEO by Yoast settings. Tab: Webmaster Tools
This tool allows you to confirm rights to the site in 4 services:
- Alexa Verification ID;
- Bing Webmaster;
- Google Webmaster;
- Yandex Webmaster Tools.
To do this, you need to fill in the meta tags of these services in the empty fields.
I’ll show you using Alexa Verification ID as an example. To add a site you must be registered and authorized in the service.

Figure 12. Adding a site to the Alexa service
We click on the continue button and get to the page for confirming rights to the site, where we see 3 methods:

Figure 13. Confirming rights to the site in the Alexa service using a meta tag
We select method 2, as shown in Figure 13, select and copy the specified verification meta tag, you can only copy the content attribute code. In my case, I copied this code:
rBoyYmIBTRbOJLqZXFTU9CYcJd8
Now you need to install it in the required field of the WordPress SEO by Yoast plugin and save the changed parameters:

Figure 14. Adding a meta tag using the WordPress SEO plugin by Yoast
After inserting the code, you need to check the code of the main page of the site. The following meta tag should appear in it:

Figure 15. Alexa verification meta tag in the site code
Now you can safely confirm the installation of the meta tag on the service website. If everything went correctly, the following message will appear:

Figure 16. Successful confirmation of rights to the site
In other services the process is almost the same.
Security tab
Setting up security in the WordPress SEO by Yoast plugin comes down to checking one box:

Figure 17. General WordPress SEO by Yoast settings. Tab: Security
Checking this box will deny access to the WordPress SEO meta box for users of the Authors and Editors roles.
Setting up titles and metadata
This section is the main one in setting up the WordPress SEO by Yoast plugin. The promotion of the site as a whole, as well as individual articles, headings and possibly tags, if you decide to open them for indexing, will depend on how you configure the display of headings and metadata.
In the plugin menu select Headings and metadata(Figure 8). And we see that this settings section has 6 tabs.

Figure 18. Headings and metadata - WordPress SEO by Yoast general tab
In the General tab, you can activate forced rewriting of article titles, which is basically what I did.
Also here you need to select title separator.
Home tab
Let's look at Figure 19, which shows the title and metadata template settings for the main blog page:

Figure 19. Headings and metadata - WordPress SEO by Yoast. Tab: Home Page
The figure shows the default settings. I do not recommend filling out the meta description field. Since for the main page SEO by Yoast plugin will fill in automatically if you have filled out Short description site.
In the keyword template we indicate keywords, which you use to promote your home page.
Let's take a closer look at the name template; by default it looks like this:
%%sitename%% %%page%% %%sep%% %%sitedesc%%
As you can see, the template consists of 4 parts:
- %%sitename%%- Name of the site;
- %%page%%- page number;
- %%sep%%- delimiter;
- %%sitedesc%%- description of the site.
Let's look at the example of page number 2 of this blog to see what is responsible for what:
Figure 20. Elements of the header template using the example of the blog Self-Webmaster
The exclusion of any element will entail its removal from the title of the site. You can experiment with the order of the elements, but I recommend leaving everything as it is.
Post Types Tab
This section is pretty much the same as the previous one, but now we'll be setting up posts, pages, and media files. Figure 20 shows my recommended settings:

Figure 21. Post type settings in the WordPress SEO by Yoast plugin
Everything is clear with templates. Let's look at the remaining points:
- Meta Robots - if you check the box, for example, in the page post types, then all pages will have noindex and nofollow meta tags; these meta tags prohibit search engines from indexing the web document. Under no circumstances do we check the boxes for posts and pages.
- The date in the fragment preview is a function for Google. This spinnet search engine can display when posts were updated. This does not provide any particular advantage, but it is possible that this search engine ranks frequently updated sites better;
- WordPress SEO Meta Box - hides the plugin panel for setting up titles and metadata.
I think I sorted everything out into pieces. If you have any questions, please ask in the comments.
Taxonomies and Archives tabs
Absolutely the same as in the previous section, only for taxonomy elements: categories, tags, formats. And archives of authors and dates.
This is how the Taxonomy section on this blog is set up:

Figure 22. Taxonomy settings in the WordPress SEO by Yoast plugin
So the archives:

Figure 23. Archive settings in the WordPress SEO by Yoast plugin
There is nothing complicated, you can navigate according to the tips. The only thing I did was open the tags for indexing. This is an experiment, so I don’t recommend adding tags to the index.
Other tab
The remaining settings are not that important at first glance, but I recommend activating them all, since their functions are useful specifically for SEO.

Figure 24. Headings and Metadata - WordPress SEO by Yoast. Tab: Other
Let's look at each point, starting with the first:
- Noindex for subpages and archives - check the box to avoid duplicating content;
- Use in meta keywords - if you are not going to enter keywords for posts and pages, then this function can not be enabled;
- Add a tag noodp meta robots throughout the site - prohibits search engines from using the DMOZ description for the site;
- Add a tag noydir meta robots throughout the site - the same thing only the Yahoo directory.
At this point, you can complete the header and metadata configuration. Let's move on.
Integration with social networks
I can’t say anything special about this point. Since I haven't used it myself yet. But I did some digging on the Internet, and the plugin’s hints explain everything well.

By checking the box Add Twitter metadata we link the site to the twitter account.
Set the type of card (tweet). There are two types of tweets available:
- Final content - the tweet will be in text form;
- Summary content with a large image - the tweet will have text and an image.
In general, this is how I set it up for myself:


Figure 27. Twitter username
Let's copy it. The username is also available in the profile under the avatar, but there it is displayed with a “dog”, and we don’t need it. Now the copied name must be pasted into the field Twitter Username in the Accounts tab:

Figure 28. Adding a username to the Twitter Username field
We save and check the code of our site again, something like this should appear there:
Figure 29. Meta tags for Twitter in the site code
Just like that, I linked my website to my Twitter account using the WordPress SEO plugin by Yoast. This is done similarly for other social networks.
Creating an XML sitemap
Any website should have a sitemap in XML format, its presence is especially important for sites with big amount content. This type Site maps are intended exclusively for search engines and help them in correctly indexing the site structure and all content.
The WordPress SEO by Yoast plugin is equipped with a tool that allows you to create and customize an XML sitemap in a couple of minutes.
Let's go to the XML sitemap settings page:

Figure 30. Creating an XML sitemap using the WordPress SEO plugin by Yoast
Check the box to enable the sitemap. To view the created sitemap, click on the XML Sitemap button, and the sitemap will open in a new window. This is what my sitemap looks like:

Figure 31. My XML sitemap WordPress SEO by Yoast
Please note that the XML sitemap generated by the WordPress SEO by Yoast plugin is available at:
http://site/ sitemap_index.xml
Let's go through the remaining tabs and look at all the available settings.
Tab a list of users. Enabling this feature will add a list of users, if any, to the sitemap. The function is enabled by unchecking:

Figure 32. List of users function for XML sitemap in the WordPress SEO by plugin
If there is no registration on your site, then feel free to check the box and disable this function.
Setting up post types for a sitemap
The next tab is for setting up the display of post types in the site map. Let's look at the screenshot:

Figure 33. Configuring the display of post types in the XML sitemap
As can be seen from Figure 33, the settings of the WordPress SEO by Yoast plugin allow you to add 3 types of posts to the XML sitemap:
- Posts (post);
- Pages (page);
- Media files (attachment).
Posts and pages must be present in the site map. But media files need to be added in certain cases:
- If you have a large number of photographs in your articles. Suitable for travel blogs based on beautiful photographs;
- If your blog template is designed to create a gallery;
- If your blog has video files.
If your blog falls under one of the conditions, you can add media files to the sitemap and open them for indexing in the Headings and Metadata section.
Taxonomies
We continue to configure the site map for search engines and now we will understand the structure of the blog in the site map.

Figure 34. Setting up taxonomy for XML sitemap
Figure 34 shows my settings; as you can see, I excluded the Tags and Formats sites from the map in order to avoid creating similar content on different pages.
Advanced settings
Advanced settings include 3 functions: bread crumbs; Permalinks And RSS. All of these tools are useful and are included in this plugin for a reason. And the function for setting up permalinks will help beginners save a lot of time and nerves by avoiding setting up workarounds.
WordPress SEO Breadcrumbs by Yoast
Breadcrumbs are a breadcrumb trail that shows the user where they are currently located. Another undeniable function of breadcrumbs is to help search engines understand the site structure and weight distribution.
Let's look at the screenshot:

Figure 35. Setting up WordPress SEO breadcrumbs by Yoast
So to enable bread crumbs check the box and install the PHP code for outputting bread crumbs into the site code, namely into a file single.php (Sometimes this file may be called differently, for example loop-single.php ).
Most often, breadcrumbs are placed above the title of an article so that visitors can immediately see in which category or sub-category they are located.
Figure 36. Example of Breadcrumbs
Figure 36 above the article title shows bread crumbs, which have a rather interesting design and undoubtedly attract the attention of visitors. The breadcrumbs for this article are represented by 3 buttons, which are links:
- Home page. We see the site domain;
- Heading. The article is located in a section called CSS Lessons;
- Article title.
Permalinks
A significant tool of the WordPress SEO plugin by Yoast. I’ll show you how I set up this tool on my blog in the screenshot:

Figure 37. Setting up WordPress SEO permalinks by Yoast
I will not repeat each point, since everything is clearly described there. I’ll tell you that for me the most important tools here are 2:
- Delete variables?replytycom;
- Hide post short link.
Both functions are aimed at protecting the blog from duplicates.
Removing duplicates ?replytycom quite a complex process, and in the WordPress SEO by Yoast plugin it is reduced to checking one box, for which the developers receive great respect from all webmasters.
I talked about how to hide a short link or in other words rel =’shortlink’ in a separate article. In it I recommended quite the hard way, and SEO by Yoast allows you to do this by checking one box.
Tools
I have already talked about one of the tools in the Tools group. And there are three of them in total:
- Bulk editor- V this tool you will be able to edit (add titles and descriptions) articles and categories together:
- File editor— allows you to edit Robots.txt and .htaccess files directly from the admin panel. If I'm not mistaken, only the WordPress SEO by Yoast plugin can do this;
- Import and Export— imports and exports SEO data.
This completes the basic settings of the WordPress SEO by Yoast plugin. Now the plugin should work correctly and have a positive impact on the promotion of your blog or website.
Setting up and filling out the WordPress SEO Meta Box
Let's look at how to set up the WordPress SEO Meta Box while writing an article. After activating and configuring the WordPress SEO by Yoast plugin, a section with SEO settings for a separate article or category should appear in the WP article editor.
Look at the example of a regular article. Here's a screenshot:
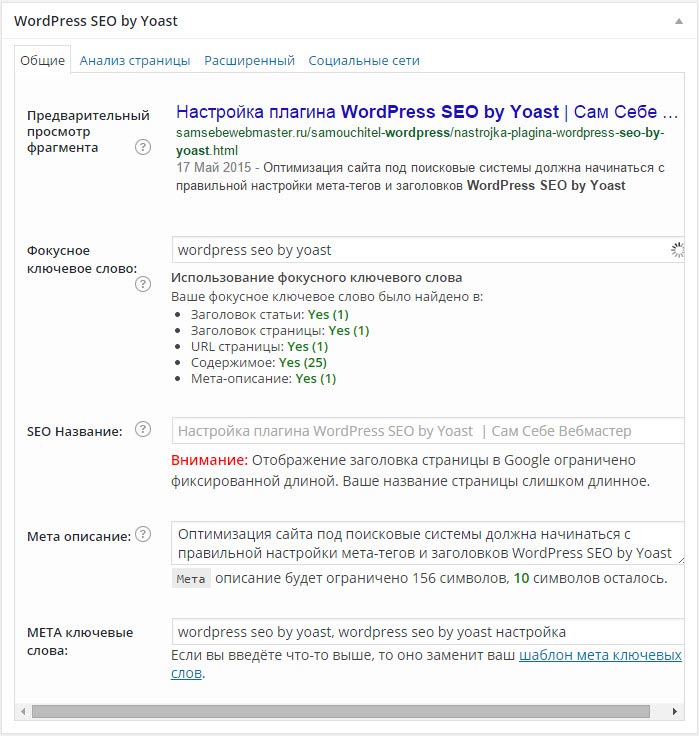
Figure 38. WordPress SEO Meta Box
Let's take a look at Figure 38; anyone who has previously worked with SEO plugins will see a “familiar picture”: Title, description, keywords and preview. Everything is familiar except for one thing: the Focus word field and the analysis of the article based on it. As you can see, I have the green words YES on all counts. This means that the article is highly optimized from an SEO point of view.
Let's go through the other tabs.
Page analysis
Sometimes this function does not work. If this suddenly happens, then the reason may be in the focus word, perhaps it simply has not loaded yet. To fix this, highlight the keyword and click on the Enter button.

Figure 39. Page analysis
As you can see from Figure 39, the WordPress SEO by Yoast plugin provides quite a wide and detailed analysis pages, and I still have some way to go.
Advanced
This section of SEO settings includes several useful tools, but in principle I practically don’t use them.

Figure 40. Advanced
I would especially like to note the functions of 301 redirects and canonical URLs. The WordPress SEO by Yoast plugin is the only one that allows you to do this manually. In certain situations this will be indispensable.
Social media
We remember that, while writing this blog, I linked my blog to my Twitter account, so in the social networks section I had settings for this social network.

Here you can specify the Title and descriptions for the tweet, and, most importantly, set the image. After that, the tweets of all those who shared will have a picture.
That's all WordPress setup SEO Meta Box fully reviewed.
Conclusion
Don't think that the WordPress SEO by Yoast plugin is all SEO in WordPress systems. No, this is just one tool, but it is one of the most important, so don't hesitate and install it on your blog.
Those who have a website have heard about SEO at least once. And most often, novice webmasters create their websites using the WordPress CMS. But what is the best plugin to use for SEO on this CMS? On the website www.. Thanks a large number features and capabilities, the WordPress SEO by Yoast plugin is a good competitor to the famous All in One SEO Pack plugin.
This plugin has quite a lot of functions that are related to the technical part and micro markup. Therefore, I advise you to study past articles on the topic of website micro-markup:
In this article we will look at how to install and configure this plugin on your website, as well as how to use all the functions that are there. And at the end you will find a small test that will help you check how you have learned the material from this article.
Features of the plugin "WordPress SEO by Yoast"
Now I want to look at this plugin to briefly tell you what capabilities it has and how it can be useful to you:
- Filling title tag, description and keywords for each article, page or category on the site;
- Preview of the snippet, how it will look in the Google search engine;
- focus word for article analysis;
-
use of meta tags noodp, noydir;
- Meta tag noodp— used to ensure that the name of your site and its description are not taken from DMOZ.
- Meta tag noydir- used to ensure that the name of your site and its description are not taken from the Yahoo directory.
- Using meta tags noindex, nofollow for archives, categories and pages (post type in CMS WordPress);
- Ability to add a tag canonical for categories, posts, pages, as well as for the main page;
- Ability to add your own fields to RSS;
- Support "";
-
Create an XML sitemap with:
- Images.
- Excluding certain types of posts.
- Meta pages tag noindex may also be excluded from the XML sitemap.
- Built-in file editor .htaccess And robots.txt;
- integration with the service Google Webmaster;
- basic feature import data from the All in One SEO Pack plugin;
This plugin has a paid version with additional functions:
- Ability to set redirects (redirections) from page to page;
- video training on how to use the plugin;
- Yoast plugin customer support;
Agree, the functionality is really impressive. Therefore, next we will look at how to install this plugin on your website. A little later we will analyze the process of setting up the plugin.
(instructions) How to install the plugin on the site?
Naturally, before you start configuring this plugin, you need to install it. There are really many installation methods. In that short video You will learn how to install the "WordPress SEO by Yoast" plugin on your website under CMS management WordPress.
Video installation instructions
If it was not clear to you this instruction, then you can read the text version with screenshots below.
So, let's look at the installation process in screenshots, if you did not understand it from the video. First of all, go to the WordPress console and go to the “Plugins” section:
Click the button at the top of the page Add new". A window appears in front of us where we can enter the name of the required plugin and WordPress will start searching for it among the plugins that are officially uploaded to "wordpress.org/plugins":
We need to enter the name of our plugin that we want to install. Previously, the plugin had a long name - "WordPress SEO by Yoast", but now it will be enough to enter the phrase " Yoast SEO":
And the required plugin will appear first in the search results:
The plugin installation process will take some time. But the main advantage of using this method of installing plugins is that you do not need to download the archive with the plugin to your computer.
After installation, a message indicating the successful installation of the plugin will appear. Now you need to “Activate” it:
You should remember that the plugin settings that you will see below are the settings that we recommend. Different SEO optimizers may have their own unique settings. And also more advanced webmasters can ignore some settings and know what exactly they do not need and what needs to be disabled. If you are a beginner and want to use the Yoast SEO plugin on your website, then follow the steps very carefully and carefully.
Plugin version discussed in this article: 3.0.7
General settings of the Yoast SEO plugin
After installing the plugin and activating it, the “SEO” item appeared in the menu on the left, where all the settings for this plugin are located. Click on this item and you will be taken to the following page with general settings:
On this page you can:
- Using the button "Start Presentation" Watch a short presentation to understand the plugin settings. Fortunately, most of the plugin has been translated into Russian;
- via button "View changes" find out what new things the creators have added and what you need to use first;
- Well, if you suddenly did something wrong in the settings, then use the button "Restore default settings" You can restore the initial settings.
This concerns the first tab. Go ahead and open the tab " About Me":
Two fields in the first block "Site name":
- Name of the site;
- alternative site name.
It doesn't make much sense to fill out these two fields. By default, the site name that you filled in at the very beginning is displayed, when WordPress installation. It can be changed either here or in the "Settings" item on the left in the menu.
And the last item on this tab:
- Company or Individual.
Where you can indicate what your site represents, as well as enter a name when selecting an item from the drop-down list. This meta data is used by the Google search engine when searching. It looks more like a formality, so it doesn’t play a significant role.
Next tab " Webmaster Tools":
A very useful feature in this plugin for those who have just installed WordPress and now need to link Google Webmaster, Yandex.Webmaster, Bing WebMaster and the Alexa service.
The advantage is that you don’t need to go into the code and look for the area between the tags
And, or upload the file to the server via FTP. You just need to use the method of confirming rights to the site using a meta tag and then simply paste the resulting meta tag into the appropriate field. Then check for the right service presence of a meta tag on the site. A useful feature that saves a lot of time.Leave this checkbox if you have several authors or moderators on your site who write articles for you and you want them not to have the ability to prohibit indexing of individual posts and so that they cannot control the search output of pages. This way, they will only be able to write articles, and you will be responsible for everything else.
And the last tab " OnPage.org":
If the checkbox is checked, indexing of your site by the search robot of this service will be allowed. For Russian-language sites, there is no point in allowing indexing, so you can uncheck the box.
Settings item "Headers and metadata"
Here you will see 6 tabs that are really important and require attention. Now let's look at each of them in detail.
1. General
Using the checkbox " Force header rewrite"You can let the Yoast SEO plugin independently rewrite headers where it deems it necessary. I left this checkbox because I want the headers entered in the plugin field to overwrite the standard post headers.
Also on this page you can select " Header separator", which will be shown in search results:
There are a total of 13 separators in the plugin. Therefore there is a choice. A little later we'll look at where this separator appears in the title template.
2. Home page
Next, we will define the title, description and keywords for the main page. By default, a template is inserted there, with the help of which the title is generated. But for the main page these values can be static. Therefore, I recommend entering your values yourself once.
- Title template- main page.
- Meta description template— enter description.
- Keyword pattern— enter several keywords.
But for posts, pages and media files, these values are generated dynamically, which we will look at right now.
3. Post types
By default, the WordPress CMS has several post types: post, page, media file, and so on. And authors have the opportunity to independently choose its type for each entry:
The Yoast SEO plugin also automatically fills in the Title field and all you have to do is enter a description and keywords. But where are these fields? The Yoast SEO plugin adds a special block at the end of each post and page:
Be sure to manually fill out the Title and Description to get maximum benefits. I showed how to do this in this version of the plugin in the GIF image below:
That is, just click on the desired field and enter the required value.
I also want to look at the template for creating the Title. For example, the following template was introduced there to form the header " %%title%% %%page%% %%sep%% %%sitename%%":
- %%title%% is the title of the entry.
- %%page%%- page number. For example "Page 2 of 3".
- %%sep%%- this is the separator that we looked at in the first “General” tab.
As you understand, there are much more such variables. But there is no point in writing all of them within the framework of this article. We've looked at the most important ones. You can remove some variables to form the Title as you wish. It is recommended to leave only the title.
4. Taxonomies
In addition to the main pages and posts, WordPress has categories and tags. After all, you can also promote categories in search engines. And thus you will have more more pages in search of. But you need to be careful here because duplicates may appear. However, this is not what we are talking about now. By default, the most common template is specified, which is used on most sites. Here you can not change anything and leave it as is. But if you want to change something, do it with caution.
I also want to remind you once again that the Yoast SEO plugin adds a special block at the end of each post, page and category. Therefore, in the “Categories” section, by selecting the required category, you can change its description and title.
In addition to categories, you can also promote a page with a specific tag (label). There is a similar situation with its description and title. In the "Tags" section for any tag you can configure the necessary fields.
5. Archives
Here you can specify meta information for pages with an archive of authors, an archive by date, and special pages (for example, a 404 page).
If you run your website alone, then your articles are completely duplicated in the author’s archive. Therefore, it is better to disable it by checking the box next to " Disable author archives".
Regarding the archive by date, here you can only check the box " Add noindex, follow to archive by date". This is done in order to avoid duplication of content.
Below on this page are settings for the search page and 404 page. Here we leave everything as is.
6. Other
This tab contains global settings. Here I recommend checking the last two boxes:
- "Add globally noodp meta robots"— we prohibit search engines from taking descriptions from the DMOZ catalog. Because that description is entered by the moderators of this directory, and it is not always the most attractive.
- "Add globally noydir meta robots"— we also prohibit taking a description from the Yahoo directory;
Yoast SEO is a WordPress plugin that configures website pages to display correctly in search engines. He will help:
- avoid problems and possible sanctions and filters from search engines for duplicate content;
- will configure the output title, meta description And meta keywords;
- will create a sitemap sitemap.xml ;
- will make a breadcrumb breadcrumb trail ( breadcrumbs);
- will help remove category stems (/category/), stop words and replytocom from comment URLs;
- will configure redirects from child pages of media files to parent posts;
- and much more useful for internal search engine optimization site.
Where to download and how to install the Yoast SEO plugin
Quick setup of Yoast SEO
Here's a reminder on how to quickly set up Yoast SEO on a new website.
If this is your first time encountering this plugin, some things may seem unclear to you. In this case, I suggest skipping this section and going below to the full Yoast SEO setup.
- We enable the full functionality of the plugin. To do this, go to SEO - Dashboard - Feauters and move Advanced settings pages to Enabled, then down and save the changes.
- New items will appear in the sidebar. Let's go to Headings and metadata(http://example.com/wp-admin/admin.php?page=wpseo_titles)
- IN Headings and metadata We go through all the tabs and delete the %%page%% %%sep%% %%sitename%% construction everywhere. Typically, only the first template remains, for example %%title%% . Save the changes.
- Also in Taxonomies(http://example.com/wp-admin/admin.php?page=wpseo_titles#top#taxonomies) delete the word Archives from the beginning of each line. Save the changes.
- In the last tab Other(http://example.com/wp-admin/admin.php?page=wpseo_titles#top#other) Subpages of archives set disabled , save changes.
- In the sidebar go to XML Sitemap(http://example.com/wp-admin/admin.php?page=wpseo_xml) and XML sitemap functionality enable (enabled). We go through all the tabs, turn off the author map and make sure that required types posts, pages and taxonomies were present in the map sitemap.xml. Save the changes.
- In the sidebar go to Additionally. We turn on the breadcrumbs navigation chain, write the text of the link to the main one, indicate in the post chain Heading. Save the changes. To insert breadcrumbs into a template, use:
- In the tab Permalinks(http://example.com/wp-admin/admin.php?page=wpseo_advanced&tab=permalinks) put down:
- Strip the category base- Remove ;
- Redirect attachment URLs to parent post URL- Redirect;
- Remove the ?replytocom variables- Remove.
Save the changes.
Above was an example of a quick Yoast SEO setup. This is a kind of cheat sheet for those who are not setting up a plugin for the first time. If you are not one of them, then we will consider all the settings in detail.
Full Yoast SEO setup
Now that the plugin is installed and activated, let's move on to setting it up. A separate SEO section has appeared in the left sidebar at the bottom, go to it:
http://example.com/wp-admin/admin.php?page=wpseo_dashboard
Inside we will be shown several sections:
- Dashboard
- Are common
- Features
- About Me
- Webmaster Tools
- Safety
Let's consider all these points in detail.
Dashboard
Dashboard or Desktop. This displays various messages and notifications that you should pay attention to.
For example, in the screenshot above we see 1 problem (the default site name is set, you need to register your own) and 2 notifications (suggestions to use the plugin configurator and connect the site to Google Search Console). We've just installed the plugin and you can use the configurator, but it won't be enough to fully customize it, so I'll skip it and go straight to reviewing the plugin and fine-tuning it.
General
The second section, which can be accessed at http://example.com/wp-admin/admin.php?page=wpseo_dashboard#top#general
It contains the following functionality:
- Configuration wizard— here is a configurator that you can use to pre-configure the plugin in several steps. You can skip it;
- About the creators— information about the creators of the plugin;
- Restore default settings— here you can reset the plugin settings to the original ones if something went wrong.
Features
The third section is Features. Available at http://example.com/wp-admin/admin.php?page=wpseo_dashboard#top#features.
Knowledge Graph (About me)
Fourth section - Knowledge Graph(About Me). Available at http://example.com/wp-admin/admin.php?page=wpseo_dashboard#top#knowledge-graph.
Why is all this needed? Google will use them for its Knowledge Graph.
And also, he can use this data in search results:
Webmaster Tools
The section is located at http://example.com/wp-admin/admin.php?page=wpseo_dashboard#top#webmaster-tools.
In this section, you can quickly confirm your domain ownership in the Google Webmasters and Yandex Webmaster panels.If you have already verified your domain ownership, skip this section.
Google Search Console
To verify ownership of the example.com domain in Google Search Console:
Yandex Webmaster Tools
To confirm ownership of the example.com domain in Yandex Webmaster Tools:
Security
The section contains only one function: Security setting, and is located at http://example.com/wp-admin/admin.php?page=wpseo_dashboard#top#security
By default (disabled), the Yoast SEO metabox in each post does not allow authors to change the permissions for posts to be viewed by search robots (meta name robots noindex), as well as override the canonical link (link rel canonical). Therefore, if you trust the authors, you can enable the ability to change these vital above parameters in posts for everyone, not just site administrators. Otherwise, leave everything as it is by default - disabled
Headings and metadata
This section is responsible for how tags are displayed in the code in the head section
, <meta name="description" content="">And <meta name="keywords" content=""></p> <p>I’ll tell you right away about the template variables that are used in this section. Variables in Yoast SEO look like a specific word wrapped in double percent signs. If Yoast sees such a variable in its metabox, it will replace it with a specific value, taking it from the settings or site data.</p> <blockquote class="note"><p>To display meta desciption for Posts, write in the field <b>Meta description</b> tag %%excerpt%%</p> </blockquote> <p><img src='https://i0.wp.com/sheensay.ru/wp-content/uploads/2017/01/yoast-title-vars.png' width="100%" loading=lazy loading=lazy></p> <p>For example, %%sitename%% will be replaced with the site name defined in the settings, %%sitedesc%% with the site description, %%title%% with the title of the post or page, and so on. Below is a complete list of variables with their descriptions:</p> <ul><li><b>%%sitename%%</b>— indicates the name of the site. Defined in site settings</li> <li><b>%%sitedesc%%</b>- description of the site. Defined there</li> <li><b>%%date%%</b>— date of publication of the post or page</li> <li><b>%%title%%</b>— post or page title</li> <li><b>%%parent_title%%</b>— title of the parent page</li> <li><b>%%excerpt%%</b>— a short description of the post or page. If does not exist, it will be generated automatically</li> <li><b>%%excerpt_only%%</b>— a short description of the post or page. If it doesn't exist, it won't output anything.</li> <li><b>%%tag%%</b>— current label/tags (tags)</li> <li><b>%%category%%</b>— heading (category) or list of headings (categories), separated by commas</li> <li><b>%%primary_category%%</b>— main heading (category)</li> <li><b>%%category_description%%</b>— description of the category</li> <li><b>%%tag_description%%</b>— description of the label (tag)</li> <li><b>%%term_title%%</b>— title of an arbitrary term</li> <li><b>%%term_description%%</b>— description of an arbitrary term</li> <li><b>%%searchphrase%%</b>— current search phrase</li> <li><b>%%sep%%</b>- the separator, which is defined in the next paragraph, and which is present in wp_title()</li> </ul><blockquote class="note"><p>You probably understand that some variables can only work on certain pages that correspond to them.</p> </blockquote> <p>The above variables are usually sufficient. However, there are also advanced options:</p> <br><img src='https://i2.wp.com/sheensay.ru/wp-content/uploads/2017/01/yoast-woo-attribute-ct.png' width="100%" loading=lazy loading=lazy><h4>Are common</h4> <p>Located at http://example.com/wp-admin/admin.php?page=wpseo_titles#top#general</p> <p><img src='https://i1.wp.com/sheensay.ru/wp-content/uploads/2017/01/yoast-title-general.png' width="100%" loading=lazy loading=lazy></p><p>Headings and Metadata - General - Yoast SEO</p> <ol><li><b>Header separator</b>— here you can select a character that will serve as a separator in the header instead of the %%sep%% variable</li> </ol><p><b>Enabled analysis</b></p> <br><img src='https://i2.wp.com/sheensay.ru/wp-content/uploads/2017/01/yoast-title-readability.png' width="100%" loading=lazy loading=lazy><blockquote class="note"><p>You are already familiar with variables (description above), so further I will give examples of templates that I usually use.</p> </blockquote> <h4>Homepage</h4> <p>Responsible for what is displayed in the title and description on the main page. Located at http://example.com/wp-admin/admin.php?page=wpseo_titles#top#home <br><br><img src='https://i2.wp.com/sheensay.ru/wp-content/uploads/2017/01/yoast-title-home.png' width="100%" loading=lazy loading=lazy><br>Here the default set is %%sitename%% %%page%% %%sep%% %%sitedesc%% . <br>In theory, it will be enough to leave %%sitename%% or %%sitename%% %%page%% . You change it at your discretion.</p> <h2>Typical solutions to problems and problems</h2> <p>This section contains typical tasks and problems that you encounter when using Yoast SEO.</p> <h3>How to remove duplicate post title in breadcrumbs WordPress SEO by Yoast</h3> <p>The code below will remove the duplicate article title in the breadcrumbs, leaving only links to the upper levels:</p><p>Add_filter("wpseo_breadcrumb_single_link", "remove_wpseo_breadcrumb_last"); function remove_wpseo_breadcrumb_last($link_output) ( if(FALSE !== strpos($link_output, "breadcrumb_last")) ( $link_output = ""; ) return $link_output; )</p><h3>How to Remove WooCommerce Products from Yoast SEO Breadcrumbs</h3>add_filter("wpseo_breadcrumb_links", "sheens_wpseo_breadcrumb_output"); function sheens_wpseo_breadcrumb_output($output)( if ("product" == $output["ptarchive"]) ( unset($output); $output = array_values($output); ) return $output; ) <h3>How to remove and disable JSON-LD from Yoast</h3>// Completely disable JSON-LD output in Yoast SEO add_filter("wpseo_json_ld_output", "__return_empty_array"); <p>Also, sometimes there is a need to disable Google SearchBox for a site</p> <blockquote class="note"><p>The SearchBox in the search results looks like this: <br><br><img src='https://i2.wp.com/sheensay.ru/wp-content/uploads/2017/01/searchbox.png' width="100%" loading=lazy loading=lazy></p> </blockquote> <p>In WordPress, you usually write http://example.com/?s=(Search_query) . If the standard search type is disabled on the site, then you should also disable it in JSON-LD:</p><p>// Disable Yoast SearchBox for Google add_filter("disable_wpseo_json_ld_search", "__return_true");</p><p>Or, you can change the existing search address, for example http://example.com/?search:</p><p>// Change the Yoast SEO search string add_filter("wpseo_json_ld_search_url", function () ( return "http://example.com/?search=(search_term_string)"; ));</p><h3>How to Disable OpenGraph Meta Tags in Yoast SEO</h3> <p>To disable Open Graph metadata, you can go to the admin panel: <b>SEO</b> — <b>Social media</b> — <b>Facebook</b>, and switch the slider <b>OpenGraph</b><br><br><img src='https://i0.wp.com/sheensay.ru/wp-content/uploads/2017/01/yoast-disable-opengraph.png' width="100%" loading=lazy loading=lazy></p> <p>To disable Open Graph via hooks, you can use the following code:</p><p>Add_action("wp_head", "remove_all_wpseo_og", 1); function remove_all_wpseo_og() ( remove_action("wpseo_head", array($GLOBALS["wpseo_og"], "opengraph"), 30); )</p><p>To disable specific OpenGraph elements, you can use the following filters:</p><p>Add_filter("wpseo_opengraph_url" , "__return_false"); add_filter("wpseo_opengraph_desc", "__return_false"); add_filter("wpseo_opengraph_title", "__return_false"); add_filter("wpseo_opengraph_type", "__return_false"); add_filter("wpseo_opengraph_site_name", "__return_false");</p><h3>ERROR: http://ogp.me/ns#image field is missing or empty</h3> <p>If an error occurs when checking a site in the micro markup validator <b>ERROR: http://ogp.me/ns#image field is missing or empty</b>, which means you did not specify a default image in the plugin settings: Yoast - Social Networks - Facebook, and you specify any image that will be shown on social networks when sharing pages that do not have thumbnails.</p> <p><img src='https://i0.wp.com/sheensay.ru/wp-content/uploads/2017/01/yoast-soc-facebook-load-image.png' width="100%" loading=lazy loading=lazy></p> <h3>How to remove rel prev next from head</h3>/** * Yoast: Remove Prev Next for archives */ add_filter("wpseo_prev_rel_link", "__return_false"); add_filter("wpseo_next_rel_link", "__return_false"); // Redirect /page/2, /page/3, etc. to the main first page of the category (category) add_action("pre_get_posts", function ($query) ( // If we are on the archives page, on pagination page 2 and higher, and there is also a category name if ($query -> is_archive && $query -> query["paged"] > 1 && $query -> query["category_name"]) ( // Redirect to the main page of the category wp_redirect(site_url($query -> query["category_name"]), 301); exit ; ) )); <h3>How to enable article:published_time and article:modified_time</h3> <p>By default, Yoast in Open Graph displays the publish date and modification date only for Posts. To enable them for other pages or pages, you can use the following code:</p><p>// Publish date and modification date for pages add_filter("wpseo_opengraph_show_publish_date", function () ( if (is_singular("page")) return true; return false; ));</p><p>And with the following code we can enable the display of article:published_time and article:modified_time for anything at all:</p><p>Add_filter("wpseo_opengraph_show_publish_date", "__return_true");</p><h2>Yoast SEO and Woocommerce</h2> <p>There is a special paid plugin for WooCommerce, a description is available at https://yoast.com/wordpress/plugins/yoast-woocommerce-seo/. At the moment, it costs $49. <br>In addition to the standard Yoast SEO features, it allows you to:</p> <ul><li>Increase the number of shares on Pinterest</li> <li>Use bread crumbs ( <b>breadcrumbs</b>) from Yoast instead of standard WooCommerce</li> <li>Guarantees excellent <a href="https://viws.ru/en/kak-pravilno-vosstanovit-rabochii-stol-na-noutbuke-poshagovaya.html">working together</a> Yoast SEO and WooCommerce</li> <li>Deletes <a href="https://viws.ru/en/kak-udalit-nenuzhnuyu-stranicu-v-vorde-kak-udalit-stranicu-v.html">unnecessary pages</a> from the sitemap sitemap.xml and gives indexing priority to the necessary pages</li> </ul><h2>Yoast or All In One Seo Pack, which plugin to choose</h2> <p>I would definitely choose <b>Yoast SEO</b>, since it contains everything you need that All In One does not <a href="https://viws.ru/en/plagin-all-in-one-seo-pravilnaya-nastroika-all-in-one-seo-pack-plagina-dlya-wordpress.html">SEO Pack</a>, and what you need to add third-party plugins:</p> <ol><li>Site map <b>sitemap.xml</b>;</li> <li>Remove /category/ from URL;</li> <li>bread crumbs <b>Breadcrumbs</b>.</li> </ol><h2>How to Import Metadata into Yoast SEO</h2> <p>Let's say you are transferring a website from an old engine to WordPress. Also, let's say we have a table articles in the database, which has columns with the data we need: meta_title , meta_description and meta_keywords columns. Also, let's say that the articles table has an ID column that corresponds to the ID of the post in the WordPress database. <br>If you need to bulk enter Yoast SEO metadata for your articles, you can use the following code. It can be registered in or created.</p><p>Add_action("admin_action_sheensay_import_yoast_meta", function() ( current_user_can("manage_options") or exit; // Only the administrator can make a request global $wpdb; // Create a database request $sql = "SELECT articles.meta_title, articles.meta_description, articles.meta_keywords, articles.ID, wp_posts.ID FROM articles " . " INNER JOIN wp_posts " . " ON articles.ID = wp_posts.ID " . " AND wp_posts.post_type = "post" " . " LIMIT 0, 10"; $rows = $wpdb->get_results($sql); exit(print_r($rows)); // Output the query result to the database. To import, you need to comment out or delete the line foreach ($rows as $row) ( update_post_meta ($row->ID, "_yoast_wpseo_title", $row->meta_title); // Write meta title update_post_meta($row->ID, "_yoast_wpseo_metadesc", $row->meta_description); // Write meta description update_post_meta($); row->ID, "_yoast_wpseo_metakeywords", $row->meta_keywords); // Write meta keywords ) printf("%d positions imported. <br>", count($rows)); exit; ));</p><p>Now you can open the URL http://example.com/wp-admin/admin.php?action=sheensay_import_yoast_meta , you will see the result of the request. Try clearing the $sql limit of LIMIT 0, 10" or increasing it, for example LIMIT 0, 1000 , then check the result by reloading the page.</p> <blockquote class="note"><p>LIMIT 0, 1000 means "select 1000 records starting from position 0". This way you can break the import into portions. The following will be:</p> <ol><li>LIMIT 0, 1000</li> <li>LIMIT 1000, 1000</li> <li>LIMIT 2000, 1000</li> <li>and so on until the end</li> </ol></blockquote> <p>Once you are sure that the request produces the required data, comment out or delete the line exit(print_r($rows)); , then reload the page. You will see how many rows are imported.</p> <blockquote class="note"><p>If there is too much data, the script may end with an error; it simply may not have enough time to execute. In this case, try either increasing the maximum PHP execution time or . <br>If the execution time cannot be increased, try feeding the data in portions, changing the limit: for example, LIMIT 0.100 first iteration, LIMIT 100.100 second, LIMIT 200.100 third, and so on.</p> </blockquote></blockquote> <script>document.write("<img style='display:none;' src='//counter.yadro.ru/hit;artfast_after?t44.1;r"+ escape(document.referrer)+((typeof(screen)=="undefined")?"": ";s"+screen.width+"*"+screen.height+"*"+(screen.colorDepth? screen.colorDepth:screen.pixelDepth))+";u"+escape(document.URL)+";h"+escape(document.title.substring(0,150))+ ";"+Math.random()+ "border='0' width='1' height='1' loading=lazy loading=lazy>");</script> </div> <div class="comment_box" id="comments"> </div> </div> <div id="sidebar"> <div class="widget widget_nav_menu" id="nav_menu-2"> <div class="menu-mainmenu-container"> <ul id="menu-mainmenu-2" class="menu"> <li class="submenu"><a href="https://viws.ru/en/category/internet/">Internet</a> </li> <li class="submenu"><a href="https://viws.ru/en/category/programs/">Programs</a> </li> <li class="submenu"><a href="https://viws.ru/en/category/instructions/">Instructions</a> </li> <li class="submenu"><a href="https://viws.ru/en/category/browsers/">Browsers</a> </li> <li class="submenu"><a href="https://viws.ru/en/category/windows-10/">Windows 10</a> </li> <li class="submenu"><a href="https://viws.ru/en/category/android/">Android</a> </li> <li class="submenu"><a href="https://viws.ru/en/category/ios/">iOS</a> </li> <li class="submenu"><a href="https://viws.ru/en/category/communication/">Connection</a> </li> </ul> </div> </div> <div class="widget"> <div class="heading star">The last notes</div> <div class="popular_posts"> <div class="news_box"> <a href="https://viws.ru/en/zhidkoe-nano-steklo-dlya-telefona-zhidkaya-zashchita-dlya-ekrana-smartfona.html" class="thumb"><img width="95" height="95" src="/uploads/87adde78af1b9560d215c3b38840a137.jpg" class="attachment-mini size-mini wp-post-image" alt="“Liquid protection” for smartphone screens: true or fake?" sizes="(max-width: 95px) 100vw, 95px" / loading=lazy loading=lazy></a> <div class="element"> <div class="title"> <a href="https://viws.ru/en/zhidkoe-nano-steklo-dlya-telefona-zhidkaya-zashchita-dlya-ekrana-smartfona.html">“Liquid protection” for smartphone screens: true or fake?</a> </div> </div> </div> <div class="news_box"> <a href="https://viws.ru/en/internet-byfly-lichnyi-kabinet-lichnyi-kabinet-baiflai-dostupnye-deistviya.html" class="thumb"><img width="95" height="95" src="/uploads/60212098c6e9f96c8182b3195ef33b3e.jpg" class="attachment-mini size-mini wp-post-image" alt="Internet byfly personal account" sizes="(max-width: 95px) 100vw, 95px" / loading=lazy loading=lazy></a> <div class="element"> <div class="title"> <a href="https://viws.ru/en/internet-byfly-lichnyi-kabinet-lichnyi-kabinet-baiflai-dostupnye-deistviya.html">Internet byfly personal account</a> </div> </div> </div> <div class="news_box"> <a href="https://viws.ru/en/chem-otkryt-boot-wim-otkrytie-wim-failov-struktura-faila-izobrazheniya-wim.html" class="thumb"><img width="95" height="95" src="/uploads/4d12234af41c69538319a628414bc760.jpg" class="attachment-mini size-mini wp-post-image" alt="How to open boot wim. Opening WIM files. WIM Image File Structure" sizes="(max-width: 95px) 100vw, 95px" / loading=lazy loading=lazy></a> <div class="element"> <div class="title"> <a href="https://viws.ru/en/chem-otkryt-boot-wim-otkrytie-wim-failov-struktura-faila-izobrazheniya-wim.html">How to open boot wim. Opening WIM files. WIM Image File Structure</a> </div> </div> </div> <div class="news_box"> <a href="https://viws.ru/en/skachat-hromium-skachat-hromium-ustanovit-brauzer-hromium.html" class="thumb"><img width="95" height="95" src="/uploads/cbe5abfed43fc21803385205ca90e702.jpg" class="attachment-mini size-mini wp-post-image" alt="Download chromium Install chromium browser" sizes="(max-width: 95px) 100vw, 95px" / loading=lazy loading=lazy></a> <div class="element"> <div class="title"> <a href="https://viws.ru/en/skachat-hromium-skachat-hromium-ustanovit-brauzer-hromium.html">Download chromium Install chromium browser</a> </div> </div> </div> <div class="news_box"> <a href="https://viws.ru/en/na-iphone-ne-rabotaet-vai-fai-pochemu-tak-proishodit-i-kak-s-etim.html" class="thumb"><img width="95" height="95" src="/uploads/29376b41d023a7640d9c0c7a3b2a5c90.jpg" class="attachment-mini size-mini wp-post-image" alt="Wi-Fi does not work on iPhone. Wi-Fi turns on on iPhone 4s." sizes="(max-width: 95px) 100vw, 95px" / loading=lazy loading=lazy></a> <div class="element"> <div class="title"> <a href="https://viws.ru/en/na-iphone-ne-rabotaet-vai-fai-pochemu-tak-proishodit-i-kak-s-etim.html">Wi-Fi does not work on iPhone. Wi-Fi turns on on iPhone 4s.</a> </div> </div> </div> </div> </div> <div class="widget"> <div class="heading star">Popular</div> <div class="popular_posts"> <div class="news_box"> <a href="https://viws.ru/en/chto-delat-esli-fleshka-v-kompyutere-postoyanno-to-propadaet.html" class="thumb"><img width="95" height="95" src="/uploads/c1b2e022ef0b940b6a4e0fb0c70e0fae.jpg" class="attachment-mini size-mini wp-post-image" alt="The flash drive keeps turning off and on" sizes="(max-width: 95px) 100vw, 95px" / loading=lazy loading=lazy></a> <div class="element"> <div class="title"> <a href="https://viws.ru/en/chto-delat-esli-fleshka-v-kompyutere-postoyanno-to-propadaet.html">The flash drive keeps turning off and on</a> </div> </div> </div> <div class="news_box"> <a href="https://viws.ru/en/standartnyi-nagruzochnyi-test-1s-standartnyi-nagruzochnyi-test.html" class="thumb"><img width="95" height="95" src="/uploads/2bc88c7460c0c6dc56bf8fa04d4ff3fc.jpg" class="attachment-mini size-mini wp-post-image" alt="Standard load test" sizes="(max-width: 95px) 100vw, 95px" / loading=lazy loading=lazy></a> <div class="element"> <div class="title"> <a href="https://viws.ru/en/standartnyi-nagruzochnyi-test-1s-standartnyi-nagruzochnyi-test.html">Standard load test</a> </div> </div> </div> <div class="news_box"> <a href="https://viws.ru/en/aliekspress-ne-ishchet-telefony-chto-delat-esli-propali-zakazy-v-lichnom-kabinete.html" class="thumb"><img width="95" height="95" src="/uploads/3ea3b7507423c9b8858724e854f269b5.jpg" class="attachment-mini size-mini wp-post-image" alt="What to do if orders in your personal account on Aliexpress are missing?" sizes="(max-width: 95px) 100vw, 95px" / loading=lazy loading=lazy></a> <div class="element"> <div class="title"> <a href="https://viws.ru/en/aliekspress-ne-ishchet-telefony-chto-delat-esli-propali-zakazy-v-lichnom-kabinete.html">What to do if orders in your personal account on Aliexpress are missing?</a> </div> </div> </div> </div> </div> <div class="widget"> <div class="heading">News</div> <div class="business_news"> <div class="news"> <div class="date">2024-05-23 01:40:21</div> <a href="https://viws.ru/en/ne-pokazyvaet-ekran-v-skaipe-igrah-reshenie-problem-s-demonstraciei.html" class="title">Solving problems with screen sharing on Skype</a> </div> <div class="news"> <div class="date">2024-05-23 01:40:21</div> <a href="https://viws.ru/en/smart-tv-vybor-operacionnoi-sistemy-umnogo-televizora-operacionnaya.html" class="title">Tizen operating system in Samsung Smart TV Webos operating system in lg TVs</a> </div> <div class="news"> <div class="date">2024-05-23 01:40:21</div> <a href="https://viws.ru/en/kolichestvo-argumentov-funkcii-esli-prilozheniya-microsoft-excel-chto-zhe-takoe-funkciya-v.html" class="title">What is a function in Excel?</a> </div> <div class="news"> <div class="date">2024-05-23 01:40:21</div> <a href="https://viws.ru/en/gde-skachat-virtual-tuner-dlya-nastroiki-gitary-programmy-dlya-nastroiki-gitary-na.html" class="title">Programs for tuning a guitar on a computer</a> </div> <div class="news"> <div class="date">2024-05-22 01:37:38</div> <a href="https://viws.ru/en/skachat-prilozhenie-gugl-plei-na-noutbuk-besplatnaya-ustanovka-na.html" class="title">Free installation of play store on laptop</a> </div> </div> </div> <div class="widget ai_widget" id="ai_widget-5"> <div class='dynamic dynamic-13' style='margin: 8px 0; clear: both;'> </div> </div> </div> </div> </div> </div> <div id="footer"> <div class="fixed"> <div class="inner"> <div class="footer_l"> <a href="https://viws.ru/en/" class="logo" style="background:none;">viws.ru</a> <div class="copyright"> <p>viws.ru - All about modern technology. Breakdowns, social networks, internet, viruses</p> <p><span>2024 - All rights reserved</span></p> </div> </div> <div class="footer_c"> <ul id="menu-topmenu-1" class="nav"> <li><a href="https://viws.ru/en/feedback.html">Contacts</a></li> <li><a href="">About the site</a></li> <li><a href="">Advertising on the website</a></li> </ul> <div class="footer_menu"> <ul id="menu-nizhnee-1" class=""> <li id="menu-item-"><a href="https://viws.ru/en/category/internet/">Internet</a></li> <li id="menu-item-"><a href="https://viws.ru/en/category/programs/">Programs</a></li> <li id="menu-item-"><a href="https://viws.ru/en/category/instructions/">Instructions</a></li> <li id="menu-item-"><a href="https://viws.ru/en/category/browsers/">Browsers</a></li> </ul> <ul id="menu-nizhnee-2" class=""> <li id="menu-item-"><a href="https://viws.ru/en/category/internet/">Internet</a></li> <li id="menu-item-"><a href="https://viws.ru/en/category/programs/">Programs</a></li> <li id="menu-item-"><a href="https://viws.ru/en/category/instructions/">Instructions</a></li> <li id="menu-item-"><a href="https://viws.ru/en/category/browsers/">Browsers</a></li> </ul> </div> </div> </div> </div> </div> </div> <script type="text/javascript">jQuery(function($) { $(document).on("click", ".pseudo-link", function(){ window.open($(this).data("uri")); } );} );</script> <script type='text/javascript' src='https://viws.ru/wp-content/plugins/contact-form-7/includes/js/scripts.js?ver=4.9.2'></script> <script type='text/javascript' src='https://viws.ru/wp-content/plugins/table-of-contents-plus/front.min.js?ver=1509'></script> <script type='text/javascript' src='https://viws.ru/wp-content/themes/delo/assets/scripts/theme.js'></script> <script type='text/javascript'> var q2w3_sidebar_options = new Array(); q2w3_sidebar_options[0] = { "sidebar" : "sidebar", "margin_top" : 60, "margin_bottom" : 200, "stop_id" : "", "screen_max_width" : 0, "screen_max_height" : 0, "width_inherit" : false, "refresh_interval" : 1500, "window_load_hook" : false, "disable_mo_api" : false, "widgets" : ['text-8','ai_widget-5'] } ; </script> <script type='text/javascript' src='https://viws.ru/wp-content/plugins/q2w3-fixed-widget/js/q2w3-fixed-widget.min.js?ver=5.0.4'></script> <script async="async" type='text/javascript' src='https://viws.ru/wp-content/plugins/akismet/_inc/form.js?ver=4.0.1'></script> </body> </html>


