Working with shadow copies of Windows. Previous versions of files. Recovering files from Windows shadow copies
It is not always necessary to install additional third-party programs in Windows 7 in order to recover deleted data or data that has been overwritten. Seven allows you to do this using your own means. If you have carelessly deleted or overwritten files, say Microsoft Office documents or family photos, and want to restore them or return them to their original state, then do not rush to install special software for this procedure.
Windows 7 data recovery is possible using the system itself; for this, Microsoft developers have added a convenient and easy-to-use tool to this version of the operating system - volume shadow copies (VVS for short). Using shadow copies, you can quickly, with just a couple of mouse clicks, revive deleted or overwritten files stored on your computer’s hard drive.
Do not confuse shadow copies with a full backup of Windows 7. This tool does not replace a full backup, but simply stores duplicates of those files that have been changed or deleted. In the “seven” this tool works on the principle of recovery points. You all probably know about these points, with the help of which you can roll back the system to a certain point. So, the VVS function creates shadow copies of data, for example, before updating the OS. This is a very handy Windows 7 data recovery tool, but only if you accidentally deleted and overwrote files. Volume Shadow Copy Service can restore up to sixty-four previous copies of each deleted or modified file.

Recovering files using Windows 7 shadow copies
To begin restoring files from shadow copies, follow these steps: Right-click on the desired file or directory in which the data to be recovered is located. Then, in the context menu that opens, select “Properties”, then go to the “Previous Versions” tab. If there are shadow copies for a file or folder on the system, you will see a list of them. Unfortunately, we could not find shadow copies of files in our system, since it is practically fresh, that is, installed specifically for the site.

To restore a file from the desired copy, simply double-click on it with the left mouse button, and it will be restored.
It is worth noting that the user can customize this tool. For example, you can determine where shadow copies of files are stored on your hard drive. In addition, by pressing the “Win+Pause” key combination and going to the “System Protection” section, you can tell Windows 7 to protect disks or hard drive partitions and determine for each of them the amount of memory that the OS can use for this.
There are not many ways to recover files encrypted by a ransomware attack without paying a ransom for them. If we're lucky, there may be some free tools to recover them, but a more realistic option is restoring your files from your backups. However, not everyone has backup copies of their files, although Windows offers a very useful feature known as Shadow Copy, which, in a nutshell, is a backup of your files. Cyber criminals have known about it for a long time, and therefore, a few months after ransomware attacks became popular, the first thing they do when they infect your computer is delete the shadow copy of your files before starting to encrypt your information.
There are a number of technologies that can be used to stop ransomware attacks: some are almost useless, such as signatures or heuristics (these are the first things malware authors check before releasing them), others can sometimes be more effective, but even a combination All of these techniques do not guarantee that you will be protected from all such attacks.
More than 2 years ago, the antivirus laboratory PandaLabs used a simple but quite effective approach: if some process tries to delete shadow copies, then most likely (but not always, by the way), we are dealing with a malicious program, and most likely with cryptographer These days, most ransomware families remove shadow copies, because if you don't, people won't pay the ransom when they can recover their files for free. Let's look at how many infections were stopped in our laboratory thanks to this approach. It is logical to assume that this number should grow exponentially, because The number of ransomware attacks using this technique is also growing rapidly. For example, here's the number of attacks we've blocked over the past 12 months using our approach:
But in the diagram we see exactly the opposite of what we expected. How is this possible? In fact, there is a very simple explanation for this “phenomenon”: we use this approach as a “last resort” when no other security techniques could detect anything suspicious, and therefore this rule is triggered, which blocks the ransomware attack. We also use this approach for internal purposes, as a result of which we can analyze in more detail those attacks that were blocked at the “last line”, and then improve all previous security levels. We also use this approach to evaluate how well or poorly we are stopping ransomware: in other words, the lower the values, the better our core technologies perform. So, as you can see, the efficiency of our work is increasing.
Original article.
Hello, friends! So I once again got to pencil and paper. More precisely, to a laptop and a virtual machine. Today I want to talk about such an absolutely interesting and useful phenomenon as previous versions of files or Windows shadow copies.
Let's demonstrate in practice how to work with shadow copies.
How to recover deleted files from Windows shadow copies
Here we have a Windows desktop. There are two folders on it: screen and zip, which we will delete and restore. The third folder is ShadowExplorer - the program with which I will work with shadow copies. I am the program, take it and use it! So, since previous versions of files (shadow copies) use recovery checkpoints, we will need to create at least one point. To do this, go to the system properties, to the “System Protection” tab. It is important for us that the protection settings have the “Enabled” mode, in the settings you can also set the reserved disk space as a percentage for these checkpoints, and also instantly create a recovery point (the “Create” button) 
Click “Create” and enter the name of the control point:  The process of creating a checkpoint ( further – CT) takes some time.
Of course, you can resort to data recovery programs, especially since the object was deleted very recently and there is a possibility of restoring it. But what if this is not the case? What if data recovery programs don't give the desired results?
Data from “ shadow copies“. Let's launch the ShadowExplorer program. We will see drop-down lists in the main window - in the first - the disk on which shadow copies are created, in the second - the date of creation of the system snapshot.
Since we have a single copy of the system snapshot, like the logical partition, the data we need will open. In the directory tree, expand the desired directory and see that our now deleted directories are still there! Right-click on the desired directory and click “Export”. 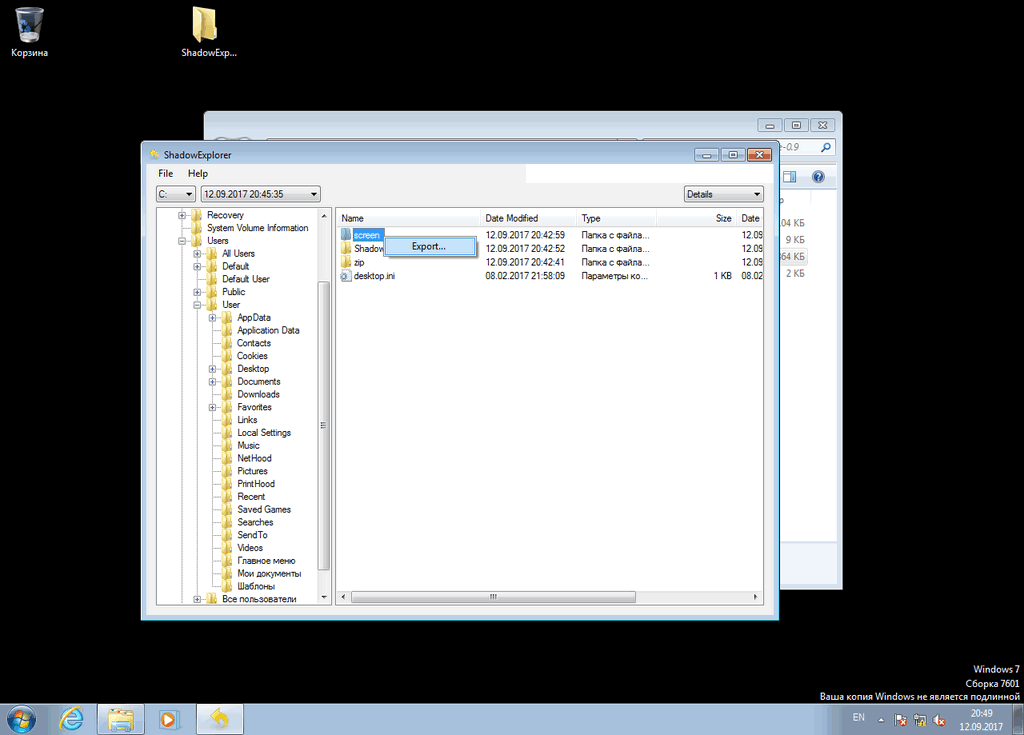 And now, the object has been restored! Of course, this is not a universal method, but nevertheless, it is quite viable and useful.
Where are Windows Shadow Copies stored?
Shadow copies of Windows are stored in the “ System Volume Information“, in files with names that look like (GUID)(GUID2), Where (GUID)– copy identifier, (GUID2)– section identifier.
Working with shadow copies using shadowcopyview
Nirsoft has an excellent tool that allows you to work with shadow copies quite conveniently. The name of this program is ShadowCopyView. I am also attaching it to the article; if you wish, you can download the current version from the developers’ website - it is free.
The main window displays shadow copies (at the top), and their contents below. There is also a context menu item “ Copy Selected Files To…“, which allows you to extract content from the shadow copy.
Working with shadow copies from the command line
But what to do if you don’t have any tools at hand? No problem, you can mount the shadow copy volume using the command line and open the shadow copy as a directory in Explorer.
First of all, we need to get a list of shadow copies:
All shadow copies will be displayed in a similar form. Here we are interested in the creation date and the “Shadow copy volume” field. Let's copy this line and create a symbolic link to this directory:
> mklink /D C:\old \\?\GLOBALROOT\Device\HarddiskVolumeShadowCopy1\
Attention! The slash at the end is required; I took the screenshot without the slash and was unable to enter the directory. The mklink command creates a link C:\old to the directory (key /D) of the backup copy.
Let's see what it looks like in Explorer:
But this does not mean at all that we now have 2 times more information recorded on the disk. This information is marked as free, but it will not be overwritten until the free space allocated during the backup service setup phase is exhausted. Remember, we indicated there what percentage of the disk to allocate for backups. Only after all the remaining space is exhausted will the shadow copies of the changed files be overwritten.
Friends! Join our
Volume Shadow Copy Service (VSS) stores recovery points and supports file backup and recovery using a snapshot mechanism called shadow copies. VSS creates static copies of open files and applications that are otherwise too volatile to be backed up.
It sounds convincing, but VSS takes up a lot of disk space. To get started, use the "vssadmin" command to see how much space the current volume shadow copies are using with the "vssadmin list shadowstorage" command. (For more information, click the "Start" button, type cmd in the search bar, and then type vssadmin /? for help.)
In the screenshot below, recovery points for drives C: and D are activated; There are also shadow copies on these same disks. Let's see how much disk space is wasted on shadow copies of these drives: 22.079 GB on drive D: (total volume: 149 GB; volume occupied by shadow copies = 15.5%) and 64.448 GB on drive C: (total volume: 465 GB; volume occupied by shadow copies = 14.9%).
At one point, we found only 230 GB of free space on the 465 GB C: drive, even though we knew for sure that it contained only 120 GB of files. The search for the missing 115 GB led us to the Volume Shadow Copy Service. We again used the "vssadmin list shadows" command (we did not show the result here because it is very long: it lists all the shadow copies on the disk) and found out that one of the shadow copies takes up 85 GB! Since we were recently copying a large collection of music files from an old 200GB USB drive to our new, faster SATA drive, VSS apparently created a shadow copy of those files at the same time it copied them to a user-accessible folder.
How to get rid of this unnecessary shadow copy? By default, Vista allocates 15% of disk space to shadow copies, but the operating system does not strictly limit the total size of shadow copies. If the shadow copy needs more space, Vista will be happy to provide it. Using the vssadmin command line utility, you can set a clear disk space limit for shadow copies. Here's how to do it:
Vssadmin resize shadowstorage /For=T: /On=T: /MaxSize=Num
Instead of the letter "T", substitute the name of your disk and replace "Num" with a number equal to 15% of the capacity of this disk. In the case of our C: drive, this command will look like this:
Vssadmin resize shadowstorage /For=C: /On=C: /Maxsize=69GB
Before using this trick, take a backup of your system and create a restore point immediately after rebooting your system. After running the above command, Vista automatically deletes the oldest restore points first until it reaches the limit you set.
The previous article talked about the backup capabilities of Windows 7 - creating file archives and disk images. This article is devoted to restoring files from an archive and system from a disk image, as well as restoring previous versions of files.
On this page:
Recovering files from an archive
In Windows 7, you can restore files from an archive using the Control Panel item.

In the main window of the Control Panel item, there are three file recovery options:
- Recover my files- allows you to select individual files and folders for recovery.
- Recover files of all users- also allows you to select individual files and folders, but for all computer users.
- Select another backup to restore files- allows you to restore files of all users, as well as select an archive located on a network drive.
Below we discuss the recovery of “my” files. The first window of the File Recovery Wizard is full of options, so let's go in order.

Selecting the archive date. By default, the most recent archive is used, which the system reports in the window. You can choose an earlier date - for example, if you need an older copy of the file.

The interface seems to be designed for very frequent archiving - by default, archives for the last week are displayed (in my opinion, it makes more sense to immediately display archives for the month), but you can select older ones, of course.
Search files. This is a very convenient tool that allows you to instantly find the files you need in the archive.

Please note that the window uses an explorer interface, i.e. in the search results you can select the desired file property columns and sort by them (however, there is no grouping).
Adding files and folders. Along with the search, it is possible to add individual files and folders - each action has its own button.
List of recoverable files. The names of added folders and individual files are displayed.
Removing files and folders from the list. Files and folders are deleted only from the list of recoverable ones, but not from the archive.
Proceed to selecting the destination for the restored files. You can recover files:
- to the original location. In this case, if a file with the same name exists, the system will display a standard dialog asking you to overwrite the file, save both copies in a folder, or refuse copying.
- to the location you specified. In this case, it is possible to restore files while maintaining the folder structure, starting from the archive root (highlighted in the figure).

Having decided on the final location of the files to be restored, click the button Restore.
Restoring previous versions of files and folders
Imagine that while working with a document, you deleted part of it, saved the file and closed the application. And then they suddenly remembered that they had deleted something very important. Or imagine that you deleted a file past the trash can, and a month later you really needed it. In both cases, you have a good chance to restore previous versions of files that can be saved in Windows 7 in two ways:
- file archives created using Windows Backup
- shadow copies created by System Protection using Volume Shadow Copy Service
Restore previous versions is accessed from the file or folder properties on the tab Previous versions.
Restoring previous versions of files from archives
If the file is included in the archive using Windows backup tools, in its properties on the tab Previous versions Archiving.

If, when restoring a file, the system detects that a file with the same name already exists, you will be prompted to overwrite the existing file, save it with a different name, or refuse recovery.
Of course, the same file can be restored from the control panel, but doing this from the file properties may be more convenient and faster.
Recovering previous versions of files and folders from shadow copies
In order to be able to restore files and folders from shadow copies, system protection must be working, which is turned on for each disk separately. It may not be too obvious, but system protection settings control the operation and amount of disk space for the Volume Copy Shadow Copy service, which provides storage for system restore points and shadow copies of files and folders.
Shadow copies are not stored indefinitely. They are allocated a certain percentage of disk space, and when the specified limit is reached, old copies are replaced with new ones. Since it talks about system protection and recovery, here I will only consider restoring previous versions.
From shadow copies you can restore previous versions:
- separate files
- file folders
Restoring an individual file from a shadow copy is almost the same as restoring a file from an archive. In the file properties tab Previous versions you will see a list of versions, and the location will be indicated Restore point.

Unlike a file saved in an archive, in this case you will have options to open and copy the file to a folder of your choice.
In addition to individual files, you can restore folders from shadow copies. The list of versions can be seen in properties folders on the tab Previous versions.

You can open the folder, copy it to another location, or restore it to the old location. When restoring, as in the case of files from archives, the system will warn you if there is a file with the same name in the folder.
Recovering deleted files from shadow copies
If you need to restore a previous copy of an existing file, just go to the tab in the file properties Previous versions. What to do if the file is deleted? You have two ways:
- folder recovery
- file search
From the shadow copy, you can restore the folder where the file was located, as described above. If you don't remember the exact location of a file, but have a rough idea of where it was in the folder tree, you can restore the parent folder.
However, before you restore the folder, you can try to find the deleted file using Windows Search. Let's look at the sequence of actions using an example. I deleted the file support_center01.png, and now I need it. I know which folder it was in, and I look for the file in it (and if I didn’t know the exact location, I would look in the nearest parent one).

Shadow copies are not indexed, and the deleted file is immediately excluded from the index, so the search does not find it. Therefore, you need to search in non-indexed places by clicking Computer. Searching for non-indexed files takes longer, but your patience will be rewarded.

In the shadow copies I found not only the PNG file I needed, but also a long-deleted BMP file with the same name, which I had forgotten about.
Why shadow copies may be missing
After reading about previous versions of files, you might want to check if they are being created on your system. If you didn't find any previous versions, it could mean that:
- system protection is disabled, i.e. there are no restore points where previous versions of system files are stored
- Little disk space is allocated to protect the system, so there is not enough space for shadow copies of user files
- the file or folder contents have not changed - in this case, shadow copies are not created
To summarize the story about file recovery, I want to emphasize that Windows technologies are interconnected. You'll have the best chance of recovering your files if you use Windows Backup along with System Protection. You can increase these chances by creating backup system images, the restoration of which will be discussed below.
Restoring the system from a previously created image
During the installation of Windows 7, a service partition is automatically created on your hard drive containing the Windows RE (Recovery Environment). Using this section you can:
- boot into recovery environment from hard drive
- create a system repair disk and boot from it
By booting into the recovery environment, you can restore the system from a pre-created image.
Attention! For a detailed description of creating a system repair disc, the recovery environment, and options for booting into it, see the article Using the Windows RE Recovery Environment in Windows 7. Below we discuss only booting into Windows RE from a hard drive.
Booting to Recovery Environment from Hard Drive
To enter the menu Additional download options, press F8 after turning on the computer, but before loading the operating system.

Select the first menu item - Troubleshooting your computer and press Enter. The Windows Recovery Environment will launch, where the first thing you will be asked to do is select your keyboard layout.

Select the language in which your administrative account password is set, as you will be asked to enter it in the next step.

After entering your password, you will see a menu with recovery options, one of which is Restoring a system image.
Restoring a system image from Windows RE
Windows RE provides various system recovery tools.


You can also choose a different recovery image. After selecting an image, click the button Further to begin the recovery process.

You can format disks and create partitions, and you have the option to exclude disks from the formatting operation (the disk containing the archive image is automatically excluded). Also, you can simply restore the image to an existing system partition. Behind the button Additionally There are two more options hidden.

Once you have decided on your recovery options, click Further, and then, in the last window of the wizard, click the button Ready. Windows 7 will warn you that all data will be deleted from the partition and begin the recovery process.

If you don't have a Windows 7 installation disc, be sure to create a system repair disc. This disk will allow you to restore a system backup image even if the Windows RE service partition on your hard drive is damaged.


