BIOS setup. BIOS (CMOS) Setup program and its main features. How to boot from an “installation” DVD or flash drive - BIOS setup in pictures
In order to follow the instructions below, you will need the bootable USB flash drive itself. The process of creating it is quite simple. You will need the flash device itself, software and data that you want to use when starting your personal computer.
The UltraISO program will be used during the preparation process.
Preparation steps:
- Download the program to your computer using any browser convenient for you.
- After the download is complete, start the installation process and follow the instructions provided by the Wizard window.


- Next, when the software installation is complete, you should open the program and insert your flash drive into the port of the system unit.

- In the program window, select the “File” tab, where using the “Open” item you open the data you need to record.

- In the “Boot” tab, left-click on the “Burn Hard Disk Image” item.

- In the window that appears, find the “Disk Drive” selection line, where the name of the flash device should be.
- To complete the procedure for creating a bootable USB flash drive, you need to left-click on the “Burn” button.

Working through the selection window
After you have created a bootable USB flash drive, connect it to a free port on the system unit and restart. When it starts, you need to methodically press the “F11” key; if nothing happens, then perhaps you have a different BIOS version, and you can try using the “F8”, “F10” or “F12” keys.
A window should appear to select how to boot an external device, where you will need to use the arrows on the keyboard to select the name of the flash drive.

Work throughBIOS
If you have problems with the previous method, then there is a reliable option - working through.
On a note! BIOS versions are different and each of them requires a special series of actions, but the operating principle remains the same. In order to understand which version of BOIS you have on your PC, you must first call up the main menu and look at the similarities with the versions presented below.
To get started, you need to insert the flash drive into any free port in the system unit, restart the computer and frequently press the “Del” or “F2” key when the computer starts. If nothing happened and the operating system started up, then restart the computer and look at the prompts, which should contain the names of the keys, for example “Tab” or “F1”. This already depends on the BIOS version and manufacturer.

VersionAMI BIOS
If, after manipulating the keys, this image appears on your monitor, then, undoubtedly, the BIOS version is installed on your personal computer - AMI.

Important! Before setting launch priority, you need to verify the functionality of the two functions.

Now it’s time to set boot priorities:

VersionAWARD BIOS
Enter the BIOS using the steps described earlier. If this picture is on your screen, then follow the following plan:
- Go to the “Integrated Peripherals” line using the arrow keys on your keyboard. The "USB Controller" and "USB 2.0 Controller" functions must be set to "Enable".


- Next, go back up a level by pressing the “Esc” button once and select “Advanced BIOS Features.”

- After entering the menu from the list of available functions, you will need the “Hard Disk Boot Priority” item, where you will set your flash memory as a priority for loading. This is done in a simple way. Using the arrows, select the name of the flash drive and by pressing the “+” key, raise this name to the first position.

- You need to press "Esc" to perform the last action. Find the “First Boot Device” item in the “Advanced BIOS Features” section, and change the previous value to “USB-HDD”.

- Then it remains to exit the BIOS, while saving the settings.
VersionPhoenix-Award Bios
After entering the BIOS, you should have the following picture if the BIOS version is Phoenix-Award.

The procedure is almost the same as in the previous version:

Video - How to set boot from a flash drive in BIOS
Hello, friends! Today we'll talk about how to set up bios computer. BIOS is the basic input/output system. It starts working as soon as you press the computer's power button. The BIOS identifies and tests all components connected to the motherboard. If something is wrong, you will know about it immediately. If all connected devices pass the test, their operating settings are determined and control is transferred to the operating system loader. These settings can be manipulated, thereby optimizing the performance of the computer. There are quite a lot of BIOS settings. It is not necessary to know all of them, but you can and should know the basic settings. In this article I will tell you everything I know and what I use when setting up the BIOS.
Naturally, you need to start with how to enter the BIOS. To do this, it is advisable to read the instructions for the motherboard or computer. I recently did this myself. There were so many interesting things there. You can also carefully look at the monitor screen when the computer boots. Usually at the bottom there will be an inscription which key must be pressed to get into the BIOS.
The most common keys are Del, F2, F10, Esc. If you can't use these keys, you need to look at the instructions.
When you enter the BIOS you will immediately find yourself in EZ Mode (see picture below)

This mode is most likely made in order to adjust various BIOS settings without going into advanced mode.
Let's look at everything in order.
Top left you see the time and date in the system. By clicking on the gear, you can conveniently and clearly set the current values.
To the right is information about the motherboard model - H87M-E and BIOS version - 0604. I updated the version thanks to the previous article. Below is information about the processor and its clock speed. Below you can see the amount of RAM and the frequency in parentheses at which it operates.
Even further to the right there is a drop-down menu with a choice of BIOS language. Motherboards with 7 and 8 series chipsets now support the Russian language. Now changing settings will be even easier and clearer.
Below You can see information about the processor temperature and voltage. This information is updated in real time.
To the right you can find out almost all the information about the installed RAM. You see how many slots you have on the motherboard. Which of them have RAM modules installed? What is the volume of each model and at what frequency does the module operate by default?
From this information you can find out whether dual-channel mode is enabled or not. In this case, the memory modules are located in channel A and B, so dual-channel mode is enabled.
There may also be a drop-down menu with a choice of XMP profile. If the memory supports these profiles, you can immediately select the one you need. In our case, profile 1 is selected, in which the memory operates at a frequency of 1600 MHz.
Further to the right, information about installed fans is displayed. This motherboard has 3 connectors for connection. One of them is for the processor fan, the other two are chassis fans (case fans). Typically one is installed at the top of the rear wall of the case to exhaust warm air. Another of the chassis fans is installed at the bottom in the front to draw in cool air. You can read more about cooling your computer.
Below You can choose the system performance depending on your needs. It seems to me that if you select Energy Saving, the system will quickly reset the processor frequency and voltage, thereby saving energy. I usually choose Optimal.
Below we can use the mouse to change the download priority. This field shows all devices connected to the computer. By swapping them, you can simply boot from a flash drive or from an optical drive to install the operating system. I recommend installing your drive (SSD or HDD) in the first position and, if necessary, installing the OS (I hope these cases will be rare for you) using the boot menu. The latter can be called up when the computer boots using the F8 key.
At the very bottom there are buttons: Shortcut (F3), Advanced (F7), SATA Information, Boot Menu (F8) and Standard (F5)
The Shortcut button opens a list for quick access to the functions you select. These functions are selected from the advanced mode by pressing the F4 key or the right button on the item. In this case, a window appears in which you select where you want to add the selected item to bookmarks (Shortcut) or to the Favorites tab
The Advanced button allows you to enter the advanced BIOS setup mode.
The SATA Information button displays information about your drives connected to the SATA ports.
The Boot Menu button displays a menu in which you can choose to boot from a flash drive or from an optical disk to reinstall Windows, for example.
Default button - Allows you to reset the BIOS settings to default. The universal settings that were set by the motherboard manufacturer will be installed. With a 99.9% probability, the computer will work with these settings. So you don't have to worry about changing the settings. Need to try. If anything, return everything to default. (This does not apply to voltage settings)
These settings in the EZ Mode window should be enough for almost all inexperienced users. To save changes or cancel them, or enter Advanced mode, click on the button at the very top right

Select the desired item in the pop-up window
After we have selected Advanced Mode - Additional or Advanced we will decide, we immediately go to the Basic BIOS settings tab

The screen is divided into parts. On the left is information and settings that can be changed, on the top right is help and brief information on the selected item, on the bottom right is a hint on managing and changing settings. There are also two buttons on the right: Quick Note and Last Modified. The first opens a notepad in which you can make notes. The second displays the changes you made last time. This is very convenient, because if instability in the computer did not appear immediately, using this button you can see what you changed in order to return the changes back.
The access level displayed is Administrator. This means that we can change any BIOS settings. There is access at the user level, where the capabilities are very limited. In the Security section, you can set the Administrator and User passwords. After this, the password will need to be entered each time you enter the BIOS.
AI Tweaker tab for more precise tuning of your computer. Including for overclocking. The following items are highlighted in yellow: Processor frequency, RAM frequency, CPU cache frequency, DMI/PEG frequency and frequency of the graphics core built into the processor

Below are the options thanks to which we can change the values highlighted in yellow at the top of this tab.
Ai Overclock Tuner - allows you to select the XMP profile. In this case, the processor multiplier, base frequency and memory parameters will be adjusted automatically. In this case, we have a point below in which we can select the desired profile.
How to change item values? Point the mouse at the desired item and left-click on it. This will open a pop-up window with possible value options for the selected item. Select the one you need and confirm with the Enter key or the left mouse button. If you have problems with the mouse, see the tips at the bottom right.
There are many options in this tab, which is why a scroll bar appears. Scroll down and see the following items

GPU Boost is a technology from ASUS for overclocking the video core built into the processor. If you don't have a discrete video card, but want to get the most out of the built-in one, then it makes sense to use this option.
Below you can enable EPU power saving mode. This is probably the same as choosing the Energy Saving mode - in the EZ Mode window. Additional functions are included that will reduce energy consumption.
We leave the remaining options, especially power management, at default.
If you really want to speed up the system, you can try setting the timings or RAM delays a little lower in the section Managing DRAM timing parameters. At the very beginning there are the main timings, reducing which can speed up the system. Change one parameter at a time. Then reboot and test. It is advisable to use the RAM test.
At the very bottom there are voltage settings, which I don’t know much about, so I don’t touch them.
Additional BIOS settings
On the Advanced Settings tab, you can configure the hardware built into the motherboard

This tab consists of sections in each of which there are several sub-items. This is where the pictures with the new BIOS end. We will look at the example of an old BIOS for the P8H67-V motherboard

In this section we can see all the interesting information about the processor

Intel Adaptive Thermal Monitor - it seems to me that it allows you to monitor the processor temperature and, when it rises above a certain limit (usually 72-75 degrees Celsius), reduces the frequency until the temperature falls within normal limits. This often happens when the computer has not been cleaned of dust for a long time. The cooling system does not cope with its functions and overheats. The end result is a decrease in productivity. This feature keeps your processor from overheating, so leave this option enabled.
Hyper-threading is a feature that allows each physical processor core to run two processes at once. As a result, the operating system (in the task manager) sees twice as many cores. This has a great effect on performance, so if you have an Intel core i3 or Core i7, then leave this feature enabled.
Active Processor Cores - a function that allows you to set how many processor cores will be active. You can only disable physical cores. For example, Core i3 has two physical cores. you can leave one active. This will greatly reduce performance. We leave this ALL function as is.
I leave the points I miss as they are.
Intel Virtualization Technology - Intel virtualization technologies. Enable if you use virtual machines.
At the bottom there is also a section CPU Power Management Configuration, where I leave everything as is.
PCH Configuration in this section I leave everything as it is
SATA Configuration

Here I leave everything as is.
Onboard Devices Configuration
Configuration of devices located on the motherboard

HD Audio Controller - Enables HD audio output.
Front Panel Tupe - type of sound output to the front panel.
The following items (VIA Storage Controller and VIA Storage OPROM) are most likely needed to support IDE devices. I don’t know exactly, so I’ll leave it at default. (I disabled these functions and my computer started to boot 2 times faster. I did not expect such an effect)
Atheros Lan - allows you to disable the built-in network card.
Asmedia USB 3.00 Controller - function allows you to enable or disable the USB 3.0 controller
Asmedia USB 3.00 Battery Charging Support - allows you to charge devices from a USB 3.0 port. By default the feature is disabled. I’m not going to turn it on because when charging devices, a lot of power passes through the port and something can burn out.
In the Serial Port Configuration section, you can disable an unused serial port. COM port. It's almost never used anymore

Disable this feature
Restore AC Power Loss - allows you to set the computer to turn on after a power failure. You can set Power Off - then the computer will not turn on. If you set Power On, the computer will turn on as soon as the power is normalized. Interesting feature I will use. Computer power failures are not only harmful to your computer's components, but can also lead to data loss. Therefore it is advisable to use .
You can also set the computer to turn on using the Power On By PS/2 Keyboard and mouse - Power On By PS/2 Mouse. You can also set the computer to turn on from other devices

By default, all this is disabled. We leave it as is.
Monitor
This tab monitors system parameters. You can control the temperature of the processor and motherboard (no one I ask, no one knows where exactly this sensor is located, if you know, please write in the comments, I’ll add it to the article, everyone will be interested)

You can also see the rotation speeds of the fans connected to the motherboard here. All this is tracked by default, if you don’t need it, then any or all of them can be disabled by selecting the desired item, pressing Enter and selecting Ignore.
The BIOS has a function that controls fans - Q-Fan Control. You can control the CPU fan and case fans separately.
Using CPU Fan Speed Low Limit, you can set the minimum rotation speed of the processor fan. In theory, if it drops below there will be a warning and the computer will not turn on. My silent computer does not have a CPU fan, so I have to disable this feature.
CPU Fan Profile—sets fan control parameters. Silence is important to me, so I chose Silent
You can also see the voltage supplied to the processor along the +3.3V, +5V, +12V lines. You can track whether any voltage is outside the limits (it seems 5%). If it does, then you can think about replacing the power supply.

Bootup NumLock State - allows you to set the state of the Num Lock key. That is, the numeric keypad will be turned on or off when the computer turns on.
Full Screen Logo - if the option is enabled, you will be shown the logo of the motherboard or computer manufacturer while POST devices are being checked ( Power-On Self-Test). By default the option is enabled. If you want to see everything that happens during the scan, disable this option.
Wait For "F1" If Error - If the function is enabled, then if a failure or error is detected during the POST test, a warning will appear on the screen asking you to press F1 to continue loading or correct the problem.
Setup Mode - allows you to select the mode when you enter the BIOS. The default is EZ Mode. If you need to immediately be in advanced mode, stop the corresponding option.
Next, you can select the download priority. What will the computer boot from? You can choose to boot from a hard drive from a flash drive or from an optical drive.
I always select Boot Option #1 - my hard drive on which the operating system is installed. This, it seems to me, reduces the boot time of the computer. If you need to boot from another drive, then the Boot Menu, called up by pressing the F8 key when you turn on the computer, comes to the rescue.
In the Hard Drive BBS Priorities section, you can select which hard drive will be first. This will be the boot priority.
For example, you have two hard drives with Windows 7 and Windows 8. If you set the hard drive with Windows 8 as a priority and set boot from it in Boot Options #1, then Windows 8 will boot. To boot Windows 7, you will need to change the priority of the hard drives in Hard Drive BBS Priorities.
Floppy Drive BBS Priorities - you can select the priority of the flash drive. Let's say you have two flash drives. You set Boot Option #1 to boot from a flash drive. And in order to boot from the desired flash drive, you need to select it first in Floppy Drive BBS Priorities.
This confuses me too, so I use the boot menu via F8.
Service
In the Service or Tool section there are three sections: ASUS EZ Flash 2 Utility, ASUS SPD Information and ASUS O.C. Profile

The ASUS EZ Flash 2 Utility is designed to help you update your BIOS. It was described in detail in the previous article.
The ASUS SPD Information utility allows you to view information about the installed RAM. Volume, frequency at which it operates, serial number, date of manufacture, manufacturer and delays or timings


The profile is saved as follows. In the Label field, enter the name of your profile. In the Save to Profile field, enter the profile number in which of the 8 to save the current BIOS settings and press Enter. A pop-up window will appear asking you to confirm your intentions. That's it, the profile is saved.
In more advanced versions of BIOS (for example, for motherboards with 7th and 8th series chipsets) it is possible to save and load a profile to a flash drive.
I don’t yet know what will happen to the profiles if the BIOS is reset (for example, the battery runs out). If anyone has information please write in the comments.
How to reset bios
Naturally, this article would not be complete without information on resetting the BIOS to default settings. At the moment I know of two ways to restore default settings

There is also a third option for collecting BIOS settings using a special utility. But I haven’t used it yet, so I only know about its existence.
Conclusion
That's basically all the BIOS settings for the ASUS P8H67-V motherboard. After you make changes, you need to save them. Press the F10 key or the Exit button at the top right to confirm saving the settings. Now the computer will reboot with the new settings and if everything goes well, the operating system will load.
General principles of working with computer BIOS. (which I currently use as a guide).
- You can change any parameter (except voltage) without fear. If the computer does not boot, everything can be returned to default by resetting the BIOS
- It's best to change parameters one at a time. This makes it easier to track and eliminate possible unstable computer behavior
- All parameters that are not known are left at default
This allows me to configure my computer’s BIOS quite safely.
There are many types of BIOS: Ami, Award, Phoenix Award, UEFI. Let's figure out which buttons to press when booting a computer or laptop so that go to BIOS and boot from a flash drive to install windows. I would like to note that the traditional key delete, F2 to enter the BIOS. Below are button combinations on how to enter the BIOS to boot from a flash drive.
Buttons for entering bios from laptop and computer manufacturers.
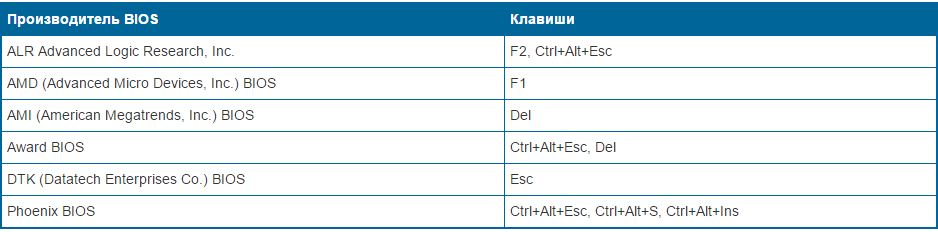
Buttons from BIOS manufacturers
How to set the BIOS to boot from a flash drive to install Windows
Let me start with the fact that you don’t always need to go into the BIOS to swap the bootloader to install windows. For this there is a so-called start menu. To go there, you need to turn on the computer, sometimes a key is written. In this case F12. Press the key that is written in the word Boot Menu.

How will we start the computer: USB flash drive or other devices. Next will be the installation of the Windows system.

How to boot from a flash drive in Ami Bios
- Click Device Priority.

In line 1st Devise set priority from the flash drive. That’s usually all, but many have encountered why I did everything correctly, but the computer does not start from the flash drive. Sometimes you just need to specify, in addition to the priority, forced loading in the line Hard Disk Drives.

- IN Hard Disk Drives set a forced launch from a flash drive.
- IN 1st drive select the media.
- Press F10 to save.
It turned out that in the settings of 1st Devise and Hard Disk Drives there is a bootloader with USB Flash i.e. We set the priority option, tried it and it didn’t work. Then we set a forced launch and everything worked out. And so on in all BIOS versions, if priority loading fails.

How to set Award Bios to boot from a flash drive
- Let's go to Advanced Features.

- Click First Device, in the context menu we set which bootloader we will start the computer with. We have chosen the primary device to launch.

- Hard Disk Priority put the flash drive in 1st place. (If in First Device If you choose to start from a drive, then you need to install a flash drive in Hard Disk Priority).
- Award is ready, press F10 to save.

How to boot from a flash drive in Phoenix Award Bios
- Settings Advanced, in line First Boot Device install a flash drive or other device.
- Click F10 to save.

New UEFI BIOS in which you can control the mouse.
- Line Boot Priority, change places by dragging with the mouse. Can be done through advanced settings > Exit/Advanced mode and choose Advanced mode.

- Presses Boot and select in Boot Option #1 loader.

Going into the BIOS and booting from a flash drive to install Windows turned out to be quite simple, you just need to change the type of boot. And remember about the priority and forced bootloader.
If you need to install Windows 7 from a flash drive via BIOS, then our article will be a great help for you.
Installing a new operating system on a computer is a fairly common problem that can arise due to the slightest malfunction of the system or the actions of an inept PC user.
This issue also became relevant in connection with the statement by official representatives of Windows about the suspension of technical support for the XP operating system.
Today, almost all users have completely switched to the so-called seven.
Our step-by-step instructions will help you quickly and easily bring your computer back to life.
Preparing the computer to reinstall Windows
Before you start working on new software, you need to properly prepare your PC. First you need to remember what important information is stored on your computer and save it to a portable storage device.
Particular attention should be paid to the local drive C, as this is where the largest amount of information is saved. Almost all users store their media files (photos, videos) in the “My Documents” folder or directly on the desktop.
These files are often located on the disk along with the already installed OS. You can also use the free space of another local drive to save information.
It is very important before reinstalling Windows to check whether there are drivers for the network card on the PC.
If you install a new system via USB, and then it turns out that the distribution does not contain drivers for the network card, then you will not be able to configure the drivers and Internet connection.
For your own confidence, it is better to once again make sure that the drivers are available. Also, be sure to check if you have drivers for your sound card, audio card, video card, etc.
Preparing a flash card for software installation
To install an operating system from a flash drive, we recommend following these rules:
- The minimum size of the flash drive must be 4 GB. This is the amount of space required to save all important components and files;
- Mandatory preparation of a Windows 7 distribution kit for recording and saving its image (*iso format);
- Selecting a program to create a disk image.
Advice! UltralSO is considered one of the best utilities for creating a disk image. The latest version is on the developer's website
We install and run the utility on the PC, and then select a pre-selected disk image from it. Step-by-step instructions for using the program will help you quickly understand all the intricacies.
- Launch
2. Now the main working window opens in front of you
3. Let's move on to recording the hard disk image
4. Now you need to connect the flash memory and enable formatting. When the flash drive formatting process is completed, you can start recording.
5. After recording is complete, the space on your flash drive will contain Windows, with which you will perform the reinstallation.
Comment! To create a flash drive for installing the system via BIOS, you can use the toolsWindows.
Setting up Bios to work with a bootable USB flash drive
Just connecting the installation flash drive to the PC to install new software is not enough; preliminary configuration of the computer is required so that it starts booting from it when turned on.
All settings are made in Bios. Any laptop or computer has a BIOS, which stores important settings, including the order in which devices should boot. It is this setting that we now need for further fruitful work.
To start the Bios, you need to hold or press a certain key on the keyboard when you turn on the computer.
You can find out which key we need from the information on the monitor. Typically these keys are Esc, Delete, F2. If you have entered Bios, one of the following screens will appear in front of you:
If your login attempt fails, restart your computer again and try starting the BIOS again. To make things easier for you, we have placed a table with the main options for enabling Bios.
Keyboard combinations for logging inBIOS depending on manufacturerBIOS
Basic key combinations for launchingBIOS depending on laptop and computer manufacturers
After you get into the Bios, you need to find the option that is responsible for loading devices. Usually it is in the menu and its name contains the word BOOT. Other options are not excluded; you may even have to look.
Here are some examples:
As a rule, selecting the main device to boot is done by pressing the arrows on the keyboard, although sometimes there are other control methods. If you can’t figure it out yourself, then refer to the help that appears in the BIOS.
In our case, the first boot device is a USB-HDD (there may be another name). After selecting it, you need to exit the Bios and save all settings using the Save and Exit Setup item.
After this step, the computer should reboot and we will move on to the main stage for which we are here.
Installing Windows 7 using a bootable USB flash drive
If everything was correctly written to the flash drive space, and the correct settings were made in the BIOS, then you will see the following message on the monitor screen, which says that you should press any key to activate the boot.
If there is no such inscription, then you will have to check your actions. To do this, go to Bios and make sure that the boot from flash drive setting is saved. If there are no errors in the Bios, then most likely you were unable to create a bootable USB flash drive and you need to repeat the whole process again.
If there is an inscription, then congratulations, your installation of the new Windows version via BIOS has begun. Some installation images, in addition to the operating system itself, also contain various additional programs, then you will have to select the required item from the menu.
It is also worth saying that some disks perform most of the settings described below by default. There is no need to worry about this, since all settings can be changed after the software installation process is completed.
A welcome screen appears in front of you, on which you select the necessary data. After the setup has been completed, click on the “Next” button, and then “Install”.
In a new window, the terms of the license agreement appear in front of us, which you, of course, read very carefully, and then agree by checking the special box and clicking the “Next” button.
The final stage of installation
In a new window you will have to select what type of installation we require. We need the full type. Next, you will have to do a little work with the disk on which the new version of the software will be written.
To do this, select the required disk partition in the menu and click on the “Disk Setup” button, after which we start formatting.
We have already described how this is done above. Here you just need to change from USB-HDD to the name of your disk. This is a very easy action that should not cause you any difficulties.
Once the reboot is complete, Windows installation will continue.
- Enter names for the computer, laptop and users.
- Set a password, if necessary.
- Enter the name of the license key, if you have one (you can skip this step).
- Selecting security settings (“Recommended settings”).
- We set the date and time.
- We configure the network.
Thanks to these simple steps, you can install Windows 7 through the BIOS using a flash drive.


