Brief instructions for the eas ops program. Brief description of the features. AIS “Planning and financial reporting and analysis”
CREATION and pilot implementation
unified AUTOMATED SYSTEM of post offices based on the MS Dynamics ax for retail platform for the Federal State Unitary Enterprise "Russian Post"
PREPARATION FOR REPRODUCTION
Training courses as part of the OPS workplace
Other services subsystem. Subscribing to periodicals
EAS OPS.001.I3.03-10
annotation
The document “Training courses as part of the workplace” regarding the description of procedures for working with the System when subscribing to periodicals was developed as part of the work on the creation and pilot implementation of a unified automated system of post offices based on the MS Dynamics AX for retail platform for Federal State Unitary Enterprise “ Russian Post" (hereinafter referred to as EAS OPS).
The purpose of the EAS OPS is to increase the efficiency of service provision by creating a unified solution for automating the activities of post offices.
This document contains initial information about working in the EAS OPS and a description of the procedures for subscribing to periodicals when using the EAS OPS system and is intended for use by post office operators if they need to obtain reference information about the EAS OPS.
The basis for the work is the Agreement No. 2013-AHKS-0009 dated April 3, 2013 for the performance of work on the topic: “Creation and pilot implementation of a unified automated system of post offices based on the MS Dynamics AX for retail platform” between the Federal State Unitary Enterprise “Russian Post” and GMCS Verex LLC.
1 Introduction... 4
1.1 Scope of application... 4
1.2 Brief description of features.. 4
1.3 Procedure for checking functionality.. 5
2 Description of operations... 7
2.1 Subscription... 8
2.1.1 Entering subscription parameters on the operation window. 8
2.1.2 Subscription accepted by the postman.. 9
2.1.3 Search for a subscription publication. 10
2.1.4 Entering information about the subscriber and his address information. 13
2.1.5 Subscription summary data.. 15
2.1.6 Formation of f. SP-1.. 15
2.2 Registration of a subscription batch.. 17
2.2.1 Registration of a subscription batch on the transaction window. 17
2.2.2 Registration of a subscription batch accepted by the postman.. 18
2.2.3 Entering subscriber information. 19
2.2.4 Entering address data. 19
2.2.5 Entering data on subscription publications. 19
2.2.6 Entering data on subscription publications. Addition. 20
2.2.7 Entering data on subscription publications. Adjustment.. 21
2.2.8 Entering data on subscription publications. Delete. 21
2.2.9 Final data on registration of a subscription batch.. 22
2.2.10 Formation of f. SP-1.. 22
2.3 Additional operations... 22
2.3.1 Search for SP-1, subscribed... 22
2.3.2 Subscription forwarding.. 25
2.3.3 Acceptance of additional payment for subscription. 27
2.3.4 Cancellation of subscription... 30
2.3.5 Subscription renewal.. 32
2.3.6 Formation of a register by subscription. 35
list of symbols and abbreviations... 40
Introduction
Application area
The document presents a training course for operators of post offices (OPS) when performing official duties in registering subscriptions to periodicals using the unified automated system of post offices (EAS OPS, System).
This document is intended to be used as a teaching aid when training fire alarm operators.
Before studying the document, you should familiarize yourself with the document “Creation and pilot implementation of a unified automated system for post offices based on the MS Dynamics AX for Retail platform. Bench testing and implementation. Training courses as part of the OPS workplace. General procedures. EAS OPS.001.I3.03-1” (hereinafter referred to as “General Procedures”), which provides brief information about the System, the procedure for preparing the System for operation and a description of typical operations common to the entire EAS OPS system.
If you have any questions about using the EAS OPS, please contact the technical support service.
Brief description of features
EAS OPS is intended to automate the operational activities of OPS.
This section provides a description of the procedures for registering a subscription to periodicals for an individual:
Subscription (accepted by the operator, accepted by the postman):
§ search for information about the publication;
§ entering subscriber information;
§ payment for subscription services;
Registration of a subscription batch (accepted by the operator, accepted by the postman):
§ entering subscriber information;
§ search for data on publications;
§ payment for registration of a subscription batch;
Subscription extension:
§ data search by f. SP-1;
§ selecting a new subscription period;
§ calculation of the cost of renewing a subscription to the software;
§ payment for subscription renewal services;
§ search for a completed subscription order;
Forwarding a subscription (within the delivery network, outside the delivery network):
§ data search by f. SP-1;
§ entering data about the new delivery address;
§ calculation of the cost of forwarding a subscription;
§ payment for the subscription forwarding service;
Cancellation of subscription:
§ data search by f. SP-1;
§ calculation of the cost of canceling a subscription to PPI;
§ payment for subscription cancellation services;
Making an additional payment for a subscription:
§ data search by f. SP-1;
§ payment for services
Unloading SP-1 forms by subscription;
Uploading subscription orders to an intermediate database.
TRAINING MATERIAL: “General work procedures in the EAS OPS” October 2014 Consumer Relations Department
 IN THIS TRAINING MATERIAL CONTENT YOU WILL RECEIVE ANSWERS TO THE FOLLOWING QUESTIONS: 1. What are the basic rules for working with the system? 2. What is the system boot order? 3. How does the opening/closing of an operating shift take place? 4. How is the main cash register window used? 5. How does activation and refund work? 6. How does retail trading work? 7. How to work with the RPO journal? 8. How to log out of the System? 2
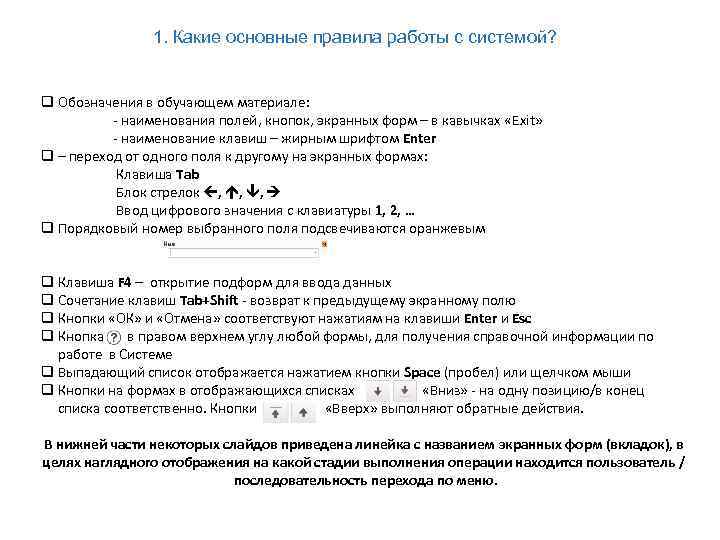 1. What are the basic rules for working with the system? q Designations in the training material: - names of fields, buttons, screen forms - in quotation marks “Exit” - names of keys - in bold Enter q - transition from one field to another on screen forms: Tab key Arrow block, Entering a digital value from the keyboard 1 , 2, … q The serial number of the selected field is highlighted in orange q Key F 4 – opens subforms for data entry q Key combination Tab+Shift – returns to the previous screen field q Buttons “OK” and “Cancel” correspond to pressing the Enter and Esc keys q A button in the upper right corner of any form for obtaining reference information on working in the System q The drop-down list is displayed by pressing the Space button or clicking the mouse q Buttons on forms in the displayed lists “Down” - one position / to the end of the list, respectively. The Up buttons do the opposite. At the bottom of some slides there is a line with the name of screen forms (tabs), in order to visually display at what stage of the operation the user is / the menu navigation sequence.
 2. What is the boot order of the system (data and programs)? Click on the shortcut on the desktop. Without a fiscal printer, the system cannot work!!! Starting the system. Checking connected equipment. If problems are detected, the following messages are displayed: Successful connection Displays the user authorization window. Select your account from the list provided. (Keys, ↓, Pg. Up, Pg. Dn or mouse click) Press Enter See next. slide To log out
 2. What is the boot order of the system (data and programs)? (Continued) See the slide above User authorization is completed Entering a password When you press Esc - return to operator selection In case of an error entering a password, the System displays a message and prompts you to re-enter the password Entering data from the keyboard, if only the password is in digital format, you can enter it with presented keyboard.
 3. How does the opening/closing of an operating shift take place? Opening a shift In case the shift was closed. Current date ≠ date of existing shift, The system displays the diagnostic message “The existing shift cannot be used, close the previous shift and open a new shift.” After authorization, a check is made to see if the previous shift is closed. If the previous shift was not closed. Log in to the System under an employee’s already used shift (account) Registration of operator data. Print, if necessary, on the cash register of the X-report. Opening a new operating shift After clicking, the current form is closed, the transition to the “User Authorization” form Displays the main form “Operations Selection Menu” (see slide above) Using the current shift Closing the current shift (see slide below)
 Closing a shift Go to the menu: Main menu Other operations (5) Closing a shift (6) The operation is completed. Click on “Ok” using the Enter key. Click on the “Close Shift” button and confirm the operation Shift closed. Generating and printing a Z-report. Blocking operations in the current shift. Cancel the operation “Closing a shift”. Return to main menu. Printing X-Report and Z-Report Diagnostic messages may be displayed when you click Yes. After completing the actions, closing the shift continues. Other operations 1. 2. Close shift Exit to the “User Authorization” form (see description above)
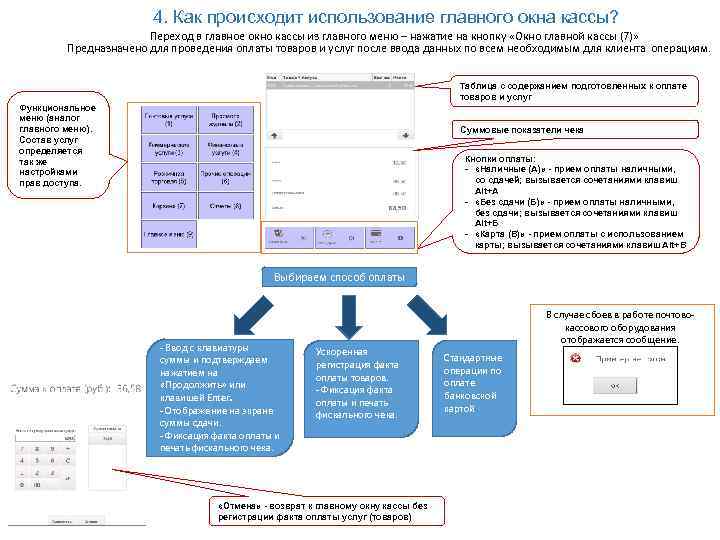 4. How is the main cash register window used? Go to the main cash register window from the main menu - click on the “Main cash register window (7)” button. Designed for making payments for goods and services after entering data on all operations necessary for the client. Table with the contents of goods and services prepared for payment. Functional menu (analogous to the main menu). The composition of services is also determined by the settings of access rights. Total indicators of the check Payment buttons: - “Cash (A)” - accept payment in cash, with change; called by the key combinations Alt+A - “Without change (B)” - accepting payment in cash, without change; called by the key combinations Alt+B - “Card (C)” - accepting payment using a card; called by the keyboard shortcuts Alt+B Select the payment method - Enter the amount from the keyboard and confirm by clicking on “Continue” or pressing the Enter key. - Display the change amount on the screen. - Recording the fact of payment and printing a fiscal receipt. Expedited registration of payment for goods. - Recording the fact of payment and printing a fiscal receipt. “Cancel” - return to the main cash register window without registering the fact of payment for services (goods). In case of failures in the operation of the postal cash register equipment, a message is displayed. Standard transactions for payment by bank card
 5. How does activation and refund work? Form “Viewing the Journal” Displaying information on all performed cash transactions Select: Main menu Window of the main cash register Viewing the journal Buttons on the form Search for a receipt/operation using certain parameters. When clicked, the “Journal Search” form opens (see slide below). Re-printing of a receipt is possible only on the day of the transaction. Carrying out the operation to create a return record. When clicked, the “Returned Goods” form opens (see slide below) List of completed cash transactions Displaying information (receipt contents) for the selected transaction from the list Closing the screen form and going to the main menu - the cash window. Resetting previously set parameters for searching for a receipt. Main cash register window View the journal Search the journal Returned goods Posting a return
 Form “Search by Journal” Search for returned/cancelled checks by characteristics of returned goods and services (SHI/SPI for RPO, transfer number, number for telegrams, contract code for cell subscription, etc.) Click on the “Search” button on the form “View Log” Display search results in the “View Log” form in the main list Enter parameters into the search fields in the “Search Log” form Keyboard input Select a value from the drop-down list (open the list, Space button, spacebar; Select - Enter) Format entering the transaction code depends on the choice in the “Operation Type” field Buttons on the form Selecting a date to search for sold services / goods from the drop-down calendar “Search” - search using the specified parameters “Clear” - deleting the specified parameter in the Main cash register window field Viewing the journal Closing the form search in the log and return to the “View Log” screen form; . Search by journal Returned goods Setting a flag to search by current date Posting a return
 Form “Returned goods” Refund of funds on the check as a whole or on individual items in the check. The “Returned goods” form is displayed, select the lines and click on the “Return goods” button Click on the “Make a return” button on the “View translation” form See next slide Check/uncheck Buttons on the form Select a line to make a return (set a flag) Select all lines for return Cancel the operation, return to the main POS menu Clear the selection of lines for return (uncheck the flag) Main cash register window Carrying out the operation of processing the return of goods “Up, Down” - switching through positions up and down. View the journal Search the journal Returned goods Post a return
 Form “Returned goods” Refund of funds on the check as a whole or on individual items in the check. The “Return Posting” form is displayed to indicate the reason for the return from the list and click on the “Select” button. Main cash register window View log The main cash register window is displayed. The item is displayed with a negative amount. Search by magazine We carry out a standard payment operation by clicking on the buttons “Without change”, “Cash”. The return operation is completed. Printing a return receipt. Returned goods Return posting
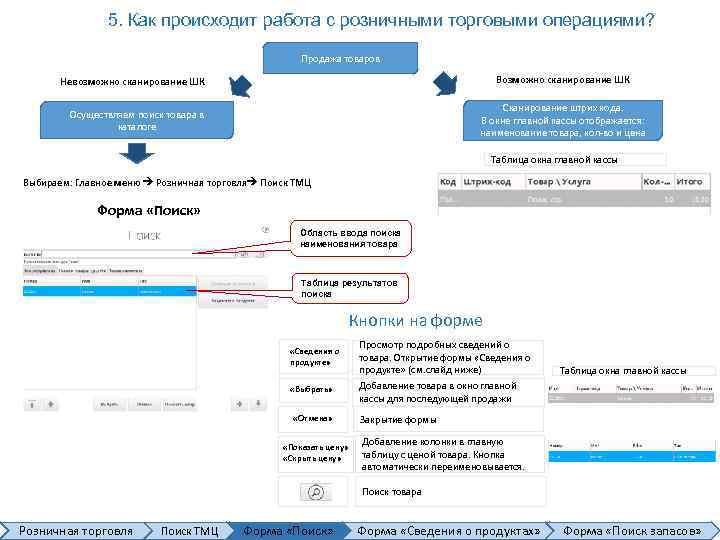 5. How does retail trading work? Sale of goods Barcode scanning is possible Barcode scanning is not possible Barcode scanning. The main cash register window displays: product name, quantity and price We search for goods in the catalog Table of the main cash register window Select: Main menu Retail Search for goods and materials "Search" form Search input area for the name of the product Search results table Buttons on the "Product information" form » View detailed information about the product. Opening the “Product Information” form (see slide below) “Select” Adding a product to the main cash register window for subsequent sale “Cancel” “Show price” “Hide price” Main cash register window table Closing the form Adding a column to the main table with the price of the product . The button is automatically renamed. Product search Retail trade Search for goods and materials "Search" form "Product information" form "Inventory search" form
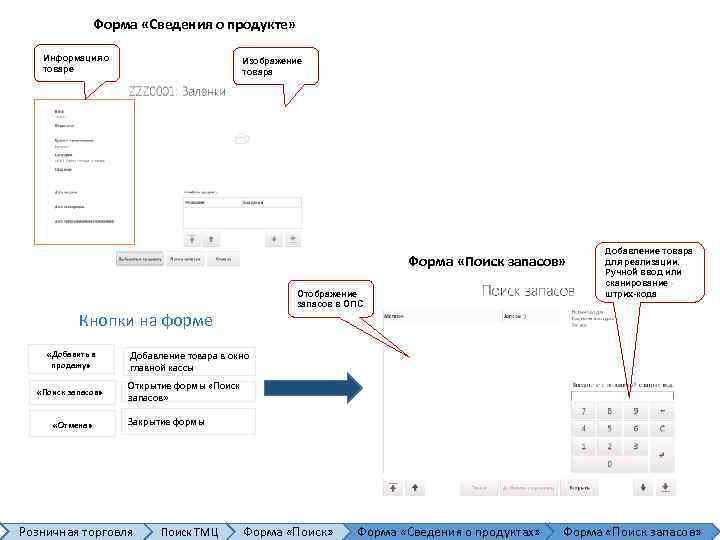 “Product Information” form Product information Product image “Inventory search” form Displaying inventories in the OPS Buttons on the “Add to sale” form “Inventory search” “Cancel” Adding a product for sale. Manually entering or scanning a barcode Adding an item to the main cash register window Opening the “Inventory Search” form Closing the form Retail trade Searching for inventory items “Search” form “Product information” form “Inventory search” form
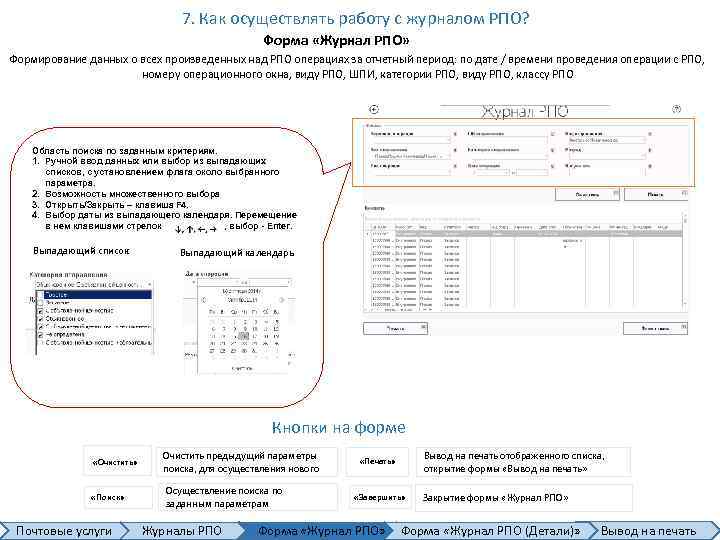 7. How to work with the RPO journal? Form “RPO Journal” Formation of data on all operations performed on RPO for the reporting period: by date / time of the operation with RPO, operating window number, type of RPO, SPI, category of RPO, type of RPO, class of RPO Search area according to specified criteria. 1. Manual data entry or selection from drop-down lists, with a flag next to the selected parameter. 2. Possibility of multiple selection 3. Open/Close - F key 4. 4. Select a date from the drop-down calendar. Move in it with the arrow keys, select - Enter. Drop-down list Drop-down calendar Buttons on the form “Clear” “Search” Postal services Clear previous search parameters to make a new one Perform a search according to specified parameters RPO journals Print the displayed list, open the form “Print” “Print” “Finish” Form “RPO Journal” Closing the “RPO Journal” form “RPO Journal (Details)” form Printing
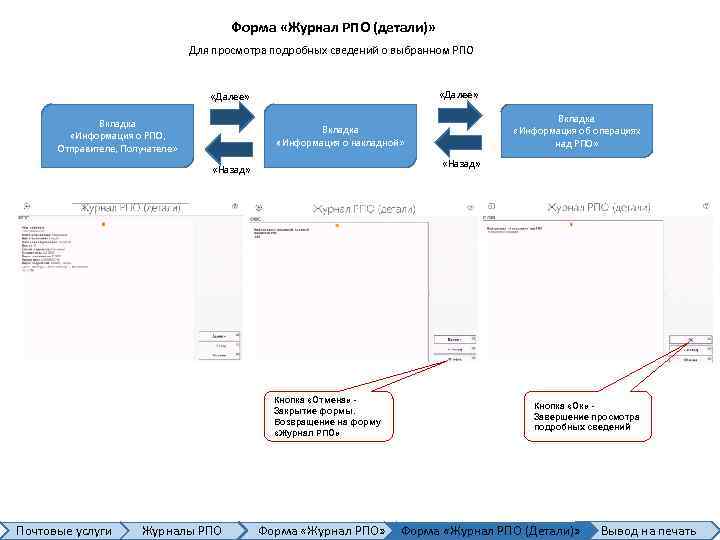 Form “RPO Log (details)” To view detailed information about the selected RPO “Next” Tab “Information about RPO, Sender, Recipient” “Back” Button “Cancel” Closing the form. Return to the “RPO Journal” form Postal services “Information on operations on RPO” tab “Invoice information” tab RPO journals “RPO Journal” form “Ok” button Finish viewing detailed information “RPO Journal (Details)” form Print out
 Printable form The list of the RPO Journal is displayed in a printed form. To print, go to the form in the top menu: File Print. Printing to the connected printer. Postal services RPO Journals Form “RPO Journal” Form “RPO Journal (Details)” Printed form
 8. How to log out of the System? The password was entered correctly In the main menu, click on the “Exit (8)” button In the authorization window, click on the “Exit” button Exit from the system is completed Entering the password Re-enter the password and exit the system The password was entered incorrectly
Federal State Unitary Enterprise "Russian Post" summed up the results of the competition for the performance of work and provision of services for the replication of the Unified Automated System of Post Offices (EAS OPS) for 23 thousand post offices. The only participant in this tender was a consortium that included OOO GMC Verex (trademark Maykor-GMCS), CJSC Lanit, CJSC NIP Informzashchita and LLC New Service Technologies (part of Maykor group of companies). The maximum contract amount is 1.1 billion rubles. In addition, Russian Post plans to spend 1 billion rubles on the provision of services for the development and maintenance of EAS OPS.
"Russian Post" summed up the results of the competition for the performance of work and provision of services for the replication of the EAS OPS. The only participant in this tender was a consortium that included Maykor-GMCS, Lanit, NIP Informzashita and New Service Technologies.
“In accordance with the requirements of procurement legislation, documents are currently being prepared for subsequent approval of the procurement results with the regulator - the Ministry of Telecom and Mass Communications of the Russian Federation. Russian Post can sign this agreement only after receiving official approval,” he clarified in an interview with a correspondent ComNews representative of the press service of Russian Post.
The agreement will come into force from the moment of signing and will be valid for 18 months. This agreement involves the replication of the EAS OPS at 23 thousand post offices in eight federal districts of the country. The details of the work will be determined by the working group after signing the contract, added a representative of the Russian Post press service. The maximum contract amount is RUB 1.1 billion.
A representative of the press service of Russian Post recalled that previously services for replication of EAS OPS were provided by the company Maykor-GMCS.
In 2016, Russian Post updated 30 thousand sets of automated workstations (AWS) in 54 branches for the deployment of EAS OPS. This year, the company plans to update technical equipment to a similar extent in different regions of the country. The postal service is confident that this modernization will speed up customer service time.
We would like to remind you that in March 2016, for the deployment of EAS, Russian Post purchased on lease more than 30 thousand automated workstation sets for post offices. “The initial maximum price of the leasing agreement in 2016 was 2.4 billion rubles. The winner’s offer was 1.2 billion rubles. The actual price of the leasing agreement was 1.3 billion rubles - due to an increase in the number of purchased workstation sets by 10%,” - noted a representative of the Russian Post press service.
Russian Post plans to simultaneously complete the replication of the EAS OPS and, accordingly, the modernization of the fleet of computer and office equipment in post offices (see ComNews dated January 26, 2016). As ComNews previously reported, Russian Post plans to complete the implementation of the EAS OPS by the end of 2017 (see ComNews dated February 12, 2016).
In addition, at the end of 2016, Russian Post announced a tender for the performance of work and provision of services for the development and maintenance of the EAS OPS. Submission of applications for the competition ended on January 23, 2017. Review of applications for the competition will take place on February 10. The maximum contract amount is 1 billion rubles. The agreement will come into force from the moment of its signing and will be valid for 36 months.
According to the terms of reference, the winner will have to identify and implement new requirements for the functionality of the EAS OPS, provide the ability to connect other service channels (portal, mobile client, contact center) to the system’s microservices, etc.
A representative of the press service of Russian Post recalled that the company Maykor-GMCS had previously performed work and provided services for the development and support of the EAS OPS.
CLOSING THE SHIFT. TYPICAL PROBLEMS
A discrepancy in funds was identified in the Cash Certificate MS-42 and the X-report:
Find out the cause
Create lines in the cash journal by amounts by item
Close a shift with an act under the role of the head of the security service using the “Close shift” button
without submitting DS"
If there are discrepancies, the “Submit DS” button is not active
67.
CLOSING THE SHIFT. TYPICAL PROBLEMSEmergency power outage in the fire alarm system:
Correctly log out of the System and turn off the operators’ computers
Shut down work on the computer of the head of the security service
Turn off all power sources
All reporting can be generated at the beginning of the next trading day. TIP OF THE DAY
To work faster you need to:
Use hotkeys
Use System prompts
Entering an address starts with the index
Use TsHDPA when entering an address
Use Data History
70.
TIP OF THE DAYRemember:
You cannot change places/rearrange equipment yourself
You can provide any services in every operating window
If necessary, you can postpone unfinished incoming reconciliation
71.
RESULTS OF THE CURRENT TRAINING COURSEToday you learned:
How can the EAC help achieve its goals?
Your role and functions on the project
Basics of launching EAS in OPS
How to start working in the EAS system and open a trading day
Basic functions of receiving, processing and delivering RPO
How to close a trading day
Useful tips when working in the EAC
72.
TRAINING COURSE - CONFLUENCEComplete training course with all materials
posted on Confluence in the EAS OPS Training section
Link:
https://r00confluence.main.russianpost.ru/pages/viewpage.action?pageId=1769735
CREATION and pilot implementation
unified AUTOMATED SYSTEM of post offices based on the MS Dynamics ax for retail platform for the Federal State Unitary Enterprise "Russian Post"
PREPARATION FOR REPRODUCTION
Postal services subsystem. Reception of RPO
EAS OPS.001.I3.03-2
annotation
The document “Training courses as part of the workplace” in terms of describing the work procedures of a post office operator when accepting registered mail (hereinafter referred to as RPO) was developed as part of the work on the creation and pilot implementation of a unified automated system of post offices based on the MS platform Dynamics AX for retail for FSUE Russian Post (hereinafter referred to as EAS OPS).
The purpose of the EAS OPS is to increase the efficiency of service provision by creating a unified solution for automating the activities of post offices.
This document contains a description of the work procedures of a post office operator when receiving registered mail using a unified automated system of post offices and is intended for operator training and for use by post office operators when it is necessary to obtain reference information about the UAS OPS.
The basis for the work is the Agreement No. 2013-AHKS-0009 dated April 3, 2013 for the performance of work on the topic: “Creation and pilot implementation of a unified automated system of post offices based on the MS Dynamics AX for retail platform” between the Federal State Unitary Enterprise “Russian Post” and GMCS Verex LLC.
1 Introduction... 4
1.1 Scope of application... 4
1.2 Brief description of features.. 4
1.3 Procedure for checking functionality.. 5
2 Description of operations... 6
2.1 Using the Operation Selection Menu... 6
2.2 Entering RPO parameters... 12
2.2.1 Entering the departure class. 13
2.2.2 Entering weight characteristics.. 14
2.2.4 Entering the declared value of the item. 15
2.2.5 Selecting the departure digit. 16
2.2.6 Entering PSI... 17
2.2.7 Indication of departure marks. 18
2.2.8 Entering data about the recipient. 19
2.2.9 Entering address data. 26
2.2.10 Indicating the method of sending RPO... 31
2.3 Entering data about the sender, cash on delivery recipient... 33
2.3.1 Entering data about the sender. 33
2.3.2 Possibility to specify the recipient of cash on delivery.. 34
2.4 Possibility of entering additional services, notification recipient, payment for shipment.. 35
2.4.1 Entering data on additional services. 35
2.4.2 Indication of the fee for the shipment. 38
2.5 Selecting stamps for RPO payment... 41
2.5.1 Selecting brands.. 43
2.6 Viewing summary data... 45
2.7 Copying RPO data when receiving several RPOs from one sender 49
2.8 Reception of migration notification.. 51
2.8.1 Entering the main parameters of the migration notification. 52
2.8.2 Entering data about the notifier / migrant. 53
2.8.3 Entering data on additional services. 56
2.8.4 Viewing summary data. 56
2.9 Reception of simple items.. 56
2.10 Additional postal services... 59
3 Emergency situations... 62
3.1 Error code – “no paper”. End of tape in the fiscal recorder.. 62
3.2 Error code – “1000 and 1002. An error occurred during the operation” at the time of payment... 62
list of symbols and abbreviations... 64
Introduction
Application area
The document presents a training course for operators of postal offices (OPS) when performing official duties for receiving registered mail items (RPO) using the unified automated system of postal offices (EAS OPS, System).
This document is intended for use in training fire alarm operators and for obtaining reference information when working in the EAS fire alarm system.
Before studying the document, you should familiarize yourself with the document “Creation and pilot implementation of a unified automated system for post offices based on the MS Dynamics AX for Retail platform. Training courses as part of the OPS workplace. General procedures. EAS OPS.001.I3.03-1” (hereinafter referred to as “General Procedures”), which provides brief information about the System, the procedure for preparing the System for operation and a description of the implementation of standard operations common to the entire EAS OPS system.
If you have any questions about using the EAS OPS, please contact the technical support service.
Brief description of features
EAS OPS is intended to automate the operational activities of OPS. This document provides a description of the work procedures for receiving RPO:
Selecting the class, type, category and category of postal item, method of forwarding in accordance with the needs of the sender;
Processing information about declared value and cash on delivery;
Entering data on weight RPO, SHI;
Selection of possible marks for RPO;
Entering data about the sender and recipient;
Entering address data of the recipient and sender;
Selection of additional services for RPO;
Selecting the type of payment RPO (GZPO, franking; advance book; cash payment, non-cash payment);
Tariffing of postal items.
Description of operations
Note:
In the document, when describing operator actions, the PC keyboard keys used are written in bold ( Enter), fields and buttons of screen forms are written in quotation marks (“Exit” button).
Entering RPO parameters
The first RPO screen displays the main groups of fields of the mail item. For any sending parameters, the following fields are present on the screen:
- “Class, Country of destination, Weight in grams”;
- “Recipient” (if the item has the “Domestic” class);
- “Preliminary total” (Preliminary amount for the shipment, taking into account the weight, type, category of the shipment, method of shipment).
Depending on the class, type and category of the shipment, the following fields may appear on the screen:
- “Paid with stamps / franking” (RPO with the possibility of payment by GZPO);
- “Method of forwarding.”
Entering departure class
The first field to select is “Departure Class”. The default departure class is “Domestic” (Figure 9).
Figure 9. Form “Reception of RPO”. "RPO" tab. Tab “Departure class”
The value of the field will change only after the contents of the “Destination Country” field have changed, in which you must select the country to which the RPO will be sent (Figure 10).

Figure 10. Fields “Departure class”, “Destination country”
After selecting the departure class, proceed to entering the RPO weight.
Entering weight characteristics
After selecting the weight input screen element (Figure 11), to obtain the weight value from the postal scale, you must press F4. The system will display the received value from the postal scale in the appropriate field.
Figure 11. Selected weight input element
Note:
Weight is indicated in grams.
If there is no postal scale or there is a failure when using it, a diagnostic message will be displayed on the screen (Figure 12).

Figure 12. Message about a problem with the scales
In this case, you must enter the weight manually from the keyboard. When entering weight, delete keys are available along with numeric ones Del And Backspace.
If you do not select a shipment type when entering weight, the System will mark the weight entry field as having an invalid value. The same mark will be given if the entered weight does not correspond to the selected type of shipment.
Selection of departure digit
The departure digit is entered if necessary. By default, the value for the "Digit" field is not specified. The departure bit can take one of the following values:
No rank;
Military;
Government;
Presidential;
Service;
Judicial;
Credit.
The category can be selected if the sender is a legal entity, with the exception of OVPO, the choice of OVPO category is available for senders - individuals. The OVPO category can be selected for “Letter” and “Postcard” items of the “Registered” category. Departure digit selection window (Figure 16):

Figure 16. Send digit selection window
SHI input
The bar identifier or bar postal identifier is entered in the “SHI” field (Figure 17).
Figure 17. “SHI” input field
The mail ID can be entered by pressing the mail scanner key, or manually using the keyboard. In both cases, the System checks that the identifier is entered correctly and, in case of an error, displays a message about this. Errors may occur if the identifier type does not match the RPO type, or the specified identifier is already contained in the System (i.e., was entered previously).
Entering recipient information
To enter data about the recipient of a registered mail item, go to the group of elements for entering data about the recipient (Figure 20).

Figure 20. “RPO Reception” form. Tab "RPO". “Recipient” tab
To enter the recipient’s personal data, you must place the cursor in the “Recipient” field and press the key F4, or left-click on the “Recipient” field. The system will display the form (Figure 21):

Figure 21. Entering the recipient's personal information
To indicate the type of client (individual / legal entity), it is necessary to indicate in the “Client Type” field whether the client is an individual or a legal entity (Figure 22).
Figure 22. Client type selection field
Below is a group of screen elements for entering the recipient’s personal data if the client is an individual (Figure 23):
Figure 23. Entering personal data of the recipient who is an individual
To enter the recipient's address data, you must fill in the following fields:
Last name (A);
Middle name (B),
or use the “Select from history” button.
When specifying the client type “Legal entity”, you must enter the name of the organization, or use the “Select from history” button (Figure 24).
Note:
If the RPO has the status “Official” and is sent to the address of another RPO, then the recipient and sender are legal entities.

Figure 24. Entering the address data of the recipient who is a legal entity
Note:
For a client with the “Individual” type, the required fields are last name, first name and patronymic.
For a client with the “Legal Entity” type, the required entry is the organization name field.
When clearing data entry fields, the entered data is deleted without changing the client type value.
If the recipient (sender) was previously entered into the System, it will be displayed in the drop-down list when entered and is available for reselection (Figure 25). In this case, the System will automatically insert his address data into the appropriate fields.
With a connected flatbed scanner, you can read information from the client’s passport.

Figure 25. Display of previously entered recipient data
If you click the “Select from history” button on the client data entry form (Figure 23, Figure 24), the System will display a reference form with previously entered customer information (Figure 26).

Figure 26. “Customer Data Selection” form
To search the directory for previously entered data, you must enter the required information (surname mask or full surname) in the empty line above the list (Figure 27).

Figure 27. Line for entering the required information in the directory
When you click the “Select” button in the “Recipient Data” form, the last name, first name, patronymic and contact phone number will be filled in (Figure 28).

Figure 28. “Recipient Data” form
If a client is selected from those previously entered, the address data will be imported into the “Recipient Address Data” form. They can be changed if necessary.
Entering address data
After entering data about the recipient, you must enter his address data, if they were not selected from the history along with the client (Figure 29).

Figure 29: Selected address selection screen element
To enter the client’s address data, place the cursor in the “Address” field and press the key F4. The system will display the address entry form (Figure 30).

Figure 30. “Address” form
On the “Address” form there are buttons:
- "OK"- confirmation of data entry;
- "Cancel"- termination of work with the screen form without saving the entered data.
Address type
Entering address data must begin by selecting the address type. The composition of the address data entry fields depends on the selected address type (Figure 31).
By default, the standard address type is defined for data entry.
For any type of address, entering the OPS index is required.
To change the address type, you must select the appropriate field. In the form that opens (Figure 31), you must select the type of address. The selected address type will be displayed on the address entry form.

Figure 31. Selecting address type
Postcode
Entering the address must begin with entering the postal code (field “Zode”).
When entering an index, you must use the number keys. The system allows you to enter a maximum of six digits. After entering an index, when moving to the next element of address data, the entered value is checked for compliance with the reference index database. If you enter an incorrect index, the System will mark the entered index as incorrect (Figure 32), saving the entered address data will be impossible.

Figure 32. Invalid index value flag
Other address data
The following address elements can be entered manually or using the Central Postal Address Data Store (CPADS):
- “Region” - region;
- “District” - district;
- “City” - populated area;
- “Intra-city territory (district)” - intra-city territory (neighborhood, settlement, etc.);
- “Street” - street;
- “House” - house number;
- “Apartment” - apartment number.
To sequentially specify address elements and move between them, you must use the key Tab(or the mouse pointer).
When using TsHDPA, the System will determine the region, district (if available) and list of settlements corresponding to the entered index. The region and district are displayed on the screen automatically; the locality must be selected from the drop-down list.
You can also use the Search by name field. point where you need to enter the initial characters of the desired locality. If the TsHDPA service unambiguously correlates the entered characters with any locality in the database, the following fields will be automatically filled in: “Index”, “Region”, “District”, “Settlement” (Figure 33).

Figure 33. Selecting a locality
If the System does not clearly identify the desired settlement based on the first characters entered, a choice will be available from the drop-down list (Figure 34).

Figure 34. List of indexes for a settlement
After selecting a locality, you must select or manually enter the intracity territory, street, house number and apartment number.
Note:
After selecting a settlement, you need to pay attention to the address element for entering an intracity territory (field “Intracity territory (district)”): if a given settlement has exactly one intracity territory, it is automatically displayed in this field. If necessary, it can be removed.
If there is no connection with TsHDPA, all fields, starting with the region (“Region”), must be filled in manually.
If you select the address type “po/box”, “Military unit”, “Field mail”, the address entry form displays a field for entering the corresponding number (“No”) (Figure 35). It must be filled in manually with numerical information. When you enter a zip code, the information in this field is not cleared.

Figure 35. Address data entry form for the “PO Box” address type
If you select the “Hotel” address type, the address entry form displays a field for entering the hotel name “Hotel Name” (Figure 36)

Figure 36. Address entry field form with the “Hotel Name” field
It must be filled in manually. When you enter a zip code, the information in this field is not cleared.
Entering sender information
Entering data about the sender is carried out in the same way as entering data about the recipient, which is described in paragraphs 2.2.9, 2.2.10 (Figure 40).

Figure 40. “RPO Reception” form. Sender Tab
Selecting stamps for RPO payment
After completing work with the “Additional Services” tab, you must click on the “ Further", in case of payment for RPO with stamps, the “Sale of stamps” tab will open. On the form, the System will automatically select the necessary stamps for payment of the current RPO, available in the OPS (Figure 50).

Figure 50. “RPO Reception” form. Tab "Sale of stamps"
If the client came with his own stamps, then it is necessary to enter the amount of his stamps in the “Paid stamps, rubles” field. The system will automatically recalculate the missing amount for payment and reformat the list of stamps (Figure 51).

Figure 51. “RPO Reception” form. “Stamp sales” tab. Filling out the “Paid stamps” field
In the field “Balance due, rub.” The amount in rubles for which the stamps must be sold is indicated.
Selection of brands
To change the list of brands there are buttons on the form:
- “Add” – adding brands to the list;
- “Change” – changing the existing list;
- “Delete” – removing brands from the list.
To add a brand, you must click on the button " Add", the "Select brand" form will open (Figure 52).

Figure 52. “Brand selection” form
To select a brand, click on the “Brand” field; a new form will open with a list of brands available in the OPS (Figure 53).

Figure 53. “Stamps” form
The form contains fields for searching brands by name and item code. To search for them, you must enter the required search data and click on the “Search” button. To clear the search filters, click on the “Clear” button. To select a brand from the list, you need to select a line and click on the “OK” button.
The system will open the previous window in which you must indicate the quantity of the selected brand and click on the “OK” button to confirm (Figure 54).

Figure 54. “Brand selection” form
The system will return to the “RPO Reception” form on the “Stamp Sales” tab.
View summary data
After completing the entry of all data on receiving RPO, you must press the button " Further" This will open the “Results” tab, which will display the cost of sending the RPO, detailed parameters of the RPO, the list and cost of additional services, details of the total amount, as well as a premium for inaccessibility, determined according to the directory “Hard to Access OPS” based on the entered address data of the sender and recipient (Figure 55).

Figure 55. “RPO Reception” form. "Results" tab
When registering an international RPO, the “Declared value in SDR” field appears on the “Results” tab, which reflects the amount of declared value in terms of SDR (Figure 56).

Figure 56. “RPO Reception” form. “Results” tab when registering an international RPO
To cancel the entered data for receiving RPO, you must click “Cancel”. To complete, click “OK”, after which the main cash register window will open (Figure 57).

Figure 57. Main window of the cash register
There can be any number of RPOs in the basket; printing will be done for each item using a separate check.
In the main window of the cash register you must select a payment method:
Cash;
No change;
When you click the “Cash” payment button, the System will display a screen form for cash payment (Figure 58).

Figure 58. Cash payment window view
In the “Enter cash amount” field, you must enter the amount of cash contributed by the client and click the “Apply” button. The system will return to the main window of the cash register, display the change amount on the screen, and the fiscal printer will print a receipt.
If the client deposits an amount into the cash register without change, in the main window of the cash register you must select the “Without change” button. The system will print the receipt on a fiscal printer.
When paying using a bank card, you must select the “Card” button. The system will carry out transactions with the card and return to the main window of the cash register, the fiscal registrar will print a receipt.
You can check the correctness of RPO reception by clicking the “View log (2)” button (Figure 59). The last sale will be on the top line of the journal. In the group of fields on the right there are characteristics of accepted RPOs that are registered in the System.

Figure 59. RPO journal
To receive the next RPO, you should sequentially click the buttons “Postal services (1)” / “Reception (1)” / “Receipt RPO (1)” on the form of the main window of the cash register (Figure 60).
View summary data
You can view the summary data on the “Results” tab (Figure 67); a description of working with the tab is presented in subsection 2.5.

Figure 67. Form “Reception of migration notification”. "Results" tab
After clicking the “Ok” button, the System displays the main window of the cash register with the registered migration notice. All actions for making payment are described in clause 2.5. There can be any number of RPOs in the basket; printing will be done for each item using a separate check.
Acceptance of simple shipments
To register the acceptance of simple shipments in the menu for selecting acceptance operations, you must press the key on the keyboard 5 , or click on the button “Receive simple shipments (5)”. The system will display a screen form for registering the acceptance of simple shipments (Figure 68).

Figure 68. Form "Reception of simple items"
This screen form consists of two tabs, in accordance with the order of data entry:
- “Class” - the default value of the field is “International”, this field is not editable;
- “Type” - the field contains the values “Small package” and “Bag M”;
- “Weight” - this field indicates the weight of a simple shipment.
- “Forwarding method” - the field contains the values “Air” and “Ground”;
- “Client type” - in this area you must select the client type “Individual” or “Legal entity”;
- “Payment method” - the field contains a list of available payment methods (Figure 69);

Figure 69. Values of the "Payment method" field
- “Full cost” - the field is filled in automatically in accordance with the tariffs.
At the bottom of the screen form there are buttons:
- “Cancel” - exit the screen form for processing a migration notification without saving data;
- “Back” - return to the previous tab (inactive on the first tab);
You can view the summary data on the “Results” tab (Figure 70Figure 67); a description of working with the tab is presented in subsection 2.5.

Figure 70. Form "Reception of simple items". "Results" tab
After clicking OK, the System displays the main cash register window. All actions for making payment are described in clause 2.5.
Emergency situations
EAS OPS remains operational in the event of emergency situations. Special actions by the user (operator) are required only when emergency situations occur directly in the fire alarm system. Such emergency situations include failures in the power supply system, failures of the server and network equipment of the fire alarm system and personal computers of users, failures of software on the server equipment of the fire alarm system or user computers.
In the event of such emergency situations occurring in the fire alarm system, the user must inform the technical support specialists servicing this fire alarm system and the maintenance personnel of the EAS fire alarm system and subsequently act according to their instructions.
When working in the System, you need to be aware of the following general rules.
Help key F1 and the button in the upper right corner of the screen (if available) are used to obtain reference data on the System.
The button in the upper left corner of the screen (if available) serves to return to the previous form without saving the entered information.
Moving between on-screen elements (input fields, buttons, menu items) is done using the key Tab, except in special cases. The movement goes from left to right and from top to bottom. When changing input elements at the top left, the composition of elements to the right and below may change, while fields located to the right and below may be cleared or marked as fields with incorrect values.
An input element that has an invalid value is marked on the left with an icon.
Moving within input fields, screen lists, menu items, selection groups (individual - legal entity) is done using the arrow keys ( ↓ ,,← ,→ ) and page translation ( PgUp,PgDn).
Moving between on-screen elements is also possible using the arrow keys, but only until they hit the elements listed in the previous paragraph.
In many screen forms, selection of a screen element is available using the mouse.
list of symbols and abbreviations
The following terms and abbreviations are used in this document:
| Change registration sheet | |||||||||
| Sheet (page) numbers | |||||||||
| Change | changed | replaced | new | canceled bathrooms | Total sheets (pages) in the document. | Document no. | Incoming number of the accompanying document. and date | Subp. | date |
Training courses as part of the OPS workplace


