Beautiful frames for Word. How to make beautiful text in Word. How to make automatic page numbering in a frame
The need for a framework arises among students of engineering and computer specialties when they need to complete a laboratory, coursework or thesis. You can buy sheets with already printed frames, but it’s easier and more convenient to type out the text with frames yourself. Here you will find and download for free a template (*.dot) that allows you to easily and simply create texts on sheets with frames. If you configure the template correctly once, you can save a lot of time. By the way, one of our readers reported that using this template he established successful business- prints for classmates and everyone in the dorm on framed sheets.
Download the file (see link below), and open this file Word editor. When you open it, you will be warned that the file contains macros. This is normal (there are no viruses). Ease of use is achieved through these macros. Therefore, select the "don't disable macros" option. After launch it will appear additional panel, which you see in the figure (it can be customized). Then everything is very simple: create new page, place the cursor on it and press the button on the panel with the desired frame. This page can be edited, fonts can be changed, etc.
In addition to the frames above, you will also receive an additional top stamp (see left) and an address stamp (an example of an address stamp can be seen in the picture below). These templates are designed to design electronic documents in accordance with GOST 2.104-68*, for design documentation. The downloaded file is a document TEMPLATE and should not be edited directly. For proper operation Place the template in your templates folder (usually C:Pogram FilesMicrosoft OfficeTemplates). For correct operation The template requires font files GOST Type A and GOST Type B, which must be installed on the system. You can download these fonts, for example, . It is strongly recommended that before starting to work with a document, without changing anything in its text, open the menu File - Document Properties and in mandatory fill in the fields regarding the Name and Number of the document, Name of the enterprise. After confirmation changes made save the document, close and open it again. It is recommended to type the text of the document using the "Body Text" style.
It is strongly recommended to use specialized styles to format headings at the appropriate level - “Heading 1”, “Heading 2”, etc. You don’t have to do this, but then you will have to manually format each heading at the appropriate level and also manually create a table of contents. It is also recommended to write stand-alone formulas (not in the main text) and create tables using the appropriate Formula and Table styles. If you need to use any other objects, create your own styles for them.
Framing a paragraph allows you to highlight an important idea, and a frame around the page decorates or is sometimes necessary for the requirements for the design of certain types of documents. We'll tell you how to make a frame - for a fragment of text or for all sheets, including a frame with a stamp in accordance with GOST.
You can select a piece of text using a regular rectangular frame or a curly one.
Regular frame
How to make a frame around text in Word:
- Select the text you want to frame. This can be a single sentence or an entire paragraph.
- On the toolbar in the “Home” tab, click on the “Borders” icon in the “Paragraph” section.
- Choose which sides of the paragraph you want borders on.
To change the appearance of lines or frame text, open the last item in the Borders and Shading submenu. Change the type, color and width of borders. In the “Sample” window, configure which sides to place the lines on. If you want to draw frames for each selected line, in the “Apply to” item, select “Text” - the lines will be framed separately. In the Fill tab, set the background color and pattern.
Figure
You can make a beautiful frame using a variety of shapes. Go to the “Insert” tab, in the “Illustrations” section, click on “Shapes”. In the drop-down list, select an image from the list - rectangles, stars, arrows, callouts and much more. Click on the selected picture, place the cursor in the desired place on the sheet, and press left button mouse and move it sideways - a figure will appear on the page. To insert text into the frame, click on the image right click mouse, select “Add text” from the menu.

The frame-shape can be changed at any time - click on it, the “Format” tab will appear in the menu. Various styles and fill patterns are available on it, you can change the direction of the text, and add WordArt objects. It’s easy to move such a frame around the document - just hold down the mouse button on it and move the pointer in any direction - or copy it, the text content will also move.
Page Framing
Let's figure out how to insert a basic frame in Word. We will need the “Page Borders” tool; depending on the version of the program, it is located in the tab:
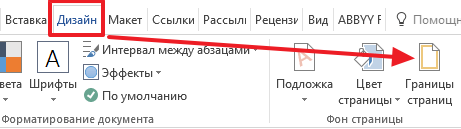
- 2016: “Constructor”;
- 2013: “Design”;
- 2010 and in Word 2007: “Page Layout”;
- To create a frame in Word 2003, select the item of the same name in the “Format” menu.
In the window, configure the frame - the type of borders, the format of the lines, their color and width, for patterned frames - the design. In the “Sample” section, set the locations of the borders.

You can apply the created drawing to all documents - in this case, the same frames will automatically appear on all sheets. Or to individual sections, for which you must first place the section break symbols in the right places.
Using Templates
To prepare documents in accordance with GOST, use special frame templates that can be downloaded for free on the Internet. The template is a “.dot” file. Once downloaded, open it like a regular document. A security message appears about running macros - allow the content to be enabled. Will appear on the toolbar new inset"Add-ons".

How to insert a frame in Word: select the desired frame with a stamp and click on it. A frame will appear on the current sheet; all you have to do is enter the data in the fields.
Conclusion
We figured out how to make a frame in Word. The program provides interesting tools to create strict or insert beautiful frames. You can make the frames yourself or use ready-made templates to quickly get the finished result.
If you need to create in Microsoft Word not an accountable document, in accordance with certain rules, but, for example, to make a postcard or a warning notice, then in this article we will figure out how to beautifully format text in Word.
To do this, you just need to change the size of the letters and choose the appropriate font; you can use one of the ready-made WordArt styles, or you can independently choose the color, effect, etc. for the text so that it looks interesting on the sheet and attracts attention.
I took all the screenshots in Word 2010, but if you have Word 2007, 2013 or 2016 installed, then these recommendations will suit you.
How to make a beautiful inscription
Let's start by adding the required field to the document. Go to the Insert tab and select Caption - "Simple inscription".
A field like this will appear on the page. Delete what you typed in the example by pressing “Delete” on the keyboard and type what you need.

Then highlight the written words and go to the "Home" tab. Expand the drop-down list with fonts and select the one that suits you best.
Please note that some fonts only apply to words written in English. So look in the list for a font that is suitable for Russian words.
In the example, as you can see, the selected font is suitable only for English words.


To change the color of the letters, click on the small arrow next to the “Text Color” button and click on the one that suits you best. If the color you want is not listed, then click “Other colors”, or select a gradient fill.

The button will allow you to select one of the ready-made design options. You can also choose yourself the right type text by clicking on the fields “Structure”, “Shadow”, “Reflection”, “Glow”, and selecting the desired one from the expanded list.

To remove borders for the created block, right-click on it, select “Shape Outline” in the context menu, then “No Outline”.

All the functions that we discussed above are applicable not only to what is printed in the block. They can also be used for things that you simply print on a sheet of paper.

Now let's figure out what else is used for beautiful design words printed in a block.
Select the block itself and go to the tab that appears "Drawing Tools"– “Format”, it is on it that there are all those buttons that we will consider further.
On this tab, the buttons in the “Shape Styles” group apply to the frame: fill, dashed frame, etc. In the “WordArt” group, all the buttons are used to change the test. Let's look at everything in order.

For the inscription block you can use any ready style. To change the outline or fill color, expand available options and select the ones you need.
Please note that if you have a little inscription peeking out of the drop-down lists, as in the example, then by hovering the cursor over any of the options, you will be able to see how everything will change.

If you want, click and choose the appropriate color yourself. Here you can choose a color that is not in the palette - "Other fill colors", or a pattern, gradient or texture as a fill.

For a block with an inscription, you can also change the “Shape Outline” - that is, the frame. Choose a color, thickness for it, or change the line to a dashed dotted line.

Now let's move on to words and see what we can do with it. As with the frame, one of the ready-made styles can also be used for text.

Button "Text Fill" will allow you to change the color of the letters.

To select a contour, click the corresponding button. Here you can not only choose the color, but also the thickness or change the strokes.

To make your words look more impressive, use various options animations. Click on a similar button, then select what exactly you want to use, for example, “Reflection”. Next, from the drop-down list, decide on the appropriate option.

If you need the text to be of some unusual shape, then select "Convert". The list that opens will contain various curvature options.

How to write a beautiful text
It is not possible to create a single template that would be used for this. Because everyone has different tastes, and similar text is created for different purposes. So, experiment, click on the buttons that I described above, and see how the words change.
There are several articles on the site, during the writing of which an interesting type of text was obtained.
In the article on how to make an inscription in Word, the result was as follows.

If you need to make an inscription in a circle or semicircle in Word, then read the article by following the link.

You can read about how to insert text into a picture in Word in this article. The result was like this:

Many people probably know that with the help text editor Microsoft Word can create advertisements, book covers, pages for magazines or newspapers, and even postcards. The functionality of this program is enormous and it would be a sin not to use it. Today we will look at one interesting feature– frames.
Most often, you need to frame a document in order to give it brightness and make it more beautiful. After all, a sheet with text equipped with a beautiful ornament looks much nicer than plain white paper.
So, now let's look at the instructions that will help you make a beautiful frame in your document.
First, you need to go to the “” tab.

This will open a dialog box called “Borders and Shading.” In it we immediately draw attention to left side she, which is called "Field". Make sure the page borders are framed (see screenshot below).

- Type of future document border (frame);
- The type of lines that will be used to outline the sheets;
- Line color and width.
The functionality is quite extensive, the main thing is that you have enough imagination to create beautiful frame.
I'll give it to you small example the frame I got:

There is some more functionality in the same dialog box that we did not consider above.
For example, a dropdown list called " Apply to" I think you can guess why it is needed and what function it performs. You can set the frame to apply to:
- The entire document;
- This section;
- This section (1st page only);
- This section (except 1st page).
The names speak for themselves.
I would also like to note that under the “Apply to” drop-down list there is a button called “ Options", after clicking on which the dialog box " ».

Here you can install:
- Margins (top, bottom, right and left), but first from the drop-down list in select "Relation" - edges of page or text.
The sample, which is also located in this dialog box, will help you understand. That is, using the “Margins” section, you can set the text indents from the frame you created. There is nothing difficult about this, practice a couple of times and you can find the aspect ratio you need.
Finally, I would also like to recommend that users who cannot make a beautiful frame in Word download it already ready-made options in the Internet. There are quite a lot of them and most are in free access. But I think that all of the above is not as complicated as it might seem at first glance.
Personally, to create a beautiful frame, I always choose the “Volume” type, and the color is softer (which would not stand out against the background white sheet paper). This way you can achieve beautiful appearance document and do not ruin its readability.
That's probably all, I wish you success and good luck in your experiments.
If there is a need to make a frame in Word, most users follow the most obvious path - they create a huge table that spans the entire page, inside which they place the text. But, despite its simplicity, this method of creating a frame is not very convenient. Especially if there are other tables in the text.
Instead, it's better to use a tool called Page Borders. With it, you can make a frame in Word for all pages of a document, only for individual pages or even for individual paragraphs of text. You can find out how this is done in this article.
How to make a frame in Word 2007 and 2010
If you are using Word 2007 and 2010, then to make a frame you need to open the “Page Layout” tab and click on the “Page Borders” button. If you have Word 2016, then the “Page Borders” button must be found on the “Design” tab.
The Borders and Shading window will then appear. Here you need to select a frame and click on the “Ok” button. After this, each page of the document will be framed.

If necessary, you can make the frame the way you need. In the Borders and Shading window, you can select the border type, color, and thickness.

If you only need to add a frame to certain pages then you can break Word document into several sections and then apply the frame only to those pages that are needed.

How to Make a Border Around Text in Word
If you don't need to make a border around the entire page, you can make one around a paragraph of text you select. For this Place the cursor on the paragraph around which you want to make a frame, click on the “Page Borders” button and go to the “Border” tab.

A quick way to create a frame around text
There are also more quick way make a frame around the text in Word. There is a button on the Home tab that users usually don't notice.

This button allows you to quickly create frames around text. To do this, just place the cursor on the desired paragraph of text, click on this button and select the appropriate frame.

How to make a frame in Word 2013 and 2016
If you have Word 2013 and 2016, then the frame is added in exactly the same way as described above. The only exception is the “Page Borders” button will not be on the “Page Layout” tab, but on the “Design” tab.
Otherwise, the process of creating a frame is exactly the same as in Word 2007 and 2010.


