How to not display numbering on a specific page. How to remove page numbering in Word of different versions
These instructions are suitable for all modern versions of Microsoft Word (2007, 2010, 2013 and 2016).
1 . Open the “Insert” tab at the top of the program and click on the “Page Number” button (it is located in the “Header and Footers” section).
2. In the menu that opens, select “Delete page numbers.”
That's it - page numbers have been removed from the entire document!
Another way to remove page numbers
You can also remove page numbers by editing headers and footers. After all, this is where page numbers are usually written.
The header and footer is the blank area of a document at the top and bottom of each page. It is not intended for printing the main text, but contains additional information (title of the work, author's name, chapter/paragraph number, date, etc.).

To clear it, open the “Insert” tab and in the “Header and Footer” section click on the “Footer” or “Header” button (depending on where the page numbers are placed). And in the menu, select the “Delete header and footer” item.

Or you could do it another way: just double-click the left mouse button on the header and footer on any page, delete the number, and then click on the red “Close footer window” button at the top.
How to remove page number from title page
Often numbering is needed not from the first, but from subsequent pages. For example, you are doing a thesis, coursework or other scientific work, the first page of which will be the title page.
Go to the “Insert” tab and click on the footer or header button. Then in the menu that opens, select “Change header/footer”.

After this, editing the headers and footers themselves and the “Designer” tab at the top of the program will open. In it, in the “Options” section, you need to check the “Special footer for the first page” checkbox.

The number will be removed from the first sheet, but will remain on the rest. To apply these changes, you need to click on the red “Close Footer Window” button at the top.
There is another way to start numbering from the second page:
1 . Open the “Page Layout” tab and to the right of the “Page Settings” section name, click on the button with the arrow.

2. Go to the “Paper Source” tab and in the “Distinguish Headers and Footers” section, check the box next to the “first page” item.

Setting Page Numbers
Sometimes you need to make sure that the numbering starts not from the first page, but from some other page. For example, so that instead of the number 1, the calculation begins with the number 2.
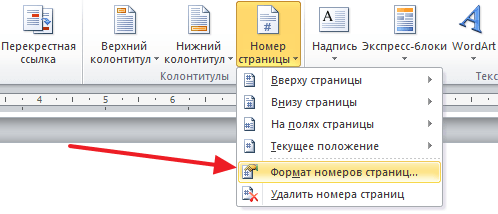
To do this, go to the “Insert” tab, click the “Page Number” button and in the menu that opens, select the “Page Number Format” item.

In the window, click on the “start with” item, type the number 2 or another number from which the numbering should begin, and click OK.

Numbering from page 3
There are situations when you need to mark sheets in a special way. For example, make sure that the first two pages are unnumbered, and the rest are numbered.
There is a solution, but it is somewhat unusual:
1 . First you need to delete all page numbers in the document: Insert - Page Number - Delete Page Numbers.

2. Then we place the cursor at the very beginning of the page from which the numbered sheets should begin.
If I want the sheets to be numbered starting from the third, then I click the mouse at the very beginning - before the first letter of the first word or heading.

3. Open the “Page Layout” tab, click on the “Breaks” button and select “Next Page”.

Most likely, nothing will change externally after this. This is usually the case - as it should be.
4 . Open editing for the footer on this sheet (top or bottom) where the number will appear. To do this, simply double-click on it with the left mouse button.
If you did everything correctly, then at the top it will say something like Footer -Section 2-

5 . At the top of the program, in the Designer, the “Same as in the previous section” button will be highlighted. Here you need to “squeeze” it, that is, click on it once with the left mouse button so that it becomes a normal (not orange) color.
We also remove the checkbox from the “Special footer for the first page” item, if it is installed.

6. And there, in the Designer, we enter the page numbers - there will be a corresponding button on the left.

If you need to customize the numbers (for example, so that the first one is one), click on “Page Number” again and select “Page Number Format...”. Then in the window click on “start with” and put the desired number.
7. Close the Designer by clicking on the “Close Header and Footer Window” button.
Not every document needs page numbers. Therefore, when users get their hands on typed text, many of them begin to be interested in the question: how to remove page numbering in Word.
There is nothing complicated about this. And after reading this article, you can be convinced of this.
Typically, page numbers are placed in the header and footer area. Therefore, to remove page numbering in Word, you need to go to header and footer editing mode.
If the document is numbered at the top or bottom of the page, move the mouse pointer over the page number so that it becomes an arrow and double-click on it with the left mouse button. The header and footer area will be delimited by a blue dotted line with the text on the left side: "Page header" or "Footer".
Select the page number and press the “Delete” or “Backspace” button on your keyboard.
If the numbering in the document is placed in the page margins, then clicking on it will not switch to the header and footer editing mode. To remove this type of numbering, open the “Insert” tab and click on the button "Page header" or "Footer". Select from drop down menu "Change footer".

The header and footer editing mode will open. Select with your mouse the area that limits the page number and press “Delete” or “Backspace”.

To exit the header-footer editing mode and return to working with text, double-click on the text with the left mouse button.

There is another way that will help remove automatic page numbering in a document. To do this, open the “Insert” tab and in the “Header and Footers” group, click on the button "Page number". Next, from the drop-down menu select "Remove page numbers".
Page numbers in the document that appear at the top, bottom, or in the margins of pages will be removed.

To remove numbering from the first two pages in Word, do the following. Go to header-footer editing mode: double-click on the number at the top or bottom of the page with the mouse. Next on the tab "Working with headers and footers"– “Designer” check the box "Special footer for the first page". Exit header and footer editing mode.

After this, place the cursor at the end of the text on the first page of the document. Go to the tab "Page layout"– “Breaks” and select from the menu "Next page".

As a result, the numbering from the second page in Word will be removed.

Now you should not have any questions about how to remove page numbering in Word 2007, Word 2010 and later versions. In addition, we figured out how to remove numbering from the first page or from the first two pages in a document.
Rate this article:When working with text documents, there is often a need to number pages. Numbering allows you to create a correct table of contents and simplifies navigation through the document.
In the Word text editor, page numbering is enabled using the “Page Number” button on the “Insert” tab. Most users know about this and usually there are no problems with it. However, sometimes page numbering needs to be adjusted to the specifics of a particular document, for example, removing numbering from the first page, and not everyone can cope with this task.
Now we will consider just such a problem. The material will be relevant for users of modern versions of Word. Such as Word 2007, 2010, 2013 and 2016.
To remove page numbers from the title page, first make a simple page number that will appear on all pages of the document, including the first. After that, go to the “Page Layout” tab. Here you need to click on the small button, which is located in the lower right corner of the “Page Options” button block.
After clicking this button, the “Page Settings” window will open. Here we go to the “Paper Source” tab and turn on the “Distinguish between first page headers and footers” option.

Then close the “Page Settings” window using the “OK” button. With this simple manipulation, we removed the numbering from the first page of the Word document.
But, there is one important point: now there is no number on the first page of the document, but on the second page there is the number “2”. If this numbering option suits you, then you can finish here. If you want the numbering on the second page to start from number “1”, then you need to go to the “Insert” tab, click on the “Page Number” button and open “Page Number Format”.
As a result, a small window with numbering parameters will appear. In order for the number “1” to appear on the second page of the document, here you need to enable the “Start with” option and set the value to “0”.

Thus, after saving this setting, Word will begin numbering pages not from one, but from zero. This means that on the second page we will get not “2”, but “1”, as needed.
It should be noted that this method of removing numbering works great only for the first page of a Word document; if you need to leave the first two pages or more without numbering, it will not work. In this case, the document must be separated using section breaks. You can read about how this is done.
The MS Office package from Bill Gates' company has long been one of the most popular complexes of very useful programs, of which Word is considered the most popular, for obvious reasons. With its help it is very easy to create, edit and format various text files. Every PC user should be able to perform at least basic operations with this application. So, it is very important to have an idea of how to clean up in Word.
At the moment, many people still use the 2003 version of the program to work with text files. This is largely due to the fact that it is very stable, convenient and has become very widespread. In addition, it works well on weak computers, which is often the reason for choosing it as the main one for organizations, offices, and so on. In order to understand how to remove page numbering in Word 2003, you need to explore the capabilities of the “Header and Footer” section, which can be accessed by opening the “View” menu. Here you will need to use one of two sub-items - “Footer” or “Header” (depending on where the numbering is located). By selecting the appropriate category, editing will become available, and the user will only have to select and delete any of the page numbers. This will clear the numbering from all other sheets of the document.

In 2007, a new version of the popular editor appeared. At the moment, there are already newer versions of it - 2010 and 2013. However, the differences between them are already insignificant, so it is enough to know how to remove page numbering in Word 2007, and you can confidently carry out this procedure in newer applications. And in order to implement it, you need to sequentially select “Insert” - “Header and Footers”. In the tab that opens, you need to find the “Page number” option. Clicking on it will open a list, among which the user is interested in the lowest item - “Delete numbers...”.
Universal method
There is another fairly simple method, after studying which the user will understand how to remove page numbering in Word of any version. This algorithm also works in other text processing applications, so knowing it is very useful. So, to clear a document from numbering, just point at the number with the serial number and double-click the left mouse button. This will make the field dedicated to headers and footers active, and the user can simply delete the number from it, which will automatically clear all other pages of the document from it.

How to remove the numbering of the first page
Sometimes you need to remove not all numbering, but only from the first page. In such cases, the methods described above will not help, since the algorithms for performing this function are implemented using other tools. In Word 2003, you will need to open “Insert” - “Page Numbers”, then uncheck the box next to “Number on first...”. For Word 2007 and newer versions, you will need to open the “Header and Footers” menu and select “Design” or “Layout” (depending on the version of the program). In the tab that opens, you just need to check the box next to the “Special footer for the first...” field. That's all. Thus, the number will no longer be displayed, and on the second it will be according to the ordinal value, and so on.
Working with the Word program is a set of skills necessary for a modern person. Preparation of reports, statements, scientific and term papers, abstract studies - all this requires knowledge of the basics of document formatting. As a rule, problems arise when changing headers and footers - that part of the printed sheet on which headings and subheadings and page numbering are displayed. The last point will be discussed in this material.
Adding or removing a page number from the title page
Pagination is a familiar feature that is widely used in the preparation of any scientific research in printed format. In order to use this text editor option, you need to go to the “Insert” tab and start working with the header and footer, which can be displayed either at the top of the printed sheet or at the bottom. Standard numbering is a footer located in the middle of the page, indicated in the form of a number or number. In order to carry out the specified document formatting, you must:
- On the “Insert” tab, click on the “Page Number” function.
- Then click on the “Bottom of Page” sub-item.
- Select a sample – “Simple number 2”.
You will see many other options for placing document pagination. Accordingly, you can change the location of the number on the page (left, right, top, etc.), depending on the requirements for the preparation of your work. However, the selected numbering type will be applied starting from the first sheet, without taking into account the title. In order to get rid of an extra number, you need to:
- Go to the “Insert” tab.
- Click on the “Page number” sub-item.
- Select the required type of numbering.
- Left-click on the “Special footer for first page” command.
In this way, each sheet of your work will be numbered, with the exception of the first, title page.
Removing document numbering
Sometimes it becomes necessary to remove the specified pagination. To execute this simple command, you must follow the specified algorithm of actions:
- Go to the “View” tab.
- Click on the “Page Layout” command.
- Selecting the “Header and Footer” item.
- Click on the page number (a dialog box should appear to format the number).
- Click on the “Delete” (or “Delete”) command.


Adding a starting page number other than 1.
Document numbering can start from any number. This option is a useful tool if you need to continuously number two different documents. To run the command you need to do the following:
- Go to the “View” tab.
- Selecting the “Page Layout” item.
- In the “Document Elements” panel, click on the “Header and Footer” column.
- Click on the “Page” function.
- Click on the “Format” button.
- In the “Start with” field, enter the required value. For example, “Start at 21.”
- Click on the “OK” command.
Thus, the document will be numbered in order, starting with designation 21.


The work of preparing research will seem trivial and easy if you master the basics and get to know the Word text editor better. And formatting and changing documents will take a matter of minutes if you spend a little time studying this article. And let everyday things be a joy!


