How to enter the recovery menu on Android: a tip for the smartphone owner. Installing CWM Recovery on Android: methods for every taste
As you know, the Android operating system provides the user with enormous functionality, using which he can realize the full potential of his smartphone: from advanced configuration using the engineering menu to a complete factory reset using a special mode - Android System Recovery 3e. You will learn what to do in this menu with a smartphone in this article.
This settings mode was designed for working with system files and system parameters. With its help, you can activate or block almost all functions of your Android device. Here you can perform such complex manipulations as completely cleaning or restoring the system in just a couple of clicks. Due to the important role this menu plays, getting into it is not so easy, but more on that below. In order not to harm your device, you need to know the mode items, their meaning in Android System Recovery 3e and what to do to carry out certain actions.
Launch Android System Recovery 3e
As mentioned above, launching this menu is not that easy. To get here:
- Turn off the gadget;
- Simultaneously hold down the volume rocker, the Home button and the power key.
After a few seconds, the Android logo will appear on the screen, and then the Android System Recovery 3e menu will launch. What to do in it and what meanings the menu items have – we’ll talk about this further.
Assigning items in mode
The very first and most important point is Reboot. It allows the user to restart the device.
To use the device's memory card as an external drive connected via USB, select Toggle USB stage.
Here you can also work with the CWM package. It is used to install your own Recovery on the device.
By selecting “Instal from sdcard” (installing CWM from a memory card), you will find yourself in a subsection with the following items:
- Installing CWM Recovery, which is pre-loaded onto the memory card - Choose zip from sdcard;
- Check the amount md5sum – Check md5sum a file;
- Find out the signature of the CWM package – Toggle Signature Verification;
- Check CWM for compatibility with the device - this can be done by clicking on Toggle Sclipt Assert.
How to use Android System Recovery 3e mode for flashing, what to do on Lenovo or other gadgets? Use only proven functions that you understand!
- Reset all smartphone data – Wipe data/factory reset;
- Wipe Cache allows you to completely clear the cache;
- Wipe dalvik cache is used to clear Dalvik Cache;
- To clear your battery usage history, use Wipe battery stat;
- Format System completely removes all system files;
- Format Date formats the data section;
- Format cache deletes cache data, but the files themselves remain in it;
- Clearing kernel cache data – Format boot;
- To completely format the device, use Wipe all partitions.

All the meanings of the menu items that we are talking about are completely identical for all gadgets running Android.
Backup/Restore is one of the most important sections, which is responsible for backing up and restoring data. It contains the following points:
- Backup – creates a backup copy of data;
- Restore – used to restore factory firmware;
- Advance Restore – used to restore individual data sections;
- Advanced Backup – can be used to copy partitions.
The next item is responsible for converting formats to Android System Recovery 3e. What to do in this menu? Here you can choose different types of conversion to EXT4 and EXT3. Here's what this section allows you to do:
- Convert/change a backup converts the device system;
- Use Convert Data to convert data;
- Change one of you backup is used to transfer backup sections;
- Convert Cache converts cache;
- Wipe data/factory reset is used to convert all partitions;
- Formatting the system – format system, data – format data, cache – format cache.
Extra menu

In the Advanced section, you can perform the following actions using the following commands:
- File System Check checks the validation of system files;
- Print Partition Info displays log information on the display;
- Copy recovery.log to sdcard is used to save copies of the recovery log;
- Opening ext and ext2 formats on an SD memory card – Partition SD Card;
- No - save my fat32 partition! stops partitions;
- Use Fix Permission to fix permissions in /data/data.
And finally, the last item is the Power Menu. It is used for power management:
- Reboot Recovery performs a reboot;
- In Bootloader mode, use Reboot into Bootloader;
- A simple reboot is carried out using Reboot;
- Power Off – normal shutdown.
Thus, using this menu you can perform a huge number of functions that are not available in the visual settings. If you have any questions, you can always ask them in the comments!
![]()
Once again, let's talk about the Recovery menu, since almost always instructions for flashing and upgrading Android involve performing certain actions specifically from the Recovery menu.
What is Recovery?
Recovery (recovery) or translated from English – Recovery Mode is a special boot mode for the device, with which you can restore the system or install updates. This is an emergency mode necessary to restore the working state of the mobile device in the event of program failures, which result in the device turning off and making it impossible to boot in normal mode.

Using Recovery mode you can:
- Restart your tablet or smartphone.
- Reset settings.
- Install updates.
- Configure and install firmware.
- Get Root rights.
- Delete your personal data located in the system.
- Restore the operating system and much more.
Remember that incorrect actions can harm the system. If your tablet contains important information, it is better to save it on another device in advance.
Before using recovery mode, please read the instructions carefully. Each tablet has a service menu that is different from others, so the question of how to access the Recovery menu on a tablet requires an individual approach.
How to log into Recovery?
The Recovery mode in each mobile device is visually different, but the login process is almost always carried out according to the same principle. In order to enter the Recovery system, you need to do a number of actions:
1. Turn off the tablet. At the same time, make sure that the battery is fully charged or connect the tablet to the network.
2. Go to Recovery mode by pressing a combination of some buttons. Since different tablet manufacturers offer different hotkey combinations, we will provide several of the most common key combinations for entering the recovery menu.
Basic key combinations for entering Recovery:
- Simultaneously hold down both the “volume” keys and the “power” key;
- simultaneously pressing one of the “volume” keys and the “power” key;
- simultaneously hold down one of the volume buttons, the Home button and the device power button.
The buttons are held until the recovery mode appears on the display.
Some Chinese devices do not have a Recovery mode. In this case, you will have to reflash the tablet.
How to navigate through the Recovery menu?
Most devices allow you to navigate through menu items using the volume control buttons. The power button serves to select the desired menu item. Some devices may use other keys.
If the control is touch, then we move through the items and select the desired item by pressing with a finger.
How to enter Recovery if there are no volume keys on the tablet?
If your tablet doesn't have volume keys, try these tips:
1. You can try to enter the desired mode by holding down the Power and Home buttons at the same time. Another option is to hold down the Home key, press the Power button and release the Home key. After the splash screen appears, press the “Home” button again.
2. You can navigate through the menu by connecting a USB keyboard via an OTG cable or using the sensor.
Hello, please explain how to use the Android System Recovery 3e mode, there is such a huge menu that half of the items are not clear.
Answers (2)
This comment is edited.
Recovery (also known as the recovery menu) is a separate small operating system that has a minimum of functions and works independently of the main one. There are stock and custom recovery. The first is “native”, the second is modified and improved, it must be installed independently.
The most common custom ones are CWM and TWRP; they are supported by most devices.
To enter recovery on Android you need:
- be sure to charge the battery 80-90%;
- turn off the device;
- simultaneously hold down the “on/off” button, volume control button “louder”, sometimes also the “home” button (depending on the model);
- wait until the manufacturer icon appears;
- release, the recovery menu will appear.
To move around it, use the volume control carriage - “louder” up, “quieter” down. To enter the sub-item you need to press the “on/off” or “home” button.
Returning to the previous menu is carried out using the “go back” item. After selecting any command, a list appears with sub-items “no” and one “yes”, which must be clicked to run.
The number of points depends on the android system recovery. Instructions for use are as follows:
- “reboot system now” - reboot, through it you can exit android system recovery, depending on the device, the menu may contain this item in the “power menu” section;
- “wipe data/factory reset” - reset to factory settings, deleting all information from the device, after which the smartphone will be the same as after purchase;
- “wipe cache partition” - this item is responsible for deleting the system and application cache, that is, clearing unnecessary files;
- “install from sdcard” - installation of archived files from a flash drive.

Some points have additional sub-points, so I’ll tell you about each of them. “Backup and restore” section:- “backup” - a backup copy of the operating system is created and stored on a flash drive;
- “restore” - installing a backup; by opening the item, a list of firmware will appear;
- “advanced restore” - restores part of the operating system, the command works with the same partitions as the next function.

You need to be very careful with the “mounts and storage” item, as it can damage the device. It is used for formatting - permanently deleting all information and mounting, that is, connecting to the system. This item works with the following sections:- “mount/system” - system;
- “unmount /data” - to store user information;
- “mount /sd-ext” - mounts part of the operating system onto a flash drive to expand capabilities;
- “unmount /cache” - cache, temporary files;
“mount /sdcard” - SD card.
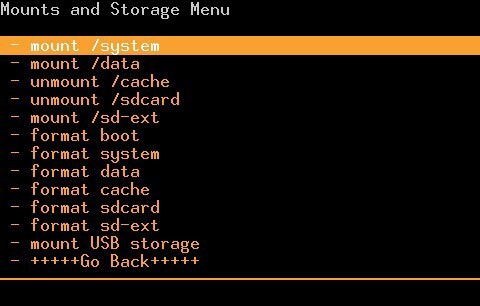
The "format" command works with the same sections, but only clears all the contents. Applying this item to “system” or “data” will kill the smartphone.
In recovery there is an “advanced” submenu, which includes additional features. Here is their list:
- “wipe dalvik cache” - cleaning unnecessary files from the dalvik machine in which programs are launched on the phone;
- “wipe battery stat” - clearing information about battery usage;
- “restart adb” - loading into adb mode, which is needed to control the device via the command line from a PC;
- “fix permissions” - the command returns file permissions to their original state.
This comment is edited.
Rarely, but a situation arises when android system recovery 3e does not respond. What to do about this problem and how to solve it depend on the reasons:
- not unlocked bootloader;
- experiments on installing custom recovery, as a result of which the original one failed;
- Broken volume or power buttons.
The most common reason why android system recovery 3e may not respond is a locked bootloader. Unlocking it occurs in different ways and depends on the specific device model.
An unsuccessfully installed recovery must be “rolled back” to its original one. First you need to find a stock recovery for the desired model - it is best to search on our and American forums.
The recovery is flashed through the ADB program, which is installed on the computer as follows:
- download the zip archive;
- open it, find the ADB.exe file;
- in the menu that appears after right-clicking on it, select “run as administrator”;
- then a blue window will appear;
- write “y” and press “inter”, repeat this 3 times, so we agree to install the program and drivers;
- go to the ADB folder, it should be in the root of drive C;
- copy the downloaded recovery here and rename it to recovery.img;
- press “shift” and the right mouse button;
- select “open command line”;
- enter “fastboot flash recovery recovery.img” this is the command that will install the downloaded recovery;
- by pressing “inter” we launch it;
- write “reboot”.
After this, you can enter the updated recovery.
If the buttons malfunction, you need to connect the device to the computer as described above, enter “reboot recovery” and press “enter”.

The second generation of Samsung Galaxy J2 has been officially released and is available in various markets. So, if you have already bought this Marshmallow-powered smartphone, it's time to learn how to use it properly. But to become a more experienced android user, you need to learn the basics first. In this regard, today we want to describe in detail the sequence of steps that must be followed in order to access the recovery mode on the new Samsung Galaxy J2 (2016).
In fact, we will describe in detail three different methods through which you can enter recovery mode on your Galaxy J2. This is a basic operation in android that all users must know to properly manage the features and performance of their devices. Entering recovery mode is not difficult, it will help provide various benefits in terms of internal access to android.
Recovery mode is a specialized environment pre-installed on the Samsung Galaxy J2, just like on any other Android smartphone or tablet. This software can only be accessed when the reboot sequence is known - this is a precaution designed for an inexperienced user who, using the recovery system, can easily mess things up inside the Android M kernel. However, putting the Galaxy J2 (2016) into recovery mode is official a process that can be completed within a few seconds.
Since this is a supported/official operation, you will not have to use third party programs or complex and risky applications to perform the steps below. This way, you won't void your phone's warranty, and there's no risk of damaging the software while entering recovery mode.
But, what can you do using recovery mode? Using stock software (pre-installed on Galaxy J2), you can only perform supported operations such as managing new updates, clearing app data cache, performing a hard reset, backing up data, and other similar procedures. On the other hand, if you decide to install a custom recovery image such as CWM or TWRP, you will be able to customize your phone by performing custom operations: for example, installing custom kernels, downloading custom programs from sources other than the Play Store to increase speed smartphone performance or increasing battery life.
One final note: Installing a custom recovery image is an unofficial operation and will void your Galaxy J2 (2016) warranty. However, the steps in this guide can be successfully applied both when using stock recovery mode and when using custom Recovery mode, so you don't have to worry about it.
Thus, the recovery system is a software through which you can access and then modify the Android system running the Samsung Galaxy J2 (2016).
Be careful though, as if you are going to customize your Galaxy J2 with a custom recovery image, you should back up your data, accounts and files before you do anything - a hard reset will apply for most of the custom work that will need to be done . So, spend a few minutes of your time and save contacts, call logs, messages, internet settings, IMEI/NVRAM data, calendar, saved passwords, EFS folders, images, videos, audio files and anything else you may need later. Note: If you are using a custom recovery image, you may want to keep the current Android OS your Galaxy J2 is running on.
There is something else that must be taken into account: the battery charge must be above 40%, otherwise the battery must be charged. If you skip this step, the phone may turn off in the middle of the reboot process - as a result, or may appear.
How to enter recovery mode on Samsung Galaxy J2 (2016)
Use hardware buttons
- This is the classic method; it will work if you turn off your Samsung phone first.
- Wait for the shutdown process to complete.
- Then press the Power button, Volume Up key and Home button at the same time and hold for a few seconds.
- The recovery mode menu should automatically appear on your Galaxy J2.
- In recovery mode, use the Volume up and down key to switch between options and the Power key to select the option you want.
- Finally, return to Android mode by selecting “reboot system now”.
Use the Android SDK toolkit
Another method involves initiating a special ADB command. But to be able to do this, first of all you must become a developer on your smartphone: go to the “Menu - Settings - About phone” section and click on the build number 7 times. Then in “Menu - Settings - Developer Options” select the USB Debugging tool. A computer will be required; Install USB drivers for Galaxy J2 (2016) on it - you can do this using the Samsung Kies toolkit; In addition, install the Android SDK on your computer. And finally do:
- Locate and open the Android SDK folder on your computer.
- Turn on your phone.
- Connect your smartphone to your computer - just plug in the USB cable.
- From the Android SDK folder, open a command prompt window: press and hold the Shift key and at the same time right-click on an empty space.
- In the command prompt window, type “adb reboot recovery”.
- Wait until the Galaxy J2 (2016) enters recovery mode.
Using Third Party Applications
There are special applications in the Play Store that can help you complete the reboot sequence. An example of such an application is Quick Boot software. Thus, download and install this application on your smartphone. Then launch it and follow the on-screen prompts to complete the reboot process and enter recovery mode.
More articles about Samsung.
To switch to Recovery Mode, you need to use a bootloader or bootloader. Recovery Mode, in turn, is used to reset to factory settings, hard reset and flash the smartphone's firmware.
Samsung smartphones have a special Download Mode, which is separate from Recovery Mode.
Today we will tell you how to switch to Recovery Mode on different Android smartphones.
How to go to Download mode on Samsung

Download Mode is a downloader for Samsung devices. This mode displays some information about the smartphone or tablet. Using the Download mode, you can connect your Android device to your computer, install new firmware or a custom Recovery menu.
To enter Download mode on Samsung, you need to follow these steps:
- Completely turn off your Android device.
- Simultaneously press the Volume Down button, the Home button and the Power button.
- Confirm your choice using the Volume Up button.
How to enter Recovery mode on Samsung

If your smartphone has a custom Recovery menu installed, for example, ClockWorkMod, then you need to use a different key combination:
- Turn off your smartphone.
- Now press the Volume Up button, the Home button and the Power button at the same time.
- Hold the buttons until the custom Recovery menu loads.
- To navigate through the menu, use the Volume Up and Down buttons. To confirm, press the Power button.
How to enter Recovery mode on Motorola and Nexus

To enter Recovery mode on Motorola and Nexus smartphones, you need to do the following:
- Turn off the device.
- Press the Volume Down button and the Power button.
- The bootloader will appear. Use the Volume keys to select Recovery. Press the Power button to select.
How to enter Recovery mode on LG
To enter Recovery mode on LG smartphones, you need to press a certain key combination:
- Turn off your device and wait a few seconds until it turns off completely.
- Press the Volume Down button and the Power button.
- When the LG logo appears, release the Power button and press it again. After this, the Hard Reset or Recovery Mode option will appear.
How to enter Recovery mode on HTC

On HTC smartphones, the procedure for switching to Recovery mode is slightly different:
- Turn on your smartphone, then go to Settings – Battery and uncheck the Fastboot box.
- Turn off your Android device and wait a few seconds.
- Press the Power button and Volume down at the same time. Hold for a few seconds.
- A screen with a white background will appear. Use the Volume key to select "Recovery".
- Press the Power button to confirm.
How to enter Recovery mode on ASUS

Switching to Recovery mode on Asus devices is very simple and fast:
- Turn off your Android device completely.
- Press the Power button and Volume up. Hold the buttons until the android robot appears on the screen.
- After a few seconds, Recovery Mode will appear.
- Using the volume up and down buttons, you can select the option that interests you, such as Factory Reset. By clicking the Power button you will make your choice.
How to enter Recovery mode on Huawei

Activating Recovery mode on Huawei is very similar to the previous ones:
- Turn off the device and wait until it turns off completely.
- Press the Volume Up button and the Power button until the screen lights up.
- After some time, Recovery mode will load.
How to go into Recovery mode on Xiaomi
There are two ways to enter Recovery mode on Xiaomi smartphones: through the update screen or using a key combination.

If the smartphone is turned on:
- Open the Updater application.
- Click on the three dots in the upper right corner.
- From the drop-down list, select “Reboot to Recovery mode”.
If the smartphone is turned off:
- Turn off your smartphone.
- Press the Volume Up button and the Power button at the same time.
If you used the wrong key combination, press the Volume Down button. This will take you to Fastboot (a protocol for connecting to a computer). To turn off the device completely, hold down the Power button for at least 12 seconds.
If you are unable to enter Recovery mode on your Android device, write in the comments.


