How to remove USB from a cassette car radio. How to connect USB to a radio: options and their effectiveness. How to properly make a USB input in your car radio
When cassette recorders and CD players appeared, cars began to be equipped with car radios. But with the development of radio electronics, USB flash drives appeared, which completely replaced other media. They do not take up much space, you can record a large number of music files on them, and during the trip the music will not be interrupted by off-road driving. How to make a USB port (adapter) for standard radios with your own hands is described in this article.
[Hide]
Guide on how to make a USB input in a car radio
Almost all modern cars are equipped with a car radio. Many drivers do not want to change it to a new Chinese device in order to get a USB input. In order to be able to listen to music from a flash drive, you need to connect a USB adapter to the standard radio (video author - oleg ko).
Preparation
It won’t take much time, but you need to have some knowledge of radio engineering and be able to use a soldering iron. First of all, you need to purchase an MP3 player that can read flash drives and memory cards. It is important that it has a headphone output. This is necessary so that you can record the audio signal.
You can use an FM trimmer that is equipped with an audio output. The advantage of the trimmer is that it comes with a remote control.

Stages
Having purchased a suitable device with an audio output and prepared the necessary tools, you can get to work.
The connection consists of the following steps:
- We take out the device and remove the tape drive or CD drive from it.
- We solder the positive power wire from the player to the radio contact. After switching on, a voltage of 9 or 12 V should appear.
- For an MP3 player, you need to include a voltage converter from 12 Volts to 5 Volts in the circuit. It is built-in in the trimmer.
- To connect sound, you need to take a shielded wire and connect it to the audio output of the player. If there is no such wire, then you need to find a pre-amplifier on the board, it is the wire that we need that goes to it.
- We find the audio signal output on the microprocessor. We unsolder the capacitors, and in their place we supply an audio signal from the player.
- Now we install the MP3 player board. In this case, care must be taken not to avoid a short circuit.
- You can make a USB input through a hole in the panel where discs or cassettes were inserted.
- The buttons for controlling the player are connected to the control keys located on the front panel.
- Next, it remains to assemble the standard one in place.

Now you can listen to music from digital devices via a DIY USB port. To do this, you need to turn on the TARE or AUX mode. Tracks are controlled either using the buttons on the panel or the remote control if an FM trimmer was used.
Conclusion
Advantages of connecting a USB adapter to the radio:
- easy to install;
- The flash drive does not have the disadvantages of playing CDs, when the laser burns out and problems arise with playing discs;
- A lot of files fit on a flash drive, they are easy to update and supplement;
- the recording is played back in the quality in which it was recorded;
- you can use a standard device;
- The USB input does not occupy the cigarette lighter.
Thus, connecting a USB port is not difficult. The main thing is to be able to use a soldering iron and understand at least a little about electronics.
By connecting your adapter for flash drives to the car radio, you can save on buying a new device equipped with a USB adapter.
2012-04-30 at 23:51
Good afternoon. It's winter outside and it's cold to dig around in the car. But if your hands are itching to upgrade something in your car, have free time, and wait until spring for a long time, then they can be occupied with interesting and educational work. For example, turn your cassette car radio into a full-fledged MP3. The rework will allow you to preserve the functions of the steering column switch (in fact, because of it, everything is started) and significantly improve the sound quality. There are rumors that there are craftsmen who do this, but I don’t know where to find them =), so I decided to do everything myself.
Almost everyone has an MP3 modulator, which consists of an MP3 player and a low-power transmitter.
It seems logical to throw away the transmitter and connect the player to the radio directly with wires. This is what you and I will do. The sequence of actions is as follows:
1) Disassemble the MP3 modulator
2) We look at what microcircuits it is made of.
3) We search on the Internet where these microcircuits have sound output.
4 Solder the wires to these terminals
5) We disassemble the car radio
6) We look at what microcircuits it is made of
7) We search on the Internet where these microcircuits have a sound input
8) Solder the output of the MP3 modulator to the input of the car radio. And enjoy =))
We will need: an experimental MP3 modulator, a car radio, a soldering iron - the smallest one, no more than 25 W, a set of small screwdrivers (Phillips, asterisks, etc.), tweezers, a magnifying glass, wires, active speakers (or, at worst, headphones), 9 V Krona battery. And the ability to solder. If you don’t know how, you can practice on old TVs, receivers, etc.
So, here we go:
1) First, screw the wires to the speaker plug. This will be our sound search device. Having studied the pinout of the microcircuit, we will touch the wire to the desired leg and listen. If the leg is correct, the speakers will sound.
2) Carefully inspect the MP3 modulator and pry off the plastic cover with a screwdriver and remove it.

Unscrew the bolts and remove the board.

We also disassemble the cigarette lighter plug - it contains a stabilizer plate.

3) We slowly examine. All microcircuits are located under the SD card reader. We are normal people and use flash drives =), so we solder it in the corners, and then bend it with tweezers and break it off.
4) Connect the battery and check how removing the card reader affected the operation of the modulator. The player feels great.
5) Consider the microcircuits. We copy everything that is written on them onto a piece of paper. I had the following:
Chip No. 1
ATJ 2009
ZB72YDAJ7T
Chip No. 2
E414 91 S4
A4 CH 1035
25 Q80 10 SCP
Chip No. 3
AS 600 1SP8
B 1040 CTT
Now we’ll find out where the names are hidden among this jumble of letters and numbers. Google...
An Internet search showed that my modulator consists of the following microcircuits:
ATJ 2009 is actually an MP3 player itself.
25Q80 - 8 MB memory.
AS 6001 - transmitter
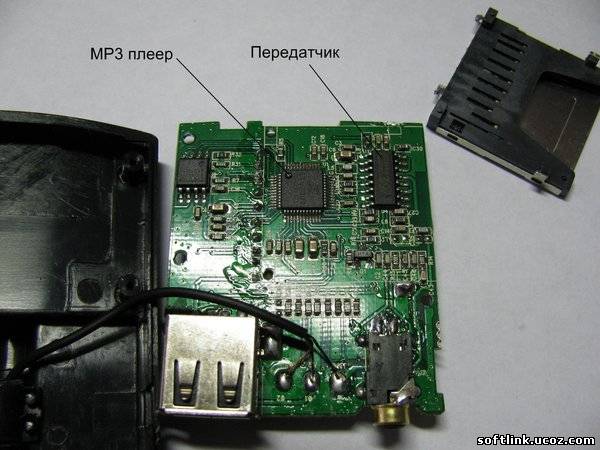
The first chip is a purebred Chinese. All information is in Chinese only. After looking through the documentation, I still don’t understand where the sound output is.
But for the second, complete information was presented in English, from which it was possible to understand that the input of the left channel is the 6th output, the right channel is the 7th output. Let's check. We connect the battery, start the song, touch the speaker wire to one of the above-mentioned legs of the microcircuit.... Oh yeah!!! The fiery sounds of prophetic trumpets reached my ears... Music roared from the speakers. Then to another....Yess!!!...This is what we were looking for.
6) We don’t need the transmitter chip anymore. We carefully solder it. Using a needle, we gradually pry up each leg and, heating it with a soldering iron, bend it. When you have unsoldered all the legs on one side, pry the microcircuit with tweezers and, shaking it from side to side, break it off from the board.

7) We connect the battery and check the patient’s well-being after all the barbarity that we inflicted on him. As it turned out, the removal of part of the insides was absolutely painless =).

When you press the appropriate buttons, the player even pretends to change the frequency. Fool!!! Never again clutter up your range with your interference =))) Ha! Ha! Ha!
8) Solder the wires to the 6th and 7th tracks. It is advisable to first glue them to the board with glue to make soldering easier.

9) We take the wires out of the case (I used a shielded stereo cable and a separate wire for the power supply). Audio output (Line Out) is ready. We put the player back together and carry out a control check. Do the speakers sound? Great. Now we need to make a sound input (Line In). Let's move on to the radio.
10) If you (like me) have never listened to cassettes on it, it makes sense to check the operation of the tape part. After rummaging around the house, I found a couple of old cassette tapes and went to check it out. Despite the frost -10 ⁰C, the cassette started playing instantly. Then I spent an hour trying to figure out how to get the car radio out of the car. The solution turned out to be quite unusual (for me). There are 4 holes in the corners of the front panel. Insert toothpicks (match, nail, etc.) into all holes. Now use a thin screwdriver to pry up the panel from below and pull it. The radio comes out.
11) We bring it home, inspect it,

Remove the top cover.

12) Unscrew the two bolts and, carefully helping with a thin screwdriver, remove the front panel.
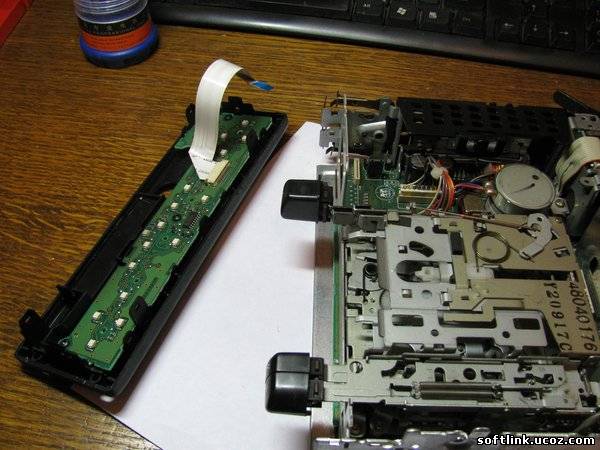
13) Disconnect the cables of the tape drive mechanism and, unscrewing the 4 bolts, remove it.

14) We look at the board slightly dumbfounded and think: “Horror!!! So many details!!! It’s simply impossible to figure this out!!!”

But, as Stanislav Lem wrote, “...If people from cave times would only do what seemed possible, they would still be sitting in caves...”.
So let's start figuring it out. As in the case of the modulator, we rewrite the names of the microcircuits and go searching on the Internet. After a couple of hours, I already roughly figured out how this organ works. Without going into details, I’ll tell you the most important thing: from the tape recorder head, the signal goes to the TEA0675 chip, which is a preamplifier. The signal is then amplified in other microcircuits and sent to the speakers. DC 459/62L makes sure that you enter the password correctly, TDA 7342 is responsible for adjusting the volume and tone, SAA 6579T deciphers the names of songs when you listen to FM.....etc. However, all this does not interest us. All our attention will be focused specifically on the TEA0675, which has a signal coming out from legs 1 and 24 before being sent into the further jungle of the radio. Here we will intercept it and replace it with our own (MP3 player signal). The radio won't notice =))
15) Unsolder the microcircuit so that it does not interfere

And solder the wires to pads 1 and 24.

Audio input (Line In) is ready.

In general, that’s all, now you can listen to how our newly-minted MP3 radio tape recorder sounds.
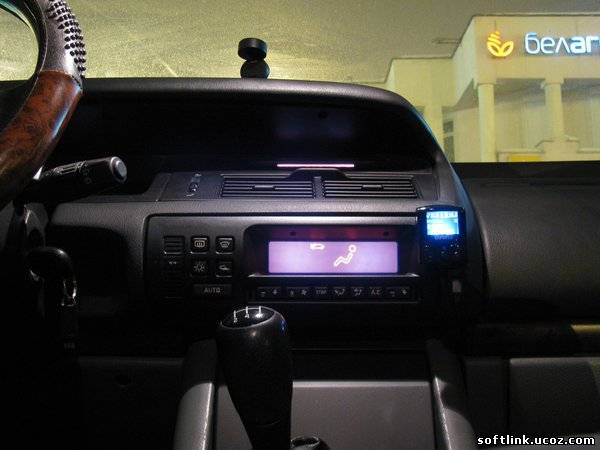
16) We put the radio back together, connect the MP3 player to the created input, climb into the car, connect all the connectors, enter the password... insert the cassette... and listen to the MP3 while the motor hums. Convenient right? …Not good? =))

Yes, the radio will not switch to operating mode with the tape part until a cassette is inserted. This is its structure. So we need to convince her that the cassette is already inserted.
17) How does the radio recorder determine the cassette in it? Nature has deprived her of her eyes, but she has a couple of sensor buttons. When the cassette is inserted, the 1st is released, the 2nd is pressed. When the cassette is pulled out, the 1st is pressed, the 2nd is released. The 3rd button on the cassette does not react at all.
Great. We are returning home.
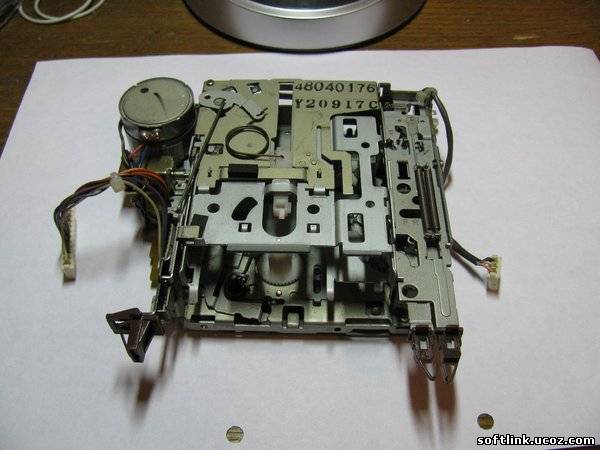
We take out the entire electronic part from the tape drive mechanism.

We bite off and solder off all unnecessary parts: motor, relay, head, etc.

We throw away the mechanism itself. We leave only the scarf with 3 buttons.

We do not touch the 1st button (it must be released), and we close the second with a jumper.

All. Now the radio is sure that you inserted the cassette and will play it (only it doesn’t know that neither the cassette, nor the tape mechanism, nor the microcircuit is gone =))
28) We connect the scarf into place, wrap it with tape for insulation and glue it somewhere inside the case so that it does not fall off.

We put the front panel in place; We glue the buttons, which now perform a purely decorative function, tightly. We seal the window for the cassette so that someone doesn’t stuff it in there.

29) We finally connect the “plus” power supply of your MP3 player. To do this, we look for any place in the radio where there is 12 volts. I recommend connecting instead of the relay (which you unsoldered). There are comfortable large areas there. (However, I myself took the “plus” from one of the unnecessary capacitors). I secured the MP3 modulator voltage stabilizer board with glue on the side wall of the radio. I replaced the snotty Chinese wires with durable Soviet ones.


It is better to use a shielded wire connecting the MP3 player and the radio. Carefully unsolder the microcircuits, do not tear off the tracks from the PCB - it will be difficult to solder the wires. After completing all the work, you will need to install the correct arrangement of stereo channels (left-right). Therefore, provide the opportunity to easily change the left channel with the right seats (if you don’t guess right away). For example, I only slightly touched the wires inside the radio, and only in the car, having determined exactly where the left and where the right were, I finally twisted everything together, insulated it and closed the lid. To find out the location of the channels, play this empatrishka. Do not route the wires to the right side (as I did)! There will be problems with installing the radio in place. I barely got mine in. Exit all wiring only to the rear. If you need to gain free access to the wiring, remove the glove box.
That's all. Now, when you turn on the radio, it automatically switches to CASS (cassette) mode and plays MP3. To switch between RADIO - CASS modes, press SRC or 3 times the LMU button on the steering column switch (DV-SV-VHF-cassette).

Don't miss updates! Subscribe to our group
Nowadays, no one can be surprised by a radio in a car; it’s difficult to see a car without it. The latter's screen displays not only sound data. In some versions, it displays speed, data about external light lights and much more. But in our digital age, not every one of them is able to support listening to music from USB. It's good that many car radios can connect this type of input.
Why connect USB
Music in cars appeared back in the 70s of the last century. At first these were simple radio receivers with a small range of received waves, and they were installed only on executive Volgas. For the owner of a medium-sized Zhiguli, such luxury was unavailable for a long time. With the development of industry, a cassette recorder was added to the radio receiver, which was later replaced by disc support. Subsequently, even a CD changer appeared. The newest cars have radios with the ability to listen to music via USB.
But what should the owner of a car produced 5-10, or even more years ago?
Buy a new radio?
No - modernize the old one.
But before we talk about such modernization, let's figure it out.
What is a USB input on a radio?
This input on it, like on any other household audio-video equipment, allows you to connect ordinary flash drives according to the 2.0 standard. But this is clearly not enough. The radio must detect the flash drive, understand the format of what is recorded on it, and play it back. No one argues that if the radio has an audio input, you can connect the output from your smartphone and download music to it.
But what happens when you get a call? In most cases, they unplug the cord from the headphones and talk without them. This simple operation requires both hands and distraction for a few seconds. If this happens in a fast moving car... The situation on the road changes quickly, you get distracted... and get into an accident.
There are several solutions to this situation:
- The radio (sometimes the CD player) may have an external input on the back side, plug a special adapter into it;
- you can remove the old player and put an FM modulator in its place;
- Solder the USB extension cable to the radio board.
Option with adapter
Most factory radios may have a socket on the back. All work comes down to several actions:
The advantages of this solution:
- The radio will “decide” that you just changed the player. Accordingly, if the radio supports MP3 playback from a disc, it will be able to play it from a flash drive.
- Some adapters, in addition to USB support, have memory card support. You can remove the card from the smart card described above and insert it into such an adapter.
But there is also a minus
Control protocols are different for different cars, so when you change cars, you will most likely have to change the adapter. But when buying a new car, this issue is not so important.
Modulator: how to connect and use
An FM modulator is a device that can transmit a signal from a flash drive (as well as a memory card) over a radio channel. In general, it is plugged into the cigarette lighter socket and tuned to a certain frequency. The same frequency is adjusted on the radio receiver. You (and your neighbor nearby) can listen to music from a flash drive. But for a large city, where the radio range is jam-packed, you can do it differently: install the modulator directly into the tape recorder. How to do it?
To work you will need:
- soldering iron;
- a set of shielded wires (you can take regular ones, but shielded ones will give better quality (a sufficient amount of wire will be in the original radio);
- Modulator (you can use any MP3 player). The advantage of the modulator is the presence of a remote control, as well as a built-in power converter;
- the radio itself;
- voltage converter 12 - 5 V.
Operating procedure
Nutrition
- After disassembling the radio, disconnect the tape drive or disc player.
- Having disassembled the modulator, remove the microcircuit (there is only one there).
- The plus from the modulator power supply is soldered to the general plus of the radio (the contact where 12V will appear when turned on),
- Minus - to the minus of nutrition.
- USB is connected to the front panel using an extension cable.
The power converter in the modulator is different, in the player it depends on its brand.
Audio
A shielded wire connects the audio output of the modulator and the input of the radio.
There is no such input on ancient cassette players. In this case, the signal will have to be fed directly to the input of the preamplifier. It's easy to find - it's where the shielded wire from the head goes.
The wiring diagram for the amplifier chip can be found on the Internet.
For example, this is what the circuit of an amplifier based on TDA2005 looks like.
Assembly
Since in the new version only the radio receiver unit remains, the modulator can be placed in the housing. If all contacts are connected correctly, then the activation of “AUX” or “Tape” is redirected to the modulator.
Video
How to make USB support and still keep the old (working) player
Connect the USB extension cable directly to the car radio board
There is no need to stop specially at soldering the extension cord. The attached video shows in sufficient detail with the names of all the parts how such a cable is soldered to the radio in Wv.
Video
What to do if you need a cassette
Sometimes the electronics of an old cassette player are configured so that it can only play when the cassette is inserted. In case of modernization there will be nothing to play with. The solution would be to find a diagram of your cassette player online and find out which jumper is clamped by the inserted cassette. Close the jumper, and the radio will be “sure” that the cassette is in place.
An ancient car radio lying on a shelf in a closet will last for many more years. Instead of buying a new one, add USB support to the old one.
Many people threw away their favorite cassette player when the world switched to CDs. I did the same thing ten years ago, gathered my will into a fist and took the absolutely serviceable Fisher PH-W405K to the trash heap. But many still have the imported radios they bought with great difficulty at Beryozki and second-hand stores. AIWA, Sanio, JVC, and even the legendary Sharp GF-777 are still gathering dust somewhere in the closet. After all, this technology is convenient for everyone: it’s compact, it sounds great, it runs on batteries for a long time (we’ll talk about converting this technology to run on batteries), but, unfortunately, it doesn’t play anything else except the radio. But I know a way to give your boomboxes, boomboxes and ghettoblasters a second life, installing a USB port in them.
One day we were given an LG FFH-217 radio tape recorder in excellent condition. My friend Misha, having learned that we had bought a dacha, gave it away with the words “you will listen to the radio.” But alas, as it turned out, FM radio stations do not broadcast there; the nearest large city is 80 km away. This radio stood there for several years until I came across a small board measuring 2x4 cm, made in China. The board contained a pair of chips and a USB connector, and a remote control was included with the board. I then bought several pieces of such boards in order to choose the most suitable one for installation in a car (see article about), one of them turned out to be powered by 5 volts, and this became the basis for my modification.
How to choose a USB board
Options for selecting a board:
- Voltage. You need to disassemble your radio and measure the voltage at the power supply outputs with a tester. Aliexpress sells boards for 5, 12 and 5-12 volts. If you find a suitable power source, then choose the USB board accordingly. Make sure it doesn't turn off when you select external output playback mode! For example, I had 5 volts on the CD unit power, but the CD power would turn off when selecting the AUX audio source. In my case, the required 5 volts were found at the contacts of the backlight lamps.
- Form factor. There are just USB boards (I have one), some with support for SD cards, some with control buttons, some with a screen. You'll need to figure out where your vintage stereo has room to put it all. The front part of my radio is completely occupied by cassette covers and an indicator, and where it was possible to make a hole for a flash drive, there was a board with control buttons and tape drive motors at the back.
- Functional. As I mentioned above, USB player boards can be simple; in addition to USB flash drives, they can also support SD cards; they can have control buttons, have a large or small screen, and also carry FM radio and Bluetooth on board. If you like to listen to music from your phone, then I would advise you to pay attention to boards with Bluetooth, then your radio will become not only a USB player, but also a Bluetooth speaker. There are absolutely luxurious and inexpensive boards with Bluetooth 4.2, and if you have enough space to put it, then you won’t need all the other functionality of the boombox.
- Pay attention to the little things. Some boards do not support flash drives larger than 8 GB. Some have an amplifier on board. Such a board can generally be mounted directly into one of the speakers, if you do not have a monoblock, and use only the speakers, but it will not be suitable for expanding the functionality of an existing device.
Description of the modification of the old radio with photo
1. We disassemble the old radio.

2. Now you need to find a place where you will embed the new board. Find a place and make a hole for the USB connector. In my case, this is the back cover.

3. Install the board to measure the required length of wires. I soldered the audio outputs directly to the corresponding AUX connector, and removed the power from the pins of the control board connector.

Even today, there are some modern cars that are equipped with radios without a USB connector, not to mention older cars. This state of affairs does not suit many car owners, which prompts them to search for possible solutions. One of the available options to equip a standard USB radio is to connect the input yourself; this is not difficult to do, but not all car radios accept this solution.
What is a USB input on a car radio?
Many car owners are faced with a situation where the standard radio in the car does not read music from a flash drive. And the whole problem is that the device simply does not have a USB input, i.e. it was not originally provided. Moreover, this situation is relevant not only for old cars, but also on modern foreign cars you can often find such a distinctive feature. Almost everyone will agree that you want to listen to music in the car without any restrictions, but you can’t record a lot on a CD. Yes, and disks in a car today are somehow inconvenient and outdated. What to do, is there a solution to the problem? After all, replacing a radio is not the cheapest pleasure and not everyone can afford it. Below we will try to understand the situation in detail and find the optimal solution.
How to make and connect a USB input to a radio
Today, all kinds of electronic devices and devices do not exist and, of course, the problem outlined above has not remained aside. It is not necessary to change the standard radio; it is enough to simply improve the device. There are different options, which we will consider.
USB adapter from mp3 player for standard tape recorder
For this method, we need the simplest mp3 player that is capable of reading music files of the appropriate format from both a memory card and a flash drive. Important feature: the player must have an audio output (jack) for headphones. It will be from this that the signal will be taken and sent to the radio. It is worth noting that to perform the procedure you need at least minimal skills in working with a soldering iron in order to avoid short circuits with solder during the soldering process and damage to the insulation of wires, elements, etc. We implement the player as follows:
- We disassemble the radio and remove the CD drive or tape drive from it (if the radio is a cassette).
- We take power from the standard device to power the player, the board of which is first removed from the case.
- Depending on the player's supply voltage, you will have to implement a voltage converter circuit. For example, the car's on-board network has 12 V, and the player is powered by a 3.6 V Li-ion battery.
- We take the sound signal from the output of the player and feed it to the AUX input of the radio. The connection requires a shielded wire, i.e. the wires must be braided. On the radio board you need to find the audio input contacts. We solder the wire from the player to them.
- We install the player board inside the radio, since after removing the CD drive, space will be freed up. For convenience, the USB connector itself is located in a hole intended for cassettes or disks.
- The wires must be connected carefully to avoid a possible short circuit.
- To control the player, the buttons are connected to unused buttons from the CD drive.
- All that remains is to assemble the radio, install it in place and you can enjoy the music, for which you just need to activate the AUX mode.
Thus, we assembled the USB adapter ourselves. With this connection method, the volume level on the radio should be lower, which will eliminate the loud signal at a high input signal level.
DIY adapter
Let's consider another option for connecting a flash drive. In this case, you will need a plug from standard headphones, tulip-type connectors and a 4-core copper braided wire. The adapter will be made from these elements. For the procedure to be successful, the radio must have an AUX input. Before starting work, make sure that the headphone wire is not broken. For this reason it is called a multimeter. The whole process is as follows:
- We remove the insulation from the headphone wire and see red and green conductors that correspond to the right and left channels (we cut off the headphones themselves). These conductors must be stripped and soldered to the middle contacts on the tulip connector.
- The braid of the main wire is connected to the steel base of the “tulip”.
- The finished adapter should have the following wiring: the middle contacts of the “tulips” receive signals from the right and left channels, and the steel base is the common contact.
- We connect an adapter to the external sound signal connector of the radio, with which you can connect any device: tablet, smartphone, player, etc.
- All that remains is to activate the AUX mode and you can listen to music.
How to make an AUX jack
From the above, you can understand that the radio must have an AUX input. But what if there is no such connector, how to connect an external signal source in this case? There is a way out of this situation, and you can do everything with your own hands. For this we need:
- audio jack (standard 3-pin stereo jack);
- wire for connections (2 in the screen);
- soldering iron and everything necessary for it (solder and flux);
- multimeter
Once everything is prepared, you can begin dismantling the device. Let's look at the whole process using the standard Toyota Avensis radio as an example. To remove it you need to:
- Pry the decorative strip from the end on the right, pull it along its entire length and remove it.
- Remove the connector from the button responsible for heating the rear window.
- The radio is secured with two bolts. To unscrew them you need to use a screwdriver with a magnet. Otherwise the bolts will fall behind the panel.
- To ensure free access, the handbrake must be raised.
- Move the selector to the central position and press the Shift Lock button, while the ignition should be turned off. In the corner we pry up the selector panel by snapping the pistons.
- Disconnect the connector going to the ashtray and remove the panel.
- More fastening bolts will be visible from below, which we carefully unscrew.
- We take out the radio so that access to the connectors on the rear panel is provided.
- Disconnect all connectors.
- Remove the brackets (left and right).
- Using a flat-head screwdriver, pry up the plastic locks on the front panel, and then remove the panel itself.
- There is a seal under the panel, which we also remove.
- We unscrew the bolts that connect the front panel to the side walls and the player. After which the walls can be removed to the side.
- Remove the back cover of the radio and the top of the player.
- You need to carefully lift the player, after which two cables will be visible and accessible. We take them out of the connectors and remove the player.
This completes the disassembly process of the device. But before you connect the AUX connector, you need to understand the board and find two points (RCH and LCH). These points correspond to two channels (outputs) of the player to the head unit. After the points are found, perform the following actions:
- We take 3 wires of different colors (the best option is a shielded pair of cores) with a small cross-section and a length of about 0.5 m.
- We connect one of the wires by soldering to ground.
- We solder the remaining two wires to the right and left channels. For soldering, use a low-power soldering iron of 25–30 W.
- After the wires are soldered, you should write down which color wire corresponds to which channel.
- The wires are wrapped in heat-shrinkable tubing.
If the question is about introducing an AUX connector into a cassette recorder, then the process is not complicated. On the front panel of the device there is a volume control with 3 pins arranged in a row. We solder wires 25 cm long to the outer terminals. It is advisable that the wire be shielded, which will avoid interference. The wires from the device are routed outside. Alternatively, you can make a small hole in the side wall for them. All that remains is to connect the audio connector and our marking will come in handy so as not to get confused with the channels. When the wires are soldered to the connector, select a convenient place to attach it.
Upon completion of installation, check the functionality of the speakers in radio mode. To supply an external signal (from an mp3 player, smartphone or tablet), use an appropriate audio adapter that connects the audio output of one of the listed devices to the AUX input of the radio. In this case, you need to turn on the CD on the radio to activate the channels.
Video: How to install AUX using a Kenwood radio as an example
Connecting a flash drive to AUX - is it possible?
Many people ask the question: is it possible to connect a flash drive directly to the AUX input of the radio? The answer is simple - you can't. And all because the flash drive needs power, plus there is simply no sound signal output from this type of media. To play music from a flash drive, you must have a reader. Those who buy an adapter of this type: an audio jack on one side, a USB jack on the other, connected by a piece of wire, will be disappointed. Such an adapter will not work for the same reasons as listed above. In this case, it is necessary to purchase a special adapter, which is not just a piece of wire, but a device assembled in a separate housing.
Thus, we looked at possible ways to obtain a USB connector for connecting a flash drive to a CD or cassette player. In fact, there is nothing complicated in this procedure. The main thing is not to rush during the soldering process, perform the actions carefully and connect the wires to the appropriate points. At the same time, the costs, compared to purchasing a new radio, are minimal.
In order to be able to connect a flash drive to the standard radio, it is not necessary to buy a new expensive device. It is enough to make simple modifications and you can listen to music both from a flash drive and from other signal sources. This will require minimal skills in working with a soldering iron and a step-by-step procedure.


