How to hide files on disk. Use the system registry. We turn to auxiliary programs
By default, the ability to see hidden files is disabled in any version of Windows. This is necessary so that inexperienced “dummies” do not accidentally delete anything and disrupt the operation of the OS. The solution is quite logical, since these folders are rarely needed. And even then - only to a few users. But sometimes there is a need to look at hidden files.
For example, during Windows optimization and waste cleaning. Many programs ( Microsoft Word, Skype) create hidden files during operation. Over time, they become unnecessary, but are stored on disk and occupy extra space.
Very often the need to include hidden folders and files occurs among gamers. After all, they are where saves from many games are stored.
Also, displaying hidden files is required by users who want to hide documents on a flash drive, but do not yet know how to find them later. In general, there are a lot of reasons.
Let me immediately note that in different Windows versions This setting is done in different ways. Although some methods may be the same. Therefore, below are several instructions on how to enable hidden files in all Windows - “seven”, “eight”, “ten” and XP. Plus given universal method, running on all OS.
Most quick way see hidden files in Windows 7:

Ready. You will now be able to open hidden files on Windows 7 because they have become visible.
If you need to disable their display, then in the same window, check the box “Do not show...”.
Second way:

And the third way to enable the display of hidden files in Windows 7:

As you can see, there is nothing complicated here. Choose any method that suits you best and use it at the right time.
How to view hidden files on a flash drive? Similar. When you enable viewing hidden files in Windows 7 with any of the the above methods, they will be visible everywhere. Including on a flash drive. You just need to connect it to your PC or laptop - and you will see the hidden folders (provided that they are there). The same applies to an external HDD.
We've sorted out the "seven", now let's move on to the "eight".
How to enable hidden files in Windows 8?
How do you configure the display of hidden files in Windows 8? There are also 3 options to choose from. The first two are described above in the instructions for Windows 7. That is, you can enable hidden files in Windows 8 by writing control command folders. Or by selecting the “Folder Options” shortcut in the Control Panel.

But there is another way to show hidden files in Windows 8:
- Open any folder you like.
- Select the "View" section.
- Click on “Show or Hide” and then check the “ Hidden elements».

Ready. Now you can view hidden files on Windows 8. And not only in current folder, but also in others. The same methods will help display hidden files on a flash drive or external HDD disk– you just need to connect them to your computer or laptop.
Show hidden files in Windows 10
The last method, which works on Windows 8, is also suitable for the “ten”. To enable hidden files in Windows 10:
- Open any folder.
- Select the "View" section.
- Check the "Hidden Elements" box.

After this you will be able to see hidden folders and documents in any section hard drive or on a flash drive (it must be connected to the PC).
If you want to hide the folders again, uncheck this box.
There is also another way to enable the display of hidden files in Windows 10:


Ready. Now you can open any hidden files on Windows 10. As you can see, the methods on different versions of the OS are quite similar, but differ in minor nuances.
How to show hidden files and folders in Windows XP?
Not many users use Piggy today, but we’ll still consider it. You can view hidden files in XP like this:


That's it - now you can open or delete hidden folders and documents.
Show hidden files in Total Commander
If you don’t want to understand the differences between different Windows versions, you can use the universal method. IN in this case you just need to install the file Total manager Commander (download link). The program sees hidden documents and works on all Windows.
How to see hidden files in Total Commander? To do this you need to do the following:


Now all folders and documents in Total Commander will be visible. And you don’t even have to go to the Windows settings and change folder display options.
Need to see hidden documents? Launch Total Commander and go to the desired hard section disk. Or connect the USB flash drive and then open it through this file manager.
As you can see, all ingenious is simple. Now you know how to show hidden files and make them visible. And if necessary, you can easily find them. My only advice: if you find any unfamiliar folders, do not delete them. After all, they may contain important system files, the removal of which will break Windows.
So, first, go to the Start menu - Computer, then select the “Arrange” menu in the left top corner. Then select the Folder and Search Options menu item. A new window will open, go to the View tab. Scroll the slider to the end and check the radio button for “Show hidden files, folders and drives” (see screenshot). After that, click the Apply button. After this, all previously hidden folders and files will be displayed in Explorer.
Step 2
If you need to hide or display any separate file, then do the following. Click right click mouse on a file or folder. Then select Properties. In the new window, on the General tab, check (or uncheck) Hidden and click Apply.
Step 3
There is another way to make hidden files visible. It is suitable for users of fine and convenient program Total Commander. If you use this program, select Configuration in the top menu, then select Settings. A new window will open, in which you need to select the “Panel Contents” tab. After that, check the box “Show hidden/system files”, click the Apply and OK buttons. After this, Total Commander will show all hidden files.
Step 4
That's all, as you can see, nothing complicated. But there is one caveat. If you have the Windows 7 operating system installed, then problems may arise with changing the display of system files. For example, you need to change a system file hosts(it is hidden by default), you will make changes, but the system will not allow you to save them. In this case, you need to open notepad from command line, on behalf of the administrator. Start Menu – Run – cmd. At the command prompt, enter notepad.exe and press Enter, then manually open hosts file(or whatever you need), change it and save.
Most computer owners have dealt with hidden folders.
Sometimes this Windows tool is very useful for hiding your documents.
But it often happens that malicious programs have settled in elements hidden by developers, and the files urgently need to be opened and cleaned.
Why does Windows hide some of the system files and how to see them, how to make folders invisible yourself?
What are invisible files for?
Hidden items are normal folders, but they are not displayed like all the others.
These elements use the “hidden” attribute.
IN Windows interface such documents are not displayed by default.
Do not be mistaken that by hiding some folders, you can free up space on your hard drive. They will weigh the same as regular ones.
Folders are invisible for several reasons.
- Operating system developers deliberately make invisible some of the system files that inexperienced user may be deleted by mistake, disrupting the operation of your computer. At everyday use the user does not need to look into them and change anything, so many do not even know about the existence of these “invisible” ones.
- Users themselves sometimes hide some documents. This is especially true if the computer is working or children use it.
- This function is also convenient to use if you have a lot of files on your computer that you rarely use. To prevent them from taking up unnecessary space and preventing you from finding and viewing more important documents, you can hide them.
- You should not exclude the influence of viruses on your PC. They can be the cause of folders that have disappeared from view.
Files can be made visible on the hard drive as a whole or in a specific part of it.
Experts offer several options for solving this problem.
The easiest way
To use it, we will turn to Explorer.
1. Open the first folder you come across or press the Windows + E key combination.
2. Then select the line "View" in the main menu. Then click on "Show or hide" and select the item "Hidden Elements" .
Showing hidden folders
This solution is also quite simple. It won’t be difficult to complete it, even if the user is not particularly computer literate.
- Need to open "My computer" ;
- Find the section at the top left "Service" , from the displayed list you need to select the line "Folder properties" (For Windows 7 or Windows 8, select "Folders settings" ).
- A new window will appear, from which you should go to the tab "View" ;
- At the bottom of the displayed list, mark the phrase "Show hidden files and folders" (When it comes to versions Windows systems 7 and Windows 8, your point is ), click on this line, then click "Apply" , and then to Ok;

- In a situation where there is a need to view hidden system files and folders, you need to uncheck the item in the same list "Hide protected system files" .
- But such an action is recommended to be performed only as a last resort.
It happens that the menu is not visible on the computer "Service" . In this case, use the Alt key (there is a chance that it is not displayed all the time).
You can also go to this window in another way:
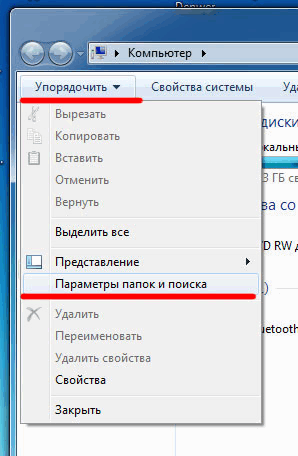
- While in a folder, you need to select the command "Arrange" . It can be found in the upper left corner, directly below the address bar;
- In the menu that pops up we find "Folder and Search Options" .
- Here again we find ourselves in "Folders settings" and move to the menu "View" .
- We put a mark on the proposal again "Show hidden files, folders and drives" .
- Click Ok
Changing folder properties
After carrying out these simple manipulations, you will again be able to see hidden folders, along with everyone else.
In order to achieve this, it is enough to remove the attribute "Hide" from invisible folders.
- We start by clicking on the invisible folder using the right mouse button and finding the menu item "Properties" .

- On the screen we will see a window showing the properties of the hidden folder. We will need to remove the check mark from the item "Hidden" and complete the operation by clicking on Ok.
- If the folder you need contains other documents, the window will ask you to remove the attribute "Hidden" specifically from this folder or from it and all the folders in it. If your task is to make all attachments visible, select the appropriate item and click on Ok.
This is how easy it is for you to display everything invisible folders.
If you need to turn it off again after this visual preview hidden documents, you can perform this task in the Folder Options window.
Use the system registry
Use the first method various reasons sometimes it doesn't work out.
For example, malware hid any documents on your PC and blocked the ability to customize the operating system.
Then you can try to solve the problem with the help of the system registry.
There it is necessary to adjust the parameters that are responsible for displaying invisible elements, which means returning them to their normal appearance.
So let's get started:
1. Go to the menu "Start" (it is located in the lower left corner of the desktop on the control panel);
2. Click on the word "Run" . In the window that appears, enter the word "regedit" and press Enter (For PCs with systems version seven and eight, you will need to enter the word "regedit" directly to the menu search bar "Start" ). Having done all this, you will see the system registry on the monitor, in it you need to find the item we need.
3. The window on the left will display a list of sections available in the registry. You will need to move step by step from section to section: HKEY_CURRENT_USER, Software, Microsoft, Windows, CurrentVersion, Explorer, Advanced.
4. Move to the required section in right side window, after that we look for the parameter "Hidden" , click on it twice and replace it in the displayed window in the line "Meaning" number zero to number one. If it turns out that required parameter not in this section, you need to start creating it. Click on empty space in the right part of the registry window, right-click and click in the list that opens "Create" , and then - "Parameter" . Rename the newly created parameter to "Hidden" and assign it a value of one by clicking on it twice.
5. Now you need to go to the registry key: HKEY_LOCAL_MACHINE, SOFTWARE, Microsoft, Windows, CurrentVersion, Explorer, Advanced, Folder, Hidden, SHOWALL.
6. In it, look for the “CheckedValue” item to assign it the value one. Using the method indicated earlier, we create this item in its absence and also enter the number one here.
Hidden folders in Windows 10
How to make an invisible folder.
Turning to command line functions
The Command Prompt in Windows helps you perform many tasks in the operating system.
To display the command line on the screen, click on the menu "Start" , then click on "Run" .
In a new window enter "CMD" and click OK. (For the seventh and eighth versions, enter the letters "CMD" V search bar menu "Start".
A command line window will appear on the monitor.
To see invisible documents V specific folder, first of all you will need to enter it.
To achieve your goal, enter the following commands one by one (after each of them, press Enter):
- X:, where X is the designation name local disk(for example, D), on which the files or folders you need are located.
- cd (for example, cd c:/windows/), where hidden documents are located.
- After you have moved to the desired directory, all you have to do is familiarize yourself with its contents. If you want only hidden folders and files to be displayed in the window, write: dir /a:h (if you enter the “dir” command without parameters, then only visible objects will be displayed on the screen).
- To achieve normal functioning former hidden folders that you will need to view through Explorer, while in the same directory, run the following actions for each object: attrib –s –h. This command will remove the “hidden” and “system” attributes (if the files or folders are actually system files, the “hidden” attribute cannot be removed from them). Note! If file or folder names contain spaces, you must write them in quotes (for example, attrib –s –h “Hidden folder 1”).
We turn to auxiliary programs
Many programs have been developed for Windows to help make hidden documents visible.
One of the most convenient and frequently used is Total Commander.

Download, install and run the program.
Then we begin our task.
- Open the menu "Configuration" , which is located at the top of the window;
- In the list that appears, select "Settings..." ;
- In a new window we look for the item "Contents of panels" and we head towards it;
- In the middle of the window there are settings items. Phrase must be marked "Show hidden/system files" and press the button "Apply" .
After completing these steps, you will be able to view the contents of invisible folders in the main window of the Total Commander program.
They will be displayed to you along with all the others.
How to prevent opening hidden files?
There are times when other users should not be allowed to change the visibility of hidden folders. It can be done.
The parameters that are in the registry will help us CheckedValue, In chapter HKLM\Software\Microsoft\Windows\CurrentVersion\Explorer\Advanced\Folder\Hidden\Showall.
As a rule, its value is determined by the number one.
By specifying the number zero for it, we will cut off the ability to show hidden files.
This method is quite effective, but since Windows 8\Server 2012, the visibility of hidden files in Explorer has been changed using a checkbox "Hidden Elements" , which cannot be influenced by such settings.
Also, prohibitions are not possible when using the “Total Commander” program and its analogues. They will still be able to find hidden elements.
What to do if you need to hide a file
The opposite situation also happens. Let's say you need to hide some documents or files. It's easy and won't take much time.
Your actions:
1. Right-click on the folder or file you selected to hide;
2. Find the property line at the bottom of the drop-down list;
3. In the window that appears, check the word "Hidden" ;

4. Click on "Run" , then Ok.
How do you know if invisible folders are visible again?
It's easy to check.
- Just go to "My computer" ;
- Next, select the folder "Program Files" . In it, the former “invisibles” will have a translucent appearance, clearly standing out from the rest.

Conclusion
In the end, I would like to advise you to pay more attention to the security of your computer - use good antivirus programs, update them regularly, do not insert unverified flash drives into the device.
But, if your PC does become a victim of an attack by viruses that hide folders or hide in invisible files, don’t be afraid, but act.
Just use one of our suggested methods for identifying hidden folders. It works!
In Windows 7, Windows 8, Windows 10 and Vista, you can hide important files and folders to randomly other users have not deleted/changed important data, or simply from being viewed by prying eyes. If necessary, these same files are quite easy to display, which we will look at later in this article.
also in Lately very often there is a case when users have all files and folders hidden, as if everything that was deleted, and instead of them, shortcuts with the same names are created, which is a consequence of a computer/removable storage device being infected with a virus.
This can also happen after installing or scanning your computer with an antivirus. If you have just such a case associated with a virus, the instructions below will also help you display hidden files and folders. But to completely remove the virus, read the article How to remove a virus with shortcuts.
The first and simplest method I always use is using Total programs Commander. Open the program, select required disk and just click the "Hidden Items" button and you will see everything that was hidden (marked with a red exclamation mark).
If you do not have the program installed, use also quite simple ways described below.
Show hidden files and folders in Windows 8.x or 10
Use the View tab and click the Options button.

On the View tab, check the “Show hidden files, folders and drives” option at the very bottom. If you want to get to the hidden system Windows files, uncheck the option "Hide protected system files"

Hidden files will appear semi-transparent. If you want to completely remove the “hidden” attribute from a file or folder, right-click on it and select properties. On the General tab, uncheck the Hidden option.

In most cases, this helps, but sometimes it happens that the checkbox from the option cannot be removed, because the hidden attribute is inactive. If so, scroll down a little and follow the instructions provided.
Windows 7 or Vista
Open any folder and select Folder and Search Options from the Organize menu.
Just like in the previous example, check or uncheck the desired options and click OK.

What to do if the folder's hidden attribute is inactive
In case you cannot remove the attribute hidden folder using the above method, the code below can help you in this situation. Just copy it, paste it into notepad and save it as folder with the extension .vbs instead of txt to get folder.vbs. Then copy and paste the file into the drive you want ( USB flash drive, SD card or HDD), where you need to show hidden files and run it as standard, double click mice.
Don't forget to change "d:" to your drive letter.
‘ Reset file attributes for all folders inside a specific drive
‘ Change d: to the drive letter where the script will be applied
cDrive = "d:"
Set FSO = CreateObject("Scripting.FileSystemObject")
ShowSubfolders FSO.GetFolder(cDrive)
WScript.Echo "Done with fix."Sub ShowSubFolders(Folder)
str = ""
For Each Subfolder in Folder.SubFolders
str = str & » » & Subfolder.Path
subFolder.Attributes = 0
ShowSubFolders Subfolder
Next
End Sub
After running the file, you should see all hidden folders, but not files (please note) since this method Applies only to folders. And for files use the following method:
- Open the Run dialog box, enter cmd and press Enter.
- Enter your drive letter, for example d: and press Enter.
- Then enter the following command:
attrib d:\*.* /d /s -h -r -s
Now, all hidden files should appear.
How to find hidden folders
Some of the files and folders in the Windows operating system do not appear on the hard drive and removable drives, since they are hidden. But what if you want to access them? How to show hidden folders and files?
The operating system usually hides system files, the deletion or modification of which can lead to a malfunction or even a complete crash of Windows. This can be called a kind of “foolproof”, thanks to which an inexperienced PC user cannot interfere with the system structure.
In addition, some user-installed programs create their own hidden files. This is all done for the same reason - so that the user does not accidentally delete anything important. Sometimes users themselves hide files, for example, so that other people cannot find them on their hard drive (by the way, this method cannot be called reliable).
How to determine if a file is hidden? A distinctive feature of hidden files and folders is the translucency of icons and names, but only if you have already enabled their display. In most cases it is turned off. How to show hidden folders and files in Windows?
How to show hidden folders and files in WindowsXP?
 How to open hidden files on a flash drive
 In WindowsXP this can be done in two ways.
In the first case, you need to go to Explorer (either double-click on the My Computer icon, or use the hotkey combination Win+E). Next, you need to select Tools - Folder Options from the menu. In the properties window that opens, click on the View tab and check the Show hidden files and folders box. Click Apply and then OK.
In the second case, you need to go to the Control Panel (in the Start menu) and select the Folder Options section. Then proceed exactly the same as in the first case.
How to show hidden folders and files in Windows 7?
 How to view a hidden folder
 In general, displaying hidden files and folders in Windows 7 is the same as in WindowsXP, but some nuances should be mentioned separately. For example, the Control Panel section in this system is called Folder Options, and in the View tab you need to check the box next to Show hidden files, folders and drives.
If you want to use Explorer for this purpose, it is important to note that by default Top Menu not displayed in this system. To see this menu, you must click Alt key. In the menu that appears, select Tools - Folder Options. Further actions you already know.
How to open hidden folders and files using a file manager?
If you already know how to hide a folder or file and do not want to make them visible in the operating system, then you can use any file manager to find and use them. One of the most famous is TotalCommander.
Open the file manager, go to the menu, select Configuration - Settings. You will see a settings window split into two halves. A list of customizable options will appear on the left side. In this case, select Panel Contents and left-click on it. After that, in the right panel you will see a list of options, including the File Display block. In it you need to select the first item, which is called Show hidden/system files (only for experienced ones!). To save the settings, click Apply and then OK.
Now you know how to find hidden folders and files in operating systems WindowsXP and 7. But do not forget that you cannot thoughtlessly change and delete system files and folders - this can cause system malfunctions, and in the worst case, even the need to completely reinstall it.


