How to reset the BIOS to the initial settings. What happens if you reset the bios settings? How to reset BIOS to factory settings
Sometimes, in case of any computer malfunctions or erroneous changes in settings, it is necessary to reset the BIOS settings. This way you can quickly revive your PC or laptop. There are several ways to return the original BIOS settings; now we will look at each of them in more detail.
Ways to return the original BIOS settings:
As you can see there are 5 options. But this may be for a system unit; for a laptop, usually only the first 3 points are suitable. The fifth point is quite rare; the button is located on the computer’s motherboard, as are the jumpers.
When is it necessary to reset BIOS settings?
Let's first figure out in what cases it is necessary to reset the BIOS settings:
- In case you have forgotten the password to enter the BIOS or operating system.
- When the computer does not load the OS, for example, the boot priority in the settings has been changed.
- If incorrect changes have been made to the BIOS settings.
These are the main reasons why it is usually necessary to reset the basic I/O system. There are, of course, many other reasons: in the case of overclocking the processor or when you have gone too far, and old computers do not know how to automatically return the original settings for the normal temperature of the component.
There may be a reason why it is necessary to reset the BIOS - it is an incorrect update, bad firmware and all that. If the computer does not turn on, but only makes sounds (), then resetting the settings in some cases can also solve this problem.
How can I reset the BIOS?
As mentioned above, there are several ways to reset the BIOS or return to factory settings. What happens in this case? After the reset, the BIOS returns to the original settings, as they were from the very beginning, that is, the factory settings will be reset.
It is also important to know: in the case of points 3 to 5 (see Table of Contents above), it is necessary to open the system unit or open the laptop case, this way you can lose the device’s warranty. But, if you don’t want to lose the warranty, and the laptop does not allow you to boot into the BIOS, then resetting with the first two options is not possible.
And so, now we will consider each of the reset points in as much detail as possible.
Resetting settings from the BIOS menu
If there is such an opportunity to get into the BIOS menu, then you don’t have to bother too much and go into the system unit or hide the laptop, because you can reset the settings directly in the BIOS Setup itself. Let's take a closer look at how we can reset our basic I/O system in this way.

The computer will reboot and check if resetting the BIOS helped you.
Reset using Debug utility
Debug is a standard utility included in the 32-bit Windows OS. If you can boot the operating system and have the opportunity to use it, but you still need to reset the BIOS to factory settings, then this item is just for you, because again, you don’t need to go into hardware or even incomprehensible BIOS menu settings.
- Launch the "Run" menu (Start-Run, or the Win+R key combination)
- Enter debug and click on OK.
A utility window resembling a command line will open. Next you need to find out what BIOS you have. You can find out the BIOS version and manufacturer as follows: you need to open the "Run" menu, enter MSINFO32 and click OK. Afterwards, a window will open where on the right in the “Element” column you need to find the “BIOS Version” item, opposite the manufacturer and version will be written.

If AMI BIOS or AWARD, then you need to enter the following command in Debug (after each line you must press Enter):
- O 70 17
- O 73 17
If Phoenix BIOS, then here is the command:
- O 70 FF
- O 71 FF
We just enter the first line - press Enter, also the second and third. After executing these commands, the BIOS settings will be reset to factory settings. To check if everything worked, just restart the computer.
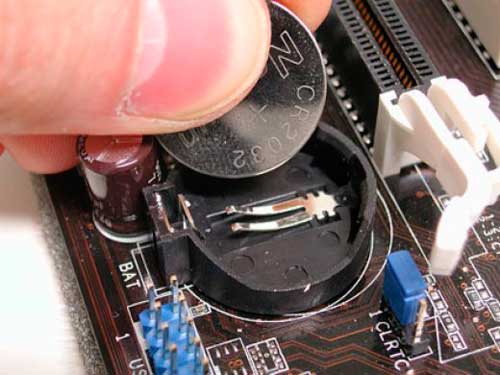
Reset using CMOS battery
If there is no way to reset it programmatically, as in the first two options, then you will have to resort to a more stringent method, but nevertheless quite effective. If you are not afraid of losing the warranty of your laptop, then this is the best way for you to return the BIOS to factory settings.

All! The BIOS settings have been reset, as you can see there is nothing complicated about it, just remove the CMOS battery, wait a little and insert it back.
Resetting BIOS using a jumper on the motherboard
This is also an effective method of resetting the BIOS, however, it is only suitable for system units; such a jumper is almost never seen on laptops.

It can also be found when instead of three jumpers there are two. They are also signed - CLR CMOS. In this case, to reset the BIOS, you just need to close both jumpers with something conductive, a screwdriver or wire, for example.

But in addition to the options above, it also occurs when there can be more contacts, like in this example, below - 6 jumpers. But closing them is also not difficult; everything is done in the same way. Where the jumper is installed by default - to reset, you need to install it opposite, the next contact is nearby, in a row, of course.

That's it, the original BIOS settings have been restored, now you can reassemble the system unit and turn on the computer.
Reset using a button on the motherboard
As already mentioned, such a button is quite rare on a motherboard. But nevertheless, we will not miss this method of resetting BIOS settings and will also consider it in a little more detail.
The location of this button (more precisely: CLR CMOS) can be either inside the system unit or outside, somewhere on the back side of the system unit. Here are some sample pictures showing where this button might be located:


The examples above show what the CLR CMOS buttons inside the system unit might look like. The pictures below show what the BIOS reset buttons may look like from the outside:


And as you probably already understood, resetting BIOS settings using this button is quite simple - just click on it and the original BIOS settings will be returned.
In these ways (and there are 5 of them in our article!) you can reset the BIOS settings to factory settings. There are several other methods, but we did not consider them in this guide. If you know how else you can reset the basic I/O system, be sure to share with us in the comments.
From time to time, users of laptops, netbooks and desktop computers are faced with the need to reset BIOS settings. This is mainly required in cases where the PC refuses to boot, which may be caused by a hardware or software failure, or when installing new hardware - processor, RAM, hard drives and other components. Let's look at all the ways to reset BIOS settings.
Briefly about BIOS
BIOS (like its more modern counterpart UEFI) is a special firmware stored on a chip built into the motherboard. This is a low-level program that is responsible for the initial startup of the computer. It stores the settings of all integrated and externally connected devices on the motherboard - from the USB interface and input/output devices to RAM and the central processor. You can learn more about BIOS functions.
When you press the power button, the first thing you do is launch the BIOS/UEFI firmware, which initializes all equipment and turns it on in a strictly defined order. If this program malfunctions, starting the computer becomes impossible. It may show some signs of life (for example, fans are making noise), but no further loading occurs. Failures or incorrect settings in the BIOS/UEFI lead to computer freezes during operation, most often when connecting external equipment to the computer or, for example, when reconfiguring a device driver (video adapter, audio card, etc.).
If your computer stops turning on or freezes during operation, you should first make sure that this is not due to the fault of the BIOS/UEFI. To do this, you need to reset the firmware settings. This can be done in two ways - software and hardware.
Soft reset BIOS/UEFI
This reset method is only possible if the computer boots at least before the initial boot stage (the logo of the motherboard or laptop manufacturer is visible). In addition, the BIOS/UEFI user interface should not be protected by a password that is unknown to the user. In the second case, you can only use the second - hardware reset method.
Software resetting of BIOS firmware settings is performed according to the following algorithm.
1. Login to the user interface
To enter the BIOS/UEFI settings, immediately after turning on the computer, press a specific hotkey. Most often, this is the “Delete”, “F2”, “F10” or “F12” button. However, for security reasons, motherboard manufacturers may change the standard BIOS/UEFI entry key to a combination of both. There are several options:
- Try pressing one of the standard hotkeys while holding down "Shift" or "Ctrl", i.e. "Ctrl+F2" or "Shift+Delete" You can also try holding both of these keys pressed, for example - "Ctrl+Shift+F12".
- Most laptops and netbooks have an additional function key "Fn". You can also try holding it by pressing one of the standard keys.
- In the case of mobile computers, there may be another option - turning on the computer using an additional function key, which is usually located above the keyboard or on the side of the laptop case. It can be signed like this - “BIOS” or “UEFI”.
You can find out exactly how to enter the BIOS/UEFI user interface from the technical documentation for the motherboard (for desktop PCs) or laptop. This can also be done on the manufacturer’s official website.

2. Launch the BIOS/UEFI reset function
The user interface structure may differ for different BIOS/UEFI versions. The reset function may be located in one of the following sections:
- In the main section, which opens immediately after entering the BIOS/UEFI settings. This may be the item "Load Optimized Defaults", "Load Default Settings", "Load Optimal Defaults", "Load BIOS Defaults" and others. Just highlight this item, press the enter key, and then confirm the reset.
- If the reset function is not located on the main page, then you should look for it in the "Exit" section. The function name can be one of those given above.
- You can also perform a reset by pressing a hotkey while in the user interface. This is usually one of the function keys - "F1" to "F12".
In some versions of UEFI firmware, the user interface is in Russian, so finding the desired section in them will not be difficult.
Hard reset
Due to the fact that some BIOS/UEFI failures can lead to complete computer inoperability, motherboard manufacturers have provided the ability to hard reset the configuration of these firmware. This can be done in one of two ways:
- Complete de-energization of the microchip on which the BIOS/UEFI configuration is stored.
- Pressing the reset button or briefly closing special contacts on the motherboard.

One or another method of hardware reset is selected depending on the specific situation (for example, sometimes it is technically easier to turn off the power to the microchip). Let's consider both options for resetting BIOS/UEFI settings.
Blackout
The BIOS/UEFI firmware stores all of its configuration on a special dynamic memory chip called CMOS. According to the principle of operation, CMOS resembles random access memory, i.e. This chip is capable of storing information as long as power is supplied to it. When the microcircuit is de-energized, all data stored in it is deleted. When you turn on your computer, the BIOS first looks to CMOS to restore user settings. But if they have been deleted from memory, the BIOS/UEFI automatically restores the factory configuration, i.e. settings are reset.
To use this reset method (for desktop PCs), follow the instructions:
- Turn off the power to the computer by using the switch on the power supply or unplugging the power cord.
- Remove the cover from the system unit.
- Inspect the motherboard.
- Find the battery on it that powers the CMOS memory (the battery is large and easy to find).
- Remove the battery from the slot and wait about 5-10 seconds before replacing it.
- BIOS/UEFI settings will be reset.

For laptops and netbooks, resetting the settings follows the same procedure, with only one exception - to gain physical access to the battery, the computer will have to be disassembled. However, some models of mobile PCs have a special cover in the case design, by removing which you can get to the battery.
Reset by button or shorting jumpers
Algorithm for resetting BIOS/UEFI settings using this method:
- As in the previous case, turn off the computer, remove the system unit cover and find the battery for the CMOS chip.
- Next to the battery there will be a button or three contacts, two of which (usually the first and second) are closed using a jumper.
- Some models of motherboards have not three, but two free (i.e., not closed by a jumper) contacts.
- Both the button and the jumpers are labeled as: Clear CMOS, CRTC, Clear RTC, CCMOS, etc.
- If it is a button, press and hold it for 5-10 seconds. You may need to use a thin object to press.
- If it is a pair of contacts, simply connect them together using a metal object, holding the latter for 5-10 seconds.
- If it is 3 pins, remove the jumper and then use it to bridge pins 2 and 3. Wait 5-10 seconds, and then install the jumper in its original place. The contacts can also be closed using a metal object (in any case, the jumper must be removed first).
The steps for laptops and netbooks are similar, as in the case of de-energizing the CMOS chip.

Resetting BIOS/UEFI settings by updating firmware
In cases where it is impossible to access the BIOS/UEFI user interface, and disassembling the computer is not possible, you can try resetting the firmware configuration by updating it. To use this method, it is also necessary that the computer turns on and successfully loads the operating system. The algorithm of actions is as follows (for Windows OS):
- First you need to determine the motherboard model. This can be done using the free AIDA64 program. Download and install it.
- Immediately after launching the utility, open the “Motherboard” section on the left side of the screen.
- In the central part of the window, in the “Motherboard Properties” section, opposite the “Motherboard” item, the motherboard model will be indicated, for example, “ASRock H61M-VS”. This information will be needed later.
- Then you need to determine the BIOS/UEFI version. This can be done from the Windows command line. Press the key combination "Win + R", and then enter "cmd" in the window and click "OK".
- A command prompt will open. Copy the command “wmic bios get smbiosbiosversion” into the window and press enter. The message "SMBIOSBIOSVersion" will be displayed on the screen, followed by the BIOS/UEFI version, for example - "P2.70".
- Open the official website of the motherboard manufacturer in your browser, for example, “www.asrock.com”.
- After logging into the site, enter the motherboard model into the search.
- On the board page, find the section “Support”, “Board Software”, “Download Software”, or others.
- This section will provide a list of available software for the motherboard. Find the "BIOS" subsection and go to it.
- Next, you will be prompted to download the BIOS firmware update. Download the latest version. It is possible that this will be the current BIOS version obtained from the Windows command line (in our case, "P2.70"). The main thing is not to download a version lower than the one currently installed on your computer.
- The firmware update is a regular EXE file. Launch it and follow the instructions.
- BIOS/UEFI settings will be reset after you restart your computer.
Remember that this method can only be used as a last resort, when it is impossible to resort to any of the standard methods of resetting BIOS/UEFI settings.
If your computer is unstable, a few tips on how to reset the BIOS may help. Problems arise as a result of incorrect BIOS settings or software failures. Let’s conditionally divide the zeroing procedure into two approaches depending on the problem: software and manual.
In the CMOS settings, find the item responsible for resetting the settings to default. It's called Load defaults BIOS, Load fail-safe defaults or something similar. It is located in a separate menu item or is always displayed in the right, lower part of the help window. It all depends on whether it is AMI or AWARD, which differ in appearance, name and location of menu items.
Once you have found this option, press the enter function key or F5, F6, F9, F11, F12. Next you will be asked to confirm the changes, enter the Y key or select OK and press ENTER.
When you have completed all the steps, be sure to save the changes. The save and exit item and the F10 key are responsible for this. The computer will restart and the settings will take effect.

There are situations when crashes occur immediately after turning on the computer. Therefore there is no possibility reset BIOS settings. There are a number of alternative actions that are considered manual.
The recommendations described below are universal. Suitable for motherboards such as asus, asrock, gigabyte. They are similar in architecture, but differ in the arrangement of elements. Next, let's look at what elements we need.
We kindly request that before performing the steps described below, it is recommended to study the documentation of the motherboard. This will protect you from unwanted consequences. You will be better oriented in your actions.
1 way. Be sure to unplug the computer from the outlet. When the PC is connected to the network, a small replenishment of energy also occurs, which will prevent you from resetting the BIOS.
Remove the side cover. Carefully inspect the motherboard. Here you will need to find contacts closed by a jumper. Next to which it says Clear_CMOS, CLR_CMOS, CCMOS or in another way, more details in the description of your board.
There are 3 contacts, the first two of which are closed by a jumper. Place the jumper on pins 2-3 for 15 seconds, then switch the jumper back.

If there are only two contacts and they do not have a jumper, short them with a metal object, such as a screwdriver.

Method 2. If you have a modern motherboard, it may be equipped with a special button for reset BIOS, which is signed as CLR CMOS. Find and hold it for a few seconds to reset the settings to factory settings.

3 way. Not a very reliable method. It is necessary to remove the CMOS battery for at least 10 minutes, or even more. That is why this method may not bring the desired result. Who wants to wait several hours? Sometimes it takes so long to reset the parameters.
After waiting, you need to insert the battery back and start the computer.
It also happens that owners are ready to throw away their components. I want to warn you against hasty conclusions. First, conduct a thorough diagnosis of your hardware. Often problems lie not in the breakdown of individual parts, but in software failures.
In practice, it happened that the computer started, but there was nothing except a black screen. The gradual replacement of components was not successful. The last thing that came to mind try resetting the BIOS. It really helped.
Resetting the BIOS on a laptop can sometimes serve as a radical method against problems on a laptop computer.
Sometimes, in case of system failures, only completely resetting the settings helps; the user should know the main nuances of these techniques.
In most cases, if the problem is not a hardware issue, this will help get the device back into working order.
Reset Features
At first glance, resetting BIOS settings to factory settings is not difficult. However, for a user conducting it for the first time (and most laptop owners may never encounter such a need), some questions arise during the process. Especially if software methods did not help, and you have to disassemble the laptop to reset.
There may be several reasons for using one of the BIOS reset methods:
- resetting a forgotten, unknown (set by another user) or lost BIOS password. Although, if the user is not going to change anything in the settings, he may not need such a reset;
- Incorrectly performed overclocking of the processor, in which critical values of memory timings or bus frequencies were set. However, it is usually not recommended to overclock the chipset on laptops - not only because of problems, but also because of cooling problems;
- the system does not boot for an unknown reason, although you can still enter the BIOS;
- The BIOS has been modified by a non-technical person who does not remember which setting should be reset.
BIOS reset options
For a laptop computer, as well as for a stationary one, there are several options for solving the problem with the BIOS by resetting it to zero:
- reset the settings using the interface itself (a method suitable only if you managed to enter the BIOS);
- using a special utility (used for 32-bit operating systems);
- hardware (mechanical) method.
Additional reset methods can be found in the documentation for your computer, if you have it. Instructions for a specific device model will help you resolve the issue; most often they can be found on the Internet - on the manufacturer’s website or, in extreme cases, on the forums of owners of similar models.
Reset via BIOS
To simplify the user's task, resetting settings to default values is possible using the utility built into the BIOS. In order to use it, you should go to the interface by pressing a certain function key during loading. Most often these are Del and F2, less often – Esc, F10 and F11. You can determine more precisely which key is needed to enter the settings immediately when the system starts, when this information appears at the bottom of the screen.
Tip: For the UEFI interface, loading is too fast, and the flashing text is not easy to see. In this case, you can try to click on all the functional ones one by one or find the one you need on the Internet based on your laptop model.
After entering the BIOS menu, you should find the exit menu (Exit) and select the Load setup defaults item in it. By agreeing to reset the settings (selecting the Yes button), you will restore their factory values. After pressing F10, the changes you have made will be saved.
Owners of some laptop models may see other inscriptions in the BIOS menu, except for Load setup defaults. For example, a user of Sony equipment will find the inscription F3 Optimized Defaults here, indicating that after pressing this function key and saving the changes, a reset will also occur.
For modern models from Samsung, Toshiba and HP, there is an F9 Setup Defaults item in the settings, usually located at the bottom or right side of the screen. This means that to reset you need to press F9 and save the changes.
For outdated hardware models whose BIOS differs from modern versions, you need to find the Use Default Settings or Set BIOS Default items in the settings.
When you select them, an inscription may appear on the screen suggesting either a reset to factory settings (Load Optimized Defaults), or a transition to settings optimized for protection against failures (Load Fail-Safe Defaults).
In most cases, resetting the settings will restore the computer to normal operation and boot.
However, if an error occurs during the reset process, for example, when selecting the media from which the system boots, the user will have to enter the BIOS settings again and make small changes:
- Open BIOS;
- Go to the Boot section;
- Select the Boot Mode tab and, if UEFI is written in this field, change it to Legacy;
- Save changes and reboot the system.
The software reset method may not work. For example, if there is a password on the BIOS. Or you can’t enter it for some other reason.
DEBUG utility
Changing interface settings is also possible using a special utility for Windows. It is built into 32-bit versions of the OS and requires running as an administrator to operate. Resetting to zero using it is not difficult, although you must have administrator rights:
- Open the command execution menu (Win+R);
- Enter the command debug.exe;
- After the command line opens, enter from the keyboard in turn: “o702E”, “o71FF” and “q”;
- After entering each command, press the enter button.
After this, the BIOS settings are reset. And after rebooting the system, the user will see an error message and the need to check the settings. Next, you should manually configure the BIOS or leave the settings the same as they were when you purchased the device.
The only drawback of the utility is its inability to work in 64-bit versions of Windows. This means that it is not suitable for most modern operating systems that require the use of other techniques.
Hardware method
A hardware method of resetting the laptop BIOS settings is required in cases where the password is unknown, forgotten, or when the user did not install any protection, but the BIOS was still protected.
In this case, selecting a password and using special utilities on the boot disk do not help. The only way out is hardware reset.
Button to reset BIOS
Laptop models released over the past 2-3 years make it possible to do without disassembling the device. To reset the BIOS, just follow these steps:
- Turn off and turn the laptop upside down;
- Check the bottom part for the presence of the CMOS inscription on the case, near which there may be a special hole for resetting the BIOS;
- Insert a sharp object such as a paper clip or nail into the hole and hold it for half a minute;
- Turn on the laptop.
If no holes are found on the back of the laptop, it should be disassembled.
Attention! Further instructions are for advanced PC users only!
Please remember that removing the cover and disassembling the computer voids the warranty.
Before disassembling, be sure to remove peripheral devices (unplug the power cord if the computer is charging, remove flash drives and cables for connecting to other equipment) and the battery.
Disabling the battery
One of the simplest hardware reset methods is to turn off the autonomous power supply on the motherboard. Most laptop models store BIOS settings and current time in memory, which is dependent on a small CR2032 battery.
By removing this battery, you can turn off the BIOS power and reset all settings, including the password. The board will have to be de-energized for a period of 5 to 40 minutes, depending on the model. Sometimes the device may turn out to be non-volatile and the reset will not occur.
The battery is easy to reach - it is usually located close to one of the edges of the board and is not covered by other components.
The user will need:
- remove the cover;
- de-energize the device by removing the battery;
- find a miniature power source;
- lightly press the latch and remove the battery;
- wait a while (in order not to repeat the procedure, it is better to wait at least 40 minutes);
- install the battery back using the same light pressure;
- turn on the laptop;
- Configure the BIOS again, setting the clock, date and system boot order.
Some boards have a built-in non-removable battery. For them, removing the battery is impossible, so you should move on to the last method.
Switching the cleaning jumper
The jumper switching method is based on the presence of a special jumper on the laptop, which is responsible for resetting the BIOS.
To find it, you will need to remove the cover of the laptop computer to gain access to the board. Most often, the switch is located near the battery, and the jumper is usually labeled with inscriptions such as CLRTC, CLR and CCMOS.
The jumper pad almost always consists of three contacts. To reset the BIOS, you need to move the jumper one step: from the first position to the second or from the second to the third.
While the jumper is in the switched position, you need to press the power button of the laptop and hold for at least 10 seconds.
Naturally, when the power is turned off, the laptop will not turn on, but the signal will be transmitted to the jumper. After this, the jumper is returned to its original position, the computer is assembled, and the BIOS is reconfigured.
Advice: Instead of a jumper on the laptop jumper, there may be a special button, pressing which allows you to perform a similar action. You should press with a pencil or pen, waiting the same 10 seconds.
Using any hardware method, from removing the battery to switching the jumper, although it almost 100% guarantees a reset, can lead to the loss of the warranty of a new laptop, so you should use them only after the end of the warranty period.
conclusions
Methods for resetting the BIOS make it possible to cope with the problem without turning to third-party specialists. Most often, the issue is resolved within a few minutes, most of which will be spent disassembling and reassembling the laptop.
But, if none of the methods helped you reset your password, you will still have to contact the experts to restore the ability to change the settings yourself.
It is possible that in this case the device is protected using a separate non-volatile chip.
Most of your computer settings and your PC's time are stored in a system such as the BIOS. Many people ask this question, how to reset bios settings to return to factory settings? I want to say that this question is asked not only by those who like to tinker with the BIOS settings and change them so that the computer will not turn on, but also by quite experienced users. Still, it is human nature to make mistakes and we learn from this.
So, in this instruction I will look at several options for resetting the BIOS. A reset is needed in order to return to the factory settings, that is, the current configuration that you configured will be completely reset. In this case, the problems that often tormented you may be resolved, for example, the operating system did not load. Resetting will also help if there is a password and you have forgotten it.
I also forgot to say that the BIOS can be reset programmatically and physically. You will find out what these two methods are below.
Software reset method
Option 1 - reset using BIOS
You can also use the BIOS itself to reset the BIOS. Some people don’t know, therefore, there is already an article about this on our website, follow the link.
In older BIOS versions, we usually see a blue screen with various items. So, all we have to do is select the item Load BIOS Setup Defaults. It may be called differently depending on the manufacturer of your laptop or motherboard. For example, there are also such names: Load Optimized Defaults, Load Fail-Safe Defaults.

Let's say in laptops we can reset the BIOS if we go to the tab Exit and we will find a point there Load Setup Defaults.

As you can see, this parameter looks the same almost everywhere, just words have been rearranged somewhere or others have been added. In , the reset is almost the same, the item is called Load Defaults and is located in the section Save and Exit.
Option 2 - reset bios using the Debug utility
This utility is present in the Windows family, you just need to open the “Run” window using the keys Win+R and enter the command there debug. A window will open into which we enter the following commands in turn (for AWARD and AMI BIOS):
Physical reset method
Option 1 – Reset BIOS using a jumper on the motherboard
Almost all motherboards are equipped with special jumpers that will help reset the bios. You can see what this jumper looks like from the image below:

When we close the contacts, the operating parameters of the motherboard change in some way; in this case, the BIOS is reset. To carry out this operation you need to perform several actions:
- This is the most important point. Turn off the power, first turn off the computer itself, then press the switch on the back of the system unit. For better effect, also unplug the plug from the socket.
- Open the system unit case and find there, there should be a jumper next to it and it has a signature like: CMOS RESET, BIOS RESET, CCMOS, Clear CMOS, CRTC, Clear RTC. Also, there should be two or three contacts responsible for reset.
- If there are 3 contacts, we need to move the jumper to the second position; if there are 2 contacts, then to reset we need to close these contacts with any conductive object, for example, a screwdriver and wait a little - 20 seconds.
- If you are not sure how to use the jumper, then look at the documentation for the motherboard, everything should be written there.
I want to say that modern and top-end motherboards even have a special button CLR CMOS, which helps you quickly reset the BIOS.

Option 2 - removing the CMOS battery
A regular battery is responsible for the operation of the BIOS and the motherboard clock. To reset the time and CMOS memory, simply remove the battery, in this case the BIOS is reset, but to do this you need to wait a few minutes, preferably 20 minutes, if that doesn’t help, then do the same operation, just wait longer, but usually this is not required.

There are motherboards in which the battery cannot be removed, be careful and do not use unnecessary force.
In order to remove the battery, you need to press the latch, and to insert it back, just press a little and the battery will snap into place.


