How to transfer data from Android to iPhone using the “Move to iOS” application. How to “move” from Android to iOS using the Move to iOS app
The official Apple app for migrating from Android to iOS has been released. The world shook. How to use it?
During the presentation of iOS 9, Apple repeatedly emphasized that now the transition from the Android platform to iOS will be carried out in just a few taps. For this purpose, the company has prepared a special application Move to iOS, which was supposed to appear in the app store Google Play right after . And Apple kept its word.
Let's look at the solution that the company offers. So, let's transfer data from Android to iOS using the Move to iOS application.
How to use Move to iOS
So, you have a smartphone running the Android operating system and you are planning to transfer all your data to your iPhone. Before starting the copy process, make sure the following:
- OS installed on smartphone no less than Android 4.0;
- both smartphones are connected to the WiFi network;
- both devices are connected to the network using a charger;
- Your iOS device has enough free memory to copy data from your Android smartphone.
- data transfer from an Android smartphone to a new iPhone.
- 1. Download the app Move to iOS to a smartphone from Android from the official app store Google Play. Download Move to iOS.
- 2. Once connected to the WiFi network, make sure you are in the menu iPhone Settings – Programs and data:

- 3. Open the application Move to iOS on an Android smartphone. Click Continue, agree to the license agreement.

- 4. After the menu appears Find the code on iPhone, select Transfer data from Android – Continue. As soon as the 10-digit code appears on the iPhone screen, on your Android smartphone press Further and enter the code.

- 5. Both devices will begin the pairing process. Once the iPhone and Android smartphone are paired, you will be asked to select what type of data you plan to copy:
- Google Accounts;
- Messages;
- Contacts;
- Calendar;
- Photographic film.

By checking the appropriate checkboxes, you can leave both smartphones alone and wait for the copying process to complete. The duration of copying directly depends on the amount of data stored in the memory of a smartphone running Android. During transfer do not minimize the application, do not disconnect smartphones from the WiFi network and chargers.

After the transfer is completed, all selected data will be successfully transferred to the iPhone memory. You will find more information on the corresponding page of the official Apple website.
![]()
After purchasing a new smartphone or tablet, the question always arises of transferring data from the old device to the newly purchased one. Moreover, recently, in addition to the traditional “moving” of contacts, there has also been added the need to synchronize some other personal information of the user.
Serious problems will not arise if the new device runs on the same operating system as the old one. Difficulties begin when you decide to “cross over to the enemy camp,” that is, you were on the Android platform, but wanted to try iOS. These two operating systems are incompatible with each other and the usual synchronizing procedures will not help here.
So, let's try to figure out how to transfer your data from Android to iOS, and do it as painlessly as possible for both the gadgets and the user himself.
Contacts
If your phone book on your old device was linked to your Google account, then “moving” is greatly simplified. Before transferring data to iOS, you need to make sure that the Google synchronization option is enabled on your Android device, and that the smartphone or tablet itself has recently connected to the Internet.

On your iPhone, you need to add your Google mail account (Gmail) and enable synchronization: Settings -> Mail, addresses. After completing the procedure, the entire list of contacts should appear on the new iOS device.
If your contacts were recorded locally, that is, directly into the phone, then transferring from Android to iOS becomes a little more complicated. On your old phone, you need to export the phone book to an external SD card or internal storage in VCF format (selected in the settings). Then you need to import the resulting file into your Google account: Gmail -> Settings -> Accounts and import -> Import mail and contacts -> .VCF file. Further transfer steps to iOS repeat the procedure described above with an iPhone.
Calendar
Just as in the case of contacts, your event calendar is automatically connected to your Google account, that is, we turn on the already familiar synchronization on the iPhone, only with the appropriate mark (“Calendar”) and the transfer to iOS is completed.

If you do not want to contact Google, you can perform a similar procedure using third-party applications. One of these is Copy My Data. This is a smart program for transferring not only a calendar, but also contacts to iOS. You need to install the utility on both of your devices and run the “moving” wizard on the old gadget, then follow the simple instructions to synchronize with the new iPhone. The program operates on the same principle as Gmail: export from Android to a file, transfer to iOS and you're done.
As in the first two cases, it is much easier to use an existing Google account. But if you decide to make iCloud your main mailer, then you will have to delve into the Gmail settings. To transfer mail to iOS, we will need a mailbox of the same name - [email protected].
The main steps need to be performed in the Gmail mailer. Click on “Settings”, then go to the “Forwarding and POP/IMAP” section and open a new window with the “Add forwarding address” button. The Forwarding Wizard will prompt you to enter the @icloud address, after which you will need to follow the link in the received email to obtain permission to forward. Now all letters will be sent to the new mail in your iCloud account.
Bookmarks
Almost all Android devices have the Chrome browser from Google installed by default. If you are completely satisfied with it and you don’t want to switch to the branded “Safari”, then there will be no problems with synchronization. All you need to do is install Chrome on your iPhone, then log in to your account and all your bookmarks will be in their places. Next, we will consider a more complex option with “Safari”.

You need to export your bookmarks from the Chrome browser. To do this, go to “Bookmarks Manager” (Menu -> Bookmarks) and click on the “Manage” section. Then select “Export to HTML” from the drop-down menu: designate the file name and location to export.
The resulting file must be imported into the built-in Internet Explorer or Edge if you are working on the Windows 10 operating system: “Options” -> “Import bookmarks from file”. Next, you need to connect your iPhone to your computer and launch iTunes. Then, in the device properties, select “Synchronize browser bookmarks with Internet Explorer.” Upon completion of the procedure, all new data will appear in the mobile version of Safari.
Photo and video
Everything is very simple here. We connect your old Android gadget to the computer via a USB interface and copy the necessary photo (usually the DCIM directory) and video files (Video, Download, etc.) to any folder on your hard drive.
Then you need to connect your iPhone in the same way and launch iTunes. In the menu you need to find the “Photos” section and select synchronization, then specify the folder to which the pictures were previously copied. For video, the procedure is similar.

If you are too lazy to contact iTunes, then you can again transfer the entire synchronization process to the shoulders of the above-mentioned Copy My Data program. In this case, just follow the instructions of the “moving” specialist and that’s it.
Applications
As for individual programs, everything here is not as rosy as with other data. If we are talking about some online games or other applications where all personal information is tied to the server, then there should be no problems.
Popular toys are, as a rule, written for both the Android platform and iOS. Therefore, progress and other information from the account will not go anywhere. All you need is to install the Apple version of the product on your iPhone and log in to your account.
But with other programs, alas, nothing can be done. All information in one form or another presented on local applications for Android will not be able to get to iOS, so you will simply have to abandon them.
There are several ways to transfer contacts from Android to iPhone. In this article we will try to talk about all the current options. They will help you move from one operating system to another without any problems.
The most popular and convenient ways to transfer contacts from Android to iPhone are the Move to iOS application and synchronization with a Google account. They allow you to copy your phone book and restore all other information.
This contact transfer is only possible for the latest generations of iPhone: X, 8, 7, 6, 5S, SE. Apple stopped supporting iPhone 5 and iPhone 5C in iOS 10.3.2. Owners of such phones will have to use copying without synchronization.
Move to iOS app
The program will allow you to painlessly switch from an Android or Windows smartphone to Apple products. It copies not only phone numbers, but also other data: message history, notes, accounts and browser bookmarks. Applications that are available on iOS will also be transferred.
By analogy with this program, others were created, for example, Yandex.Moving. The project could not stay on the market, and the developers have already closed it.
Important! Move to iOS is only suitable for initial iPhone setup. If you have already completed it, you will have to reset existing data on iOS or transfer contacts in another way.
The transfer proceeds as follows:
- Connect both smartphones to Wi-Fi. Make sure your iPhone has enough storage for all your data. Find the app on Google Play Store for Android and download it.

- Open the application. Go through all the settings until the code entry field appears on the screen.

- Begin the initial setup of your new iOS device. When you reach the “Programs and data” item, select “Transfer data from Android” from the bottom menu.

- A window will open with a brief description of the Move to iOS application. Click on the “Next” button.

- A code will appear that will be needed later to transfer contacts from Android to iPhone.

- Enter the code in the special field in the Move to iOS application on Android. Wait until the Data Transfer screen appears. Select the content you want to transfer to your new Apple gadget.

- Data copying begins. The operation time depends on the number of phone numbers and Wi-Fi speed. When the transfer is complete, all you have to do is click on “Finish”.

This way you can transfer all the information on your smartphone in just 5–10 minutes.
Using synchronization with Google and Outlook services
This method of transferring contacts from Android to iPhone is suitable if this opportunity was missed during the initial setup. The whole process is as follows:
- Open iPhone settings. Go to the “Accounts and Passwords” menu item.
- Click on "Add Account".

- From the options provided, select Google Mail or Outlook.com.

- Enter your account login and password and click “Next”.

- There will be options on the screen for what data to transfer. Find the “Contacts” item and turn the switch to ON. Finally, click “Save”.

Know! Contacts from the account will be transferred to the iPhone phone book only after it is opened. Sometimes it takes a few minutes.
Copy without synchronization
If it is not possible to transfer information from one device to another, other transfer options are available:
- copying via iTunes;
- transmission via Gmail;
- transfer from SIM card;
- use of third party programs.
Many people are looking for ways to transfer phone numbers via Bluetooth, but Apple products do not provide such an option. The Bluetooth function is used only to connect a headset or car radio.
Copying via iTunes
In older versions of iTunes, it was possible to transfer contacts from Outlook, Windows and Google directly to your computer. The latest update no longer has this feature. Therefore, you will have to use additional programs.
Important! You will need help from the application to access the files. You need to download it to your iPhone. RManager is ideal, but there are other options: GoodReader, iZip Pro, Parallels Access or FileApp.
- Download and then prepare the phone numbers yourself. Using your computer, go to Gmail and log in. Find the Gmail tab in the top left corner of the page. Select the “Contacts” subcategory from the drop-down menu.

- The Google Contacts service will open in a new window. In the top menu, find the “More” tab and select “Export” from the suggested options.

- Select vCard as the export format. The document will be placed in the Downloads folder on your computer. The movement also happens in the background, so you can continue to use other programs on your PC.

- Connect your iPhone with a USB cable to your computer and open iTunes. Click on the phone icon.

- In the “Shared Files” tab, open “RManager”.

- Click on “Add file...”.

- Select a document with contacts. You can also simply drag and drop it into iTunes.

- Open RManager on your iPhone, go to the “My Files” section and find the copy of contacts that you previously dragged there.

- After clicking on the desired file, a similar message will appear. Select "Open in..."

- In the menu that appears, select “Copy to Contacts.”

The phone book will be downloaded in a few seconds.
Transfer via Gmail
This option is suitable if you urgently need to transfer your phone book from Android to iPhone, but there is no time for synchronization.
The transfer happens like this:
- Go to your Android smartphone's phone book and open settings. Typically, this requires an icon of three parallel stripes on the screen or body of the phone. Find the "Import and Export" item.

- Click on the "Export to memory" button. A copy of the vCard with the VCF extension will be automatically created on the device.

Important! The name of the required tab depends on the phone model. Sometimes it differs from the option proposed in these instructions.
- Find the document you need in the file manager. Select it, click on the “Send” button and send it via Gmail.

- In the “To” column, you can indicate your iCloud or any convenient email address. You can also leave a message in drafts and then open it on your smartphone.

Know! If you send a file via draft, it will remain in your mailbox for a long time. You can open it from any Apple device and restore all phone numbers if necessary.
- Go to your email account on your iPhone, select the desired file and open it. A copy of the numbers will be automatically transferred to your phone.

This method of transferring contacts from Android to iPhone is convenient because it is not necessary to have both devices on hand. You need to send the phone numbers first, and you can save them to your iPhone later.
Transfer from SIM card
If your contacts are saved on your SIM card, transferring them to your iPhone will be very easy:
- Go to “Settings” and find the “Contacts” item.

- Use the "Import SIM Contacts" button.

The transfer of information will begin immediately and will take a few seconds. This method is considered one of the fastest.
Third party programs
Move to iOS is the official Apple app for synchronizing devices with different operating systems. You can also find third-party programs that can handle this task:
- CopyTrans;
- My Contacts Backup;
- CardDAV-Sync.
Important! You will have to pay for most of these programs. The previously listed methods are available without payment.
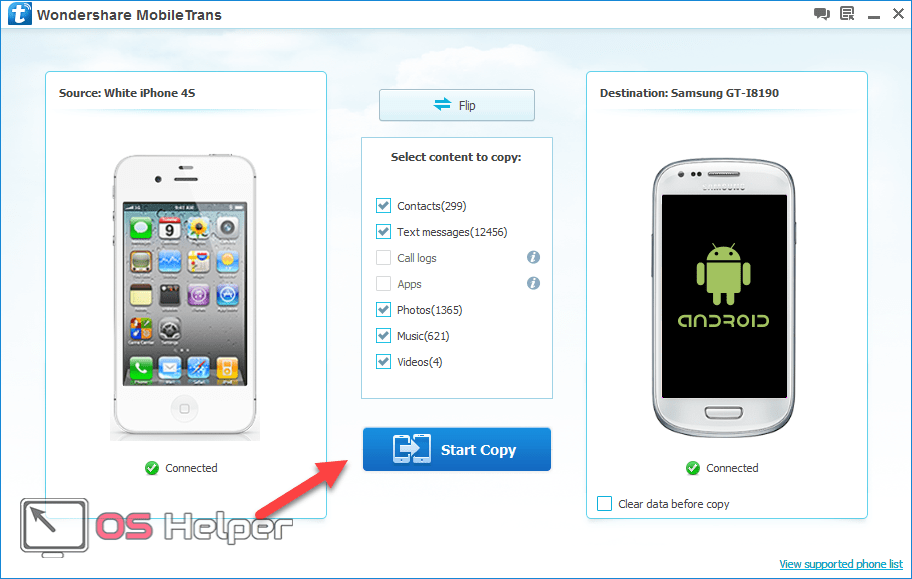
Allows you to download contacts via Windows:
- Download the application from the developer's official website and install it on your computer.
![]()
- In the main menu there will be an icon with two phones. Click on it.

- Connect both devices to your computer via USB cables. The “Start Copy” button will begin transferring data.
Other programs are easier to use. CopyTrans and My Contacts Backup transfer information via a vCard file. Only this time you don't have to create it manually.
CardDAV-Sync is a tool for synchronizing data across devices. To transfer information to an iPhone, you need to follow the instructions for transferring data through a Google or Outlook account, which is described above, only select “Other” in the accounts menu. In the Contacts subsection, there is an option for CardDAV Account. As soon as you enter your username and password, your contacts will be copied.
Important! Most of the programs listed are only suitable for the latest generations of iPhone: X, 8, 7, 6, 5S, SE.
Let's sum it up
If you choose the most convenient and fastest transfer method, it is Move to iOS. Even if you have already done the initial setup of your iPhone, it makes sense to reset it and do a full synchronization. When you don’t want to completely reset your gadget, the Google Contacts service is an excellent solution. It is used in all Android and Windows Mobile devices. The CardDAV account works on the same principle, but it is no longer as popular.
If in the end you need full synchronization of phones via a computer, Wondershare MobileTrans is suitable. For remote synchronization, it is better to send the information via email or iTunes. To work with vCard contact cards, there are CopyTrans and My Contacts Backup applications. This is an old and proven method. Transferring contacts is not difficult at all. Some methods can be understood intuitively, without additional instructions.
Video instruction
We invite you to watch a video explaining how to easily transfer contacts from Android to iPhone.
Are you planning to migrate from Android to iPhone, but don’t know how to transfer data? Don't worry, in this article we have collected the easiest ways to quickly transfer important information.
Method 1: Through the mobile program Move to iOS (Go to iOS)
This method allows you to transfer: telephone records, messages, photos and videos, bookmarks from an Internet browser, accounts and calendar data. Also some free applications if programs are available in the App Store.
- Download the Move to iOS program for free on your Android device.
- Launch the application and follow the program instructions. Click on the “Next” button, and then select “Search for code” in the upper right corner. At this time, on the new iPhone, you must complete the initial activation. If activation was performed previously, you will have to perform a data reset or transfer data in another way.
- Connect your iPhone to a Wi-Fi network.
- On the activation screen, go to the “Programs and Data” section, where select “Transfer data from Android”.
- In the new window, click continue until the digital code appears.
- Enter the code on your phone from where the data will be transferred. Wait until the “Data Transfer” notification appears.
- On your Android device, mark the data you want to transfer.
- After information about data transfer appears, you should put the device aside. The duration of data transfer is affected by the amount of information transferred. If necessary, connect the device to a wall charger.
- When finished, confirm the data transfer. Check if all data has been transferred to the new device.
Method 2: Through the iTunes desktop program
iTunes allows you to transfer photos, videos and music.
- Connect your Android device to your PC, find and copy the necessary data to your computer: photos, videos, music.
- Disconnect your Android device and connect your iPhone.
- Open iTunes, click on the phone icon.
- In the sidebar, select the category of data you want to synchronize.
- Check the box next to “Synchronize”. Next, select the folder where the necessary data is stored, synchronization settings, and then apply.


Method 3: Through cloud storage - Dropbox, Google Drive, Yandex Drive, etc.
Allows you to transfer files from the above methods, as well as documents, including PDF and archives.
- On your Android device, open the cloud storage client, where you add the files you want to synchronize. To do this, click on the “add” button.
- Specify the folder where the files are stored. And then, wait for the synchronization to complete.
- Download a cloud storage client on your iPhone. Login to the application to access the files.
Method 4: Through a desktop recovery program
Data recovery programs are also suitable for data transfer. This method is convenient in case the mobile device is damaged or partially does not function.
Wondershare Dr.Fone or EASEUS Mobisaver are suitable for extracting information from an Android device. Similar utilities work on a similar principle. You need to connect the device to the PC via a synchronization cable and wait for the phone to be detected. Next, select the type of files that need to be extracted. Wait until the extraction is complete, and then save the information on your PC. The resulting files will only need to be transferred to the iPhone using the methods described above - iTunes or cloud storage.
Method 5: Using the MobileTrans program
An easy way to transfer contacts, messages, calendar, call history, photos. More music, videos, applications and program data between platforms. To transfer data, follow these steps:
- Install and launch the MobileTrans program.
- Connect iPhone and Android to PC.
- Select the Phone to Phone Transfer option.
- In the next window, select the data transfer device – iPhone, and the receiving device – Android.
- Select the type of files you are interested in, and then click on the “Start Transfer” button.
- Wait for the data transfer to complete.


Method 6: Through Android applications for data transfer
SHAREit, Xender, Zapya, Send Anywhere and AirDroid applications can also transfer files. The main condition is to use the same service program on the sending and receiving devices.
Principle of operation:
Install the program on your iPhone.
Moving files from Android to Android is quite simple. All data can be transferred to an external micro SD card, and then installed in a new device. It is not possible to copy personal information from one operating system to another (for example, from Android to iOS) using this method. Let's look at how to transfer user data and files from Android to iPhone or vice versa.
Ways to move information from Android to iOS
Copying data between different operating systems can be done in several ways. It all depends on the type of files that need to be moved. To transport your calendar, SMS messages, notes and numbers from your phone book, the easiest way is to use the Move to iOS program or Google virtual storage. To transfer multimedia, a PC and the iTunes application or the same cloud service are used.
Copying information via Move to iOS
Move to iOS is an official Apple product that allows you to transfer a calendar with all notes, contacts from the phone book and other user data from Android to iPhone or iPad. For a successful transfer, the following conditions must be met:
Before you transfer your notes, calendar, and other data, install the Move to iOS app on your Android phone. This can be done through Google Play or another site. If you download the utility from a third-party source, first check it with an antivirus. The further procedure will be as follows:
- Turn on Wi-Fi on both gadgets.
- On a new iPhone, when setting it up for the first time, activate the “Transfer data from Android” function. If the smartphone has already been in use, you will need to erase all information and settings from it by running the appropriate procedure.

- Open Move to iOS and agree to the terms of use of the program.
- In the “Find the code” window, click “Next”, thereby activating the synchronization of mobile devices.

- After the application detects your iPhone, a verification code will appear on it. Enter it in the appropriate field.

- Mark the data you will transfer and click Next.

Once the copying is complete, all user information will appear on the new smartphone. It's worth noting that you won't be able to transfer apps from Android to iPhone, so you'll need to download them again.
Using Google Cloud Storage
You can transfer your calendar, notes and other important information from Android to iPhone through the Google service. This is done as follows:

After copying the information to the virtual disk, it will be accessible from a computer or other mobile device. Now, to transfer data to iOS, you just need to link it to the same account. This is done in the “Mail, Addresses, Calendars” tab. If everything is done correctly, the iPhone will automatically prompt you to synchronize. 
The Google Photo service will help you transfer photos and videos from one phone to another. On Android this application is standard, but on iOS you will need to download it. To copy, just link both smartphones to one account and make minimal settings in the Google Photo program itself. 

Exactly the same steps must be taken to download music to the iPhone.
Moving data from iPhone to Android
Transferring data from iPhone to Android is done in almost the same way as in reverse. You can use Google Shared Drive to copy your phone book, notes, and calendar. This is perhaps the easiest way to transfer from iOS to Android, although there are other transportation methods (Dropbox, Outlook, Yandex, etc.).


