Ready permissions plugin for minecraft 1.8. Tutorial on setting up PermissionsEx (PEX). Managing players in groups
If you are planning to create your own server or project, then you will most likely need a plugin that divides all players into different groups. For example, you need moderators and helpers, how can you add them to special groups and give them certain rights? A plugin called "PermissionsEX" comes to the rescue. This is exactly the plugin we have on our servers.
Thanks to this plugin, you can add players to special groups and give them different rights. The plugin also allows you to make global and local chat, change the color of your nickname.
Setting up the plugin:
First you need to go to the permissions.yml file and correct it a little.
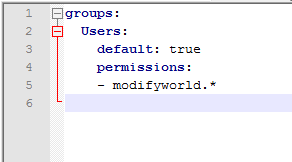
When you open the file, you will see the following:

Let's analyze each component.
groups:- After this parameter there will be groups and rights.
default:- default group. All players who have just logged in will go there.
default:true- Using this parameter you can set the default group.
permissions:- below this parameter you can enter rights for a specific group.
modifyworld.*- The ability to make changes to the players in the world. It's better to leave it blank.
Group example

Teams:
Service
| Team | Permission | Description |
|---|---|---|
| /pex | permissions.manage | Shows PEX help |
| /pex toggle debug | permissions.manage | On/Off debug mode (creates a lot of debugging information in server.log) |
| /pex user |
permissions.manage. |
Check eligibility |
| /pex reload | permissions.manage.reload | Reloads the plugin |
| /pex config |
permissions.manage.config | Outputs the value |
| /pex backend | permissions.manage.backend | List currently used backends. |
| /pex backend |
permissions.manage.backend | Change the permissions backend on-the-fly (Use with caution!) Note that this will only change the backend on-the-fly, it will not save the change in the config file, nor will it convert anything. This is for testing only.) |
| /pex hierarchy | permissions.manage.users | Shows complete hierarchy of players/groups |
| /pex dump |
permissions.manage.dump | Dumps users and groups into the selected format |
Player Rights Management
| Team | Permission | Description |
|---|---|---|
| /pex users | permissions.manage.users | Shows a list of all recorded users. And server players |
| /pex user |
permissions.manage.users | Shows player permissions |
| /pex user |
permissions.manage.users.prefix. |
Install to player |
| /pex user |
permissions.manage.users.suffix. |
Install to player |
| /pex user |
permissions.manage.users. |
Remove player |
| /pex user |
Give the right |
|
| /pex user |
permissions.manage.users.permissions. |
Take away the right |
| /pex user |
Give temporary right |
|
| /pex user |
permissions.manage.users.permissions.timed. |
Take from the player |
| /pex user |
permissions.manage.users.permissions. |
Set option |
Managing player group rights
| Team | Permission | Description |
|---|---|---|
| /pex user |
Show a list of groups in which the player is a member |
|
| /pex user |
permissions.manage.membership. |
Add a player |
| /pex user |
permissions.manage.membership. |
Set group |
| /pex user |
permissions.manage.membership. |
Remove player |
Group rights management
| Team | Permission | Description |
|---|---|---|
| /pex groups | permissions.manage.groups.list | Show all registered groups |
| /pex default group | Show default group | |
| /pex set default group |
permissions.manage.groups.inheritance | Set group |
| /pex group |
permissions.manage.groups.prefix. |
Install to group |
| /pex group |
permissions.manage.groups.suffix. |
Install to group |
| /pex group |
permissions.manageups.create. |
To create a group |
| /pex group |
permissions.manage.groups.remove. |
Delete group |
| /pex group |
List of parent groups for a group |
|
| /pex group |
permissions.manage.groups.inheritance. |
Install to group |
| /pex group |
Show all group permissions |
|
| /pex group |
permissions.manage.groups.permissions. |
Give the right |
| /pex group |
permissions.manage.groups.permissions. |
Take away the right |
| /pex group |
Give temporary right |
|
| /pex group |
permissions.manage.groups.permissions.timed. |
Take away temporary right |
| /pex group |
permissions.manage.groups.permissions. |
Set option |
| /pex group |
permissions.manage.groups.weight. |
Show/set group weight |
Managing players in groups
| Team | Permission | Description | ||
|---|---|---|---|---|
| /pex group |
permissions.manage.membership. |
Show all players in a group |
||
| /pex group |
permissions.manage.membership. |
Add player/players |
||
| /pex group |
permissions.manage.membership. |
Remove player/players from group |
||
| /pex promote |
permissions.user.promote. |
Promote a player |
||
| /pex demote |
permissions.user.demote. |
Demote a player |
permissions.manage.worlds | Show world heredity information |
| /pex world |
permissions.manage.worlds.inheritance | Set parent world/worlds |
Installation:
2. Place it in the Plugins folder.
3. Reboot the server.
All plugins in Minecraft of any version have their own rights or permissions for certain plugin commands and actions. These permissions must be written in the file permissions.yml, which is located in the folder from the rights plugin (for example: PermissionsEx).
All rights to plugins are in the file permissions.yml.
Everything in this file should be written like this:
groups:
default:
default: true
permissions:
-lwc.protect
- commandbook.kit
- commandbook.kit.list
- commandbook.spawn
Moder:
inheritance:
- default
default: false
permissions:
- iConomy.holdings.others
- permission: iConomy.accounts.take
- iConomyChestShop.shop.create
- ChestShop.shop.create
Admin:
inheritance:
- Moder
default: false
permissions:
- authme.admin.changepassword
-authme.admin.reload
-authme.admin.unregister
-authme.admin.register
Helper:
inheritance:
- default
default: false
permissions:
- commandbook.mute
- commandbook.unmute
- commandbook.msg
- commandbook.broadcast
- commandbook.return
- commandbook.teleport
- commandbook.teleport.other
users:
Kratos:
group:
- Admin
Nexus:
group:
-Helper
Bezumets:
group:
- Moder
The most important thing in permissions.yml this is saving tabs in the data. If you break it, nothing will work.
What does the word "tab" look like and mean in a file? permissions.yml:
To explain it in very simple terms, this is saving a certain number of spaces from the left edge of individual sections and file parameters. That is, it should be:
(For ease of understanding, I will list everything in the following form)
groups, users: 0 spaces.
Names of groups in groups, Nicknames of players in users: 2 spaces.
Parameters, permissions, etc.: 4 spaces.
Sections groups And users cannot be repeated and exist in 1 instance. The rights for groups of players are described (Administrators, Moderators, Helpers, VIPs), there cannot be any player nicknames here, only the rights themselves permissions plugins, written as:
-<пробел>(permission)
Commandbook.teleport
default: true - means that this right will be issued by default to all players who enter the server, it must exist in 1 copy, in other groups of rights it must be default: false
inheritance: indicates a protruding parent group, such as the above group Moder takes rights from the group default and complements them with his own, and Admin bases its rights on the rights of the group Moder which includes rights default.
Chapter users contains user nicknames and the group they belong to. Instead of a group maybe permissions if you need to specify certain rights for a user rather than a group. Here as in the section groups it is necessary to maintain the same tabulation.
All questions in the comments.
And so, probably each of you, except for experienced server holders, has problems with setting up access rights.
Personally, I use the PermissionsEx plugin because I think it is the best permissions distribution plugin for servers.
What we need:
1. Notepad++
2. The plugin itself. The latest version can always be downloaded.
3. Straight arms. (Required item)
So, let's begin.
1. Download the plugin and unpack it. There are 3 files in the folder:
2. Place the files in the plugins folder, start the server, and stop it.
There appeared 3 folders:
ChatManager and ModifyWorld
3. Open the PermissionsEx folder. In this folder, open the permissions.yml file using Notepad++
And we see this:
And so, in order:
groups://do not touch this word, it indicates that groups and their permissions will appear below.
default://the name of the group includes all users who have just logged onto the server, unless of course you have registered them in another group.
default: true// this parameter sets the group as the default group. this means that any player for whom other groups and/or exceptions are not defined will have all the rights of this group.
//everything that goes below is actually the “rights” for the group itself; permissions from various plugins installed on your server need to be entered there.
Groups default: default: true permissions: - modifyworld.* - commandbook.spawn - commandbook.who - commandbook.say - commandbook.msg - myhome.home.soc.* - iConomy.access - iConomy.bank.access - iConomy.bank .deposit - iConomy.bank.join - iConomy.bank.join.multiple - iConomy.bank.leave - iConomy.bank.list - iConomy.bank.main - iConomy.bank.main.change - iConomy.bank.main.set - iConomy.bank.main.view - iConomy.bank.transfer - iConomy.bank.transfer.multiple - iConomy.bank.withdraw - iConomy.list - iConomy.payment - iConomy.rank - jobs.join.* - jobs.world .* - lwc.protect - iConomyChestShop.shop.create - iConomyChestShop.shop.create. - iConomyChestShop.shop.exclude. - iConomyChestShop.shop.buy - iConomyChestShop.shop.sell - iConomyChestShop.command.iteminfo - commandbook.call - commandbook.time.check - commandbook.rules - myhome.home.basic.home - myhome.home.basic.set - myhome .home.basic.delete - myhome.home.soc.invite Moder: default: false inheritance: - Default permissions: - modifyworld.* - commandbook.kick - commandbook.bans.ban - commandbook.bans.unban - commandbook.shock. other - commandbook.rocket.other - commandbook.shock - commandbook.rocket - commandbook.mute - commandbook.teleport.* - commandbook.spawn - commandbook.kit.list - commandbook.who - commandbook.say - commandbook.msg - worldgurad. god - worldguard.ungod - worldguard.god.other - worldguard.ungod.other - worldguard.heal.* - worldguard.slay.* - myhome.* - iConomy.access - iConomy.bank.access - iConomy.bank.deposit - iConomy.bank.join - iConomy.bank.join.multiple - iConomy.bank.leave - iConomy.bank.list - iConomy.bank.main - iConomy.bank.main.change - iConomy.bank.main.set - iConomy. bank.main.view - iConomy.bank.transfer - iConomy.bank.transfer.multiple - iConomy.bank.withdraw - iConomy.list - iConomy.payment - iConomy.rank - jobs.join.* - jobs.world.* - commandbook.whereami.compass - commandbook.whereami - lwc.protect - iConomyChestShop.shop.create - iConomyChestShop.shop.create. - iConomyChestShop.shop.exclude. - iConomyChestShop.shop.buy - iConomyChestShop.shop.sell - iConomyChestShop.command.iteminfo - commandbook.call - worldedit.navigation.jumpto - worldedit.navigation.thru - commandbook.time.check - commandbook.rules - lwc.mod - myhome .home.basic.home - myhome.home.basic.set - myhome.home.basic.delete - myhome.home.soc.invite - vanish.* Admins: default: false inheritance: - Moder permissions: - "*" users : admin: group: - Admins permissions: null Moderator: group: - Moder permissions: null
This Permissions is configured for plugins: CommandBook, MyHome, VanishNoPickup, Jobs, LWC, WorldEdit, iConomy, iConomy ChestShop, WorldGuard.
Here, as you may have noticed, new parameters have appeared:
info: //group parameters
prefix: " //prefix
suffix: " //suffix
// to display prefixes/suffixes, you must enable the ChatManager plugin, which is included with PEX. To do this, in the plugins/ChatManager/ folder in the config.yml file, find enable and change it, if necessary, from enable: false to enable: true
inheritance: //inheritance of rights
— Default //in this case, all rights of the “default” group are inherited
You may also have noticed that the users parameter has appeared:
Under it you need to indicate the nicknames of the users to whom you want to give additional rights and/or move them to another group. Eg:
Moderator:
group:
—Moder
permissions: null
where “Moderator” is the player’s nickname, “Moder” is the name of the group, permissions: null are additional rights for this user, in this case there are none.
Remember! In YAML you need to strictly follow the sequence, one extra space and the parameter will not work.
Note from idg_dima: YAML works great with extra issues or even empty lines, the only thing it breaks is tabs.
And we bring our changes for the delay in checking the article, we were very busy with some things, including preparing the server for the move.
What is PermissionsEx?
PermissionsEx (PEX) is a new permissions plugin, based on Permissions ideas and supports all of its features. But PEX is more! It offers different backends, powerful ingame management, fine grained restrictions for world modification.
Please use the forum for help/discussions.
Current features
- Support for UUIDs as of version 1.21
- Several backend support. Currently bundled backends are File (YAML) and SQL (MySQL, SQLite). Also it’s possible to add your own.
- YAML backend, with new, fully rethinked, config schema. Now all user, groups and their permissions are stored in one file – permission.yml. File name can also be adjusted.
- SQL backend, most delicious. Currently MySQL and SQLite supported, but other DB (like Postgre) are possible too. PEX deploys the DB scheme (tables and initial data) automatically. This means that you only need to provide data on how to connect to the db, everything else PEX will handle by itself.
- Flexible architecture and API – you can change a lot programmatically.
- Rich chat/console command interface. You can do almost everything ingame. Command list below.
- Modifyworld – Permission-based restrictions mechanism (we call it “modifyworld”), which provides the possibility to control players abilities, such as destroying/placing blocks, riding carts/boats or even getting spotted by mobs and much more. Available from its project page
- Multigroup inheritance. User, as well as Group, can be member of several groups. And inherit their permissions, options and prefix/suffix.
- Permissions based upon Regular Expressions. This means you can use regular expressions. Example: modifyworld.blocks.(destroy|place).(3|12) – this permission allow place or destroy only sand (12) or dirt (3) blocks. There is still limitation on dot usage in your regexps – dots are escaped by default. Raw regex flag is also available and explained on the wiki.
- Multiworld permissions. Just don’t specify world and permission would work in any world.
- Multiworld inheritance. You can inherit different groups in different worlds.
- Performance friendly. Low-level caching helps a lot when you have 100+ online users
- Promotional/Demotional system. You can assign ranks to groups and promote/demote users to higher/lower ranked group. NEW: new you can make serveral ranking ladders.
- World-inheritance – permissions/option of one world can be inherited by another world.
- Timed Permissions – you can give user permission only for some amount of time.
- As of version 1.21.1, PermissionsEx automatically updates to keep you up to date with the latest bugfixes and new features. The automatic update functionality will only perform updates between minor releases (for example only 1.21.1->1.21.2, not 1.21.3->1.22). To disable it, set the updater option to false in plugins/PermissionsEx/config.yml.
- Bukkit Permissions (SuperPerms) compatible.
To disable error reporting, create a file called `report-disable` in the plugins/PermissionsEx folder. Note that enabling this option means you WILL NOT get any support for errors because the information published (permissions file, configuration, and versions) is essential to resolving issues.
Plugin installation:
1) Download the plugin itself, the latest version can ALWAYS be found at THIS link.
After downloading the archive, we will find the following files in it:
2) Move (copy) the files (ChatManager, Modifyworld, Permissions, PermissionsEx) to the plugins folder of your server (example path: C:\Server\plugins)
3) Start the server, wait for the message “Done” in the server console and stop it.
4) Go to the Plugins folder and see the following:
If you did everything correctly and saw the folders created by the plugin, then you can assume that the plugin is installed.Setting PermissionsEx:
First, let's look at the permissions.yml file at (your server\plugins\PermissionsEx). Remark: files with the .yml extension can be viewed with ANY text editor, but for convenience I recommend using Notepad++ (you can download it)Opening the file we will see the following:
In order:groups: //do not touch this word, it indicates that groups and their permissions will appear below.
default: //name of the group, all users who have just logged into the server will be included in it, unless of course you have registered them in another group.
default: true // this parameter sets the group as the default group. this means that any player for whom other groups and/or exceptions are not defined will have all the rights of this group.
permissions: //everything that goes below is actually the “rights” for the group themselves, you need to enter permissions from various plugins installed on your server there.
- modifyworld.* //the ability to “modify” the world, I do not recommend touching this parameter. Remark: in fact, the “modifyworld” parameter has many more meanings, but since this is a small FAQ and only the most important things are discussed here, I did not explain this parameter, if you are interested, you can read the official documentation in English at THIS link.Now let's look at the already configured permissions for several plugins.
groups: default: default: true permissions: - modifyworld.* - commandbook.spawn - commandbook.who - commandbook.say - commandbook.msg - myhome.home.soc.* - iConomy.access - iConomy.bank.access - iConomy. bank.deposit - iConomy.bank.join - iConomy.bank.join.multiple - iConomy.bank.leave - iConomy.bank.list - iConomy.bank.main - iConomy.bank.main.change - iConomy.bank.main. set - iConomy.bank.main.view - iConomy.bank.transfer - iConomy.bank.transfer.multiple - iConomy.bank.withdraw - iConomy.list - iConomy.payment - iConomy.rank - jobs.join.* - jobs. world.* - lwc.protect - iConomyChestShop.shop.create - iConomyChestShop.shop.create.This Permissions is configured for plugins: CommandBook, MyHome, VanishNoPickup, Jobs, LWC, WorldEdit, iConomy, iConomy ChestShop, WorldGuard.
Here, as you may have noticed, new parameters have appeared:
- info: //group parameters
- prefix: "" //prefix
- suffix: "" //suffix
// to display prefixes/suffixes, you must enable the ChatManager plugin, which is included with PEX. To do this, in the plugins/ChatManager/ folder in the config.yml file, find enable and change it, if necessary, from enable: false to enable: true
- inheritance: //inheritance of rights
Default //in this case, all rights of the "default" group are inherited
You may also have noticed that the users parameter has appeared:
Under it you need to indicate the nicknames of the users to whom you want to give additional rights and/or move them to another group. Eg:Moderator:
group:
- Moder
permissions: nullwhere “Moderator” is the player’s nickname, “Moder” is the name of the group, permissions: null are additional rights for this user, in this case there are none.
Remember! In YAML you need to strictly follow the sequence, one extra space and the parameter will not work. In order to have fewer errors, I RECOMMEND using THIS site. Remark: paste your code into the left window, if there are no errors in the right window, then you wrote the code in yaml correctly and it will work.
This article is taken from rubukkit.org


